
nignx配置https
一、HTTPS简介
1.https简介
HTTPS其实是有两部分组成:HTTP + SSL / TLS,也就是在HTTP上又加了一层处理加密信息的模块。服务端和客户端的信息传输都会通过TLS进行加密,所以传输的数据都是加密后的数据
2.https协议原理
首先,客户端与服务器建立连接,各自生成私钥和公钥,是不同的。服务器返给客户端一个公钥,然后客户端拿着这个公钥把要搜索的东西加密,称之为密文,并连并自己的公钥一起返回给服务器,服务器拿着自己的私钥解密密文,然后把响应到的数据用客户端的公钥加密,返回给客户端,客户端拿着自己的私钥解密密文,把数据呈现出来
二、证书和私钥的生成
注意:一般生成的目录,应该放在nginx/conf/ssl目录
1.创建服务器证书密钥文件 server.key:
openssl genrsa -des3 -out server.key 1024
输入密码,确认密码,自己随便定义,但是要记住,后面会用到。
2.创建服务器证书的申请文件 server.csr
openssl req -new -key server.key -out server.csr
输出内容为:
Enter pass phrase for root.key: ← 输入前面创建的密码
Country Name (2 letter code) [AU]:CN ← 国家代号,中国输入CN
State or Province Name (full name) [Some-State]:BeiJing ← 省的全名,拼音
Locality Name (eg, city) []:BeiJing ← 市的全名,拼音
Organization Name (eg, company) [Internet Widgits Pty Ltd]:MyCompany Corp. ← 公司英文名
Organizational Unit Name (eg, section) []: ← 可以不输入
Common Name (eg, YOUR name) []: ← 此时不输入
Email Address []:admin@mycompany.com ← 电子邮箱,可随意填
Please enter the following ‘extra’ attributes
to be sent with your certificate request
A challenge password []: ← 可以不输入
An optional company name []: ← 可以不输入
3.备份一份服务器密钥文件
cp server.key server.key.org
4.去除文件口令
openssl rsa -in server.key.org -out server.key
5.生成证书文件server.crt
openssl x509 -req -days 365 -in server.csr -signkey server.key -out server.crt
三、配置文件
1.下面为配置文件/etc/nginx/nginx.conf
server{
#比起默认的80 使用了443 默认 是ssl方式  多出default之后的ssl
        listen 443 default ssl;
#default 可省略
#开启  如果把ssl on;这行去掉,ssl写在443端口后面。这样http和https的链接都可以用
        ssl on;
#证书(公钥.发送到客户端的)
        ssl_certificate ssl/server.crt;
#私钥,
        ssl_certificate_key ssl/server.key;
#下面是绑定域名
        server_name www.XX.com;
        location / {
#禁止跳转
        proxy_redirect off;
#代理淘宝
proxy_pass https://www.tao.com/;
        }
}
四、开启nginx的ssl模块
1.the “ssl” parameter requires ngx_http_ssl_module in /usr/local/nginx/conf/nginx.conf:37
原因是nginx缺少http_ssl_module模块,编译安装时带上–with-http_ssl_module配置就可以了
2.如果已经安装过nginx,想要添加模块看下面
1)切换到nginx源码包
cd /usr/local/src/nginx-1.11.3
2)查看ngixn原有的模块
/usr/local/nginx/sbin/nginx -V
3)重新配置
./configure –prefix=/usr/local/nginx –with-http_stub_status_module –with-http_ssl_module
4)重新编译,不需要make install安装。否则会覆盖
make
5)备份原有已经安装好的nginx
cp /usr/local/nginx/sbin/nginx /usr/local/nginx/sbin/nginx.bak
6)将刚刚编译好的nginx覆盖掉原来的nginx(ngixn必须停止)
cp ./objs/nginx /usr/local/nginx/sbin/
这时,会提示是否覆盖,请输入yes,直接回车默认不覆盖
7)启动nginx,查看nginx模块,发现已经添加
/usr/local/nginx/sbin/nginx -V
五、nignx配置https
- 安装nginx
yum -y install epel-release
yum -y install nginx
- 修改文件
vim /etc/nginx/nginx.conf
# For more information on configuration, see:
# * Official English Documentation: http://nginx.org/en/docs/
# * Official Russian Documentation: http://nginx.org/ru/docs/

user nginx;
worker_processes auto;
error_log /var/log/nginx/error.log;
pid /run/nginx.pid;

# Load dynamic modules. See /usr/share/doc/nginx/README.dynamic.
include /usr/share/nginx/modules/*.conf;

events {

    worker_connections 1024;
}

http {

    log_format  main  '$remote_addr - $remote_user [$time_local] "$request" '
                      '$status $body_bytes_sent "$http_referer" '
                      '"$http_user_agent" "$http_x_forwarded_for"';

    access_log  /var/log/nginx/access.log  main;

    sendfile            on;
    tcp_nopush          on;
    tcp_nodelay         on;
    keepalive_timeout   65;
    types_hash_max_size 2048;

    include             /etc/nginx/mime.types;
    default_type        application/octet-stream;

    # Load modular configuration files from the /etc/nginx/conf.d directory.
    # See http://nginx.org/en/docs/ngx_core_module.html#include
    # for more information.
    include /etc/nginx/conf.d/*.conf;

    server {

        listen       80 default_server;
        listen       [::]:80 default_server;
        server_name  _;
        root         /usr/share/nginx/html;

        # Load configuration files for the default server block.
        include /etc/nginx/default.d/*.conf;

        location / {

        }

        error_page 404 /404.html;
        location = /404.html {

        }

        error_page 500 502 503 504 /50x.html;
        location = /50x.html {

        }
    }

# Settings for a TLS enabled server.
#
    server {

        listen       443 ssl http2 default_server;
        listen       [::]:443 ssl http2 default_server;
        server_name  _;
        root         /usr/share/nginx/html;

        ssl_certificate "/root/server.crt";
        ssl_certificate_key "/root/server.key";
        ssl_session_cache shared:SSL:1m;
        ssl_session_timeout  10m;
        ssl_ciphers HIGH:!aNULL:!MD5;
        ssl_prefer_server_ciphers on;

        # Load configuration files for the default server block.
        include /etc/nginx/default.d/*.conf;

        location / {

        }

        error_page 404 /404.html;
        location = /404.html {

        }

        error_page 500 502 503 504 /50x.html;
        location = /50x.html {

        }
    }

}
重启nginx
nignx #启动
nginx -s reload #重启
nginx -s stop #停止
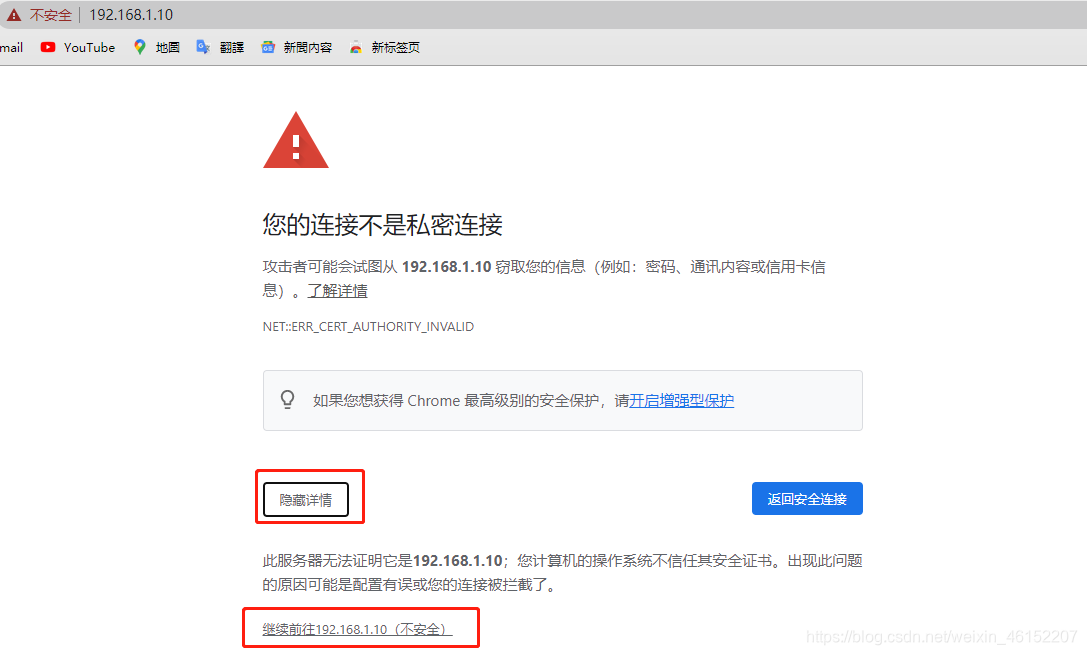
测试访问如果https端口用的是443
则浏览器不用输入端口号
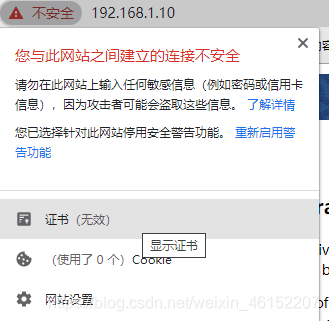
因为这里采用的是自签证书,所以访问的是不安全提示
如果想要安全提示正式环境操作,还是需要去正规渠道获取
阿里云有免费的ssl证书

发布者:全栈程序员-站长,转载请注明出处:https://javaforall.net/101835.html原文链接:https://javaforall.net


