
大家好,又见面了,我是你们的朋友全栈君。
https://www.jianshu.com/p/80a932d1f11e
https://www.jianshu.com/p/178f3a065187
https://www.cnblogs.com/czaoth/p/5830735.html
https://www.cnblogs.com/jackmaxwell/p/7117909.html
https://docs.unity3d.com/540/Documentation/Manual/SL-Pass.html
http://www.lsngo.net/2018/01/20/unity_depthtextureprojector/
https://blog.csdn.net/puppet_master/article/details/77489948
本篇博客主要是解决,深度图的原理与例子实现问题。
下面我们直接用unity的脚本和shader,介绍如何使用unity给我们提供的深度图。
C#脚本:
using System.Collections;
using System.Collections.Generic;
using UnityEngine;

[ExecuteInEditMode]
public class DepthTextureTest : MonoBehaviour
{

    private Material postEffectMat = null;
    private Camera currentCamera = null;

    void Awake()
    {

        currentCamera = GetComponent<Camera>();
    }

    void OnEnable()
    {

        if (postEffectMat == null)
            postEffectMat = new Material(Shader.Find("DepthTexture/DepthTextureTest"));
        currentCamera.depthTextureMode |= DepthTextureMode.Depth;
    }

    void OnDisable()
    {

        currentCamera.depthTextureMode &= ~DepthTextureMode.Depth;
    }

    void OnRenderImage(RenderTexture source, RenderTexture destination)
    {

        if (postEffectMat == null)
        {

            Graphics.Blit(source, destination);
        }
        else
        {

            Graphics.Blit(source, destination, postEffectMat);
        }
    }
}
shader代码:
Shader "DepthTexture/DepthTextureTest"
{

	CGINCLUDE
		#include "UnityCG.cginc"
		sampler2D _CameraDepthTexture;

		fixed4 frag_depth(v2f_img i) : SV_Target
		{

			float depthTextureValue = SAMPLE_DEPTH_TEXTURE(_CameraDepthTexture, i.uv);
			//float linear01EyeDepth = LinearEyeDepth(depthTextureValue) * _ProjectionParams.w;
			float linear01EyeDepth = Linear01Depth(depthTextureValue);
			return fixed4(linear01EyeDepth, linear01EyeDepth, linear01EyeDepth, 1.0);
		}
	ENDCG

	SubShader
	{

		Pass
		{

			ZTest Off
			Cull Off
			ZWrite Off
			Fog{
    Mode Off }

			CGPROGRAM
			#pragma vertex vert_img
			#pragma fragment frag_depth
			ENDCG
		}
	}
}
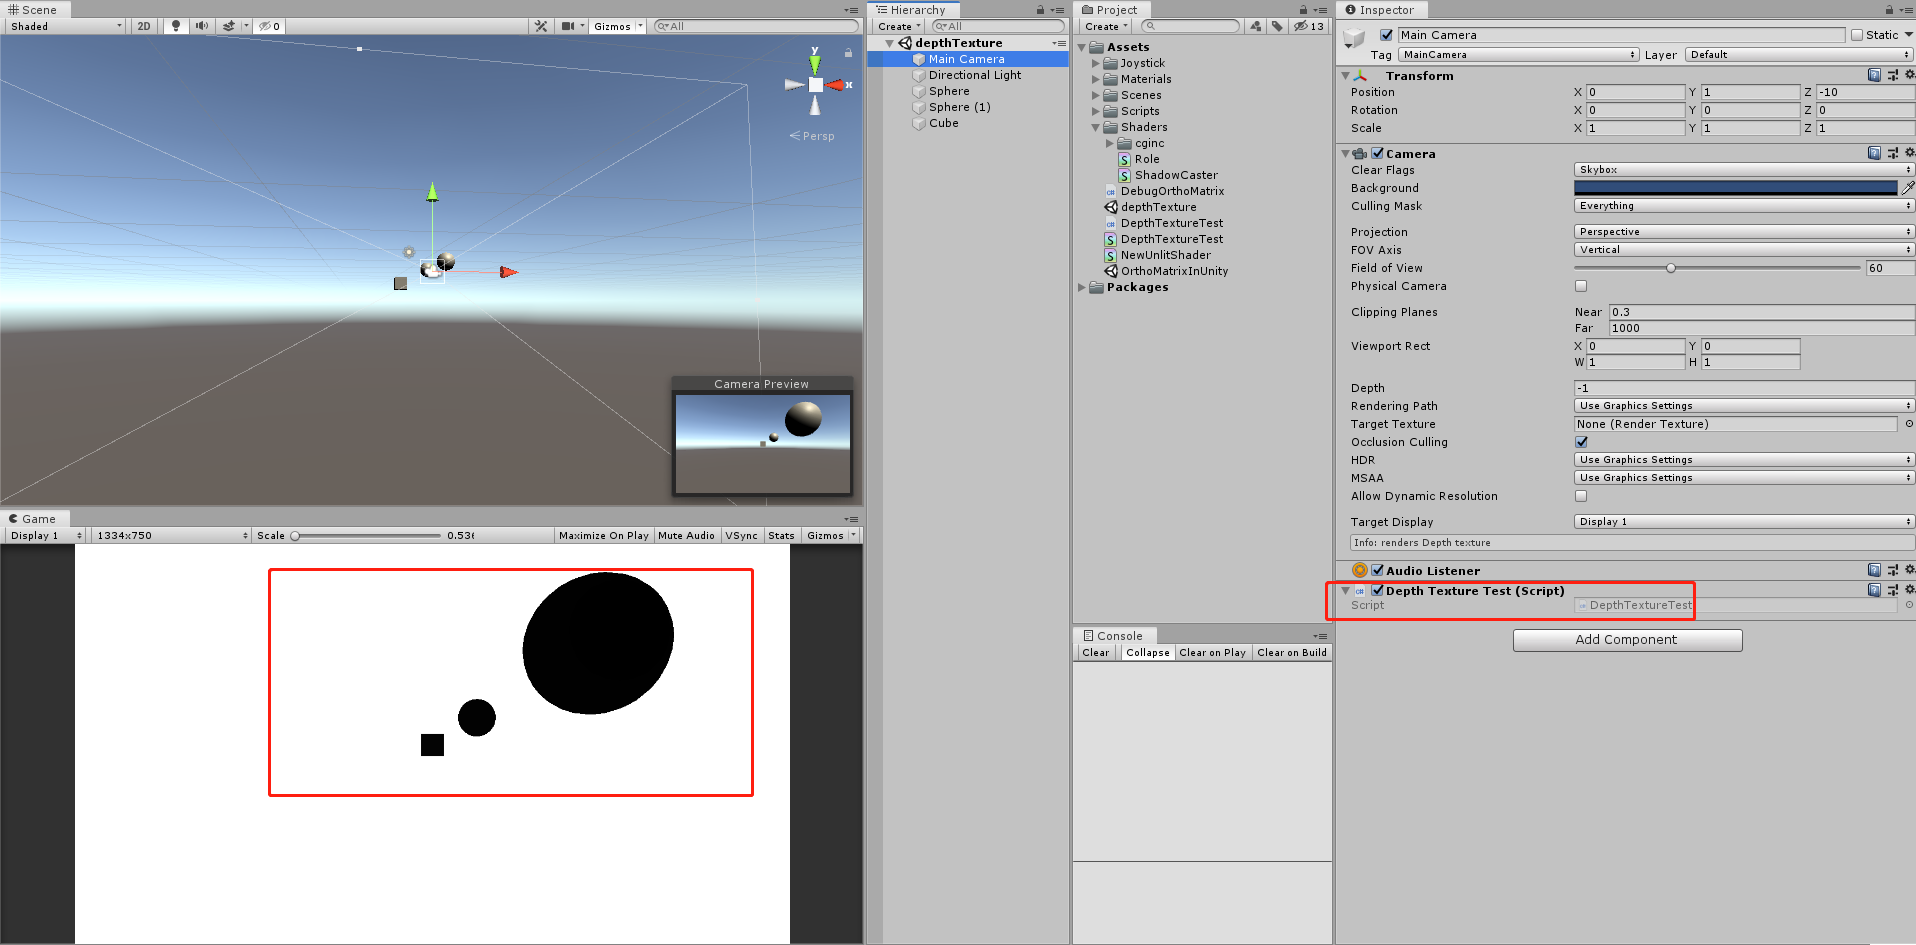
最终结果:

上面用到了这个宏:SAMPLE_DEPTH_TEXTURE
原型如下:
#define SAMPLE_DEPTH_TEXTURE(sampler, uv) (tex2D(sampler, uv).r)
这句代码也可以写为:
tex2D(_CameraDepthTexture, i.uv).r;
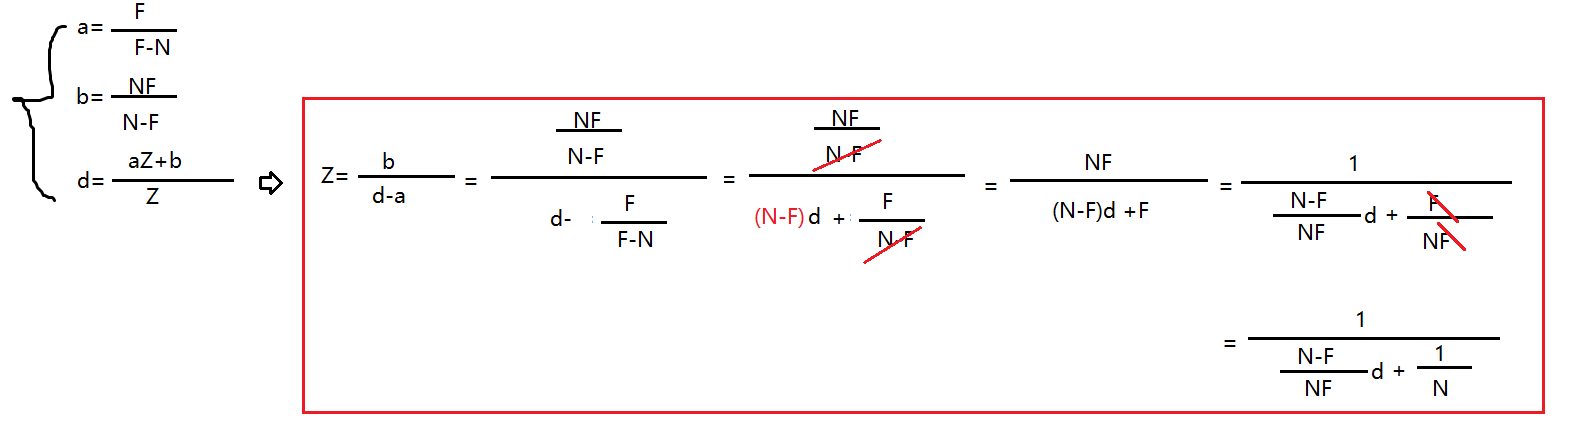
从视空间深度转化到屏幕空间深度的公式如下:
a = F/(F – N)
b = NF/(N – F)
最终depth(屏幕空间)=(aZ + b)/Z (Z为视空间深度)
我们在屏幕空间使用屏幕空间的坐标进行插值,得到逐像素的坐标。
屏幕空间的深度是和1/z成正比的。
那么经过透视变换、透视投影之后,得到的是屏幕空间的深度值,而我们需要使用视空间下的z才好计算,所以需要反推得到视空间下的深度z。
Linear01Depth原型:
// Z buffer to linear 0..1 depth
inline float Linear01Depth( float z )
{

    return 1.0 / (_ZBufferParams.x * z + _ZBufferParams.y);
}
这地方的推导有点问题:
// Values used to linearize the Z buffer (http://www.humus.name/temp/Linearize%20depth.txt)
// x = 1-far/near
// y = far/near
// z = x/far
// w = y/far
// or in case of a reversed depth buffer (UNITY_REVERSED_Z is 1)
// x = -1+far/near
// y = 1
// z = x/far
// w = 1/far
float4 _ZBufferParams;
LinearEyeDepth原型:
// Z buffer to linear depth
inline float LinearEyeDepth( float z )
{

    return 1.0 / (_ZBufferParams.z * z + _ZBufferParams.w);
}
z&1/z
通过上面的深度图具体的使用,我们发现,实际上真正使用的深度,是从顶点的视空间在,经过投影变成一个1/Z成正比的值(屏幕空间Depth),然后在使用时,再通过投影变换时的计算公式反推回对应视空间像素的位置Z。
https://developer.nvidia.com/content/depth-precision-visualized
发布者:全栈程序员-站长,转载请注明出处:https://javaforall.net/129926.html原文链接:https://javaforall.net


