
大家好,又见面了,我是你们的朋友全栈君。
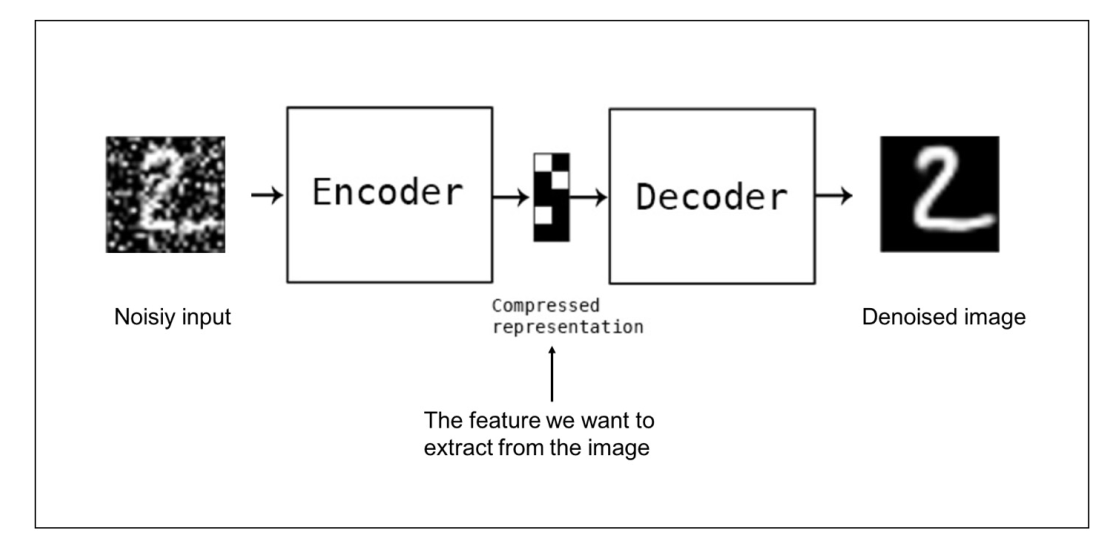
降噪自动编码器是一种用于图像去噪无监督的反馈神经网络
原理如下图所示

训练代码如下
from keras.layers import Input, Conv2D, MaxPooling2D, UpSampling2D, ZeroPadding2D
from keras.models import Model
from keras.callbacks import TensorBoard
from keras.datasets import mnist
import numpy as np

(x_train, y_train), (x_test, y_test) = mnist.load_data()

x_train = x_train.astype('float32') / 255.
x_test = x_test.astype('float32') / 255.
x_train = np.reshape(x_train, (len(x_train), 28, 28, 1))  # adapt this if using `channels_first` image data format
x_test = np.reshape(x_test, (len(x_test), 28, 28, 1))  # adapt this if using `channels_first` image data format


noise_factor = 0.5
x_train_noisy = x_train + noise_factor * np.random.normal(loc=0.0, scale=1.0, size=x_train.shape)
x_test_noisy = x_test + noise_factor * np.random.normal(loc=0.0, scale=1.0, size=x_test.shape)

x_train_noisy = np.clip(x_train_noisy, 0., 1.)
x_test_noisy = np.clip(x_test_noisy, 0., 1.)


def train_model():
    input_img = Input(shape=(28, 28, 1))  # adapt this if using `channels_first` image data format
    x = Conv2D(16, (3, 3), activation='relu', padding='same')(input_img)
    x = MaxPooling2D((2, 2), padding='same')(x)
    x = Conv2D(8, (3, 3), activation='relu', padding='same')(x)
    x = MaxPooling2D((2, 2), padding='same')(x)
    x = Conv2D(8, (3, 3), activation='relu', padding='same')(x)
    encoded = MaxPooling2D((2, 2), padding='same', name='encoder')(x)

    # at this point the representation is (4, 4, 8) i.e. 128-dimensional

    x = Conv2D(8, (3, 3), activation='relu', padding='same')(encoded)
    x = UpSampling2D((2, 2))(x)
    x = Conv2D(8, (3, 3), activation='relu', padding='same')(x)
    x = UpSampling2D((2, 2))(x)
    x = Conv2D(16, (3, 3), activation='relu')(x)
    x = UpSampling2D((2, 2))(x)
    decoded = Conv2D(1, (3, 3), activation='sigmoid', padding='same')(x)

    autoencoder = Model(input_img, decoded)
    autoencoder.compile(optimizer='adadelta', loss='binary_crossentropy')

    autoencoder.fit(x_train_noisy, x_train,
                    epochs=20,
                    batch_size=128,
                    shuffle=True,
                    validation_data=(x_test_noisy, x_test),
                    callbacks=[TensorBoard(log_dir='/tmp/tb', histogram_freq=0, write_graph=False)])

    autoencoder.save('autoencoder.h5')

train_model()
测试代码如下
import numpy as np
from keras.models import Model
from keras.datasets import mnist
import cv2
from keras.models import load_model
from sklearn.metrics import label_ranking_average_precision_score
import time

print('Loading mnist dataset')
t0 = time.time()
(x_train, y_train), (x_test, y_test) = mnist.load_data()
x_train = x_train.astype('float32') / 255.
x_test = x_test.astype('float32') / 255.
x_train = np.reshape(x_train, (len(x_train), 28, 28, 1))  # adapt this if using `channels_first` image data format
x_test = np.reshape(x_test, (len(x_test), 28, 28, 1))  # adapt this if using `channels_first` image data format

noise_factor = 0.5
x_train_noisy = x_train + noise_factor * np.random.normal(loc=0.0, scale=1.0, size=x_train.shape)
x_test_noisy = x_test + noise_factor * np.random.normal(loc=0.0, scale=1.0, size=x_test.shape)

x_train_noisy = np.clip(x_train_noisy, 0., 1.)
x_test_noisy = np.clip(x_test_noisy, 0., 1.)
t1 = time.time()
print('mnist dataset loaded in: ', t1-t0)

print('Loading model :')
t0 = time.time()
# Load previously trained autoencoder
autoencoder = load_model('autoencoder.h5')
t1 = time.time()
print('Model loaded in: ', t1-t0)


def plot_denoised_images():
    denoised_images = autoencoder.predict(x_test_noisy.reshape(x_test_noisy.shape[0], x_test_noisy.shape[1], x_test_noisy.shape[2], 1))
    test_img = x_test_noisy[0]
    resized_test_img = cv2.resize(test_img, (280, 280))
    cv2.imshow('input', resized_test_img)
    cv2.waitKey(0)
    output = denoised_images[0]
    resized_output = cv2.resize(output, (280, 280))
    cv2.imshow('output', resized_output)
    cv2.waitKey(0)
打赏
如果对您有帮助,就打赏一下吧O(∩_∩)O


版权声明:本文内容由互联网用户自发贡献,该文观点仅代表作者本人。本站仅提供信息存储空间服务,不拥有所有权,不承担相关法律责任。如发现本站有涉嫌侵权/违法违规的内容, 请联系我们举报,一经查实,本站将立刻删除。
发布者:全栈程序员-站长,转载请注明出处:https://javaforall.net/137703.html原文链接:https://javaforall.net


