
大家好,又见面了,我是你们的朋友全栈君。
************* 注: cropper.js 版本更新至1.5.11 。****
github上的官方cropper.js地址是 https://github.com/fengyuanchen/cropperjs
新的 下载地址
更新版本后发现监听事件不能用了,查了下监听事件改动了。如下:
// Cropper
    $image.on({
        ready: function (e) {
            //This event fires when the target image has been loaded and the cropper instance is ready for operating.
            //百度翻译:此事件在目标图像已加载且cropper实例已准备好进行操作时激发。
            //即:在我选择完图片后执行
            console.log(e.type);
            $("#containerDiv").show();
            $("#imgEdit").show();
        },
        cropstart: function (e) {
            //操作开始
            //其中action 包含了
            /**
             * Options:
             'crop': create a new crop box    创建了新裁剪框
             'move': move the canvas (image wrapper)   移动了图片
             'zoom': zoom in / out the canvas (image wrapper) by touch.  图片 放大或缩小
             'e': resize the east side of the crop box   裁剪框右边 调整大小
             'w': resize the west side of the crop box   裁剪框左边 调整大小
             's': resize the south side of the crop box   裁剪框下边 调整大小
             'n': resize the north side of the crop box   裁剪框上边 调整大小
             'se': resize the southeast side of the crop box   裁剪框右下角 调整大小
             'sw': resize the southwest side of the crop box   裁剪框左下角 调整大小
             'ne': resize the northeast side of the crop box   裁剪框右上角 调整大小
             'nw': resize the northwest side of the crop box   裁剪框左上角 调整大小
             'all': move the crop box (all directions)    裁剪框 整个块移动
             */
            console.log(e.type, e.detail.action);
        },
        cropmove: function (e) {
            //操作移动中
            console.log(e.type, e.detail.action);
        },
        cropend: function (e) {
            //操作动作结束
            console.log(e.type, e.detail.action);
        },
        crop: function (e) {
            //This event fires when the canvas (image wrapper) or the crop box changed.
            //在画布(图片) 或者裁剪框变化时触发
            console.log(e.type);
        },
        zoom: function (e) {
            //This event fires when a cropper instance starts to zoom in or zoom out its canvas (image wrapper).
            //当放大或缩小时触发
            console.log(e.type, e.detail.ratio);
        }
    }).cropper(options);
************* 注:以下是根据cropper.js 是 0.7 版,测试的效果, 目前可能会有点问题,在目前的手机浏览器上 拖拽放大缩小图片时 会出现黑图失效 。****
我的需求功能:在手机端实现上传头像,带裁剪框。
cropper.js 通过canvas实现图片裁剪,最后在通过canvas获取裁剪区域的图片base64串。
cropper 文档:官方文档是全英文的,好吧我看不懂。只能一个个试试效果,就有了下面的总结。官方文档<-点这

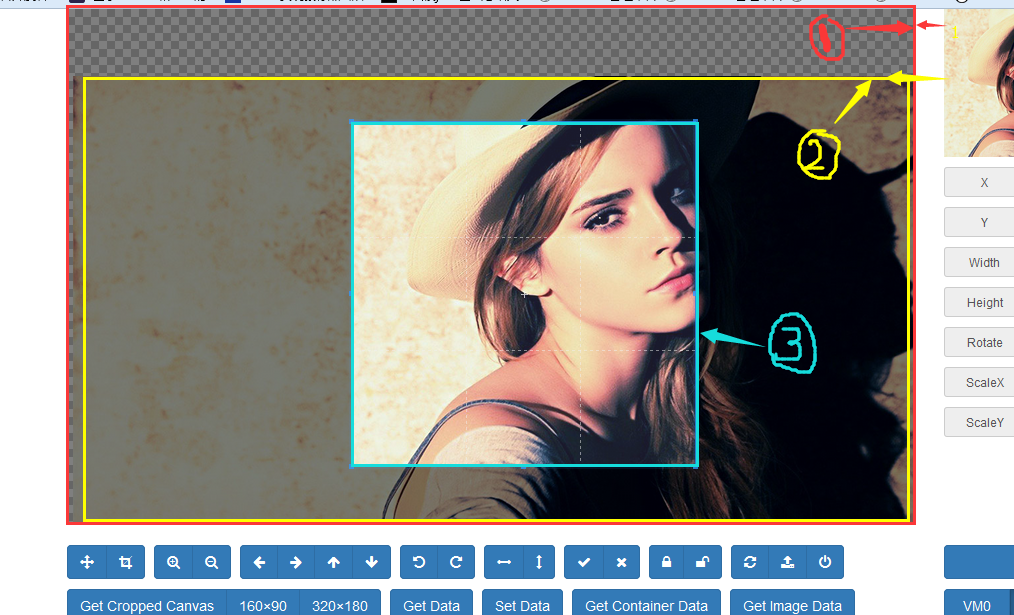
1.container 容器 2.canvas 图片 3.crop 裁剪框
option相关参数说明:
viewMode 显示模式
- Type:
Number - Default:
0 - Options:
0: the crop box is just within the container 裁剪框只能在 1内移动1: the crop box should be within the canvas 裁剪框 只能在 2图片内移动2: the canvas should not be within the container 2图片 不全部铺满1 (即缩小时可以有一边出现空隙)3: the container should be within the canvas 2图片 全部铺满1 (即 再怎么缩小也不会出现空隙)
dragMode 拖动模式
- Default:
'crop' - Options:
'crop': create a new crop box 当鼠标 点击一处时根据这个点重新生成一个 裁剪框'move': move the canvas 可以拖动图片'none': do nothing 图片就不能拖动了
Define the dragging mode of the cropper.
toggleDragModeOnDblclick 默认true .是否允许 拖动模式 “crop” 跟“move” 的切换状态。。即当点下为crop 模式,如果未松开拖动这时就是“move”模式。放开后又为“crop”模式
preview 截图的显示位置 型:String(jQuery选择器),默认值''
responsive :类型:Boolean,默认值true。是否在窗口尺寸改变的时候重置cropper。
checkImageOrigin:类型:Boolean,默认值true。默认情况下,插件会检测图片的源,如果是跨域图片,图片元素会被添加crossOrigin class,并会为图片的url添加一个时间戳来使getCroppedCanvas变为可用。添加时间戳会使图片重新加载,以使跨域图片能够使用getCroppedCanvas。在图片上添加crossOrigin class会阻止在图片url上添加时间戳,及图片的重新加载。
background:类型:Boolean,默认值true。是否在容器上显示网格背景。 要想改背景,我是直接改,cropper.css样式中的 cropper-bg
canvas(图片)相关
movable:类型:Boolean,默认值true。是否允许移动图片
rotatable:类型:Boolean,默认值true。是否允许旋转图片。
scalable 默认 true 。 是否允许扩展图片。(暂时不知道干嘛用)
zoomable 默认true, 石头允许缩放图片。
zoomOnWheel 默认 true 是否允许鼠标滚轴 缩放图片
zoomOnTouch 默认true 是否允许触摸缩放图片(触摸屏上两手指操作。)
wheelZoomRatio 默认0.1 师表滚轴缩放图片比例。即滚一下。图片缩放多少。如 0.1 就是图片的10%
crop(裁剪框)相关
aspectRatio 裁剪框比例 默认NaN 例如:: 1 / 1,//裁剪框比例 1:1
modal:类型:Boolean,默认值true。是否在剪裁框上显示黑色的模态窗口。
cropBoxMovable :默认true ,是否允许拖动裁剪框cropBoxResizable :默认 true,//是否允许拖动 改变裁剪框大小
autoCrop:类型:Boolean,默认值true。是否允许在初始化时自动出现裁剪框。autoCropArea:类型:Number,默认值0.8(图片的80%)。0-1之间的数值,定义自动剪裁框的大小。highlight:类型:Boolean,默认值true。是否在剪裁框上显示白色的模态窗口。
guides:类型:Boolean,默认值true。是否在剪裁框上显示虚线。
center: 默认true 是否显示裁剪框 中间的+
restore : 类型:Boolean,默认值true 是否调整窗口大小后恢复裁剪区域。
大小相关
minContainerWidth:类型:Number,默认值200。容器的最小宽度。
minContainerHeight:类型:Number,默认值100。容器的最小高度。
minCanvasWidth:类型:Number,默认值0。canvas 的最小宽度(image wrapper)。
minCanvasHeight:类型:Number,默认值0。canvas 的最小高度(image wrapper)。
监听触发的方法
build:类型:Function,默认值null。build.cropper事件的简写方式。 ====== 。控件初始化前执行
built:类型:Function,默认值null。built.cropper事件的简写方式。 ====== 空间初始化完成后执行
dragstart:类型:Function,默认值null。dragstart.cropper事件的简写方式。 ====== 拖动开始执行
dragmove:类型:Function,默认值null。dragmove.cropper事件的简写方式。====== 拖动移动中执行
dragend:类型:Function,默认值null。dragend.cropper事件的简写方式。====== 拖动结束执行
zoomin:类型:Function,默认值null。zoomin.cropper事件的简写方式。 ====== 缩小执行
zoomout:类型:Function,默认值null。zoomout.cropper事件的简写方式。 ====== 放大执行
demo 下载 分数被调高了。
新下载地址点-》 demo
html
<section style="margin-top: 50px;">
		<input id="photoBtn" type="button" onclick="document.getElementById('inputImage').click()" value="选择照片"><!-- 可以增加自己的样式 -->
		<input  id="inputImage"  type="file" accept="image/*" style="display: none;"/>
		<br/>
  		<img  id="showImg" />
	</section>

	<div class="container" style="padding: 0;margin: 0;position:fixed;display: none;top: 0;left: 0;z-index: 200;" id="containerDiv">
	    <div class="row" style="display: none;" id="imgEdit">
	      <div class="col-md-9">
	        <div class="img-container">
	          <img src="" alt="Picture">
	        </div>
	      </div>
	    </div>
	    <div class="row" id="actions" style="padding: 0;margin: 0;width: 100%;position: fixed;bottom: 5px;">
	      <div class="col-md-9 docs-buttons">
	        <div class="btn-group" >
	          <button type="button" class="btn btn-primary" data-method="destroy" title="Destroy" style="height: auto;">
	            <span class="docs-tooltip" data-toggle="tooltip" >
	              <span class="fa fa-power-off" >取消</span>
	            </span>
	          </button>
	        </div>

	        <div class="btn-group btn-group-crop " style="float: right;">
	          <button type="button" class="btn btn-primary" id="imgCutConfirm" data-method="getCroppedCanvas" data-option="{ "width": 320, "height": 180 }" style="height: auto;margin-right: 17px;">
	            <span class="docs-tooltip" data-toggle="tooltip" title="">确认</span> <!--cropper.getCroppedCanvas({ width: 320, height: 180 }) -->
	          </button>
	        </div>

	      </div><!-- /.docs-buttons -->
	    </div>
  	</div>
</pre><pre name="code" class="html">
使用调用cropper 截图 的js
var fileImg = "";
</pre><pre name="code" class="html">window.onload = function () {

  'use strict';//表示强规则

  var screenWidth = $(window).width();
  var screenHeight =  $(window).height();

  var Cropper = window.Cropper;
  var console = window.console || { log: function () {} };
  var container = document.querySelector('.img-container');
  var image = container.getElementsByTagName('img').item(0);
  var actions = document.getElementById('actions');
  var isUndefined = function (obj) {
	  return typeof obj === 'undefined';
  };
  var options = {
		minContainerHeight :  screenHeight,
		minContainerWidth : screenWidth,
        aspectRatio: 1 / 1,//裁剪框比例 1:1
        viewMode : 1,//显示
        guides :false,//裁剪框虚线 默认true有
        dragMode : "move",
        build: function (e) { //加载开始
        	//可以放你的过渡 效果
        },
        built: function (e) { //加载完成
        	$("#containerDiv").show();
            $("#imgEdit").show();
        },
        zoom: function (e) {
          console.log(e.type, e.detail.ratio);
        },
        background : true,// 容器是否显示网格背景
		movable : true,//是否能移动图片
		cropBoxMovable :false,//是否允许拖动裁剪框
		cropBoxResizable :false,//是否允许拖动 改变裁剪框大小
  };
  var cropper = new Cropper(image, options);
 //禁用默认方法
  function preventDefault(e) {
    if (e) {
      if (e.preventDefault) {
        e.preventDefault();
      } else {
        e.returnValue = false;
      }
    }
  }

  // Tooltip
  $('[data-toggle="tooltip"]').tooltip();


  if (typeof document.createElement('cropper').style.transition === 'undefined') {
	  $('button[data-method="rotate"]').prop('disabled', true);
	  $('button[data-method="scale"]').prop('disabled', true);
  }

  // Methods
  actions.querySelector('.docs-buttons').onclick = function (event) {
    var e = event || window.event;
    var target = e.target || e.srcElement;
    var result;
    var input;
    var data;

    if (!cropper) {
      return;
    }

    while (target !== this) {
      if (target.getAttribute('data-method')) {
        break;
      }

      target = target.parentNode;
    }

    if (target === this || target.disabled || target.className.indexOf('disabled') > -1) {
      return;
    }

    data = {
      method: target.getAttribute('data-method'),
      target: target.getAttribute('data-target'),
      option: target.getAttribute('data-option'),
      secondOption: target.getAttribute('data-second-option')
    };

    if (data.method) {
      if (typeof data.target !== 'undefined') {
        input = document.querySelector(data.target);

        if (!target.hasAttribute('data-option') && data.target && input) {
          try {
            data.option = JSON.parse(input.value);
          } catch (e) {
            console.log(e.message);
          }
        }
      }

      if (data.method === 'getCroppedCanvas') {
        data.option = JSON.parse(data.option);
      }

      result = cropper[data.method](data.option, data.secondOption);

      switch (data.method) {
        case 'scaleX':
        case 'scaleY':
          target.setAttribute('data-option', -data.option);
          break;

        case 'getCroppedCanvas':
          if (result) {

            fileImg = result.toDataURL('image/jpg');
            $("#showImg").attr("src",fileImg).show();
            $("#photoBtn").val("重新选择");
          }

          break;

        case 'destroy':
        	$("#inputImage").val("");
        	$("#containerDiv").hide();
        	$("#imgEdit").hide();
          break;
      }

      if (typeof result === 'object' && result !== cropper && input) {
        try {
          input.value = JSON.stringify(result);
        } catch (e) {
          console.log(e.message);
        }
      }

    }
  };

  // Import image
  var inputImage = document.getElementById('inputImage');
  var URL = window.URL || window.webkitURL;
  var blobURL;

  if (URL) {
    inputImage.onchange = function () {
      var files = this.files;
      var file;

      if (cropper && files && files.length) {
        file = files[0];

        if (/^image\/\w+/.test(file.type)) {
          blobURL = URL.createObjectURL(file);
          cropper.reset().replace(blobURL);
        } else {
          window.alert('Please choose an image file.');
        }
      }
      $(inputImage).find("img").hide();
    };
  } else {
    inputImage.disabled = true;
    inputImage.parentNode.className += ' disabled';
  }

};
$("#imgCutConfirm").bind("click",function(){
<span style="white-space:pre">	</span>$("#containerDiv").hide();
  <span style="white-space:pre">	</span>$("#imgEdit").hide();
<span style="white-space:pre">	</span>$("#getCroppedCanvasModal").modal("hide");
})
获取截图 并ajax提交,
//提交表达
	function submitForm(){
		$("#registerForm").attr("enctype","multipart/form-data");

		var formData = new FormData($("#registerForm")[0]);
		formData.append("imgBase64",encodeURIComponent(fileImg));//
		formData.append("fileFileName","photo.jpg");


		$.ajax({
	        url: "",
	        type: 'POST',
	        data: formData,
	        timeout : 10000, //超时时间设置,单位毫秒
	        async: true,
	        cache: false,
	        contentType: false,
	        processData: false,
	        success: function (result) {
	       	},
	        error: function (returndata) {
	        }
 		});
	}
使用canvas生成的截图。我只找到生成base64的。就是那一长串字符。。
原本我想生成jpg / png ,,没找到。
后来找到在后台 把base64 的转成jpg/png 的方法。
然后又把图片上传到七牛上面,发现可以使用二进制流上传,就不用jpg了
后台处理base64 java代码片段
/**
     * 上传base64
     * @param imgBase64 图片base64
     * @param fileName 图片名称
     * @return
     */
    private String uploadImgBase64(String imgBase64,String fileName){

    	String uploadPath=FILEDATE;
    	String fileExt = fileFileName.substring(fileFileName.lastIndexOf(".") + 1).toLowerCase();//上传的文件的后缀
    	String newFileName = fileName+ "." + fileExt;//上传后的文件名字
    	String uploadPathName = uploadPath + newFileName;//获取到上传后的文件路径+文件名

    	BASE64Decoder decoder = new BASE64Decoder();

    	imgBase64 = imgBase64.substring(30);

    	try {
    		imgBase64 = URLDecoder.decode(imgBase64,"UTF-8");

    		byte[] decodedBytes = decoder.decodeBuffer(imgBase64);// 将字符串格式的imagedata转为二进制流(biye[])的decodedBytes
    		for(int i=0;i<decodedBytes.length;++i){
	            if(decodedBytes[i]<0) {
	                //调整异常数据
	            	decodedBytes[i]+=256;
	            }
	        }

			//使用七牛上传
			new QiniuUploadFile().upload(decodedBytes, uploadPathName);
		} catch (IOException e) {
			e.printStackTrace();
		}

    	return uploadPathName;

    }
===========================分割========================================
头像需要改成圆形框的方法:
cropper.js中没有提供圆形的方法,如果想要圆形的你要修改
1. cropper.js的。 在cropper.js中找到 getCroppedCanvas方法 在context.drawImage.apply上添加
var circle = {
                x: canvasWidth / 2,
                y: canvasHeight / 2,
                r: canvasWidth / 2
           };

          context.arc(circle.x, circle.y, circle.r, 0, Math.PI * 2, false);
context.clip(); 2.在cropper.css 中 这改之后就只会生成 圆形图了
.cropper-face  添加border-radius: 100%;
  .cropper-view-box 删除outline outline-color 添加border: 2px solid #39f;
  border-color: rgba(51, 153, 255, .75);
  border-radius: 100%;
这改之后就只会生成 圆形图了,,具体想灵活的自由切换圆形跟矩形,就要进一步封装。
我参考的文章咻咻咻
1.jQuery简单且功能强大的图片剪裁插件
2.英文copper api 当找不到方法时,可以看这里,不要怕英文版的,实在不行你可以一个一个试过去看看效果哈哈。不会告诉你我就是这么干的。
发布者:全栈程序员-站长,转载请注明出处:https://javaforall.net/140638.html原文链接:https://javaforall.net


