
大家好,又见面了,我是你们的朋友全栈君。
首先在Centos7下安装docker,


然后修改配置文件信息,运行命令
vim /usr/lib/systemd/system/docker.service
在配置信息中找到
ExecStart=/usr/bin/dockerd -H fd:// --containerd=/run/containerd/containerd.sock -H tcp://0.0.0.0:2375
在末尾加上
-H tcp://0.0.0.0:2375
如下面显示的一样
[root@localhost ~]# vim /usr/lib/systemd/system/docker.service

[Unit]
Description=Docker Application Container Engine
Documentation=https://docs.docker.com
BindsTo=containerd.service
After=network-online.target firewalld.service containerd.service
Wants=network-online.target
Requires=docker.socket

[Service]
Type=notify
# the default is not to use systemd for cgroups because the delegate issues still
# exists and systemd currently does not support the cgroup feature set required
# for containers run by docker
ExecStart=/usr/bin/dockerd -H fd:// --containerd=/run/containerd/containerd.sock -H tcp://0.0.0.0:2375
ExecReload=/bin/kill -s HUP $MAINPID
TimeoutSec=0
RestartSec=2
Restart=always

# Note that StartLimit* options were moved from "Service" to "Unit" in systemd 229.
# Both the old, and new location are accepted by systemd 229 and up, so using the old location
# to make them work for either version of systemd.
StartLimitBurst=3

# Note that StartLimitInterval was renamed to StartLimitIntervalSec in systemd 230.
# Both the old, and new name are accepted by systemd 230 and up, so using the old name to make
# this option work for either version of systemd.
StartLimitInterval=60s

# Having non-zero Limit*s causes performance problems due to accounting overhead
# in the kernel. We recommend using cgroups to do container-local accounting.
LimitNOFILE=infinity
LimitNPROC=infinity
LimitCORE=infinity

# Comment TasksMax if your systemd version does not supports it.
# Only systemd 226 and above support this option.
TasksMax=infinity

# set delegate yes so that systemd does not reset the cgroups of docker containers
Delegate=yes

# kill only the docker process, not all processes in the cgroup
KillMode=process

[Install]
这样就设置成功了
然后在检查一下防火墙的的状态,可以在防火墙中开放该端口,也可以直接关闭防火墙
我是直接关闭防火墙的,如下
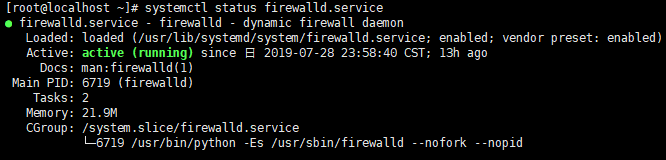
查看防火墙状态 systemctl status firewalld.service

绿的running表示防火墙开启

执行关闭命令 systemctl stop firewalld.service

再次执行查看防火墙命令 systemctl status firewalld.service

执行开机禁用防火墙自启命令 systemctl disable firewalld.service

版权声明:本文内容由互联网用户自发贡献,该文观点仅代表作者本人。本站仅提供信息存储空间服务,不拥有所有权,不承担相关法律责任。如发现本站有涉嫌侵权/违法违规的内容, 请联系我们举报,一经查实,本站将立刻删除。
发布者:全栈程序员-站长,转载请注明出处:https://javaforall.net/144826.html原文链接:https://javaforall.net


