
大家好,又见面了,我是你们的朋友全栈君。
C# 的事务编程
1 Db事务
DbConnection 中创建基于当前连接的 DbTransaction
2 使用TransactionScope ,创建环境事务
一旦创建,在这个环境包含的DbConnection 实例 都会根据连接字符串中的
Sqlserver 连接字符串支持,是否自动附加当前环境事务.
连接字符串关键字(Enlist)
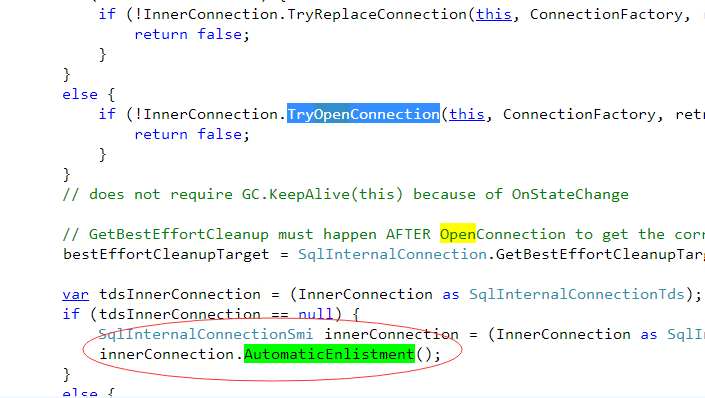
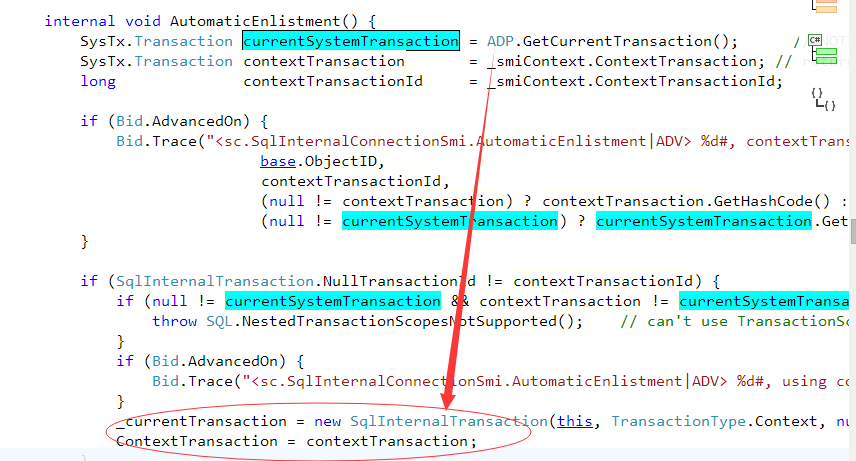
SqlConnection.ConnectionString 属性支持关键字 Enlist,该关键字指示 System.Data.SqlClient 是否将检测事务上下文并自动在分布式事务中登记连接。 如果 Enlist=true,连接将自动在打开的线程的当前事务上下文中登记。 如果 Enlist=false,SqlClient 连接不会与分布式事务进行交互。 Enlist 的默认值为 true。 如果连接字符串中未指定 Enlist,若在连接打开时检测到一个,连接将自动在分布式事务中登记。
Server=(local)SQL2005;Database=Northwind;Integrated Security=SSPI;auto-enlist=false
Mysql 等其他 OLDP数据库 需要驱动支持。


以下来自MSDN:
Transaction 类,以及隐式编程模型使用 TransactionScope 类,在其中事务自动管理基础结构。
 重要事项 重要事项 |
|---|
|
TransactionScope 类,以便为您自动管理环境事务上下文。TransactionScope 和 DependentTransaction 跨多个函数调用或多个线程调用需要使用相同的事务的应用程序的类。Implementing An Implicit Transaction Using Transaction Scope 主题。Writing A Transactional Application。 |
TransactionScope 通过 new 语句中,事务管理器确定哪些事务参与进来。 一旦确定,该范围将始终参与该事务。 环境事务是在代码中执行的事务。Current 类的静态 Transaction 属性,获取对环境事务的引用。Implementing An Implicit Transaction Using Transaction Scope 主题。
TransactionScope 对象并调用其 Dispose 方法),则范围所参与的事务可以继续。 如果在事务范围内发生异常,参与到其中的事务将回滚。
Complete 方法一次,以通知该事务管理器是可接受,即可提交事务。 未能调用此方法中止事务。
Dispose 方法将标记事务范围的末尾。 在调用此方法之后所发生的异常不会影响事务。
Current 内某个范围内,将引发异常时 Dispose 调用。 但是,在作用域结束时,以前的值被还原。Dispose 上 Current 在事务范围创建事务,事务将中止范围的末尾。
// This function takes arguments for 2 connection strings and commands to create a transaction
// involving two SQL Servers. It returns a value > 0 if the transaction is committed, 0 if the
// transaction is rolled back. To test this code, you can connect to two different databases
// on the same server by altering the connection string, or to another 3rd party RDBMS by
// altering the code in the connection2 code block.
static public int CreateTransactionScope(
    string connectString1, string connectString2,
    string commandText1, string commandText2)
{
    // Initialize the return value to zero and create a StringWriter to display results.
    int returnValue = 0;
    System.IO.StringWriter writer = new System.IO.StringWriter();

    try
    {
        // Create the TransactionScope to execute the commands, guaranteeing
        // that both commands can commit or roll back as a single unit of work.
        using (TransactionScope scope = new TransactionScope())
        {
            using (SqlConnection connection1 = new SqlConnection(connectString1))
            {
                // Opening the connection automatically enlists it in the
                // TransactionScope as a lightweight transaction.
                connection1.Open();

                // Create the SqlCommand object and execute the first command.
                SqlCommand command1 = new SqlCommand(commandText1, connection1);
                returnValue = command1.ExecuteNonQuery();
                writer.WriteLine("Rows to be affected by command1: {0}", returnValue);

                // If you get here, this means that command1 succeeded. By nesting
                // the using block for connection2 inside that of connection1, you
                // conserve server and network resources as connection2 is opened
                // only when there is a chance that the transaction can commit.
                using (SqlConnection connection2 = new SqlConnection(connectString2))
                {
                    // The transaction is escalated to a full distributed
                    // transaction when connection2 is opened.
                    connection2.Open();

                    // Execute the second command in the second database.
                    returnValue = 0;
                    SqlCommand command2 = new SqlCommand(commandText2, connection2);
                    returnValue = command2.ExecuteNonQuery();
                    writer.WriteLine("Rows to be affected by command2: {0}", returnValue);
                }
            }

            // The Complete method commits the transaction. If an exception has been thrown,
            // Complete is not  called and the transaction is rolled back.
            scope.Complete();

        }

    }
    catch (TransactionAbortedException ex)
    {
        writer.WriteLine("TransactionAbortedException Message: {0}", ex.Message);
    }
    catch (ApplicationException ex)
    {
        writer.WriteLine("ApplicationException Message: {0}", ex.Message);
    }

    // Display messages.
    Console.WriteLine(writer.ToString());

    return returnValue;
}
发布者:全栈程序员-站长,转载请注明出处:https://javaforall.net/154885.html原文链接:https://javaforall.net


