
大家好,又见面了,我是你们的朋友全栈君。如果您正在找激活码,请点击查看最新教程,关注关注公众号 “全栈程序员社区” 获取激活教程,可能之前旧版本教程已经失效.最新Idea2022.1教程亲测有效,一键激活。
Jetbrains全系列IDE稳定放心使用
参考文档
1、sp80-pk881-6_a_qm215_linux_android_software_porting_manual.pdf
2、80-pk881-21_a_qm215_linux_peripheral_(uart,_spi,_i2c)_overview.pdf
3、80-ne436-1_j_bam_low-speed_peripherals_for_linux_kernel_configuration_and_debugging_guide.pdf
硬件和复用情况确认
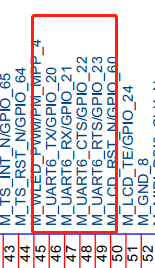
首先确认要使用的UART号,得到其使用的TX,RX,TXS,RXS,并查看是否被复用为其他功能引脚,如SPI、SIM等等
以QM215 UART6为例,其用到的引脚如下,使用到了gpio20,gpio21,gpio22,gpio23,且查看设备树,发现并未被复用为其他功能.

修改如下
1、 msm-4.9/arch/arm64/boot/dts/qcom/msm8917-pinctrl.dtsi
//配置 gpio20 gpio21 gpio22 gpio23 功能为uart
blsp2_uart2 {
   //uart6
	blsp2_uart2_active: blsp2_uart2_active {

		mux {

			pins = "gpio20", "gpio21","gpio22", "gpio23";
			function = "blsp_uart6";
		};

		config {

			pins = "gpio20", "gpio21","gpio22", "gpio23";
			drive-strength = <2>;
			bias-disable;
		};
	};

	blsp2_uart2_sleep: blsp2_uart2_sleep {

		mux {

			pins = "gpio20", "gpio21","gpio22", "gpio23";
			function = "blsp_uart6";
		};

		config {

			pins = "gpio20", "gpio21","gpio22", "gpio23";
			drive-strength = <2>;
			bias-disable;
		};
	};

};
2、msm-4.9/arch/arm64/boot/dts/qcom/msm8917.dtsi
//配置uart6为高速串口
blsp2_uart2: uart@7af0000 {

	compatible = "qcom,msm-hsuart-v14";
	reg = <0x7af0000 0x200>,
		  <0x7ac4000  0x1f000>;
	reg-names = "core_mem", "bam_mem";
	interrupt-names = "core_irq", "bam_irq", "wakeup_irq";
	#address-cells = <0>;
	interrupt-parent = <&blsp2_uart2>;
	interrupts = <0 1 2>;
	#interrupt-cells = <1>;
	interrupt-map-mask = <0xffffffff>;
	interrupt-map = <0 &intc 0 307 0
					 1 &intc 0 239 0
					 2 &tlmm 21 0>;
	qcom,inject-rx-on-wakeup;
	qcom,rx-char-to-inject = <0xfd>;
	qcom,bam-tx-ep-pipe-index = <2>;
	qcom,bam-rx-ep-pipe-index = <3>;
	qcom,master-id = <84>;
	clock-names = "core_clk", "iface_clk";
	clocks = <&clock_gcc clk_gcc_blsp2_uart2_apps_clk>,
		<&clock_gcc clk_gcc_blsp2_ahb_clk>;
	pinctrl-names = "sleep", "default";
	pinctrl-0 = <&blsp2_uart2_sleep>;
	pinctrl-1 = <&blsp2_uart2_active>;
	qcom,msm-bus,name = "blsp2_uart2";
	qcom,msm-bus,num-cases = <2>;
	qcom,msm-bus,num-paths = <1>;
	qcom,msm-bus,vectors-KBps =
	<84 512 0 0>,
	<84 512 500 800>;
};

//配置uart6为低速串口
 blsp2_uart2: serial@7af0000 {
   //uart6
	compatible = "qcom,msm-uartdm-v1.4",
				 "qcom,msm-uartdm";
	reg = <0x7af0000 0x200>;
	interrupts = <0 307 0>;
	clocks = <&clock_gcc clk_gcc_blsp2_uart2_apps_clk>,
	<&clock_gcc clk_gcc_blsp2_ahb_clk>;
	clock-names = "core", "iface";
	status = "disabled";
};
3、 msm-4.9/arch/arm64/boot/dts/qcom/qm215-qrd.dtsi
//使能UART6
&blsp2_uart2 {

	status = "ok";
	pinctrl-names = "default", "sleep";
	pinctrl-0 = <&blsp2_uart2_active>;
	pinctrl-1 = <&blsp2_uart2_sleep>;
};
串口调试
编译并烧写成功,在dev目录下查看uart6是否生成.
高速串口:ttyHS*
低速串口:ttyMSM*

测试程序代码:
#include<stdio.h>
#include<stdlib.h>
#include<string.h>
#include<sys/types.h>
#include<sys/stat.h>
#include<fcntl.h>
#include<unistd.h>
#include<termios.h>
#include<strings.h>

int set_opt(int fd,int nSpeed, int nBits, char nEvent, int nStop)
{

	struct termios newtio,oldtio;
	if( tcgetattr( fd,&oldtio)  !=  0) {

	    perror("tcgetattr error");
	    return -1;
	}
	bzero( &newtio, sizeof( newtio ) );
	newtio.c_cflag  |=  CLOCAL | CREAD;
	newtio.c_cflag &= ~CSIZE;

	switch( nBits )
	{

	    case 7:
	        newtio.c_cflag |= CS7;
	        break;
	    case 8:
	        newtio.c_cflag |= CS8;
	        break;
	}

	switch( nEvent )
	{

	    case 'O':
	        newtio.c_cflag |= PARENB;
	        newtio.c_cflag |= PARODD;
	        newtio.c_iflag |= (INPCK | ISTRIP);
	        break;
	    case 'E':
                newtio.c_iflag |= (INPCK | ISTRIP);
                newtio.c_cflag |= PARENB;
                newtio.c_cflag &= ~PARODD;
                break;
	    case 'N':
	        newtio.c_cflag &= ~PARENB;
	        break;
	}

	switch( nSpeed )
	{

	    case 2400:
	        cfsetispeed(&newtio, B2400);
	        cfsetospeed(&newtio, B2400);
	        break;
	    case 4800:
	        cfsetispeed(&newtio, B4800);
	        cfsetospeed(&newtio, B4800);
	        break;
	    case 9600:
	        cfsetispeed(&newtio, B9600);
	        cfsetospeed(&newtio, B9600);
	        break;
	    case 115200:
	        cfsetispeed(&newtio, B115200);
	        cfsetospeed(&newtio, B115200);
	        break;
	    case 460800:
	        cfsetispeed(&newtio, B460800);
	        cfsetospeed(&newtio, B460800);
	        break;
			case 500000:
	        cfsetispeed(&newtio, B500000);
	        cfsetospeed(&newtio, B500000);
	        break;
			case 576000:
	        cfsetispeed(&newtio, B576000);
	        cfsetospeed(&newtio, B576000);
	        break;
			case 921600:
	        cfsetispeed(&newtio, B921600);
	        cfsetospeed(&newtio, B921600);
	        break;
	    case 1000000:
	        cfsetispeed(&newtio, B1000000);
	        cfsetospeed(&newtio, B1000000);
	        break;
	    case 1152000:
	        cfsetispeed(&newtio, B1152000);
	        cfsetospeed(&newtio, B1152000);
	        break;
	    default:
	        cfsetispeed(&newtio, B9600);
	        cfsetospeed(&newtio, B9600);
	        break;
	}

	if( nStop == 1){

	    newtio.c_cflag &=  ~CSTOPB;
	}else if ( nStop == 2 ){

	    newtio.c_cflag |=  CSTOPB;
	}
	newtio.c_cc[VTIME]  = 0;
	newtio.c_cc[VMIN] = 0;
	tcflush(fd,TCIFLUSH);
	if((tcsetattr(fd,TCSANOW,&newtio))!=0)
	{

	    perror("set error");
	    return -1;
	}
	return 0;
}

int main(int argc,char *argv[])
{

	int fd,ret_set,ret_read,ret;
	char buf_read[1024];
	char buf_write[1024];
	char tty[20]="/dev/";
	if(3 < argc)
	{

	    strcat(tty,argv[1]);
	    fd = open(tty, O_RDWR);
	    if(fd == -1)
	    {

				printf("Open %s failed! Exit!\n",tty);
				exit(1);
	    }
	    printf("open %s successfully!\n",tty);

	    ret_set = set_opt(fd, atoi(argv[2]), 8, 'N', 1);
	    if (ret_set == -1)
	    {

				printf("Set %s failed! Exit!\n",tty);
				exit(1);
	    }
	    printf("Set %s successfully!\n",tty);
	    printf("Baud rate: %s\n",argv[2]);
	    memset(buf_write, 0, sizeof(buf_write));
	    memcpy(buf_write,argv[3],sizeof(buf_write));
	    buf_write[99] = '\n';
			printf("Data: %s, size: %lu\n",buf_write,strlen(buf_write));
	    while (1)
	    {

	        memset(buf_read, 0, sizeof(buf_read));
	        ret = write(fd, buf_write, strlen(buf_write)+1);
					if( ret > 0){

		   			printf("Write data: %s\n",buf_write);
	        }else{

				    printf("Write data failed! Exit!\n");
				    exit(1);
					}
	        ret_read = read(fd, buf_read, 100);
	        if(ret_read > 0){

	            printf("Read data: %s\n\n", buf_read);
	        }
	        sleep(3);
	    }
			close(fd);
	}else{

	    printf("Usage: uart [tty node] [baud rate] [data] [data size < 1024]\n");
	    printf("Sample: uart ttyHSL1 115200 test\n");
	}
 return 0;
}
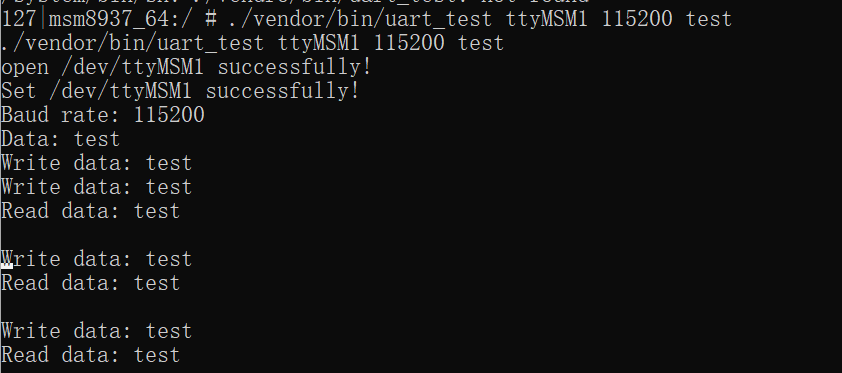
短接TX和RX,运行测试程序,得到以下结果,uart调试成功
将串口设置为高速串口,AP端收到的数据一直为0XFD
将串口设置为高速串口,与电脑通信,则AP端收到的数据一直为0XFD(原因不明),修改msm-4.9/drivers/tty/serial/msm_serial_hs.c如下,接收发送皆正常.

发布者:全栈程序员-站长,转载请注明出处:https://javaforall.net/183632.html原文链接:https://javaforall.net


