
大家好,又见面了,我是你们的朋友全栈君。如果您正在找激活码,请点击查看最新教程,关注关注公众号 “全栈程序员社区” 获取激活教程,可能之前旧版本教程已经失效.最新Idea2022.1教程亲测有效,一键激活。
Jetbrains全系列IDE使用 1年只要46元 售后保障 童叟无欺
SpringApplication源码解析
运行SpringApplication的方式
在创建SpringBoot应用,我们经常看到
SpringApplication.run(ApplicationConfiguration.class,args);
那有没有其他方式可以运行SpringApplication,答案是有的。我们可以通过自定义SpringApplication来实现
SpringApplication springApplication = new SpringApplication(ApplicationConfiguration.class); //这里也是传入配置源,但也可以不传
springApplication.setWebApplicationType(WebApplicationType.NONE); //指定服务类型 可以指定成非Web应用和SERVLET应用以及REACTIVE应用
springApplication.setAdditionalProfiles("prod");  //prodFiles配置
Set<String> sources = new HashSet<>(); //创建配置源
sources.add(ApplicationConfiguration.class.getName()); //指定配置源
springApplication.setSources(sources); //设置配置源,注意配置源可以多个
ConfigurableApplicationContext context = springApplication.run(args); //运行SpringApplication 返回值为服务上下文对象
context.close(); //上下文关闭
也可以使用Builber工厂模式
ConfigurableApplicationContext context = new SpringApplicationBuilder(ApplicationConfiguration.class)//这里也是传入配置源,但也可以不传
        .web(WebApplicationType.REACTIVE)
        .profiles("java7")
        .sources(ApplicationConfiguration.class) //可以多个Class
        .run();
context.close(); //上下文关闭
分析SpringApllication构造方法
推断Web应用类型
相信大家都很好奇,我们没有设置WebApplicationType的时候,为什么spring boot 能知道服务类型。
其实因为SpringApplication在创建的时候,做了 推断Web应用类型
我们来看看SpringApplication构造方法源码
public SpringApplication(ResourceLoader resourceLoader, Class<?>... primarySources) {

   this.resourceLoader = resourceLoader;
   Assert.notNull(primarySources, "PrimarySources must not be null");
   this.primarySources = new LinkedHashSet<>(Arrays.asList(primarySources)); //设置配置源,可以多个,所以是个list
   this.webApplicationType = WebApplicationType.deduceFromClasspath();  //推断web服务类型
   setInitializers((Collection) getSpringFactoriesInstances(ApplicationContextInitializer.class)); //工厂加载应用上下文初始化器
   setListeners((Collection) getSpringFactoriesInstances(ApplicationListener.class)); //工厂加载应用上下文初始化监听器
   this.mainApplicationClass = deduceMainApplicationClass(); // 推断实际启动引导类
}
其中WebApplicationType.deduceFromClasspath();便是用来推断web服务类型的
我们来看看具体实现webApplicationType类的deduceFromClasspath方法
static WebApplicationType deduceFromClasspath() {

    //判断WebFlux不为空 并且 WebMVC为空 并且JERSEY为空 便返回WebApplicationType.REACTIVE 说明是REACTIVE服务
   if (ClassUtils.isPresent(WEBFLUX_INDICATOR_CLASS, null) && !ClassUtils.isPresent(WEBMVC_INDICATOR_CLASS, null)
         && !ClassUtils.isPresent(JERSEY_INDICATOR_CLASS, null)) {

      return WebApplicationType.REACTIVE;
   }
   //遍历判断不是SERVLET服务,便是非Web服务
   for (String className : SERVLET_INDICATOR_CLASSES) {

      if (!ClassUtils.isPresent(className, null)) {

         return WebApplicationType.NONE;
      }
   }
   //上面都不符合就返回SERVLET服务
   return WebApplicationType.SERVLET;
}
理解应用上下文初始化器
接下来便是工厂加载应用上下文初始化器
利用 Spring 工厂加载机制,实例化ApplicationContextInitializer 实现类,并排序对象集合
setInitializers((Collection) getSpringFactoriesInstances(ApplicationContextInitializer.class));//工厂加载应用上下文初始化器
private <T> Collection<T> getSpringFactoriesInstances(Class<T> type, Class<?>[] parameterTypes, Object... args) {

   ClassLoader classLoader = getClassLoader();
   // Use names and ensure unique to protect against duplicates
   Set<String> names = new LinkedHashSet<>(SpringFactoriesLoader.loadFactoryNames(type, classLoader));
   List<T> instances = createSpringFactoriesInstances(type, parameterTypes, classLoader, args, names);
   AnnotationAwareOrderComparator.sort(instances); //初始化完成后,并排序对象集合
   return instances;
}
我们可以先看看spring.factories里面
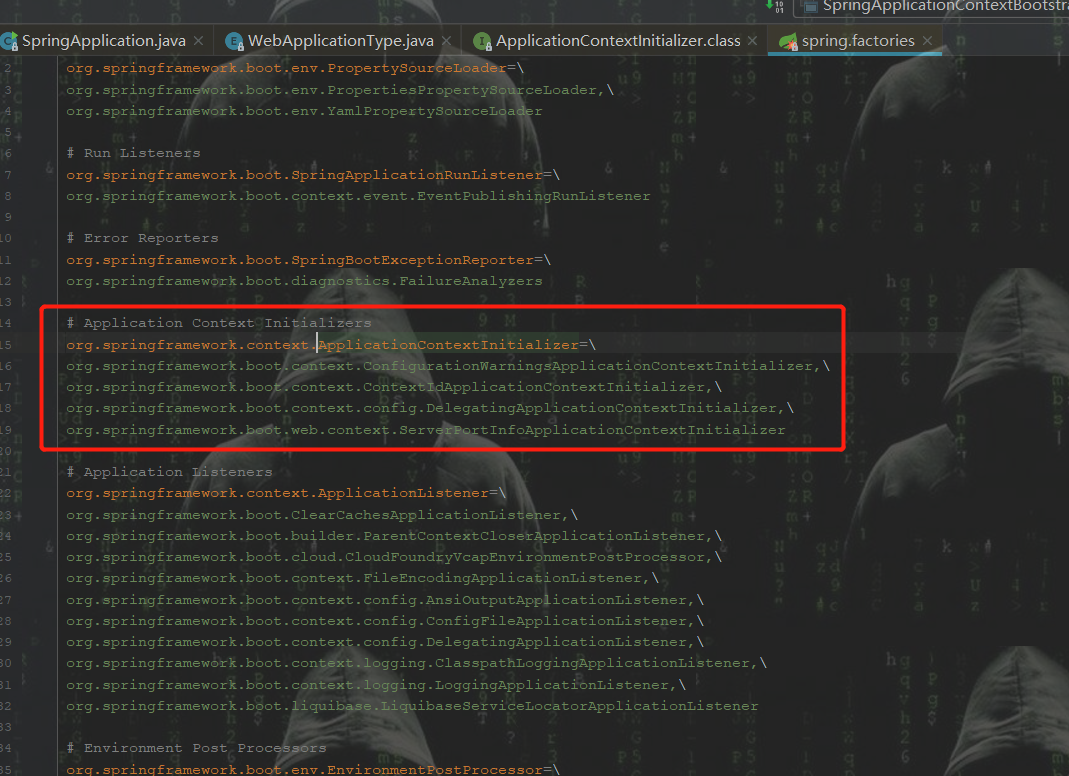
 我们可以随便打开一个上下文初始化的实现可以看出,这里实现ApplicationContextInitializer 只需要实现ApplicationContextInitializer接口并重新initialize方法即可
看到这里我们可以自定义实现应用上下文初始化方法
/** * HelloApplicationContextInitializer * @author cr * @date 2020/4/14 22:30 */
public class HelloApplicationContextInitializer implements ApplicationContextInitializer,Ordered {

    @Override
    public void initialize(ConfigurableApplicationContext applicationContext) {

        System.out.println("application.id = "+applicationContext.getId());
    }

    @Override
    public int getOrder() {

        return Ordered.LOWEST_PRECEDENCE;
    }
}
这里特别提醒,要注意ordered优先级问题,设置的优先级可以决定装载的顺序,文章后续会详细说明
理解应用上下文初始化监听器
接下来,我们看看上下文初始化监听器
利用 Spring 工厂加载机制,实例化 ApplicationListener实现类,并排序对象集合。
setListeners((Collection) getSpringFactoriesInstances(ApplicationListener.class)); //工厂加载应用上下文初始化监听器
工厂加载并排序方法是一样的,还是用getSpringFactoriesInstances该方法进行实现
找找spring.factories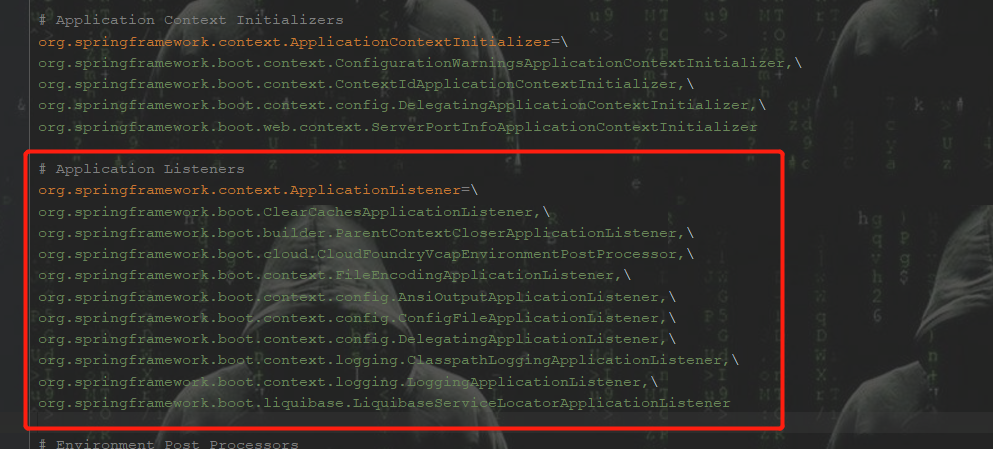 这里可以看到,有ConfigFileApplicationListener和LoggingApplicationListener
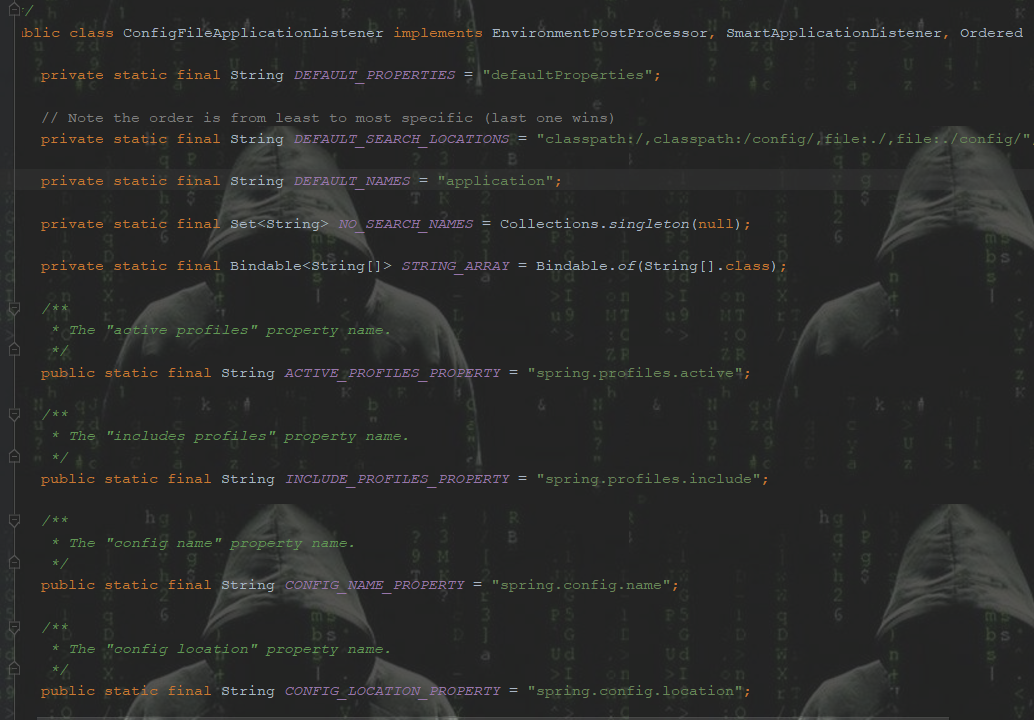
ConfigFileApplicationListener 的实现就是用来实现我们经常用application.properties 以及application.yml
可以打开看看
 这里它实现的是SmartApplicationListener的派生接口并重写了supportsEventType和onApplicationEvent方法
我们照葫芦画瓢写一个试试
/** * Before {@link ConfigFileApplicationListener} 实现 * @author cr * @date 2020/4/14 23:53 */
public class BeforeConfigFileApplicationListener implements SmartApplicationListener,Ordered {

    @Override
    public boolean supportsEventType(Class<? extends ApplicationEvent> eventType) {

        return ApplicationEnvironmentPreparedEvent.class.isAssignableFrom(eventType)
                || ApplicationPreparedEvent.class.isAssignableFrom(eventType);
    }
    @Override
    public void onApplicationEvent(ApplicationEvent event) {

        if (event instanceof ApplicationEnvironmentPreparedEvent) {


            ApplicationEnvironmentPreparedEvent preparedEvent = (ApplicationEnvironmentPreparedEvent) event;
            Environment environment = preparedEvent.getEnvironment(); //获取application配置
            //获取在application.properties 里面的name属性
            System.out.println("environment.getProperty(\"name\"): "+environment.getProperty("name"));
        }
        if (event instanceof ApplicationPreparedEvent) {

        }
    }
    @Override
    public int getOrder() {
    //比ConfigFileApplicationListener 优选级更高
        return ConfigFileApplicationListener.DEFAULT_ORDER -1;
    }
}
这里要注意优选级问题,如果你的优先级低于ConfigFileApplicationListener的优先级,那你这里获取name是获取不到的
推断实际启动引导类
最后便是推断实际启用引导类,老规矩,看看源码
this.mainApplicationClass = deduceMainApplicationClass();
private Class<?> deduceMainApplicationClass() {

   try {

      StackTraceElement[] stackTrace = new RuntimeException().getStackTrace(); // 获取线程
      for (StackTraceElement stackTraceElement : stackTrace) {
    //遍历线程
         if ("main".equals(stackTraceElement.getMethodName())) {
    //取出线程方法名
            return Class.forName(stackTraceElement.getClassName()); //取出线程类名
         }
      }
   }
   catch (ClassNotFoundException ex) {

      // Swallow and continue
   }
   return null;
}
这里可以看到,它推断是获取所有线程,然后取出线程的方法名为main的类名,进行实现的
分析SpringApplication.run()方法
源码解析
先上一波源码,再逐一分析
public ConfigurableApplicationContext run(String... args) {

   StopWatch stopWatch = new StopWatch();// 创建并启动计时监控类
   stopWatch.start();
   ConfigurableApplicationContext context = null;
   Collection<SpringBootExceptionReporter> exceptionReporters = new ArrayList<>();
   configureHeadlessProperty(); //该方法只做了一件事:设置了一个名为java.awt.headless的系统属性 其实是想设置该应用程序,即使没有检测到显示器,也允许其启动.
   SpringApplicationRunListeners listeners = getRunListeners(args); //加载SpingApplication运行时监听器SpringApplicationRunListeners
   listeners.starting(); // 发布应用启动事件
   try {

      ApplicationArguments applicationArguments = new DefaultApplicationArguments(args); //初始化默认应用参数类
      ConfigurableEnvironment environment = prepareEnvironment(listeners, applicationArguments); //根据运行监听器和应用参数来准备 Spring 环境
      configureIgnoreBeanInfo(environment);
      Banner printedBanner = printBanner(environment); //创建 Banner 打印类
      context = createApplicationContext(); // 创建SpringApplication应用上下文对象
      exceptionReporters = getSpringFactoriesInstances(SpringBootExceptionReporter.class,// 准备异常报告器
            new Class[] {
    ConfigurableApplicationContext.class }, context);
      prepareContext(context, environment, listeners, applicationArguments, printedBanner); //准备应用上下文
      refreshContext(context); //刷新应用上下文
      afterRefresh(context, applicationArguments); //应用上下文刷新后置处理
      stopWatch.stop();// 停止计时监控类
      if (this.logStartupInfo) {

         new StartupInfoLogger(this.mainApplicationClass).logStarted(getApplicationLog(), stopWatch); //输出日志记录执行主类名、时间信息
      }
      listeners.started(context); //发布应用上下文启动完成事件
      callRunners(context, applicationArguments); //执行所有 Runner 运行器
   }
   catch (Throwable ex) {

      handleRunFailure(context, ex, exceptionReporters, listeners);
      throw new IllegalStateException(ex);
   }

   try {

      listeners.running(context); //发布应用上下文就绪事件
   }
   catch (Throwable ex) {

      handleRunFailure(context, ex, exceptionReporters, null);
      throw new IllegalStateException(ex);
   }
   return context; //返回应用上下文
}
我们详细分析一下运行 SpringApplication 运行监听器( SpringApplicationRunListeners )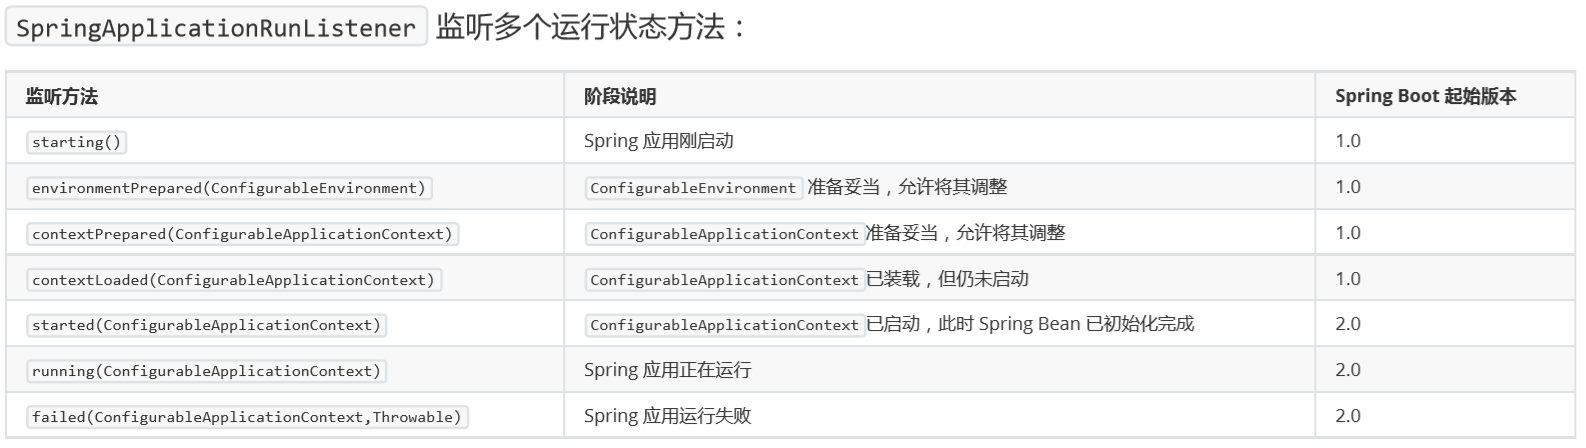
看看getRunListeners方法
private SpringApplicationRunListeners getRunListeners(String[] args) {

   Class<?>[] types = new Class<?>[] {
    SpringApplication.class, String[].class };
   return new SpringApplicationRunListeners(logger,
         getSpringFactoriesInstances(SpringApplicationRunListener.class, types, this, args));
}
又是一个工厂方法
我们看看spring.factories
# Run Listeners
org.springframework.boot.SpringApplicationRunListener=\
org.springframework.boot.context.event.EventPublishingRunListener
我们自定义实现一个应用监听器
/** * @author cr * @date 2020/4/14 23:39 */
public class HelloWorldRunListener implements SpringApplicationRunListener {


    public HelloWorldRunListener(SpringApplication application,String[] args){


    }

    @Override
    public void starting() {

        System.out.println("HelloWorldRunListener starting()");
    }

    @Override
    public void environmentPrepared(ConfigurableEnvironment environment) {


    }

    @Override
    public void contextPrepared(ConfigurableApplicationContext context) {


    }

    @Override
    public void contextLoaded(ConfigurableApplicationContext context) {


    }

    @Override
    public void started(ConfigurableApplicationContext context) {


    }

    @Override
    public void running(ConfigurableApplicationContext context) {


    }

    @Override
    public void failed(ConfigurableApplicationContext context, Throwable exception) {


    }
}
基本上,了解了run运行的周期,本文就结束了,推荐小马哥的Spring Boot编程思想,本文也是结合小马哥的视频学习并做出的总结
发布者:全栈程序员-站长,转载请注明出处:https://javaforall.net/195549.html原文链接:https://javaforall.net


