
1 概述
netty的基本了解
1.1 netty是什么?
快速简单的网络编程框架,极大的简化了基于TCP UDP协议的网络编程,简单,灵活,高性能,稳定
1.2 特点
- 设计
- 性能
- 安全
支持SSL/TLS,StartTLS
2 原理
2.1 IO模型
先了解下操作系统相关IO通信模型
2.1.1 阻塞IO
同步阻塞IO
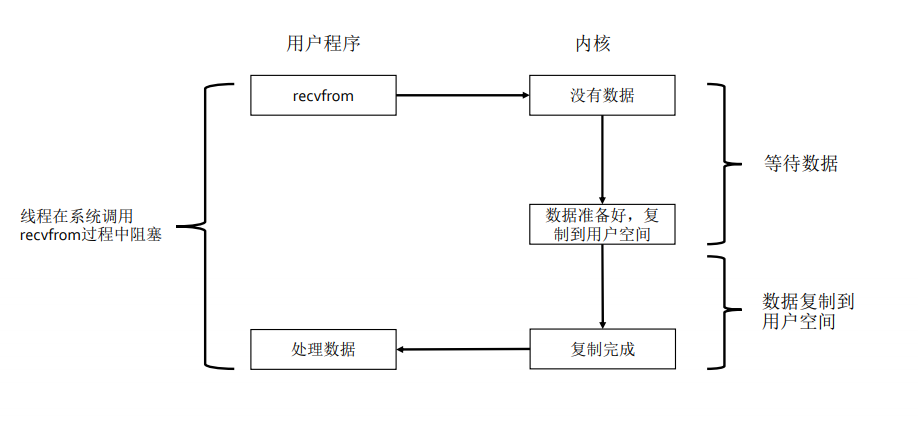
线程在读取网络数据时,分为两个阶段,等待数据和复制数据阶段,等待数据阶段等待网卡读到数据并存入网卡对应的内存缓存区,复制数据阶段是将网卡缓冲区的的数据复制到用户空间,即用户程序可以访问的内存区域。
同步阻塞IO线程在等待数据和复制数据两个阶段都阻塞,具体是在系统调用recvfrom的过程中阻塞,等待数据复制到用户空间后,才处理数据。如下图:

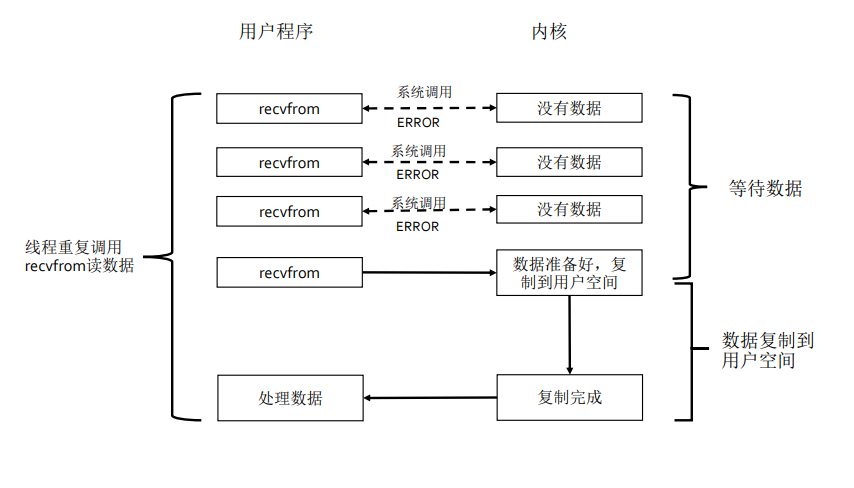
同步非阻塞IO
线程在等待数据期间不阻塞,而是通过持续的发送recvfrom向内核请求数据状态,内核立即返回而不阻塞,这样线程灵活一些,线程不阻塞,但是耗费资源,没有数据时要持续的调用。而在等待数据复制到内核空间这个时间段阻塞,复制完成后处理数据。
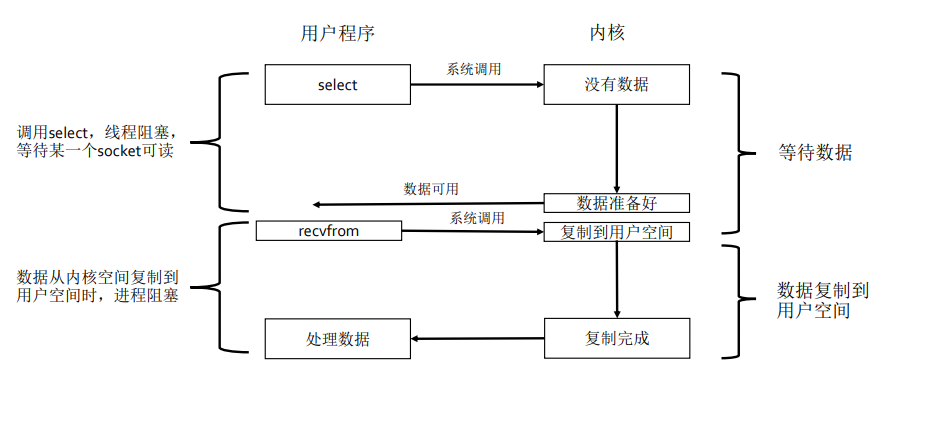
2.1.2 IO多路复用
poll
和select,区别在于监听的socket对应的文件描述符,使用链表存储,没有数量限制。
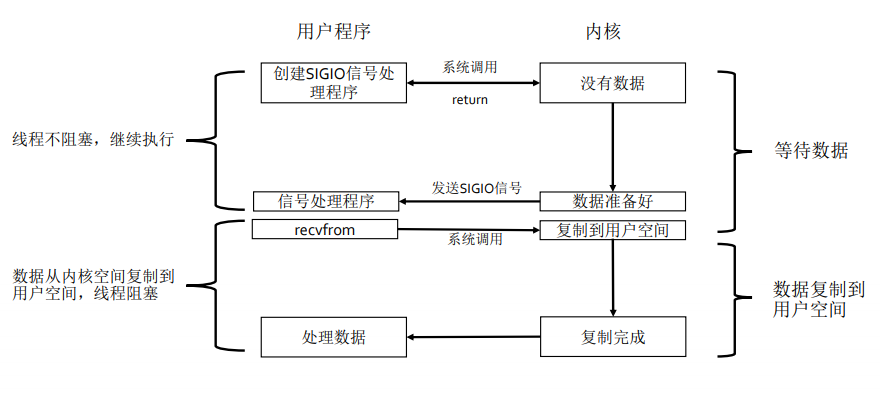
epoll
等待数据阶段,线程不阻塞,用户程序注册一个信号handler来处理对应的socket事件,然后线程返回继续做后续的事情,当内核数据准备好了会发送一个信号,程序调用recvfrom系统调用,将数据从内核空间拷贝到用户空间。
复制数据阶段,线程阻塞,等待数据复制到用户空间后,处理数据。
select,poll,epoll比较
- 单个进程能够监视的文件描述符的数量存在最大限制1024。select处理连接时,用户进程每次把所有负责的socket连接告诉操作系统(从用户态复制句柄数据结构到内核态),让操作系统内核去查询这些套接字上是否有事件发生,轮询完后,再将句柄数据复制到用户态,再让用户应用程序轮询处理已发生的网络事件,这一过程资源消耗较大,因此,select/poll能处理的并发连接有限。select模型下socket连接越多性能越差。
- poll有select同样的问题
- epoll没有循环处理文件描述符的问题,通过回调的方式实现,不需要将所有句柄复制到内核态去轮询。
2.1.3 异步IO
2.2 netty模型
netty提供了select,epoll,kqueue的IO多路复用模型NIO的实现,通过提供NioEventLoopGroup,EpollEventLoopGroup,KqueueEventLoopGroup线程模型来实现。
3 架构
3.1 功能架构
通过官方文档提供的架构图来了解
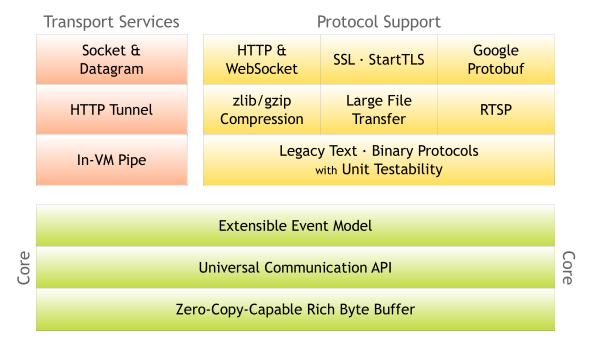
netty在底层具有零拷贝能力的丰富字节缓冲的基础上,提供通用的通信API,可扩展的事件模型,支持TCP,UDP通信,HTTP tunnel传输,In-VM pipe方式的传输服务。支持http、websocket通信协议,SSL和StartTLS通信协议,Google protobuf数据编解码协议,zlib、gzip压缩协议,大文件传输,RTSP协议等传输协议。
3.2 reactor模型
以NioEventLoopGroup为例,来学习reactor线程模型流程。
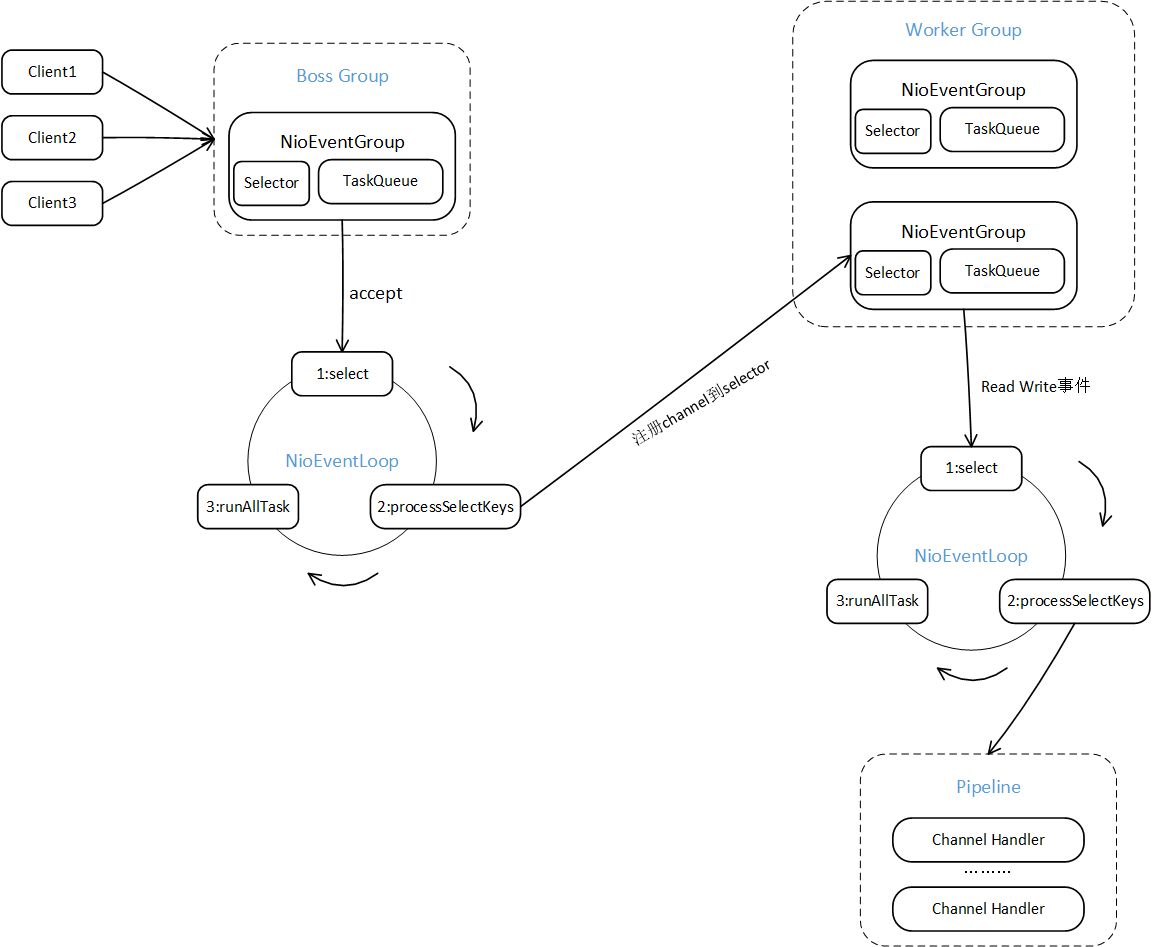
客户端连接时,Boss线程组处理连接事件,处理方式为EventLoopGroup轮询处理,step1先select,拿到就绪的socket列表,接下来step2处理就绪的channel key,将channel注册到work EventLoopGroup,step3执行队列中任务,完成后继续轮询处理连接事件
3.3 高性能
netty的一下特点来支撑Netty的高性能
- 基于I/O多路复用模型
- 零拷贝
- 基于NIO的Buffer
- 基于内存池的方式,循环重用缓冲区,避免缓冲区的重建销毁损耗性能。
- 无锁化的串行设计理念
- I/O操作的异步处理
- 提供对protobuf等高性能序列化协议支持
4 实现
- NioEventLoopGroup,多线程模式处理基于NIO Selector的channel的时间,通常Netty需要两个NioEventLoopGroup对象bossGroup和- -workGroup,分别处理不同的事件,select模型的具体实现。同时netty提供了epoll,kqueue和本地IO模型的实现
- NioEventLoopGroup,基于select实现核心的reactor线程模型,轮询select事件,处理事件,并执行其他任务。netty特提供了其他模型的实现。
- Channel,与socket联系,或者与能够进行I / O操作(例如读取,写入,连接和绑定)的组件的联系,IO操作的通道。
- Selector,多路复用器,执行select操作,由jdk底层实现。支持select操作的Channel注册到Selector,selector进行select操作,找到发生IO事件的channel,通过selectedKey的方式返回给调用程序。
- Pipieline,IO事件处理流水线,多个处理程序按照顺序进行数据、业务逻辑处理。
- ChannelHandler,数据或业务逻辑处理程序。
- BootStrap,客户端启动程序,通过简单的方式启动一个客户端。
- ServerBootStrap,服务器端启动程序,通过简单的方式启动一个服务端。
- FastThreadLocalThread,netty执行任务的线程。
先看一下线程模型相关核心接口和类的关系图如下:
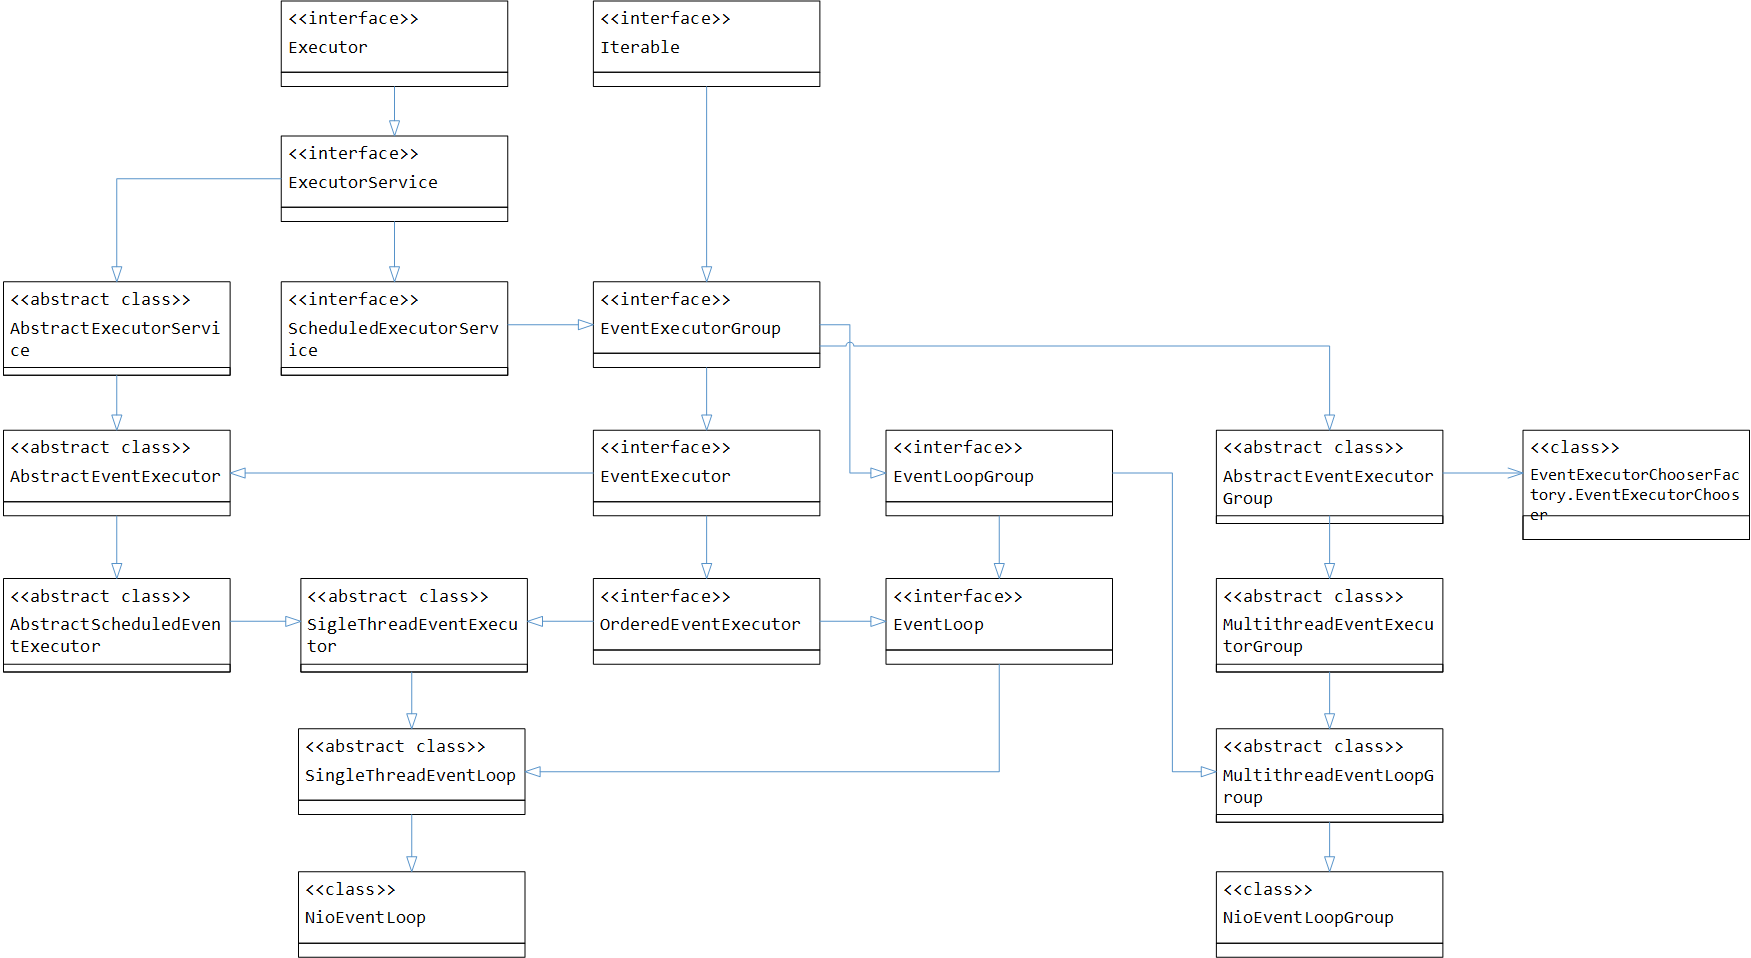
顶级接口定义的方法能力包括:
- Executor顶级接口定义了execute处理
- Iterable定义了轮询遍历
- ExecutorService定义了多任务场景下,任务提交,调用
- ScheduleExecutorService定义了任务定时、延迟调度
- EventExecutorGroup,定义了一组EventExecutor场景下,通过next()选择一个EventExecutor
- EventExecutor,通过parent()选择父group,
- EventLoopGroup,定义了注册Channel,ChannelPromise
- EventLoop,处理注册到EventLoop的Channel对应的IO操作,子类实现reactor线程模型
4.1 多线程模型
EventLoopGroup的子类MultithreadEventLoopGroup抽象类定义了多线程的线程模型,MultithreadEventLoopGroup有5个实现类分别是:
- NioEventLoopGroup,处理基于NIO IO模型的通道
- DefaultEventLoopGroup,用于本地传输
- EpollEventLoopGroup,使用epoll IO模型,运行在linux上
- KQueueEventLoopGroup,使用kqueue IO模型,运行在mac上
- LocalEventLoopGroup,已过期,被DefaultEventLoopGroup代替
新版本中LocalEventLoopGroup被DefaultEventLoopGroup,也就是共4中实现,4种实现区别是处理事件的EventExecutor执行器不同,但是多线程模型是相同的,下面以NioEventLoopGroup为例来学习一下多线程模型
NioEventLoopGroup
NioEventLoopGroup实现了Execute,ExecuteService,ScheduledExecuteService顶级接口,实现了execute,submit,schuedule等处理Runable、Callable任务的能力,通过代码发现,NioEventLoopGroup内部管理多个EventExecutor,NioEventLoopGroup处理任务是委托给内部的一个EventExecutor来处理的,直接上代码,next()方法返回了NioEventLoopGroup管理的一个EventExecutor对象
public abstract class AbstractEventExecutorGroup implements EventExecutorGroup {
    @Override public Future<?> submit(Runnable task) {
    return next().submit(task); } @Override public <T> Future<T> submit(Callable<T> task) {
    return next().submit(task); } @Override public ScheduledFuture<?> schedule(Runnable command, long delay, TimeUnit unit) {
    return next().schedule(command, delay, unit); } ... ... }
MultithreadEventExecutorGroup中定义了一个名叫children的数组,数组中存放EventExecutor对象,在构造MultithreadEventExecutorGroup时,根据线程数量,初始化对应数量的EventExecutor存在children中,这个操作在MultithreadEventExecutorGroup的构造器中完成
children = new EventExecutor[nThreads]; for (int i = 0; i < nThreads; i ++) {
    boolean success = false; try {
    children[i] = newChild(executor, args); success = true; } catch (Exception e) {
    // TODO: Think about if this is a good exception type throw new IllegalStateException("failed to create a child event loop", e); } finally {
    if (!success) {
    for (int j = 0; j < i; j ++) {
    children[j].shutdownGracefully(); } for (int j = 0; j < i; j ++) {
    EventExecutor e = children[j]; try {
    while (!e.isTerminated()) {
    e.awaitTermination(Integer.MAX_VALUE, TimeUnit.SECONDS); } } catch (InterruptedException interrupted) {
    // Let the caller handle the interruption. Thread.currentThread().interrupt(); break; } } } }
同时NioEventLoopGroup的newChild()方法中实现了EventExecutor的创建,可以看到newChild方法返回了EventLoop,EventLoop继承于EventExecutor,四种实现的区别在于返回的EventLoop不同,也就是事件处理器不同,对于NioEventLoop的创建我们在NioEventLoop时再深入学习。
@Override protected EventLoop newChild(Executor executor, Object... args) throws Exception {
    EventLoopTaskQueueFactory queueFactory = args.length == 4 ? (EventLoopTaskQueueFactory) args[3] : null; return new NioEventLoop(this, executor, (SelectorProvider) args[0], ((SelectStrategyFactory) args[1]).newSelectStrategy(), (RejectedExecutionHandler) args[2], queueFactory); }
@Override public EventExecutor next() {
return chooser.next(); } chooser是EventExecutorChooser的对象,在MultithreadEventExecutorGroup的构造方法中初始化,使用DefaultEventExecutorChooserFactory工厂模式进行创建并初始化
// 初始化chooser chooser = chooserFactory.newChooser(children); // 初始化chooserFactory public static final DefaultEventExecutorChooserFactory INSTANCE = new DefaultEventExecutorChooserFactory(); DefaultEventExecutoryChooserFactory在初始化chooser是,根据EventExecutor的数量进行不同,使用不同的EventExecutorChooser算法选择具体的EventExecutor,如果EventExecutor的数量是2的幂次方,使用位运算,否则使用算数取模的运算方式,最终实现轮询选择多个EventExecutor的算法
@Override public EventExecutorChooser newChooser(EventExecutor[] executors) {
    //executor的数量 是2的幂 if (isPowerOfTwo(executors.length)) {
    return new PowerOfTwoEventExecutorChooser(executors); } else {
    return new GenericEventExecutorChooser(executors); } }
PowerOfTwoEventExecutorChooser选择方式,数量是2的幂,按位与,最终按照executors的顺序轮询返回一个EventExecutor
@Override public EventExecutor next() {
    return executors[idx.getAndIncrement() & executors.length - 1]; }
GenericEventExecutorChooser选择方式,算数取模,最终按照executors的顺序轮询返回一个EventExecutor
@Override public EventExecutor next() {
    return executors[(int) Math.abs(idx.getAndIncrement() % executors.length)]; }
线程相关
1,线程数量
protected MultithreadEventLoopGroup(int nThreads, Executor executor, Object... args) {
    super(nThreads == 0 ? DEFAULT_EVENT_LOOP_THREADS : nThreads, executor, args); }
并在static代码块中初始化了DEFAULT_EVENT_LOOP_THRADS的数量,如果系统启动参数指定了,就是用系统启动参数指定的线程数量,否则使用cpu核心数*2作为线程数量
static {
    DEFAULT_EVENT_LOOP_THREADS = Math.max(1, SystemPropertyUtil.getInt( "io.netty.eventLoopThreads", NettyRuntime.availableProcessors() * 2)); if (logger.isDebugEnabled()) {
    logger.debug("-Dio.netty.eventLoopThreads: {}", DEFAULT_EVENT_LOOP_THREADS); } }
2,线程对象
NioEventLoopGroup初始化在确定线程数量后,又调用了父类MultithreadEventLoopGroup的父类MultithreadEventExecutorGroup的构造方法,初始化执行任务的executor为ThreadPerTaskExecutor,在此处指定了初始化执行任务的executor为ThreadPerTaskExecutor创建线程使用的ThreadFactory
protected MultithreadEventExecutorGroup(int nThreads, Executor executor, EventExecutorChooserFactory chooserFactory, Object... args) {
    ... if (executor == null) {
    executor = new ThreadPerTaskExecutor(newDefaultThreadFactory()); } ... }
ThreadPerTaskExecutor执行任务的方式是,为每个任务创建新的线程来执行任务,如下:
public final class ThreadPerTaskExecutor implements Executor {
    private final ThreadFactory threadFactory; public ThreadPerTaskExecutor(ThreadFactory threadFactory) {
    this.threadFactory = ObjectUtil.checkNotNull(threadFactory, "threadFactory"); } @Override public void execute(Runnable command) {
    threadFactory.newThread(command).start(); // 创建新线程来执行Runnable任务 } }
创建ThreadFactory过程,可以看到创建并返回了DefaultThreadFactory
protected ThreadFactory newDefaultThreadFactory() {
    return new DefaultThreadFactory(getClass()); }
DefaultThreadFactory的创建过程, 初始化了线程的标识,是否后台线程,线程优先级
public DefaultThreadFactory(Class<?> poolType) {
    this(poolType, false, Thread.NORM_PRIORITY); } public DefaultThreadFactory(Class<?> poolType, boolean daemon, int priority) {
    this(toPoolName(poolType), daemon, priority); } public DefaultThreadFactory(String poolName, boolean daemon, int priority) {
    this(poolName, daemon, priority, null); } public DefaultThreadFactory(String poolName, boolean daemon, int priority, ThreadGroup threadGroup) {
    ObjectUtil.checkNotNull(poolName, "poolName"); if (priority < Thread.MIN_PRIORITY || priority > Thread.MAX_PRIORITY) {
    throw new IllegalArgumentException( "priority: " + priority + " (expected: Thread.MIN_PRIORITY <= priority <= Thread.MAX_PRIORITY)"); } prefix = poolName + '-' + poolId.incrementAndGet() + '-'; this.daemon = daemon; this.priority = priority; this.threadGroup = threadGroup; }
下面看一下,DefaultThreadFactory创建线程的过程,可以看到创建了FastThreadLocalRunnable的线程
@Override public Thread newThread(Runnable r) {
    // 创建线程,FastThreadLocalRunnable对普通Runnable任务进行了包装 Thread t = newThread(FastThreadLocalRunnable.wrap(r), prefix + nextId.incrementAndGet()); try {
    if (t.isDaemon() != daemon) {
    t.setDaemon(daemon); } if (t.getPriority() != priority) {
    t.setPriority(priority); } } catch (Exception ignored) {
    // Doesn't matter even if failed to set. } return t; } protected Thread newThread(Runnable r, String name) {
    return new FastThreadLocalThread(threadGroup, r, name); }
至此我们了解了NioEventLoopGroup创建时的线程数量和线程类型。
4.2 reactor线程模型
在了解EventLoopGroup了解到EventLoopGroup有多个线程,每个线程对应EventExecutor,也就是EventLoop,实现了select轮询的流程,EventLoop同样有多个实现,也就是SingleThreadEventLoop抽象类的多个实现类,包括:
- DefaultEventLoop
- EpollEventLoop
- KQueueEventLoop
- NioEventLoop
- ThreadPerChannelEventLoop
同样,我们先以NioEventLoop为例学习,NioEventLoopGroup创建执行器时,创建的是NioEventLoop对象,也就是newChild方法的逻辑
@Override protected EventLoop newChild(Executor executor, Object... args) throws Exception {
    EventLoopTaskQueueFactory queueFactory = args.length == 4 ? (EventLoopTaskQueueFactory) args[3] : null; return new NioEventLoop(this, executor, (SelectorProvider) args[0], ((SelectStrategyFactory) args[1]).newSelectStrategy(), (RejectedExecutionHandler) args[2], queueFactory); }
SelectorProvider
SelectorProvider是一个Java SPI顶级抽象类,定义了Selector和可选择Channel,SelectProvider的具体实现都继承自SelectorProvider,同过SelectorProvider调用jdk底层初始化具体的Selector对象。
SelectStrategy
select策略,不指定时使用使用默认的的DefaultSelectStrategy,默认DefaultSelectStrategy实现如下,
final class DefaultSelectStrategy implements SelectStrategy {
    static final SelectStrategy INSTANCE = new DefaultSelectStrategy(); private DefaultSelectStrategy() {
    } @Override public int calculateStrategy(IntSupplier selectSupplier, boolean hasTasks) throws Exception {
    return hasTasks ? selectSupplier.get() : SelectStrategy.SELECT; } }
NioEventLoopGroup在执行任务是,先调用next()找到EventExecotur也就是NioEventLoop,通过NioEventLoop的execute方法执行任务
 @Override public void execute(Runnable command) {
    next().execute(command); }
调用NioEventLoop的execute方法后,先启动线程,启动线程时会调用NioEventLoop的run方法
private void doStartThread() {
    executor.execute(new Runnable() {
    @Override public void run() {
    ...... try {
    SingleThreadEventExecutor.this.run(); success = true; } catch (Throwable t) {
    logger.warn("Unexpected exception from an event executor: ", t); } finally {
    ... ... } } }); }
NioEventLoop中的run方法实现reactor轮询,核心源码如下:
@Override protected void run() {
    int selectCnt = 0; for (;;) {
    try {
    int strategy; try {
    ... ... select策略 nextWakeupNanos.set(curDeadlineNanos); try {
    if (!hasTasks()) {
    strategy = select(curDeadlineNanos); } } finally {
    nextWakeupNanos.lazySet(AWAKE); } default: } } catch (IOException e) {
    ... ... } try {
    if (strategy > 0) {
    processSelectedKeys(); } } finally {
    // Ensure we always run tasks. ranTasks = runAllTasks(); } } catch (CancelledKeyException e) {
    ... ... } } }
select之前,先拿到下次调度任务的调度时间,设置selector的wakeup时间(selector的wakeup()方法可以使正在阻塞的select操作立即返回),并且队列没有任务时,进入select(),select如下:
 private int select(long deadlineNanos) throws IOException {
    if (deadlineNanos == NONE) {
    return selector.select(); } // Timeout will only be 0 if deadline is within 5 microsecs long timeoutMillis = deadlineToDelayNanos(deadlineNanos + L) / L; return timeoutMillis <= 0 ? selector.selectNow() : selector.select(timeoutMillis); }
如果没有需要调度的任务,直接调用selector.select(),如果有任务,计算select timeout时间,如果调度剩余时间小于5微妙则timeout时间为0,调度剩余时间大于等于5微秒则向上转为毫秒取整,如6微秒,则超时时间为1毫秒,100微秒也为1毫秒。
计算好timeout时间后,如果timeout时间小于等于0,执行selectNow()非阻塞select,否则执行select(timeout)阻塞select,阻塞timeout毫秒
processSelectedKeys
在select()或者selectNow()之后,NioEventLoop通过processSelectedKeys处理select的结果,首先根据设置的IO所占时间比即ioRatio(默认50%)来确定执行策略。
- 如果ioRatio 100%,直接按照顺序执行processSelectedKeys和runAllTasks,
- 否则如果select或selectNow的结果大于零时先执行processSelectedKeys,完成后根据ioRatio计算runAllTasks的时间,指定runAllTask的超时时间,执行runAllTasks
- 如果select为0,直接执行runAllTasks,指定超时时间为0
代码如下
if (ioRatio == 100) {
    try {
    if (strategy > 0) {
    processSelectedKeys(); } } finally {
    // 保证每次执行任务. ranTasks = runAllTasks(); } } else if (strategy > 0) {
    final long ioStartTime = System.nanoTime(); try {
    processSelectedKeys(); } finally {
    // Ensure we always run tasks. final long ioTime = System.nanoTime() - ioStartTime; ranTasks = runAllTasks(ioTime * (100 - ioRatio) / ioRatio); } } else {
    ranTasks = runAllTasks(0); // This will run the minimum number of tasks }
processSelectedKeys的逻辑如下,当selectedKeys不为空时,执行netty对selectedKeySet做过优化的处理逻辑processSelectedKeysOptimized(),否则执行processSelectedKeysPlain()。
 private void processSelectedKeys() {
    if (selectedKeys != null) {
    processSelectedKeysOptimized(); } else {
    processSelectedKeysPlain(selector.selectedKeys()); } }
selectedKeys 优化
netty对selectedKeySet的优化,在NioEventLoop的构造方法中调用的openSelector()方法初始化Selector时开始,openSelector()中的关键代码如下:
private SelectorTuple openSelector() {
    ...... // 1,调用jdk底层初始化selector,且不需要优化时,直接返回构建的SelectorTuple ...... // 2, 加载SelectorImpl ...... // 3,加载异常处理 ...... // 4,初始化selectedKeySet  final Class<?> selectorImplClass = (Class<?>) maybeSelectorImplClass; // selectedKeySet为SelectedSelectionKeySet类型的对象 final SelectedSelectionKeySet selectedKeySet = new SelectedSelectionKeySet(); Object maybeException = AccessController.doPrivileged(new PrivilegedAction<Object>() {
    @Override public Object run() {
    try {
    // 5,反射的方式,设置给unwrappedSelector的selectedKeysField和publicSelectedKeysField字段selectedKeySet对象 Field selectedKeysField = selectorImplClass.getDeclaredField("selectedKeys"); Field publicSelectedKeysField = selectorImplClass.getDeclaredField("publicSelectedKeys"); ...... // java9适配,设置反射属性可访问 ...... // 通过反射将selectedKeySet设置到unwrappedSelector,代替原来的selectedKeysField,publicSelectedKeysField selectedKeysField.set(unwrappedSelector, selectedKeySet); publicSelectedKeysField.set(unwrappedSelector, selectedKeySet); return null; } catch (NoSuchFieldException e) {
    return e; } catch (IllegalAccessException e) {
    return e; } } }); ...... //异常处理,返回 selectedKeys = selectedKeySet; return new SelectorTuple(unwrappedSelector, new SelectedSelectionKeySetSelector(unwrappedSelector, selectedKeySet)); }
看来优化在于SelectedSelectionKeySet,再跟进SelectedSelectionKeySet,发现SelectedSelectionKeySet继承AbstractSet,替换掉了原来的HashSet,使用数组存储key,和原来的HashSet相比,极端情况下的On复杂度变为O1,性能提升。
final class SelectedSelectionKeySet extends AbstractSet<SelectionKey> {
    SelectionKey[] keys; int size; SelectedSelectionKeySet() {
    keys = new SelectionKey[1024]; } ... ... }
继续processSelectedKeys,所以,默认配置下,NioEventLoop时轮询时selectedKeys 不为空,所以代码再跟进processSelectedKeysOptimized()中,看到遍历数组处理selectedKey,通过SelectionKey 拿到附件,也就是最终要处理k的对象,是AbstractNioChannel或者NioTask对象,最终在processSelectedKey()方法中,附件a来处理IO事件。
 private void processSelectedKeysOptimized() {
    for (int i = 0; i < selectedKeys.size; ++i) {
    final SelectionKey k = selectedKeys.keys[i]; // null out entry in the array to allow to have it GC'ed once the Channel close // See https://github.com/netty/netty/issues/2363 selectedKeys.keys[i] = null; final Object a = k.attachment(); if (a instanceof AbstractNioChannel) {
    processSelectedKey(k, (AbstractNioChannel) a); } else {
    @SuppressWarnings("unchecked") NioTask<SelectableChannel> task = (NioTask<SelectableChannel>) a; processSelectedKey(k, task); } // 需要重新select时,重新select if (needsToSelectAgain) {
    // null out entries in the array to allow to have it GC'ed once the Channel close // See https://github.com/netty/netty/issues/2363 selectedKeys.reset(i + 1); selectAgain(); i = -1; } } }
再看processSelectedKey中的逻辑,首先校验k有效性,如果k无效关闭channel后返回,否则继续处理如下逻辑:
- 获取key的就绪操作代码
- 首先处理connect事件,如果没有处理connect事件就进行读写操作,JDK会抛出异常
- 处理IO写事件
- 处理IO读、accept事件
 private void processSelectedKey(SelectionKey k, AbstractNioChannel ch) {
    final AbstractNioChannel.NioUnsafe unsafe = ch.unsafe(); // .... 省略k异常逻辑 try {
    int readyOps = k.readyOps(); // We first need to call finishConnect() before try to trigger a read(...) or write(...) as otherwise // the NIO JDK channel implementation may throw a NotYetConnectedException. if ((readyOps & SelectionKey.OP_CONNECT) != 0) {
    // remove OP_CONNECT as otherwise Selector.select(..) will always return without blocking // See https://github.com/netty/netty/issues/924 int ops = k.interestOps(); ops &= ~SelectionKey.OP_CONNECT; k.interestOps(ops); unsafe.finishConnect(); } // Process OP_WRITE first as we may be able to write some queued buffers and so free memory. if ((readyOps & SelectionKey.OP_WRITE) != 0) {
    // Call forceFlush which will also take care of clear the OP_WRITE once there is nothing left to write ch.unsafe().forceFlush(); } // Also check for readOps of 0 to workaround possible JDK bug which may otherwise lead // to a spin loop if ((readyOps & (SelectionKey.OP_READ | SelectionKey.OP_ACCEPT)) != 0 || readyOps == 0) {
    unsafe.read(); } } catch (CancelledKeyException ignored) {
    unsafe.close(unsafe.voidPromise()); } }
在processSelectedKeysOptimized中,处理完成后,判断是否needsToSelectAgain,来重新select,什么情况下需要重新select?通过查询发吗发现,在Channel取消从EventLoop注册时,EventLoop取消Channel的key时,判断取消的key数量大于256时,将needsToSelectAgain置为true,触发重新select。如下:
 void cancel(SelectionKey key) {
    key.cancel(); cancelledKeys ++; if (cancelledKeys >= CLEANUP_INTERVAL) {
   //常量256 cancelledKeys = 0; needsToSelectAgain = true; } }
runAllTasks
在processSelectedKeys之后,执行runAllTask执行队列中的任务和需要调度执行的任务,完成后再通过afterRunningAllTasks来执行tailTask队列中的任务。
 protected boolean runAllTasks() {
    assert inEventLoop(); boolean fetchedAll; boolean ranAtLeastOne = false; do {
    // 从scheduledTaskQueue中取任务,放到taskQueue中 fetchedAll = fetchFromScheduledTaskQueue(); // 执行taskQueue中的任务 if (runAllTasksFrom(taskQueue)) {
    ranAtLeastOne = true; } // 循环从scheduledTaskQueue中取任务 } while (!fetchedAll); // keep on processing until we fetched all scheduled tasks. if (ranAtLeastOne) {
    lastExecutionTime = ScheduledFutureTask.nanoTime(); } // 执行完成后,执行tailTask队列中的任务 afterRunningAllTasks(); return ranAtLeastOne;
上面了解了,NioEventLoop的核心轮询流程
4.3 Future 和 Promise
Future
JDK Future代表一个异步处理的结果,Future顶级接口提供了一些方法,包括异步是否处理完成的检测方法,等待异步处理完成方法,取回异步处理结果的的方法。
- 提供个get()方法得到异步处理结果,结果只有在异步处理完成时通过get()方法取回,调用get()方法时,在处理完成之前get()方法阻塞。
- 提供了cancel()取消方法,来指定异步处理正常执行完成还是取消,但是当一个异步处理已经完成时,就不能取消,
- 同时JMM的happens-before规则,规定了一下顺序,异步处理的结果happens-before另一个线程执行get()后的所有操作。
ChannelFuture
- 提供了多个方法来检测IO操作是否完成,等待完成,获取IO操作结果
- 可以添加ChannelFutureListener来在IO操作完成时,得到通知。Listener不阻塞,可以达到最大的性能和资源利用率,基于事件的变成模式。
- await()是一个阻塞操作,调用await时,调用线程阻塞,直到IO操作完成,可以很简单的实现串行逻辑。但是调用线程在IO操作完成之前其实没有必要阻塞,并且线程间的通知开销比较高,而且在特定情况下还会出现死锁。
- ChannelFuture中包含当前IO操作的Channel对象引用,
ChannelFuture死锁问题
在ChannelHandler中不要调用await方法
EventHandler中的事件处理方法,通常被IO线程调用,如果await被EventHandler中的方法调用,根据调用关系的传递性,那么await也是被IO线程调用,那这样,IO线程调用永远也不会结束了,导致死锁。如:
// 死锁 public void channelRead(ChannelHandlerContext ctx, Object msg) {
    future = ctx.channel.close(); future.awaitUninterruptibly() // ... ... 其他逻辑 }
通常使用listener来完成这种操作,避免出现死锁,如下:
public void channelRead(ChannelHandlerContext ctx, Object msg) {
    future = ctx.channel.close(); future.addListener(new ChannelFutureListener(){
    public void operationComplete(ChannelFuture future) {
    // ... ... 其他逻辑 } }); }
Promise
继承Netty Future,指定Future是可写的,关键定义方法如下:
| 方法 | 描述 |
|---|---|
| Promise setSuccess(V result) | 标记Future为成功,并通知所有listener |
| boolean trySuccess(V result) | 标记Future为成功,并通知所有listener,因为Future或许已经被标记,所以可能返回false |
| Promise setFailure(Throwable e) | 标记Future为失败,并通知所有listener |
| boolean tryFailure(Throwable e) | 标记Future为失败,通知所有listener,因为Future或许已经被标记,可能返回false |
| boolean setUncancellable() | 标记此Future不能被取消 |
| … | … |
ChannelPromise
指定ChannelFuture是可写的,并且ChannelPromise中包含Channel对象。
netty借用Future Promise实现了异步操作等待、通过listener异步回调、通知
4.4 Pipleline
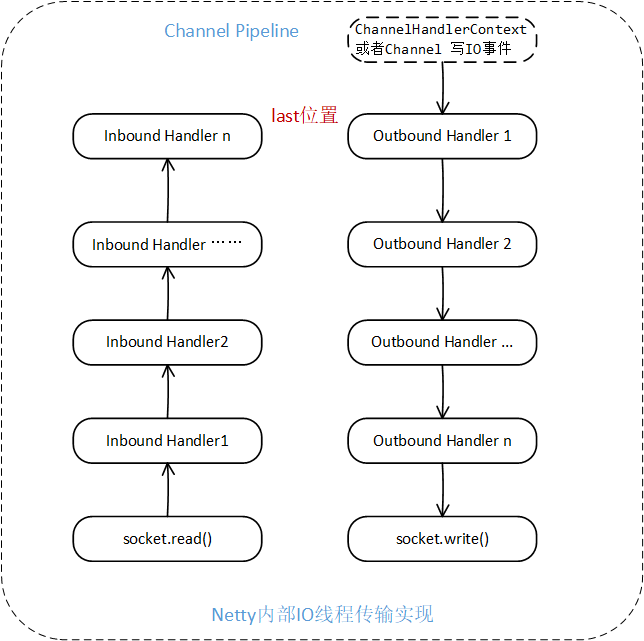
ChannelPipiline,一个ChannelHandler的集合,ChannelHandler是处理或拦截Channel读入数据事件、写出数据操作,ChannelPipiline实现了先进的拦截过滤模式,用户可以控制事件的处理方式,并自定义ChannelHandler之间的协作。
事件流转
通常情况下,I/O事件在ChannelPipiline中流转并被各个ChannelHandler处理的过程如下图:
构建一个ChannelPipeline
可以通过如下的方式来构建一个pipeline
ChannelPipeline} p = ... p.addLast("1", new InboundHandlerA()); p.addLast("2", new InboundHandlerB()); p.addLast("3", new OutboundHandlerA()); p.addLast("4", new OutboundHandlerB()); p.addLast("5", new InboundOutboundHandlerX()); public NioServerSocketChannel(ServerSocketChannel channel) {
super(null, channel, SelectionKey.OP_ACCEPT); config = new NioServerSocketChannelConfig(this, javaChannel().socket()); } // 调用到abstact channel protected AbstractChannel(Channel parent) {
this.parent = parent; id = newId(); unsafe = newUnsafe(); pipeline = newChannelPipeline(); } // 创建pipline protected DefaultChannelPipeline newChannelPipeline() {
return new DefaultChannelPipeline(this); } // 包装为AbstractChannelHandlerContext newCtx = newContext(group, filterName(name, handler), handler); // 调用addLast0方法 addLast0(newCtx); // addLast0() 将handler添加到双向链表中 private void addLast0(AbstractChannelHandlerContext newCtx) {
AbstractChannelHandlerContext prev = tail.prev; newCtx.prev = prev; newCtx.next = tail; prev.next = newCtx; tail.prev = newCtx; } @Override public final void read() {
// .... 获取配置,需要中断时中断读 // 从channel或者ChannelPipeline事件处理流水线 final ChannelPipeline pipeline = pipeline(); // 获取数据缓冲区分配器 final ByteBufAllocator allocator = config.getAllocator(); final RecvByteBufAllocator.Handle allocHandle = recvBufAllocHandle(); allocHandle.reset(config); ByteBuf byteBuf = null; boolean close = false; try {
// 轮询读数据,直到读完,即lastBytesRead为-1 do {
byteBuf = allocHandle.allocate(allocator); allocHandle.lastBytesRead(doReadBytes(byteBuf)); if (allocHandle.lastBytesRead() <= 0) {
// nothing was read. release the buffer. byteBuf.release(); byteBuf = null; close = allocHandle.lastBytesRead() < 0; if (close) {
// There is nothing left to read as we received an EOF. readPending = false; } break; } // 当前读数据次数+1 allocHandle.incMessagesRead(1); readPending = false; // 传递读到的数据到 pipeline 中的各个InboundHandler pipeline.fireChannelRead(byteBuf); byteBuf = null; } while (allocHandle.continueReading()); // 读完成 allocHandle.readComplete(); // 传递读完成事件到pipeline的各个InboundHandler pipeline.fireChannelReadComplete(); // 读完成 关闭流水线 if (close) {
closeOnRead(pipeline); } // 异常处理 } catch (Throwable t) {
handleReadException(pipeline, byteBuf, t, close, allocHandle); } finally {
// 修改selectedkey状态 if (!readPending && !config.isAutoRead()) {
removeReadOp(); } } } pipeline处理事件
对pipeline的结构了解,对于被动的read,connect事件从head开始执行,对于主动发起的bind,connect,write事件从tail开始执行。
- 从tail开始执行的主动事件,从pipeline开始调用(如:pipeline.write),pipeline最终调用到unsafe来完成事件
- 被动事件,如read,finish connect事件,由eventloop来检测,交给unsafe处理,再fire事件到pileline,pipeline中的多个Hander再按照顺序进行业务处理和数据处理
读数据上面已经拆解过,下面以write数据为例,看一下netty如何通过pipeline来写数据,从channel.writeAndFlush()定位到如下代码:
 @Override public ChannelFuture write(Object msg) {
    // 直接调用pipeline的write return pipeline.write(msg); }
pipeline从tail开始执行
 @Override public final ChannelFuture write(Object msg) {
    // 从tail开始执行 return tail.write(msg); }
调用到AbstractChannelHandlerContext的write方法
 private void write(Object msg, boolean flush, ChannelPromise promise) {
    // 找到第一个outBoundHandler AbstractChannelHandlerContext next = findContextOutbound(); final Object m = pipeline.touch(msg, next); EventExecutor executor = next.executor(); if (executor.inEventLoop()) {
    // 同步执行 if (flush) {
    next.invokeWriteAndFlush(m, promise); } else {
    next.invokeWrite(m, promise); } } else {
    // 当前线程不是EventExecutor线程,异步执行 AbstractWriteTask task; if (flush) {
    task = WriteAndFlushTask.newInstance(next, m, promise); } else {
    task = WriteTask.newInstance(next, m, promise); } safeExecute(executor, task, promise, m); } }
invokeWrite()方法中调用了invokeWrite0(),再看看invokeWrite0()方法,一般的hander中,写数据又会调用ctx.write()方法,完成事件在pipeline()中的传播
 private void invokeWrite0(Object msg, ChannelPromise promise) {
    try {
    // 通过调用ctx.write(),又会找到下一个handler,以此完成事件在pipeline中的流转 ((ChannelOutboundHandler) handler()).write(this, msg, promise); } catch (Throwable t) {
    notifyOutboundHandlerException(t, promise); } }
最终会调用到HeadContext的write()方法,再调用unsafe.write()完成写数据操作。
 @Override public void write(ChannelHandlerContext ctx, Object msg, ChannelPromise promise) {
    unsafe.write(msg, promise); }
PS:channel.writeAndFlush()和channelHandlerContext.write()的实现是不一样的
channel.writeAndFlush(),从头调用pipeline(),保证所有的OutBoundHandler都能处理数据
channelHandlerContext.write()是查找下一个channelHandlerContext来处理,不是所有OutBoundHandler都可以处理数据,用来实现pipeline流水线中的写事件的流转。
4.5 ServerBootstrap
通过一段简单服务器启动代码,来看服务器是怎么启动起来的。如下
 public void run () {
    EventLoopGroup bossGroup = new NioEventLoopGroup(); EventLoopGroup workerGroup = new NioEventLoopGroup(); try {
    ServerBootstrap serverBootstrap = new ServerBootstrap(); serverBootstrap.group(bossGroup, workerGroup).channel(NioServerSocketChannel.class).childHandler(new ChannelInitializer<Channel>() {
    @Override protected void initChannel(Channel channel) throws Exception {
    channel.pipeline().addLast(new SimpleServerHandler()); } }).option(ChannelOption.SO_BACKLOG, 128).childOption(ChannelOption.SO_KEEPALIVE, true); ChannelFuture f = serverBootstrap.bind(this.port).sync(); f.channel().closeFuture().sync(); } catch (Exception e) {
workerGroup.shutdownGracefully(); bossGroup.shutdownGracefully(); } } - EventLoopGroup ,多线程,每个线程对应EventLoop,不停检测bind accept read write connect disconnect IO事件,处理IO事件,执行任务。
- serverBootstrap.group(bossGroup, workerGroup),指定bossGroup和workGroup,boss和worker功能不同,boss负责accept新的连接,并丢给worker线程去处理,work处理连接的IO读写事件
- channel(NioServerSocketChannel.class),指定socket服务端为NioServerSocketChannel
- .childHandler(),指定流水线中的数据业务处理Handler
- option,serverBootstrap,channel的配置参数
- bind(xxx),监听xxx端口
- sync(),等待bind完成
- f.channel().closeFuture().sync(),bind完成后等待channel关闭
- shutdownGracefully(), EventLoopGroup停止轮询检测事件
netty怎么通过这段代码启动并且accept客户端连接的?从上面代码看,bind()之前的代码是创建组件,指定配置,不在赘述。直接从bind开始入手,根据调用关系,直接找到了doBind()方法,如下:(省略掉了非关键代码)
 private ChannelFuture doBind(final SocketAddress localAddress) {
    // 创建ServerSocketChannel,并注册到bossGroup final ChannelFuture regFuture = initAndRegister(); // ...注册异常处理,省略... if (regFuture.isDone()) {
    // 创建ServerSocketChannel并注册成功. ChannelPromise promise = channel.newPromise(); // 继续bind逻辑 doBind0(regFuture, channel, localAddress, promise); return promise; } else {
    // ServerSocketChannel没有注册成功. final PendingRegistrationPromise promise = new PendingRegistrationPromise(channel); // 注册监听事件 regFuture.addListener(new ChannelFutureListener() {
    @Override public void operationComplete(ChannelFuture future) throws Exception {
    Throwable cause = future.cause(); if (cause != null) {
    // Registration on the EventLoop failed so fail the ChannelPromise directly to not cause an // IllegalStateException once we try to access the EventLoop of the Channel. promise.setFailure(cause); } else {
    // Registration was successful, so set the correct executor to use. // See https://github.com/netty/netty/issues/2586 promise.registered(); // 继续bind逻辑 doBind0(regFuture, channel, localAddress, promise); } } }); return promise; } }
doBind为主流程,继续。在initAndRegister()中创建了ServerSocketChannel,初始化channel,并注册到bossGroup处理线程组
 final ChannelFuture initAndRegister() {
    Channel channel = null; try {
    // 创建channel对象,创建流水线 channel = channelFactory.newChannel(); // 设置配置参数,创建事件处理流水线,配置流水线等。 init(channel); } catch (Throwable t) {
    // ...省略异常处理... } // 注册到boss group ChannelFuture regFuture = config().group().register(channel); // ...省略异常处理... return regFuture; }
channelFactory.newChannel(),通过反射的方式创建ServerSocketChannel对象,如下:(省略了非关键代码)
public class ReflectiveChannelFactory<T extends Channel> implements ChannelFactory<T> {
    private final Constructor<? extends T> constructor; public ReflectiveChannelFactory(Class<? extends T> clazz) {
    this.constructor = clazz.getConstructor(); } @Override public T newChannel() {
    return constructor.newInstance(); } }
init(channel),初始化channel,如下:
 @Override void init(Channel channel) {
    // 设置配置参数到channel setChannelOptions(channel, newOptionsArray(), logger); setAttributes(channel, newAttributesArray()); // 创建流水线 ChannelPipeline p = channel.pipeline(); final EventLoopGroup currentChildGroup = childGroup; final ChannelHandler currentChildHandler = childHandler; // 包装socketChannel创建的参数,也就是accept创建新连接的参数 final Entry<ChannelOption<?>, Object>[] currentChildOptions = newOptionsArray(childOptions); final Entry<AttributeKey<?>, Object>[] currentChildAttrs = newAttributesArray(childAttrs); // 流水线添加Handher, p.addLast(new ChannelInitializer<Channel>() {
    @Override public void initChannel(final Channel ch) {
    final ChannelPipeline pipeline = ch.pipeline(); // 添加config handler ChannelHandler handler = config.handler(); if (handler != null) {
    pipeline.addLast(handler); } // 异步添加 ServerBootstrapAcceptor handler,任务添加到channel的eventLoop任务队列中,select之前执行 ch.eventLoop().execute(new Runnable() {
    @Override public void run() {
    pipeline.addLast(new ServerBootstrapAcceptor( ch, currentChildGroup, currentChildHandler, currentChildOptions, currentChildAttrs)); } }); } }); }
继续绑定逻辑dobind0(),
 private static void doBind0( final ChannelFuture regFuture, final Channel channel, final SocketAddress localAddress, final ChannelPromise promise) {
    // 在触发channelRegistered()之前调用方法。 使用户处理程序有机会在其channelRegistered()实现中设置管道。 channel.eventLoop().execute(new Runnable() {
    @Override public void run() {
    if (regFuture.isSuccess()) {
    // 执行最终的bind操作,调用jdk bind绑定端口,并产生channel active事件 channel.bind(localAddress, promise).addListener(ChannelFutureListener.CLOSE_ON_FAILURE); } else {
    promise.setFailure(regFuture.cause()); } } }); }
这样Nio Socket Server就启动并绑定了指定端口,但是如何accept处理新的连接,并交给worker线程组处理呢?从processSelectedKey入手,根据调用关系,定位到AbstractNioMessageChannel中的NioMessageUnsafe类的read方法,如下:(删除了非关键代码)
@Override public void read() {
    // 读到需要accept的channel do {
    int localRead = doReadMessages(readBuf); if (localRead == 0) {
    break; } if (localRead < 0) {
    closed = true; break; } allocHandle.incMessagesRead(localRead); } while (continueReading(allocHandle)); int size = readBuf.size(); for (int i = 0; i < size; i ++) {
    // 流水线循环发出读到channel事件 readPending = false; pipeline.fireChannelRead(readBuf.get(i)); } readBuf.clear(); allocHandle.readComplete(); // 流水线发出杜万成事件 pipeline.fireChannelReadComplete(); }
流水线发出读到新channel的事件后,就到了流水线中ServerBootstrap启动时注册的ServerBootstrapAcceptor Handler来处理了,关键代码下:
 @Override @SuppressWarnings("unchecked") public void channelRead(ChannelHandlerContext ctx, Object msg) {
    // 获取拿到 channel final Channel child = (Channel) msg; child.pipeline().addLast(childHandler); // channel 设置配置 setChannelOptions(child, childOptions, logger); setAttributes(child, childAttrs); try {
    // 注册到worker group 轮询处理IO事件 childGroup.register(child).addListener(new ChannelFutureListener() {
    //注册监听事件 @Override public void operationComplete(ChannelFuture future) throws Exception {
    if (!future.isSuccess()) {
    forceClose(child, future.cause()); } } }); } catch (Throwable t) {
    // 异常时关闭 channel forceClose(child, t); } }
至此,ServerBootstarp启动,并可以接受客户端的连接,处理连接,交给worker 线程组处理连接的IO事件。
4.6 Bootstrap
我们再解剖客户端的启动过程,下面是一个简单的netty客户端启动代码:
 public static void main(String[] args) throws Exception {
    String host = args[0]; int port = Integer.parseInt(args[1]); EventLoopGroup workerGroup = new NioEventLoopGroup(); try {
    Bootstrap b = new Bootstrap(); // (1) b.group(workerGroup); // (2) b.channel(NioSocketChannel.class); // (3) b.option(ChannelOption.SO_KEEPALIVE, true); // (4) b.handler(new ChannelInitializer<SocketChannel>() {
    @Override public void initChannel(SocketChannel ch) throws Exception {
    ch.pipeline().addLast(new SimpleClientHandler()); } }); // Start the client. ChannelFuture f = b.connect(host, port).sync(); // (5) // Wait until the connection is closed. f.channel().closeFuture().sync(); } finally {
    workerGroup.shutdownGracefully(); } }
关于组件的初始化、配置,和Socket socket类似,这里不在描述,直接从connect开始读代码,追踪到doResolveAndConnect()方法,如下:
 private ChannelFuture doResolveAndConnect(final SocketAddress remoteAddress, final SocketAddress localAddress) {
    // 创建NioSocketChannel,创建相关组件,并初始化,注册到worker group,和Server启动类似 final ChannelFuture regFuture = initAndRegister(); final Channel channel = regFuture.channel(); // 继续connect return doResolveAndConnect0(channel, remoteAddress, localAddress, channel.newPromise());
继续往下追踪,追踪到下面的代码,调用channel来进行connect
 private static void doConnect( final SocketAddress remoteAddress, final SocketAddress localAddress, final ChannelPromise connectPromise) {
    // This method is invoked before channelRegistered() is triggered. Give user handlers a chance to set up // the pipeline in its channelRegistered() implementation. final Channel channel = connectPromise.channel(); channel.eventLoop().execute(new Runnable() {
    @Override public void run() {
    if (localAddress == null) {
    channel.connect(remoteAddress, connectPromise); } else {
    channel.connect(remoteAddress, localAddress, connectPromise); } connectPromise.addListener(ChannelFutureListener.CLOSE_ON_FAILURE); } }); }
最终调用AbstrackNioUnsafe完成connect:
 @Override public final void connect( final SocketAddress remoteAddress, final SocketAddress localAddress, final ChannelPromise promise) {
    ... ... // 调用jdk底层 connect if (doConnect(remoteAddress, localAddress)) {
    fulfillConnectPromise(promise, wasActive); } else {
    //超时处理,关闭 connectTimeoutFuture = eventLoop().schedule(new Runnable() {
    @Override public void run() {
    ChannelPromise connectPromise = AbstractNioChannel.this.connectPromise; if (connectPromise != null && !connectPromise.isDone() && connectPromise.tryFailure(new ConnectTimeoutException( "connection timed out: " + remoteAddress))) {
    close(voidPromise()); } } }, connectTimeoutMillis, TimeUnit.MILLISECONDS); } } } catch (Throwable t) {
    ......异常处理 } }
4.7 zero-copy
4.7.1 操作系统zero-copy
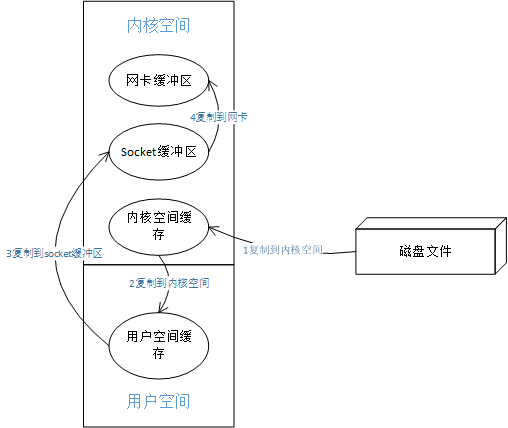
以读取磁盘文件,通过socket发送远程为例,如果不是零拷贝,通过传统的read文件,write文件的方式,逻辑需要四步copy:
- 将磁盘文件读到内核空间.
- 文件数据从内核空间copy到用户空间.
- 从用户空间copy到socket缓冲区。
- 从socket缓冲区copy到网卡缓冲区。
四个步骤的拷贝,如下图:
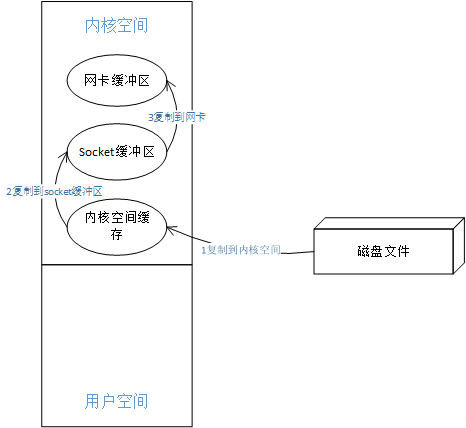
zero-copy零拷贝技术,是在linux2.1引入操作系统sendFile()系统调用的支持下,分为以下三步拷贝:
- 1 文件读入到内核缓冲区,不再将文件复制到用户态,用户态程序不参与文件传输
- 2 数据复制到socket缓冲区。
- 3 数据在复制到网卡缓冲区。
这样就少了一次数据copy,提高性能。如下图:
上图对Read Write过程做了很好的优化,但是看起来第二步有些多余,linux2.4优化了sendFile()系统调用,进一步优化:
- 1 文件数据copy到kernel buffer
- 2 kernel buffer中的数据的起始位置和偏移量写到socket buffer
- 3 根据socket buffer中的起始位置和偏移量,直接将kernel buffer中的数据复制到网卡缓冲区
如下图:

过上述过程,数据只经过了2次copy就从磁盘传送出去了。在操作系统的支持下,Java和netty也实现了各自的Zero-copy。
4.7.2 Java zero-copy
FileChannel提供了transferTo()方法调用,将文件通过零copy的方式传输到另一个Channel,FileChannel或者SocketChannel,如传输到socketChannel
//使用sendfile:读取磁盘文件,并网络发送 FileChannel sourceChannel = new RandomAccessFile(source, "rw").getChannel(); SocketChannel socketChannel = SocketChannel.open(.....); sourceChannel.transferTo(0, sourceChannel.size(), socketChannel); 基于零copy实现文件copy
 public void copy(String source, String target) throws Exception {
    FileChannel sourceFile = new FileInputStream(source).getChannel(); FileChannel targetFile = new FileInputStream(target).getChannel(); sourceFile.transferTo(0, sourceFile.size(), targetFile); }
4.7.3 netty zero-copy
netty的零拷贝,既有应用层面的zero-copy,也有操作系统zero-copy的应用,前者是广义的zero-copy,后者是狭义的zero-copy,都避免了数据不必要的copy,netty的zero-copy体现在:
- Netty提供了CompositeByteBuf类,它可以将多个ByteBuf合并为一个逻辑上的ByteBuf,避免了各个ByteBuf之间的拷贝。
- 通过wrap操作,我们可以将byte[]数组、ByteBuf、 ByteBuffer 等包装成一个 Netty ByteBuf对象,进而避免了拷贝操作。
- ByteBuf支持slice 操作,因此可以将ByteBuf分解为多个共享同一个存储区域的ByteBuf,避免了内存的拷贝。
- 通过FileRegion包装的FileChannel.tranferTo实现文件传输,可以直接将文件缓冲区的数据发送到目标Channel,避免了传统通过循环write方式导致的内存拷贝问题。
可以看到FileRegion是netty对linux操作系统zero-copy系统调用sendFile()的应用,其余是netty在应用层面对数据读写的优化,避免不必要的复制。
CompositeByteBuf
CompositeByteBuf是一个虚拟的buf缓冲区,将多个独立的缓冲区合成一个虚拟的缓冲区,一般使用ByteBufAllocator的compositeBuffer()的方式或者Unpooled.wrappedBuffer(ByteBuf…)的方式创建,一般不适用构造函数创建。
//传统方式,byte[]转为ByteBuf byte[] bytes = ......; ByteBuf byteBuf = Unpooled.buffer(); byteBuf.write(bytes); //netty,byte[]转为ByteBuf byte[] bytes = ......; ByteBuf byteBuf = Unpooled.wrappedBuffer(bytes); ByteBuf slice
netty使用自己的NIO ByteBuf,netty ByteBuf支持slice操作,即返回ByteBuf的某一段数据,而不需要copy,如byteBuf.slice(int index, int length)返回byteBuf读数据段从index开始到length长度的数据,返回的数据是直接共享byteBuf数据,而不是copy一份返回,避免了数据copy数据带来的消耗。
/ * 返回此缓冲区的子区域的一部分。 修改返回的缓冲区或父缓冲区的内容会影响彼此的内容,同时它们会维护单独的索引和标记。 此方法不会修改父缓冲区的{@code readerIndex}或{@code writerIndex} */ public abstract ByteBuf slice(int index, int length); 4.8 其他设计
4.8.1 ReferenceCounted
引用计数对象,需要显式的回收分配内存。
实例化新的ReferenceCounted时,引用计数值为1,开始计数。 retain()增加引用计数,而release()减少引用计数。 如果引用计数减少到0,则将显式释放对象,访问已释放对象通常会导致访问异常。
如果实现ReferenceCounted的对象是容器,其中包含多个其他实现ReferenceCounted的对象,则当容器的引用计数变为0时,包含的对象也将通过release()释放。
通过引用计数来支持显式的内存回收。
4.8.2 ByteBuf
netty的数据缓冲,ByteBuf实现了ReferenceCounted,支持引用计数,可以显示的回收内存,提高GC成效,防止内存泄漏。
Netty ByteBuf 对比JDK ByteBuffer
- ByteBuffer长度固定,扩展ByteBuffer长度,会导致重新创建更大的ByteBuffer,并发生数据copy,性能低
- ByteBuffer只用了一个position指针来标识位置,读写模式切换时需要调用flip()函数和rewind()函数
- 存储字节的数组是动态的,最大是Integer.MAX_VALUE。这里的动态性存在write操作中,write时得知buffer不够时,会自动扩容。
- netty ByteBuf的读写索引分离。
- netty ByteBuf支持引用计数
HeapByteBuffer
NIO 在 JDK 1.4 中引入的 ByteBuffer 类允许 JVM 实现通过本地调用来分配内存。这主要是为了避免在每次调用本地 I/O 操作之前(或者之后)将缓冲区的内容复 制到一个中间缓冲区(或者从中间缓冲区把内容复制到缓冲区),省略一次数据copy。
DirectByteBuffer
1,在使用Socket传递数据时性能很好,由于数据直接在直接缓冲区中,不需要从用户空间copy数据到直接缓冲区的过程,性能好。
2,相对于基于堆的缓冲区,它们的分配和释放都较为昂贵。不支持业务处理,需要业务处理时,不得不进行一 次复制。
内存分配可参考jemalloc,后续学习补充。
4.8.3 Unpooled
4.8.4 FastThreadLocalThread
public class FastThreadLocalThread extends Thread {
    // This will be set to true if we have a chance to wrap the Runnable. private final boolean cleanupFastThreadLocals; private InternalThreadLocalMap threadLocalMap; ... ... }
在创建FastThreadLocal时,返回InternalThreadLocalMap生成的index,代码如下
 public FastThreadLocal() {
    index = InternalThreadLocalMap.nextVariableIndex(); }
下面通过get,set,remove方法来了解FastThreadLocal到底快在哪里,get时:
 public final V get() {
    // 从InternalThreadLocalMap获取对象存储容器InternalThreadLocalMap  InternalThreadLocalMap threadLocalMap = InternalThreadLocalMap.get(); // 根据初始化时返回的index,获取对象 Object v = threadLocalMap.indexedVariable(index); // 如果对象不为空 if (v != InternalThreadLocalMap.UNSET) {
    // 返回对象 return (V) v; } // 如果对象为空,初始化对象 return initialize(threadLocalMap); }
set时:
 public final void set(V value) {
    // value不为空 if (value != InternalThreadLocalMap.UNSET) {
    // 从InternalThreadLocalMap获取对象存储容器InternalThreadLocalMap InternalThreadLocalMap threadLocalMap = InternalThreadLocalMap.get(); // 见setKnownNotUnset方法,对象存储到一个set中,以此来支持removeAll操作 setKnownNotUnset(threadLocalMap, value); } else {
    // value等于UNSET,删除,下次get时,会自动重新调用initialValue()方法初始化值 remove(); } } private void setKnownNotUnset(InternalThreadLocalMap threadLocalMap, V value) {
    // 根据index将value存入threadLocalMap if (threadLocalMap.setIndexedVariable(index, value)) {
    // 对象存储到一个set中,以此来支持removeAll操作 addToVariablesToRemove(threadLocalMap, this); } }
remove时:
 public final void remove(InternalThreadLocalMap threadLocalMap) {
    ...省略空判断 // 根据index从removeIndexedVariable中删除 Object v = threadLocalMap.removeIndexedVariable(index); // 从待删除set中删除this,避免removeALL时重复删除 removeFromVariablesToRemove(threadLocalMap, this); if (v != InternalThreadLocalMap.UNSET) {
    try {
    // remove时v对象时回调 onRemoval((V) v); } catch (Exception e) {
    PlatformDependent.throwException(e); } } }
由以上可见,FastThreadLocal是由InternalThreadLocalMap来进行对象管理,从InternalThreadLocalMap再深入了解。在FastThreadLocal中获取InternalThreadLocalMap时,通过getIfSet或者get方法来获取,代码如下:
 public static InternalThreadLocalMap get() {
    Thread thread = Thread.currentThread(); // 当前线程是FastThreadLocalThread if (thread instanceof FastThreadLocalThread) {
    // 初始化fastThreadLocal return fastGet((FastThreadLocalThread) thread); } else {
    // 初始化slowThreadLocal return slowGet(); } } private static InternalThreadLocalMap fastGet(FastThreadLocalThread thread) {
    InternalThreadLocalMap threadLocalMap = thread.threadLocalMap(); // 等于null时初始化InternalThreadLocalMap if (threadLocalMap == null) {
    thread.setThreadLocalMap(threadLocalMap = new InternalThreadLocalMap()); } return threadLocalMap; } private static InternalThreadLocalMap slowGet() {
    InternalThreadLocalMap ret = slowThreadLocalMap.get(); // 等于null时,初始化InternalThreadLocalMap,存入线程普通ThreadLocal,变慢 if (ret == null) {
    ret = new InternalThreadLocalMap(); slowThreadLocalMap.set(ret); } return ret; } public static InternalThreadLocalMap getIfSet() {
    Thread thread = Thread.currentThread(); // 当前线程是FastThreadLocalThread,返回FastThreadLocalThread的InternalThreadLocalMap属性,有可能是空 if (thread instanceof FastThreadLocalThread) {
    return ((FastThreadLocalThread) thread).threadLocalMap(); } // 否则返回普通ThreadLocal中存储的InternalThreadLocalMap  return slowThreadLocalMap.get(); }
再看看获取nextVariableIndex,get,set,remove对象时的逻辑
 // 获取index public static int nextVariableIndex() {
    // 维护支持CAS原子操作AtomicInteger类型的对象nextIndex,来获取连续的index int index = nextIndex.getAndIncrement(); if (index < 0) {
    // index越界,抛出异常 nextIndex.decrementAndGet(); throw new IllegalStateException("too many thread-local indexed variables"); } return index; } // 根据index,读取Object对象 public Object indexedVariable(int index) {
    Object[] lookup = indexedVariables; // 从数组中返回对象 return index < lookup.length? lookup[index] : UNSET; } // 存放对象value到index public boolean setIndexedVariable(int index, Object value) {
    Object[] lookup = indexedVariables; // 当前index小于lookup的边界 if (index < lookup.length) {
    Object oldValue = lookup[index]; lookup[index] = value; return oldValue == UNSET; } else {
    // 扩容并存放到lookup数组中 expandIndexedVariableTableAndSet(index, value); return true; } } // 根据index删除,并返回v public Object removeIndexedVariable(int index) {
    Object[] lookup = indexedVariables; // 小于时,直接返回 if (index < lookup.length) {
    Object v = lookup[index]; lookup[index] = UNSET; return v; } else {
    return UNSET; } }
(完^_^)
发布者:全栈程序员-站长,转载请注明出处:https://javaforall.net/200524.html原文链接:https://javaforall.net

![【数据结构】二叉树[通俗易懂]](https://javaforall.net/wp-content/uploads/2020/11/2020110817443450-480x300.jpg)
