
大家好,又见面了,我是你们的朋友全栈君。如果您正在找激活码,请点击查看最新教程,关注关注公众号 “全栈程序员社区” 获取激活教程,可能之前旧版本教程已经失效.最新Idea2022.1教程亲测有效,一键激活。
Jetbrains全家桶1年46,售后保障稳定
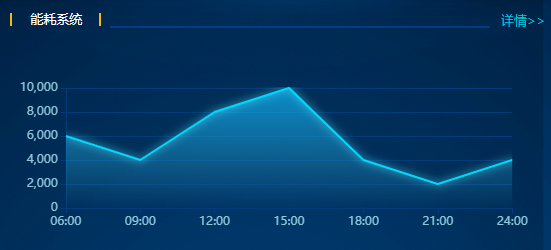

series:里面定义
折线发光高亮的效果
   lineStyle: {
              shadowColor: "#5cfbff", //透明的颜色
              shadowOffsetX: 0,
              shadowOffsetY: 0,
              opacity: 1, //透明度
              shadowBlur: 8, //阴影大小
              type: "solid", //实线
              width: 2,
            },
网格颜色的渐变
   areaStyle: {
              normal: {
                //前四个参数代表位置 左下右上,暗青色到亮青色,
                color: new echarts.graphic.LinearGradient(0, 0, 0, 1, [
                  { offset: 0, color: "rgba(12,180,250, 1)" }, //从上往下的渐变
                  { offset: 1, color: "rgba(63, 208, 249, 0)" },
                ]),
              },
            },
附上封住代码
<template>
  <div id="linechart" />
</template>
<script>
import echarts from "echarts";

export default {
  props: ["id"],
  data() {
    return {
      charts: "",
    };
  },
  mounted() {
    this.$nextTick(() => {
      this.initChart("linechart");
    });
  },
  methods: {
    initChart(id) {
      this.charts = echarts.init(document.getElementById(id), "blue");
      this.charts.setOption({
        color: ["#00D8FF"],
        tooltip: {
          trigger: "axis",
        },
        legend: {
          y: "bottom",
          itemGap: 30,
          itemWidth: 30,
          itemHeight: 10,
          textStyle: {
            fontSize: 13, //字体大小
            color: "rgb(142, 199, 220)", //字体颜色
          },
        },
        calculable: true,

        xAxis: [
          {
            type: "category",
            boundaryGap: false,
            data: [
              "06:00",
              "09:00",
              "12:00",
              "15:00",
              "18:00",
              "21:00",
              "24:00",
            ],
            axisLabel: {
              show: true,
              textStyle: {
                color: ["rgb(142, 199, 220)"],
              },
            },
            axisLine: {
              lineStyle: {
                color: "#023c7a",
                width: 1,
              },
            },
          },
        ],
        yAxis: [
          {
            type: "value",
            axisLabel: {
              formatter: "{value} °C",
            },
            splitLine: {
              lineStyle: {
                color: "#023c7a",
                width: 1,
              },
            },
            axisLine: {
              lineStyle: {
                color: "#023c7a",
                width: 1,
              },
            },
            axisLabel: {
              show: true,
              textStyle: {
                color: ["rgb(142, 199, 220)"],
              },
            },
          },
        ],
        series: [
          {
            symbolSize: 0, //折线点的大小

            type: "line",
            data: [6000, 4000, 8000, 10000, 4000, 2000, 4000, 2000, 6000],
            areaStyle: {
              normal: {
                //前四个参数代表位置 左下右上,暗青色到亮青色,
                color: new echarts.graphic.LinearGradient(0, 0, 0, 1, [
                  { offset: 0, color: "rgba(12,180,250, 1)" }, //从上往下的渐变
                  { offset: 1, color: "rgba(63, 208, 249, 0)" },
                ]),
              },
            },

            lineStyle: {
              shadowColor: "#5cfbff", //透明的颜色
              shadowOffsetX: 0,
              shadowOffsetY: 0,
              opacity: 1, //透明度
              shadowBlur: 8, //阴影大小
              type: "solid", //实线
              width: 2,
            },
          },
        ],
      });
    },
  },
};
</script>
版权声明:本文内容由互联网用户自发贡献,该文观点仅代表作者本人。本站仅提供信息存储空间服务,不拥有所有权,不承担相关法律责任。如发现本站有涉嫌侵权/违法违规的内容, 请发送邮件至 举报,一经查实,本站将立刻删除。
发布者:全栈程序员-站长,转载请注明出处:https://javaforall.net/203619.html原文链接:https://javaforall.net