
文章目录
前言
说到NIO、Netty,Reactor模型一定是绕不开的,因为这种模式架构太经典了,但是好多人在学习的时候,往往会忽视基础的学习,一上来就是Netty,各种高大上,但是却没有静下心来好好看看Netty的基石——Reactor模型。本文就带着大家看看Reactor模型,让大家对Reactor模型有个浅显而又感性的认识。
一、经典的同步阻塞模型


这是最为传统的Socket服务设计,有多个客户端连接服务端,服务端会开启很多线程,一个线程为一个客户端服务。
在绝大多数场景下,处理一个网络请求有如下几个步骤:
- read:从socket读取数据。
- decode:解码,因为网络上的数据都是以byte的形式进行传输的,要想获取真正的请求,必定需要解码。
- compute:计算,也就是业务处理,你想干啥就干啥。
- encode:编码,同理,因为网络上的数据都是以byte的形式进行传输的,也就是socket只接收byte,所以必定需要编码。
1.下面看传统的BIO代码:
public static void main(String[] args) { try { ServerSocket serverSocket = new ServerSocket(9696); Socket socket = serverSocket.accept(); new Thread(() -> { try { byte[] byteRead = new byte[1024]; socket.getInputStream().read(byteRead); String req = new String(byteRead, StandardCharsets.UTF_8);//encode // do something byte[] byteWrite = "Hello".getBytes(StandardCharsets.UTF_8);//decode socket.getOutputStream().write(byteWrite); } catch (IOException e) { e.printStackTrace(); } }).start(); } catch (IOException e) { e.printStackTrace(); } } 这个设计的问题就是:需要开启大量的线程。因为一个客户端独占一个线程
我们的目标是:
随着负载的增加可以优雅降级;
能够随着资源的改进,性能可以持续提升;
同时还要满足可用性和性能指标:
3.1 低延迟
3.2 满足高峰需求
3.3 可调节的服务质量
- 阻塞 (针对的是被调用方)
不管是等待客户端的连接,还是等待客户的数据,都是阻塞的,一夫当关,万夫莫开,不管你什么时候连接我,不管你什么时候给我数据,我都依然等着你。
让我们试想下:如果accept()、read()这两个方法都是不阻塞的,是不是传统的Socket问题就解决一半了? - 同步 (针对的是调用方)
服务端是死死的盯着客户端,看客户端有没有连接我,有没有给我发数据。
如果我可以喝着茶,打着农药,而你发了数据,连接了我,系统通知我一下,我再去处理,那该多好,这样传统的Socket问题又解决了一半。 - NIO就很好的解决了传统Socket问题:
2.client端代码:
import java.io.IOException; import java.io.InputStream; import java.net.InetSocketAddress; import java.net.Socket; import java.nio.charset.StandardCharsets; import java.util.Scanner; public class Client { public static void main(String[] args) { try { Socket socket = new Socket(); socket.connect(new InetSocketAddress("localhost", 9090)); new Thread(() -> { while (true) { try { InputStream inputStream = socket.getInputStream(); byte[] bytes = new byte[1024]; inputStream.read(bytes); System.out.println(new String(bytes, StandardCharsets.UTF_8)); } catch (Exception e) { e.printStackTrace(); } } }).start(); while (true) { Scanner scanner = new Scanner(System.in); while (scanner.hasNextLine()) { String s = scanner.nextLine(); socket.getOutputStream().write(s.getBytes()); } } } catch (IOException e) { e.printStackTrace(); } } } 3.因此,我们要引出我们今日的主角: reactor
二、单reactor单线程设计
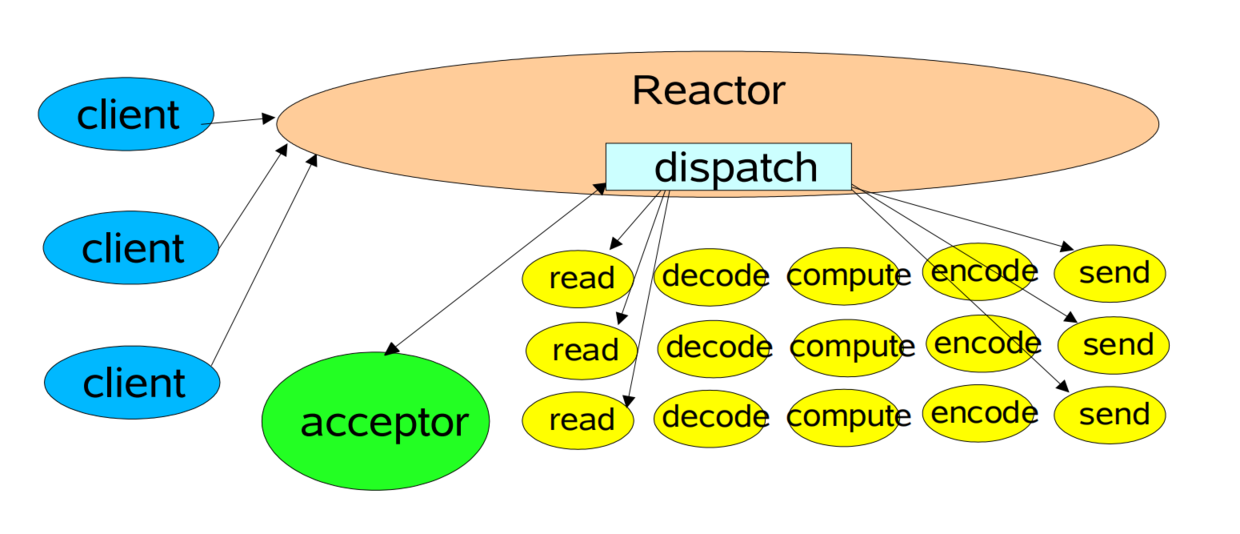
这是最简单的Reactor模型,可以看到有多个客户端连接到Reactor,Reactor内部有一个dispatch(分发器)。
有连接请求后,Reactor会通过dispatch把请求交给Acceptor进行处理,有IO读写事件之后,又会通过dispatch交给具体的Handler进行处理。
此时一个Reactor既然负责处理连接请求,又要负责处理读写请求,一般来说处理连接请求是很快的,但是处理具体的读写请求就要涉及到业务逻辑处理了,相对慢太多了。Reactor正在处理读写请求的时候,其他请求只能等着,只有等处理完了,才可以处理下一个请求。
单线程Reactor模型编程简单,比较适用于每个请求都可以快速完成的场景,但是不能发挥出多核CPU的优势,在一般情况下,不会使用单Reactor单线程模型。
代码示例
public class Main { public static void main(String[] args) { Reactor reactor = new Reactor(9090); reactor.run(); } } public class Reactor implements Runnable { ServerSocketChannel serverSocketChannel; Selector selector; public Reactor(int port) { try { serverSocketChannel = ServerSocketChannel.open(); selector = Selector.open(); serverSocketChannel.socket().bind(new InetSocketAddress(port)); serverSocketChannel.configureBlocking(false); // 注册了连接事件 SelectionKey selectionKey = serverSocketChannel.register(selector, SelectionKey.OP_ACCEPT); // 并且在selectionKey对象附加了一个Acceptor对象,这是用来处理连接请求的类 selectionKey.attach(new Acceptor(selector, serverSocketChannel)); } catch (IOException e) { e.printStackTrace(); } } @Override public void run() { while (true) { try { selector.select(); Set
selectionKeys = selector.selectedKeys(); Iterator
iterator = selectionKeys.iterator(); while (iterator.hasNext()) { SelectionKey selectionKey = iterator.next(); dispatcher(selectionKey); iterator.remove(); } } catch (IOException e) { e.printStackTrace(); } } } private void dispatcher(SelectionKey selectionKey) { Runnable runnable = (Runnable) selectionKey.attachment(); runnable.run(); } }
定义了一个Reactor类。
在构造方法中,注册了连接事件,并且在selectionKey对象附加了一个Acceptor对象,这是用来处理连接请求的类。
import java.io.IOException; import java.nio.channels.SelectionKey; import java.nio.channels.Selector; import java.nio.channels.ServerSocketChannel; import java.nio.channels.SocketChannel; public class Acceptor implements Runnable { private Selector selector; private ServerSocketChannel serverSocketChannel; public Acceptor(Selector selector, ServerSocketChannel serverSocketChannel) { this.selector = selector; this.serverSocketChannel = serverSocketChannel; } @Override public void run() { try { SocketChannel socketChannel = serverSocketChannel.accept(); System.out.println("有客户端连接上来了," + socketChannel.getRemoteAddress()); socketChannel.configureBlocking(false); SelectionKey selectionKey = socketChannel.register(selector, SelectionKey.OP_READ); selectionKey.attach(new WorkerHandlerThreadPool(socketChannel)); } catch (IOException e) { e.printStackTrace(); } } } 目前如果有事件发生,那一定是连接事件,因为在Reactor类的构造方法中只注册了连接事件,还没有注册读写事件。
发生了连接事件后,Reactor类的dispatcher方法拿到了Acceptor附加对象,调用了Acceptor的run方法,在run方法中又注册了读事件,然后在selectionKey附加了一个WorkHandler对象。
Acceptor的run方法执行完毕后,就会继续回到Reactor类中的run方法,负责监听事件。
此时,Reactor监听了两个事件,一个是连接事件,一个是读事件。
当客户端写事件发生后,Reactor又会调用dispatcher方法,此时拿到的附加对象是WorkHandler,所以又跑到了WorkHandler中的run方法。
public class WorkHandler implements Runnable { private SocketChannel socketChannel; public WorkHandler(SocketChannel socketChannel) { this.socketChannel = socketChannel; } @Override public void run() { try { ByteBuffer byteBuffer = ByteBuffer.allocate(1024); socketChannel.read(byteBuffer); String message = new String(byteBuffer.array(), StandardCharsets.UTF_8); System.out.println(socketChannel.getRemoteAddress() + "发来的消息是:" + message); //System.out.println("sleep 10s"); //Thread.sleep(10000); socketChannel.write(ByteBuffer.wrap("你的消息我收到了".getBytes(StandardCharsets.UTF_8))); } catch (IOException e) { e.printStackTrace(); } } } WorkHandler就是真正负责处理客户端写事件的了。
下面我们可以进行测试了:
有客户端连接上来了,/127.0.0.1:64571 有客户端连接上来了,/127.0.0.1:64577 /127.0.0.1:64571发来的消息是:123 /127.0.0.1:64577发来的消息是:456 /127.0.0.1:64571发来的消息是:我是第一个人 /127.0.0.1:64577发来的消息是:我是第二个人 我们知道了单Reactor单线程模型有那么多缺点,就可以有针对性的去解决了。让我们再回顾下单Reactor单线程模型有什么缺点:在处理一个客户端的请求的时候,其他请求只能等着。
那么我们只要+上多线程的概念不就可以了吗?没错,这就是单Reactor多线程模型。
三、单reactor多线程设计

可以看到,Reactor还是既要负责处理连接事件,又要负责处理客户端的写事件,不同的是,多了一个线程池的概念。
当客户端发起连接请求后,Reactor会把任务交给acceptor处理,如果客户端发起了写请求,Reactor会把任务交给线程池进行处理,这样一个服务端就可以同时为N个客户端服务了。
让我们继续敲敲键盘,实现一个单Reactor多线程模型把:
代码示例
public class Acceptor implements Runnable { private Selector selector; private ServerSocketChannel serverSocketChannel; public Acceptor(Selector selector, ServerSocketChannel serverSocketChannel) { this.selector = selector; this.serverSocketChannel = serverSocketChannel; } @Override public void run() { try { SocketChannel socketChannel = serverSocketChannel.accept(); System.out.println("有客户端连接上来了," + socketChannel.getRemoteAddress()); socketChannel.configureBlocking(false); SelectionKey selectionKey = socketChannel.register(selector, SelectionKey.OP_READ); // 修改此处就可以切换成多线程模型了 selectionKey.attach(new WorkerHandlerThreadPool(socketChannel)); } catch (IOException e) { e.printStackTrace(); } } } public class WorkerHandlerThreadPool implements Runnable { static ExecutorService pool = Executors.newFixedThreadPool(2); private SocketChannel socketChannel; public WorkerHandlerThreadPool(SocketChannel socketChannel) { this.socketChannel = socketChannel; } @Override public void run() { try { System.out.println("WorkerHandlerThreadPool thread :" + Thread.currentThread().getName()); ByteBuffer buffer = ByteBuffer.allocate(1024); socketChannel.read(buffer); pool.execute(new Process(socketChannel, buffer)); } catch (IOException e) { e.printStackTrace(); } } } public class Process implements Runnable { private SocketChannel socketChannel; private ByteBuffer byteBuffer; public Process(SocketChannel socketChannel, ByteBuffer byteBuffer) { this.byteBuffer = byteBuffer; this.socketChannel = socketChannel; } @Override public void run() { try { System.out.println("sleep 10s"); Thread.sleep(10000); System.out.println("process thread:" + Thread.currentThread().getName()); String message = new String(byteBuffer.array(), StandardCharsets.UTF_8); System.out.println(socketChannel.getRemoteAddress() + "发来的消息是:" + message); socketChannel.write(ByteBuffer.wrap("你的消息我收到了".getBytes(StandardCharsets.UTF_8))); } catch (IOException e) { e.printStackTrace(); } catch (InterruptedException e) { e.printStackTrace(); } } } 查看测试结果:
有客户端连接上来了,/127.0.0.1:64797 有客户端连接上来了,/127.0.0.1:64800 WorkerHandlerThreadPool thread :main sleep 10s process thread:pool-1-thread-1 /127.0.0.1:64797发来的消息是:I am one WorkerHandlerThreadPool thread :main sleep 10s WorkerHandlerThreadPool thread :main sleep 10s process thread:pool-1-thread-2 /127.0.0.1:64800发来的消息是:I am two process thread:pool-1-thread-1 /127.0.0.1:64797发来的消息是:hah 可以很清楚的看到acceptor、workHandler还是主线程,但是到了process就开启多线程了。
单Reactor多线程模型看起来是很不错了,但是还是有缺点:一个Reactor还是既然负责连接请求,又要负责读写请求,连接请求是很快的,而且一个客户端一般只要连接一次就可以了,但是会发生很多次写请求,如果可以有多个Reactor,其中一个Reactor负责处理连接事件,多个Reactor负责处理客户端的写事件就好了,这样更符合单一职责,所以主从Reactor模型诞生了。
四、多reactor多线程设计

这就是主从Reactor模型了,可以看到mainReactor只负责连接请求,而subReactor
只负责处理客户端的写事件。
下面来实现一个主从Reactor模型,需要注意的是,我实现的主从Reactor模型和图片上有区别。图片上是一主一从,而我实现的是一主八从,图片上一个subReactor下面开了一个线程池,而我实现的subReactor之下没有线程池,虽然有所不同,但是核心思路是一样的。
代码示例
public class Reactor implements Runnable { ServerSocketChannel serverSocketChannel; Selector selector; public Reactor(int port) { try { serverSocketChannel = ServerSocketChannel.open(); selector = Selector.open(); serverSocketChannel.socket().bind(new InetSocketAddress(port)); serverSocketChannel.configureBlocking(false); SelectionKey selectionKey = serverSocketChannel.register(selector, SelectionKey.OP_ACCEPT); selectionKey.attach(new Acceptor(serverSocketChannel)); } catch (IOException e) { e.printStackTrace(); } } @Override public void run() { while (true) { try { selector.select(); Set

       selectionKeys = selector.selectedKeys(); Iterator

        iterator = selectionKeys.iterator(); while (iterator.hasNext()) { SelectionKey selectionKey = iterator.next(); dispatcher(selectionKey); iterator.remove(); } } catch (IOException e) { e.printStackTrace(); } } } private void dispatcher(SelectionKey selectionKey) { Runnable runnable = (Runnable) selectionKey.attachment(); runnable.run(); } }
public class Acceptor implements Runnable { private ServerSocketChannel serverSocketChannel; private final int core = 8; private int index; private SubReactor[] subReactors = new SubReactor[core]; private Thread[] threads = new Thread[core]; private final Selector[] selectors = new Selector[core]; public Acceptor(ServerSocketChannel serverSocketChannel) { this.serverSocketChannel = serverSocketChannel; for (int i = 0; i < core; i++) { try { selectors[i] = Selector.open(); } catch (IOException e) { e.printStackTrace(); } subReactors[i] = new SubReactor(selectors[i]); threads[i] = new Thread(subReactors[i]); threads[i].start(); } } @Override public void run() { try { System.out.println("acceptor thread:" + Thread.currentThread().getName()); SocketChannel socketChannel = serverSocketChannel.accept(); System.out.println("有客户端连接上来了," + socketChannel.getRemoteAddress()); socketChannel.configureBlocking(false); selectors[index].wakeup(); SelectionKey selectionKey = socketChannel.register(selectors[index], SelectionKey.OP_READ); selectionKey.attach(new WorkerHandler(socketChannel)); if (++index == threads.length) { index = 0; } } catch (IOException e) { e.printStackTrace(); } } } public class SubReactor implements Runnable { private Selector selector; public SubReactor(Selector selector) { this.selector = selector; } @Override public void run() { while (true) { try { selector.select(); System.out.println("selector:" + selector.toString() + "thread:" + Thread.currentThread().getName()); Set
selectionKeys = selector.selectedKeys(); Iterator
iterator = selectionKeys.iterator(); while (iterator.hasNext()) { SelectionKey selectionKey = iterator.next(); dispacher(selectionKey); iterator.remove(); } } catch (IOException e) { e.printStackTrace(); } } } private void dispacher(SelectionKey selectionKey) { Runnable runnable = (Runnable) selectionKey.attachment(); runnable.run(); } }
public class WorkerHandler implements Runnable { private SocketChannel socketChannel; public WorkerHandler(SocketChannel socketChannel) { this.socketChannel = socketChannel; } @Override public void run() { try { System.out.println("workHandler thread:" + Thread.currentThread().getName()); ByteBuffer buffer = ByteBuffer.allocate(1024); socketChannel.read(buffer); String message = new String(buffer.array(), StandardCharsets.UTF_8); System.out.println(socketChannel.getRemoteAddress() + "发来的消息:" + message); socketChannel.write(ByteBuffer.wrap("你的消息我收到了".getBytes(StandardCharsets.UTF_8))); } catch (IOException e) { e.printStackTrace(); } } } 查看结果:
acceptor thread:main 有客户端连接上来了,/127.0.0.1:65194 selector:sun.nio.ch.KQueueSelectorImpl@5athread:Thread-0 selector:sun.nio.ch.KQueueSelectorImpl@5athread:Thread-0 workHandler thread:Thread-0 /127.0.0.1:65194发来的消息:123 acceptor thread:main 有客户端连接上来了,/127.0.0.1:65202 selector:sun.nio.ch.KQueueSelectorImpl@59887d72thread:Thread-1 selector:sun.nio.ch.KQueueSelectorImpl@59887d72thread:Thread-1 workHandler thread:Thread-1 /127.0.0.1:65202发来的消息:444 可以很清楚的看到,从始至终,acceptor都只有一个main线程,而负责处理客户端写请求的是不同的线程,而且还是不同的reactor、selector。
五、Reactor模型结构图

- Synchronous Event Demultiplexer:同步事件分离器,用于监听各种事件,调用方调用监听方法的时候会被阻塞,直到有事件发生,才会返回。对于Linux来说,同步事件分离器指的就是IO多路复用模型,比如epoll,poll 等, 对于Java NIO来说, 同步事件分离器对应的组件就是selector,对应的阻塞方法就是select。
- Handler:本质上是文件描述符,是一个抽象的概念,可以简单的理解为一个一个事件,该事件可以来自于外部,比如客户端连接事件,客户端的写事件等等,也可以是内部的事件,比如操作系统产生的定时器事件等等。
- Event Handler:事件处理器,本质上是回调方法,当有事件发生后,框架会根据Handler调用对应的回调方法,在大多数情况下,是虚函数,需要用户自己实现接口,实现具体的方法。
- Concrete Event Handler: 具体的事件处理器,是Event Handler的具体实现。
- Initiation Dispatcher:初始分发器,实际上就是Reactor角色,提供了一系列方法,对Event Handler进行注册和移除;还会调用Synchronous Event Demultiplexer监听各种事件;当有事件发生后,还要调用对应的Event Handler。
总结
这里就结束了对reactor的多种模式的总结
转载自:https://blog.csdn.net/a/article/details/
发布者:全栈程序员-站长,转载请注明出处:https://javaforall.net/203794.html原文链接:https://javaforall.net


