
本章通过先总体介绍UICollectionView及其常用方法,再结合一个实例,了解如何使用UICollectionView。
UICollectionView 和 UICollectionViewController 类是iOS6 新引进的API,用于展示集合视图,布局更加灵活,可实现多列布局,用法类似于UITableView 和 UITableViewController 类。
使用UICollectionView 必须实现UICollectionViewDataSource,UICollectionViewDelegate,UICollectionViewDelegateFlowLayout这三个协议。
下面先给出常用到的一些方法。(只给出常用的,其他的可以查看相关API)
#pragma mark -- UICollectionViewDataSource //定义展示的UICollectionViewCell的个数 -(NSInteger)collectionView:(UICollectionView *)collectionView numberOfItemsInSection:(NSInteger)section { return 30; } //定义展示的Section的个数 -(NSInteger)numberOfSectionsInCollectionView:(UICollectionView *)collectionView { return 1; } //每个UICollectionView展示的内容 -(UICollectionViewCell *)collectionView:(UICollectionView *)collectionView cellForItemAtIndexPath:(NSIndexPath *)indexPath { static NSString * CellIdentifier = @"GradientCell"; UICollectionViewCell * cell = [collectionView dequeueReusableCellWithReuseIdentifier:CellIdentifier forIndexPath:indexPath]; cell.backgroundColor = [UIColor colorWithRed:((10 * indexPath.row) / 255.0) green:((20 * indexPath.row)/255.0) blue:((30 * indexPath.row)/255.0) alpha:1.0f]; return cell; } #pragma mark --UICollectionViewDelegateFlowLayout //定义每个UICollectionView 的大小 - (CGSize)collectionView:(UICollectionView *)collectionView layout:(UICollectionViewLayout*)collectionViewLayout sizeForItemAtIndexPath:(NSIndexPath *)indexPath { return CGSizeMake(96, 100); } //定义每个UICollectionView 的 margin -(UIEdgeInsets)collectionView:(UICollectionView *)collectionView layout:(UICollectionViewLayout *)collectionViewLayout insetForSectionAtIndex:(NSInteger)section { return UIEdgeInsetsMake(5, 5, 5, 5); } #pragma mark --UICollectionViewDelegate //UICollectionView被选中时调用的方法 -(void)collectionView:(UICollectionView *)collectionView didSelectItemAtIndexPath:(NSIndexPath *)indexPath { UICollectionViewCell * cell = (UICollectionViewCell *)[collectionView cellForItemAtIndexPath:indexPath]; cell.backgroundColor = [UIColor whiteColor]; } //返回这个UICollectionView是否可以被选择 -(BOOL)collectionView:(UICollectionView *)collectionView shouldSelectItemAtIndexPath:(NSIndexPath *)indexPath { return YES; }下面通过一个例子具体介绍下。(例子来自网络。但是是通过第三方获得的,无法取得链接。还望见谅。)
iOS CollectionView的出现是一大福利,再也不用用TableView来定义复杂的多栏表格了,用法与Table类似,只是Cell必须自己添加,无默认模式
由于CollectionView没有默认的Cell布局,所以一般还是自定义方便又快捷
一、自定义Cell
1、新建类CollectionCell继承自UICollectionViewCell
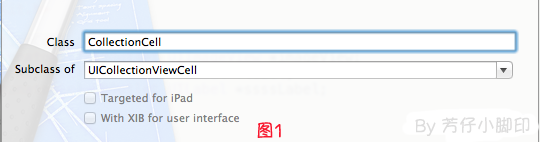
2、新建Xib,命名为CollectionCell.xib

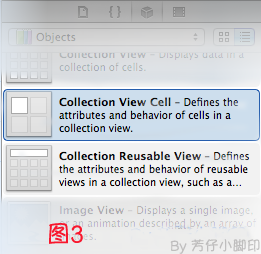
a.选中CollectionCell.xib删掉默认的View,从控件中拖一个Collection View Cell(图3)到画布中,设置大小为95*116;
b.选中刚刚添加的Cell,更改类名为CollectionCell,如图4

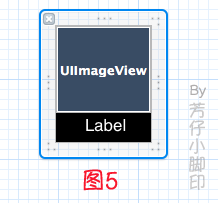
c.在CollectionCell.xib的CollectionCell中添加一个ImageView和一个Label(图5)
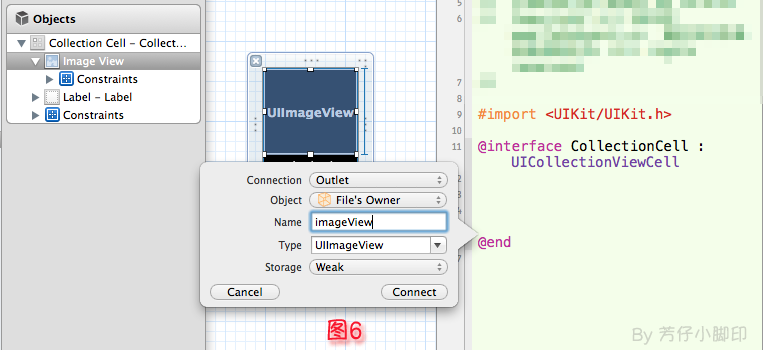
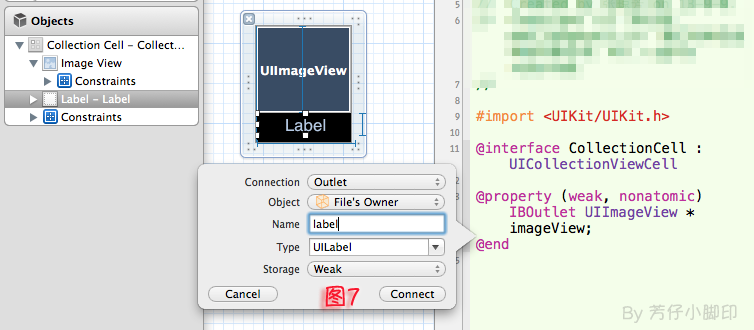
d.创建映射, 图6,图7
e.选中CollectionCell.m , 重写init方法
- (id)initWithFrame:(CGRect)frame { self = [super initWithFrame:frame]; if (self) { // 初始化时加载collectionCell.xib文件 NSArray *arrayOfViews = [[NSBundle mainBundle] loadNibNamed:@"CollectionCell" owner:self options:nil]; // 如果路径不存在,return nil if (arrayOfViews.count < 1) { return nil; } // 如果xib中view不属于UICollectionViewCell类,return nil if (![[arrayOfViews objectAtIndex:0] isKindOfClass:[UICollectionViewCell class]]) { return nil; } // 加载nib self = [arrayOfViews objectAtIndex:0]; } return self; }f.选中CollectionCell.xib 修改其identifier为CollectionCell。
1、拖动一个Collection View到指定ViewController的View上
2、连线dataSource和delegate,并创建映射,命名为CollectionView
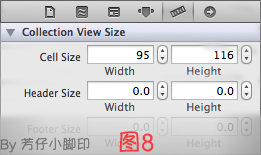
3、选中CollectionView的标尺,将Cell Size的Width和Height改成与自定义的Cell一样的95*116,图8
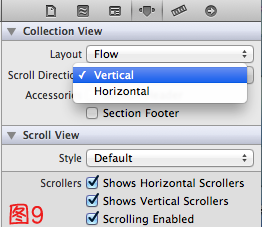
4、选中CollectionView的属性,可以修改其属性,比如是垂直滑动,还是水平滑动,选择Vertical或Horizontal
5、选中CollectionViewCell,修改Class,继承自CollectionCell
5、在ViewDidLoad方法中声明Cell的类,在ViewDidLoad方法中添加,此句不声明,将无法加载,程序崩溃
其中,CollectionCell是这个Cell的标识(之前几步已经定义过了。 )
[self.collectionView registerClass:[CollectionCell class] forCellWithReuseIdentifier:@"CollectionCell"];6、在ViewController.h中声明代理
@interface ViewController : UIViewController
7、在.m文件中实现代理方法
//每个section的item个数 -(NSInteger)collectionView:(UICollectionView *)collectionView numberOfItemsInSection:(NSInteger)section { return 12; } -(UICollectionViewCell *)collectionView:(UICollectionView *)collectionView cellForItemAtIndexPath:(NSIndexPath *)indexPath { CollectionCell *cell = (CollectionCell *)[collectionView dequeueReusableCellWithReuseIdentifier:@"CollectionCell" forIndexPath:indexPath]; //图片名称 NSString *imageToLoad = [NSString stringWithFormat:@"%d.png", indexPath.row]; //加载图片 cell.imageView.image = [UIImage imageNamed:imageToLoad]; //设置label文字 cell.label.text = [NSString stringWithFormat:@"{%ld,%ld}",(long)indexPath.row,(long)indexPath.section]; return cell; }8 。效果如图10

点击某项后跳转事件与UITableView类似,实现代理方法
-(void)collectionView:(UICollectionView *)collectionView didSelectItemAtIndexPath:(NSIndexPath *)indexPath
即可,不赘述
学习的路上,与君共勉。
发布者:全栈程序员-站长,转载请注明出处:https://javaforall.net/205106.html原文链接:https://javaforall.net


