


个人 github
BERT本质上是一个两段式的NLP模型。第一个阶段叫做:Pre-training,跟WordEmbedding类似,利用现有无标记的语料训练一个语言模型。第二个阶段叫做:Fine-tuning,利用预训练好的语言模型,完成具体的NLP下游任务。
Google已经投入了大规模的语料和昂贵的机器帮我们完成了Pre-training过程 附上中文预训练bert链接:https://pan.baidu.com/s/1pFY_VV6zbwwSuMCSE7QqJQ 提取码: auyr ,
中文预训练BERT-wwm(Pre-Trained Chinese BERT with Whole Word Masking):
| 模型简称 | 语料 | Google下载 | 讯飞云下载 |
|---|---|---|---|
BERT-wwm-ext, Chinese |
中文维基+ 通用数据[1] |
TensorFlow PyTorch |
TensorFlow(密码thGd) PyTorch(密码bJns) |
BERT-wwm, Chinese |
中文维基 | TensorFlow PyTorch |
TensorFlow(密码mva8) PyTorch(密码8fX5) |
BERT-base, ChineseGoogle |
中文维基 | Google Cloud | – |
BERT-base, Multilingual CasedGoogle |
多语种维基 | Google Cloud | – |
BERT-base, Multilingual UncasedGoogle |
多语种维基 | Google Cloud |
这里主要介绍fine-tuning过程。
回到Github中的代码,只有run_classifier.py和run_squad.py是用来做fine-tuning 的,其他可以暂时不考虑。这里使用run_classifier.py进行文本相似度(本质分类建模)。
代码解析
从主函数开始,可以发现它指定了必须的参数:
data_dir指的是我们的输入数据的文件夹路径。查看代码,不难发现,作者给出了输入数据的格式:
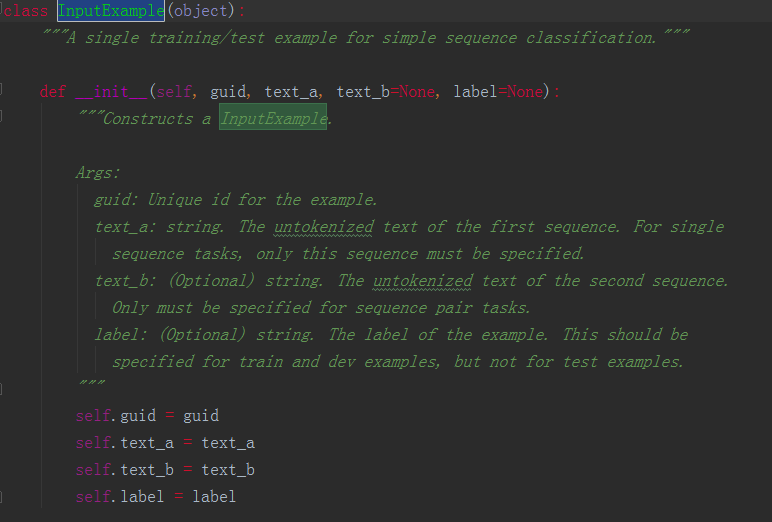
可以发现它要求的输入分别是guid, text_a, text_b, label,其中text_b和label为可选参数。例如我们要做的是单个句子的分类任务,那么就不需要输入text_b;另外,在test样本中,我们便不需要输入lable。
这里的task_name,一开始可能不好理解它是用来做什么的。仔细查看代码可以发现:
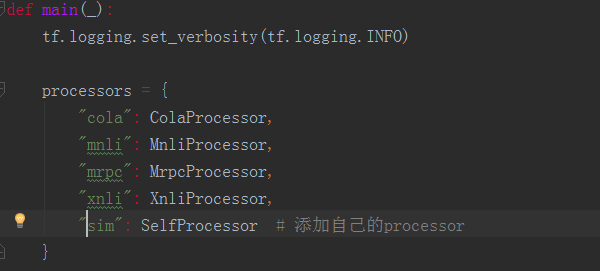
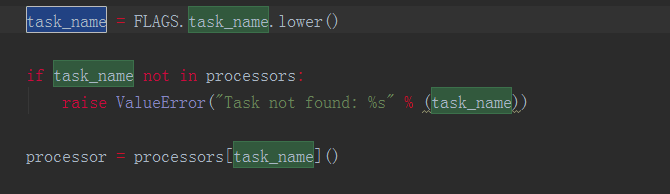
task_name是用来选择processor的。
修改 processor
任何模型的训练、预测都是需要有一个明确的输入,而BERT代码中processor就是负责对模型的输入进行处理。我们以分类任务的为例,介绍如何修改processor来运行自己数据集上的fine-tune。在run_classsifier.py文件中我们可以看到,google对于一些公开数据集已经写了一些processor,如XnliProcessor,MnliProcessor,MrpcProcessor和ColaProcessor。这给我们提供了一个很好的示例,指导我们如何针对自己的数据集来写processor。
对于一个需要执行训练、交叉验证和测试完整过程的模型而言,自定义的processor里需要继承DataProcessor,并重载获取label的get_labels和获取单个输入的get_train_examples,get_dev_examples和get_test_examples函数。其分别会在main函数的FLAGS.do_train、FLAGS.do_eval和FLAGS.do_predict阶段被调用。
这三个函数的内容是相差无几的,区别只在于需要指定各自读入文件的地址。
以get_train_examples为例,函数需要返回一个由InputExample类组成的list。InputExample类是一个很简单的类,只有初始化函数,需要传入的参数中guid是用来区分每个example的,可以按照train-%d'%(i)的方式进行定义。text_a是一串字符串,text_b则是另一串字符串。在进行后续输入处理后(BERT代码中已包含,不需要自己完成) text_a和text_b将组合成[CLS] text_a [SEP] text_b [SEP]的形式传入模型。最后一个参数label也是字符串的形式,label的内容需要保证出现在get_labels函数返回的list里。
class SelfProcessor(DataProcessor): """Processor for the CoLA data set (GLUE version).""" def get_train_examples(self, data_dir): file_path = os.path.join(data_dir, 'train.csv') with open(file_path, 'r', encoding="utf-8") as f: reader = f.readlines() examples = [] for index, line in enumerate(reader): guid = 'train-%d' % index split_line = line.strip().split("\t") print(split_line) text_a = tokenization.convert_to_unicode(split_line[1]) text_b = tokenization.convert_to_unicode(split_line[2]) label = split_line[3] examples.append(InputExample(guid=guid, text_a=text_a, text_b=text_b, label=label)) return examples def get_dev_examples(self, data_dir): file_path = os.path.join(data_dir, 'val.csv') with open(file_path, 'r', encoding="utf-8") as f: reader = f.readlines() examples = [] for index, line in enumerate(reader): guid = 'train-%d' % index split_line = line.strip().split("\t") text_a = tokenization.convert_to_unicode(split_line[1]) text_b = tokenization.convert_to_unicode(split_line[2]) label = split_line[3] examples.append(InputExample(guid=guid, text_a=text_a, text_b=text_b, label=label)) return examples def get_test_examples(self, data_dir): """See base class.""" file_path = os.path.join(data_dir, 'test.csv') with open(file_path, 'r', encoding="utf-8") as f: reader = f.readlines() examples = [] for index, line in enumerate(reader): guid = 'train-%d' % index split_line = line.strip().split("\t") text_a = tokenization.convert_to_unicode(split_line[1]) text_b = tokenization.convert_to_unicode(split_line[2]) label = split_line[3] examples.append(InputExample(guid=guid, text_a=text_a, text_b=text_b, label=label)) return examples def get_labels(self): """See base class.""" return ["0", "1"] def _create_examples(self, lines, set_type): """Creates examples for the training and dev sets.""" examples = [] for (i, line) in enumerate(lines): # Only the test set has a header if set_type == "test" and i == 0: continue guid = "%s-%s" % (set_type, i) if set_type == "test": text_a = tokenization.convert_to_unicode(line[2]) label = "0" else: text_a = tokenization.convert_to_unicode(line[2]) label = tokenization.convert_to_unicode(line[4]) examples.append( InputExample(guid=guid, text_a=text_a, text_b=None, label=label)) return examples准备好train.tsv, dev.tsv以及test.tsv
新建一个跟自己task_name对应的processor,用于将train.tsv、dev.tsv以及test.tsv中的数据提取出来赋给text_a, text_b, label
下载好Pre-training模型,设定好相关参数,run。

运行 fine-tune
之后就可以直接运行run_classsifier.py进行模型的训练。在运行时需要制定一些参数,一个较为完整的运行参数如下所示:
export BERT_BASE_DIR=/path/to/bert/chinese_L-12_H-768_A-12 #全局变量 下载的预训练bert地址 export MY_DATASET=/path/to/xnli #全局变量 数据集所在地址 python run_classifier.py --task_name=sim #自己添加processor在processors字典里的key名 --do_train=true --do_eval=true --dopredict=true --data_dir=$MY_DATASET 训练数据路径 --vocab_file=$BERT_BASE_DIR/vocab.txt --bert_config_file=$BERT_BASE_DIR/bert_config.json --init_checkpoint=$BERT_BASE_DIR/bert_model.ckpt --max_seq_length=128 #语句长度 --train_batch_size=32 --learning_rate=5e-5 --num_train_epochs=2.0 --output_dir=./sim_output/ #模型输出路径BERT 源代码(其他)
我们还可以发现,在create_model的函数里,除了从modeling.py获取模型主干输出之外,还有进行fine-tune时候的loss计算。因此,如果对于fine-tune的结构有自定义的要求,可以在这部分对代码进行修改。如进行NER任务的时候,可以按照BERT论文里的方式,不只读第一位的logits,而是将每一位logits进行读取。
BERT这次开源的代码,由于是考虑在google自己的TPU上高效地运行,因此采用的estimator是tf.contrib.tpu.TPUEstimator,虽然TPU的estimator同样可以在gpu和cpu上运行,但若想在gpu上更高效地做一些提升,可以考虑将其换成tf.estimator.Estimator,于此同时model_fn里一些tf.contrib.tpu.TPUEstimatorSpec也需要修改成tf.estimator.EstimatorSpec的形式,以及相关调用参数也需要做一些调整。在转换成较普通的estimator后便可以使用常用的方式对estimator进行处理,如生成用于部署的.pb文件等。
参考:
1、http://www.52nlp.cn/bert-paper-%E8%AE%BA%E6%96%87-%E6%96%87%E7%AB%A0-%E4%BB%A3%E7%A0%81%E8%B5%84%E6%BA%90%E6%B1%87%E6%80%BB
2、https://www.jianshu.com/p/aa2eff7ec5c1
3、https://juejin.im/post/5c093c04f265da611d?utm_source=gold_browser_extension
发布者:全栈程序员-站长,转载请注明出处:https://javaforall.net/205428.html原文链接:https://javaforall.net


