
Android从7.0开始引入新的OTA升级方式,A/B System Updates,这里将其叫做A/B系统,涉及的内容较多,分多篇对A/B系统的各个方面进行分析。本文为第三篇,主系统和bootloader的通信。
A/B System系列
- Android A/B System OTA分析(一)概览
- Android A/B System OTA分析(二)系统image的生成
- Android A/B System OTA分析(三)主系统和bootloader的通信
- Android A/B System OTA分析(四)系统的启动和升级
Update Engine系列
- Android Update Engine分析(一)Makefile
- Android Update Engine分析(二)Protobuf和AIDL文件
- Android Update Engine分析(三)客户端进程
- Android Update Engine分析(四)服务端进程
- Android Update Engine分析(五)服务端核心之Action机制
- Android Update Engine分析(六)服务端核心之Action详解
- Android Update Engine分析(七) DownloadAction之FileWriter
- Android Update Engine分析(八)升级包制作脚本分析
本文基于AOSP 7.1.1_r23 (NMF27D)代码进行分析。
1. 传统系统的沟通机制
传统方式中,Android主系统同bootloader和recovery系统通过存放于misc分区的bootloader_message结构进行通信。
struct bootloader_message { char command[32]; char status[32]; char recovery[768]; /* The 'recovery' field used to be 1024 bytes. It has only ever * been used to store the recovery command line, so 768 bytes * should be plenty. We carve off the last 256 bytes to store the * stage string (for multistage packages) and possible future * expansion.*/ char stage[32]; char reserved[224]; }; android系统或recovery系统根据操作更新bootloader_message的command成员,并写入misc分区;bootloader启动后读取misc分区并解析得到bootloader_message,根据command内容选择相应的操作,command可能的内容包括:"update-radio/hboot"- 指示
bootloader更新firmware
- 指示
"boot-recovery"- 指示
bootloader加载recovery系统,进入recovery mode
- 指示
2. A/B系统的沟通机制
2.1 boot_control的接口定义
A/B系统中,指定了用于通信的HAL层boot_control功能的定义,但没有指定通信数据具体的存储实现,这点有别于传统方式下AOSP定义的存储于misc分区的bootloader_message结构。
HAL层的boot_control,其定义位于文件中hardware/libhardware/include/hardware/boot_control.h:
/ * Every hardware module must have a data structure named HAL_MODULE_INFO_SYM * and the fields of this data structure must begin with hw_module_t * followed by module specific information. */ typedef struct boot_control_module { struct hw_module_t common; /* * (*init)() perform any initialization tasks needed for the HAL. * This is called only once. */ /* init 用于HAL初始化调用,仅启动时调用一次 */ void (*init)(struct boot_control_module *module); /* * (*getNumberSlots)() returns the number of available slots. * For instance, a system with a single set of partitions would return * 1, a system with A/B would return 2, A/B/C -> 3... */ /* 返回系统slot分区套数,1套slot包含boot, system和vendor分区 */ unsigned (*getNumberSlots)(struct boot_control_module *module); /* * (*getCurrentSlot)() returns the value letting the system know * whether the current slot is A or B. The meaning of A and B is * left up to the implementer. It is assumed that if the current slot * is A, then the block devices underlying B can be accessed directly * without any risk of corruption. * The returned value is always guaranteed to be strictly less than the * value returned by getNumberSlots. Slots start at 0 and * finish at getNumberSlots() - 1 */ /* 返回系统当前所在的slot位置 */ unsigned (*getCurrentSlot)(struct boot_control_module *module); /* * (*markBootSuccessful)() marks the current slot * as having booted successfully * * Returns 0 on success, -errno on error. */ /* 标记当前slot为已经成功启动 */ int (*markBootSuccessful)(struct boot_control_module *module); /* * (*setActiveBootSlot)() marks the slot passed in parameter as * the active boot slot (see getCurrentSlot for an explanation * of the "slot" parameter). This overrides any previous call to * setSlotAsUnbootable. * Returns 0 on success, -errno on error. */ /* 标记指定slot为可启动 */ int (*setActiveBootSlot)(struct boot_control_module *module, unsigned slot); /* * (*setSlotAsUnbootable)() marks the slot passed in parameter as * an unbootable. This can be used while updating the contents of the slot's * partitions, so that the system will not attempt to boot a known bad set up. * Returns 0 on success, -errno on error. */ /* 标记指定slot为不可启动 */ int (*setSlotAsUnbootable)(struct boot_control_module *module, unsigned slot); /* * (*isSlotBootable)() returns if the slot passed in parameter is * bootable. Note that slots can be made unbootable by both the * bootloader and by the OS using setSlotAsUnbootable. * Returns 1 if the slot is bootable, 0 if it's not, and -errno on * error. */ /* 返回指定slot是否可启动 */ int (*isSlotBootable)(struct boot_control_module *module, unsigned slot); /* * (*getSuffix)() returns the string suffix used by partitions that * correspond to the slot number passed in parameter. The returned string * is expected to be statically allocated and not need to be freed. * Returns NULL if slot does not match an existing slot. */ /* 返回指定slot的系统分区后缀,例如“_a”/“_b”等 */ const char* (*getSuffix)(struct boot_control_module *module, unsigned slot); /* * (*isSlotMarkedSucessful)() returns if the slot passed in parameter has * been marked as successful using markBootSuccessful. * Returns 1 if the slot has been marked as successful, 0 if it's * not the case, and -errno on error. */ /* 返回指定slot是否已经标记为成功启动 */ int (*isSlotMarkedSuccessful)(struct boot_control_module *module, unsigned slot); void* reserved[31]; } boot_control_module_t; 2.2 boot_control的存储和功能实现
对于boot_control,AOSP仅定义了其功能接口,并没有提供具体的代码实现,各厂家根据这个头文件,自定义其存储和功能实现。
使用grep工具搜索代码中的boot_control关键字,可以发现AOSP代码里面包含了三个平台的boot_control实现:
Google平台的BrilloIntel平台的edisonQualComm
2.2.1 Google平台Brillo的实现
AOSP代码中,system\extra\boot_control_copy 定义了bootctrl.default实现:
$ ls -lh system/extras/boot_control_copy/ total 36K -rw-r--r-- 1 ygu users 458 Mar 31 08:50 Android.mk -rw-r--r-- 1 ygu users 11K Mar 31 08:50 NOTICE -rw-r--r-- 1 ygu users 7.7K Mar 31 08:50 boot_control_copy.c -rw-r--r-- 1 ygu users 5.1K Mar 31 08:50 bootinfo.c -rw-r--r-- 1 ygu users 2.0K Mar 31 08:50 bootinfo.h 各文件的内容如下:
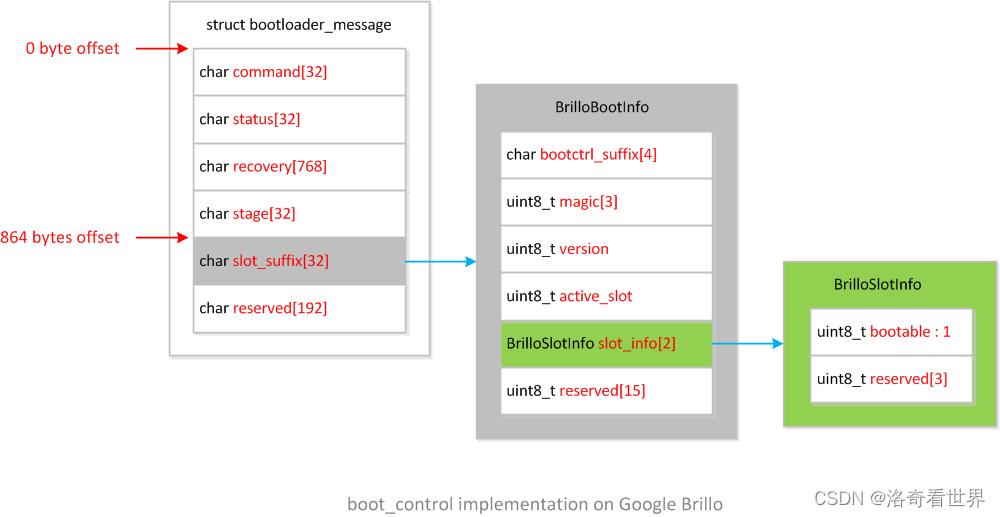
bootinfo.h定义了结构体BrilloSlotInfo和BrilloBootInfoBrilloBootInfo包含结构体BrilloBootInfo,作为boot_control的私有数据实现,定义如下:typedef struct BrilloSlotInfo { uint8_t bootable : 1; uint8_t reserved[3]; } BrilloSlotInfo; typedef struct BrilloBootInfo { // Used by fs_mgr. Must be NUL terminated. char bootctrl_suffix[4]; // Magic for identification - must be 'B', 'C', 'c' (short for // "boot_control copy" implementation). uint8_t magic[3]; // Version of BrilloBootInfo struct, must be 0 or larger. uint8_t version; // Currently active slot. uint8_t active_slot; // Information about each slot. BrilloSlotInfo slot_info[2]; uint8_t reserved[15]; } BrilloBootInfo;结构体
BrilloBootInfo占用32字节,系统复用misc分区的bootloader_message结构体,将BrilloBootInfo存放在偏移量为864字节的成员slot_suffix[32]中,整个misc分区数据结构的框图如下:

bootinfo.c实现了对BrilloBootInfo进行存取操作的接口- 存取操作
bool boot_info_load(BrilloBootInfo *out_info)bool boot_info_save(BrilloBootInfo *info)
- 校验和复位操作
bool boot_info_validate(BrilloBootInfo* info)void boot_info_reset(BrilloBootInfo* info)
- 指定分区的打开操作
int boot_info_open_partition(const char *name, uint64_t *out_size, int flags)
- 存取操作
boot_control_copy.c实现了boot_control模块的功能/* This boot_control HAL implementation emulates A/B by copying the * contents of the boot partition of the requested slot to the boot * partition. It hence works with bootloaders that are not yet aware * of A/B. This code is only intended to be used for development. */ boot_control_module_t HAL_MODULE_INFO_SYM = { .common = { .tag = HARDWARE_MODULE_TAG, .module_api_version = BOOT_CONTROL_MODULE_API_VERSION_0_1, .hal_api_version = HARDWARE_HAL_API_VERSION, .id = BOOT_CONTROL_HARDWARE_MODULE_ID, .name = "Copy Implementation of boot_control HAL", .author = "The Android Open Source Project", .methods = &module_methods, }, .init = module_init, .getNumberSlots = module_getNumberSlots, .getCurrentSlot = module_getCurrentSlot, .markBootSuccessful = module_markBootSuccessful, .setActiveBootSlot = module_setActiveBootSlot, .setSlotAsUnbootable = module_setSlotAsUnbootable, .isSlotBootable = module_isSlotBootable, .getSuffix = module_getSuffix, };
代码实现了boot_control_module_t模块接口的功能,这里不再对每一个函数实现进行注释,但需要特别指出的是,函数module_setActiveBootSlot内部会根据传入的slot参数将对应分区boot_X内容复制到boot分区(系统上应该存在三个分区,如boot,boot_a和boot_b),bootloader不需要改动代码去检查到底是从哪个分区启动,只管加载boot分区就好了,带来的问题就是,一旦启动失败(例如,kernel挂载system分区失败,根本没有进入Android环境),bootloader无法切换到另外一个slot。注释中也提到,这种方式不需要修改bootloader,其代码实现只是用于开发目的,最终产品不应该是这样的。
2.2.2 Intel平台edison的实现
AOSP代码中,hardware\bsp\intel\soc\common\bootctrl定义了bootctrl.edison的实现:
$ ls -lh hardware/bsp/intel/soc/common/bootctrl/ total 20K -rw-r--r-- 1 ygu users 860 Mar 31 08:47 Android.mk -rw-r--r-- 1 ygu users 9.1K Mar 31 08:47 bootctrl.c -rw-r--r-- 1 ygu users 1.5K Mar 31 08:47 bootctrl.h 各文件的内容如下:
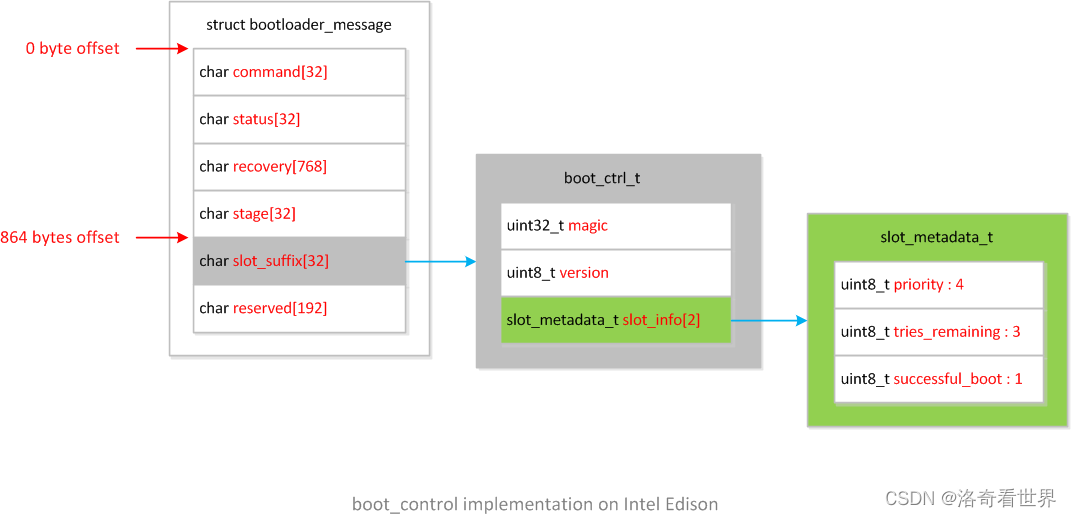
bootctrl.h定义了结构体slot_metadata_t和boot_ctrl_tboot_ctrl_t包含结构体slot_metadata_t,作为boot_control的私有数据实现,定义如下:#define BOOT_CONTROL_VERSION 1 typedef struct slot_metadata { uint8_t priority : 4; uint8_t tries_remaining : 3; uint8_t successful_boot : 1; } slot_metadata_t; typedef struct boot_ctrl { /* Magic for identification - '\0ABB' (Boot Contrl Magic) */ uint32_t magic; /* Version of struct. */ uint8_t version; /* Information about each slot. */ slot_metadata_t slot_info[2]; uint8_t recovery_tries_remaining; } boot_ctrl_t;跟
Brillo类似,系统复用misc分区的bootloader_message结构体,将boot_ctrl_t存放在偏移量为864字节的成员slot_suffix[32]中,整个misc分区数据结构的框图如下:
bootctrl.c实现了boot_ctrl_t存取操作和boot_control的模块功能-
int bootctrl_read_metadata(boot_ctrl_t *bctrl)int bootctrl_write_metadata(boot_ctrl_t *bctrl)
boot_control模块功能/* Boot Control Module implementation */ boot_control_module_t HAL_MODULE_INFO_SYM = { .common = { .tag = HARDWARE_MODULE_TAG, .module_api_version = BOOT_CONTROL_MODULE_API_VERSION_0_1, .hal_api_version = HARDWARE_HAL_API_VERSION, .id = BOOT_CONTROL_HARDWARE_MODULE_ID, .name = "boot_control HAL", .author = "Intel Corporation", .methods = &bootctrl_methods, }, .init = bootctrl_init, .getNumberSlots = bootctrl_get_number_slots, .getCurrentSlot = bootctrl_get_current_slot, .markBootSuccessful = bootctrl_mark_boot_successful, .setActiveBootSlot = bootctrl_set_active_boot_slot, .setSlotAsUnbootable = bootctrl_set_slot_as_unbootable, .isSlotBootable = bootctrl_is_slot_bootable, .getSuffix = bootctrl_get_suffix, };
boot_ctrl_t存取操作-
由于没有bootloader的代码,所以对于如何通过结构体slot_metadata_t的成员priority和priority来选择启动哪一个slot并不清楚,无法对结构体成员的作用有更详细的说明。
值得一提的是,通过读取linux命令行参数androidboot.slot_suffix=来确定当前系统在哪一个slot上运行(见bootctrl_get_active_slot函数)。
2.2.3 QualComm平台的实现
AOSP代码中,hardware\qcom\bootctrl定义了bootctrl.$(TARGET_BOARD_PLATFORM)的实现(具体名字依赖于TARGET_BOARD_PLATFORM变量设定):
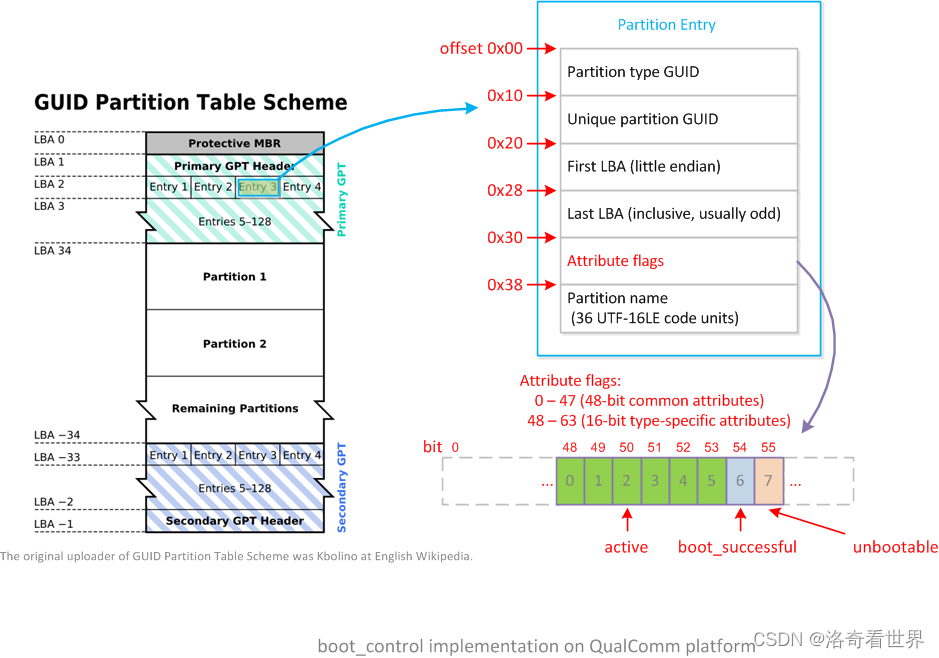
$ ls -lh hardware/qcom/bootctrl/ total 28K -rw-r--r-- 1 ygu users 944 Mar 31 08:47 Android.mk -rw-r--r-- 1 ygu users 1.5K Mar 31 08:47 NOTICE -rw-r--r-- 1 ygu users 19K Mar 31 08:47 boot_control.cpp QualComm平台的实现比较特别,没有单独定义boot_control的私有数据,而是将A/B系统相关信息存放到gpt表上。
从GPT内容的第3个逻辑块LBA 2开始,依次存放的是每个GPT分区的详细信息Partition Entry,单个Partition Entry占用128个字节,从其第48个字节开始存放的是分区属性(Attribute flags)。A/B系统将每个slot分区的信息,存放到分区属性的Bit 48开始的位置上。
QualComm平台详细的A/B系统分区属性如下:
关于
GPT分区的详细信息,可以参考另外一篇文章:< <博通机顶盒平台gpt分区和制作工具>
>的第1部分,关于GPT的介绍。
在代码实现中比较特别的是:
- 统计系统中
boot开头的分区数作为slot总数(见get_number_slots函数) - 访问系统的属性
ro.boot.slot_suffix来确定当前系统在哪一个slot上运行(见get_current_slot函数)
2.3.4 Broadcom机顶盒平台的实现
在Broadcom单独提供的代码中(非AOSP代码),vendor/broadcom/bcm_platform/hals/boot_control定义了bootctrl.$(TARGET_BOARD_PLATFORM)的实现(如bootctrl.bcm7252ssffdr4):
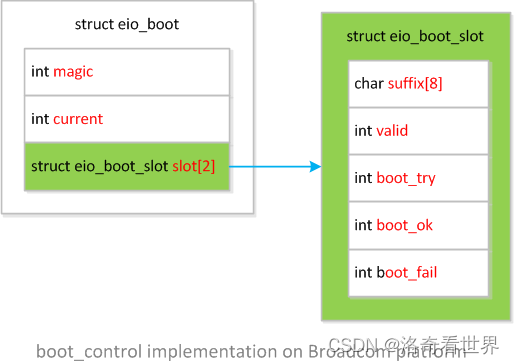
$ ls -lh vendor/broadcom/bcm_platform/hals/boot_control/ total 20K -rw-r--r-- 1 ygu users 1.3K Mar 30 16:09 Android.mk -rw-r--r-- 1 ygu users 11K May 6 16:26 boot_control.cpp -rw-r--r-- 1 ygu users 1.1K Mar 30 16:09 eio_boot.h eio_boot.h定义了结构体eio_boot_slot和eio_booteio_boot包含结构体eio_boot_slot,作为boot_control的私有数据实现,定义如下:struct eio_boot_slot { char suffix[8]; int valid; int boot_try; int boot_ok; int boot_fail; }; struct eio_boot { int magic; int current; struct eio_boot_slot slot[2]; };结构体
eio_boot的数据存放在名为eio的分区上。
Broadcom机顶盒平台eio_boot结构框图如下:
boot_control.cpp实现了eio_boot存取操作和boot_control的模块功能struct boot_control_module HAL_MODULE_INFO_SYM = { .common = { .tag = HARDWARE_MODULE_TAG, .module_api_version = BOOT_CONTROL_MODULE_API_VERSION_0_1, .hal_api_version = HARDWARE_HAL_API_VERSION, .id = BOOT_CONTROL_HARDWARE_MODULE_ID, .name = "boot control hal for bcm platform", .author = "Broadcom", .methods = &boot_control_module_methods, .dso = 0, .reserved = {0} }, .init = init, .getNumberSlots = getNumberSlots, .getCurrentSlot = getCurrentSlot, .markBootSuccessful = markBootSuccessful, .setActiveBootSlot = setActiveBootSlot, .setSlotAsUnbootable = setSlotAsUnbootable, .isSlotBootable = isSlotBootable, .getSuffix = getSuffix, .isSlotMarkedSuccessful = isSlotMarkedSuccessful, };Broadcom平台的分区后缀名不同于常见的_a/_b,而是采用_i/_e,这里略去对函数内容的注释。
2.3 boot_control的测试工具
除了定义HAL层的接口外,AOSP也提供了boot_control模块调用的工具bootctl,位于:
system/extras/bootctl/bootctl.c
默认情况下,bootctl不会参与编译,可以在包含update_engine是将其添加到PRODUCT_PACKAGES,如下:
PRODUCT_PACKAGES += \ update_engine \ update_verifier \ bootctl bootctl工具很简单,通过命令行调用boot_control的功能接口,以下是在Broadcom参考平台上运行bootctl的例子:
bcm7252ssffdr4:/ $ su bcm7252ssffdr4:/ # which bootctl /system/bin/bootctl bcm7252ssffdr4:/ # bootctl --help bootctl - command-line wrapper for the boot_control HAL. Usage: bootctl COMMAND Commands: bootctl hal-info - Show info about boot_control HAL used. bootctl get-number-slots - Prints number of slots. bootctl get-current-slot - Prints currently running SLOT. bootctl mark-boot-successful - Mark current slot as GOOD. bootctl set-active-boot-slot SLOT - On next boot, load and execute SLOT. bootctl set-slot-as-unbootable SLOT - Mark SLOT as invalid. bootctl is-slot-bootable SLOT - Returns 0 only if SLOT is bootable. bootctl is-slot-marked-successful SLOT - Returns 0 only if SLOT is marked GOOD. bootctl get-suffix SLOT - Prints suffix for SLOT. SLOT parameter is the zero-based slot-number. 64|bcm7252ssffdr4:/ # 64|bcm7252ssffdr4:/ # bootctl hal-info HAL name: boot control hal for bcm platform HAL author: Broadcom HAL module version: 0.1 bcm7252ssffdr4:/ # bootctl get-number-slots 2 bcm7252ssffdr4:/ # bootctl get-current-slot 0 bcm7252ssffdr4:/ # bootctl get-suffix 0 _i bcm7252ssffdr4:/ # bootctl get-suffix 1 _e 最后的bootctl get-suffix调用可以看到,在我的测试平台上,slot A和slot B的分区命名后缀分别为_i和_e。
基于bootctl的基础上,Android系统提供了两个基于Brillo平台的测试代码,分别位于以下路径:
system/extras/tests/bootloaderexternal/autotest/server/site_tests/brillo_BootLoader
后续打算写一篇博客来单独介绍如何在Android下运行这些测试例子进行单元测试。
2.4 boot_control的调用
2.4.1 bootloader读取boot_control私有实现的数据
设备启动后bootloader会读取boot_control私有实现的数据,来判断从哪一个slot启动,由于各家实现的私有数据结构不一样,所以无法详细说明如何解析和处理的过程。
2.4.1 boot_control_android调用boot_control
文件system/update_engine/boot_control_android.cc中,类BootControlAndroid有一个私有成员module_:
// The Android implementation of the BootControlInterface. This implementation // uses the libhardware's boot_control HAL to access the bootloader. class BootControlAndroid : public BootControlInterface { ... private: // NOTE: There is no way to release/unload HAL implementations so // this is essentially leaked on object destruction. boot_control_module_t* module_; ... }; 在BootControlAndroid的Init方法内,获取boot_control_module_t模块指针并赋值给module_成员,然后调用module_->init进行boot_control的初始化,如下:
bool BootControlAndroid::Init() { const hw_module_t* hw_module; int ret; #ifdef _UE_SIDELOAD // For update_engine_sideload, we simulate the hw_get_module() by accessing it // from the current process directly. # 对于update_engine_sideload应用,直接将HAL_MODULE_INFO_SYM转换为hw_module hw_module = &HAL_MODULE_INFO_SYM; ret = 0; if (!hw_module || strcmp(BOOT_CONTROL_HARDWARE_MODULE_ID, hw_module->id) != 0) { ret = -EINVAL; } #else // !_UE_SIDELOAD # 对于update_engine应用,通过BOOT_CONTROL_HARDWARE_MODULE_ID获取hw_module ret = hw_get_module(BOOT_CONTROL_HARDWARE_MODULE_ID, &hw_module); #endif // _UE_SIDELOAD if (ret != 0) { LOG(ERROR) << "Error loading boot_control HAL implementation."; return false; } # 通过hw_module得到boot_control_module_t,从而后面可以愉快地调用其各种功能实现函数 module_ = reinterpret_cast

    (const_cast

     (hw_module)); # 调用boot_control的init函数 module_->init(module_); LOG(INFO) << "Loaded boot_control HAL " << "'" << hw_module->name << "' " << "version " << (hw_module->module_api_version>>8) << "." << (hw_module->module_api_version&0xff) << " " << "authored by '" << hw_module->author << "'."; return true; }
初始化完成后,就可以通过module_成员来调用各种boot_control的操作了。
2.4.2 update_verifier调用boot_control
文件bootable/recovery/update_verifier/update_verifier.cpp中,获取boot_control_module_t指针,检查当前slot分区是否已经标记为successful,如果没有,则尝试verify_image并将当前slot标记为successful,具体代码如下:
int main(int argc, char argv) { ... # 直接根据名称"bootctrl"获取模块 const hw_module_t* hw_module; if (hw_get_module("bootctrl", &hw_module) != 0) { SLOGE("Error getting bootctrl module.\n"); return -1; } # 将"bootctrl"模块转化为"boot_control_module_t"结构体 boot_control_module_t* module = reinterpret_cast

    ( const_cast

     (hw_module)); # 调用init module->init(module); # 获取当前slot unsigned current_slot = module->getCurrentSlot(module); # 检查当前slot是否标记为successful int is_successful= module->isSlotMarkedSuccessful(module, current_slot); SLOGI("Booting slot %u: isSlotMarkedSuccessful=%d\n", current_slot, is_successful); # 如果当前slot没有标记为successful,说明当前启动可能存在问题 if (is_successful == 0) { // The current slot has not booted successfully. # 检查"ro.boot.verifymode",是否其它原因导致失败 # 不是其它原因导致失败的情况下,重新调用verify_image验证 ... # verify_image验证成功,尝试标记当前slot为successful int ret = module->markBootSuccessful(module); if (ret != 0) { SLOGE("Error marking booted successfully: %s\n", strerror(-ret)); return -1; } SLOGI("Marked slot %u as booted successfully.\n", current_slot); } # 完成操作,退出update_verifier SLOGI("Leaving update_verifier.\n"); return 0; }
整个A/B系统中,基于boot_control的上层应用操作已经实现了,各家需要单独实现boot_control的底层操作,同时bootloader也需要配合解析boot_control的私有数据,从而选择相应的slot来启动Android系统。
3. 联系和福利
洛奇工作中常常会遇到自己不熟悉的问题,这些问题可能并不难,但因为不了解,找不到人帮忙而瞎折腾,往往导致浪费几天甚至更久的时间。
所以我组建了几个微信讨论群(记得微信我说加哪个群,如何加微信见后面),欢迎一起讨论:
- 一个密码编码学讨论组,主要讨论各种加解密,签名校验等算法,请说明加密码学讨论群。
- 一个Android OTA的讨论组,请说明加Android OTA群。
- 一个git和repo的讨论组,请说明加git和repo群。
在工作之余,洛奇尽量写一些对大家有用的东西,如果洛奇的这篇文章让您有所收获,解决了您一直以来未能解决的问题,不妨赞赏一下洛奇,这也是对洛奇付出的最大鼓励。扫下面的二维码赞赏洛奇,金额随意:

洛奇自己维护了一个公众号“洛奇看世界”,一个很佛系的公众号,不定期瞎逼逼。公号也提供个人联系方式,一些资源,说不定会有意外的收获,详细内容见公号提示。扫下方二维码关注公众号:

发布者:全栈程序员-站长,转载请注明出处:https://javaforall.net/206377.html原文链接:https://javaforall.net


