
基于卷积神经网络的手写数字识别(附数据集+完整代码+操作说明)
配置环境
使用环境:python3.8
平台:Windows10
IDE:PyCharm
1.前言
手写数字识别,作为机器视觉入门项目,无论是基于传统的OpenCV方法还是基于目前火热的深度学习、神经网络的方法都有这不错的训练效果。当然,这个项目也常常被作为大学/研究生阶段的课程实验。可惜的是,目前网络上关于手写数字识别的项目代码很多,但是普遍不完整,对于初学者提出了不小的挑战。为此,博主撰写本文,无论你是希望借此完成课程实验或者学习机器视觉,本文或许对你都有帮助。
2.问题描述
本文针对的问题为:随机在黑板上写一个数字,通过调用电脑摄像头实时检测出数字是0-9哪个数字
3.解决方案
4.实现步骤
4.1数据集选择
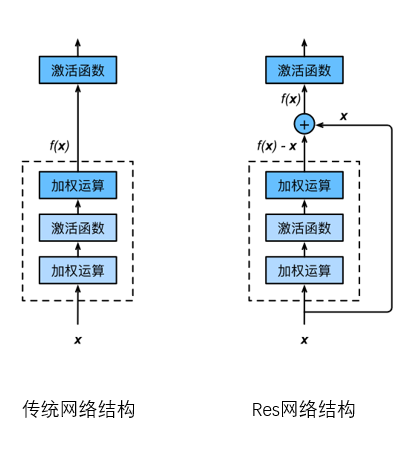
4.2构建网络
采用Resnt(残差网络),残差网络的优势在于:
- 更易捕捉模型细微波动
- 更快的收敛速度

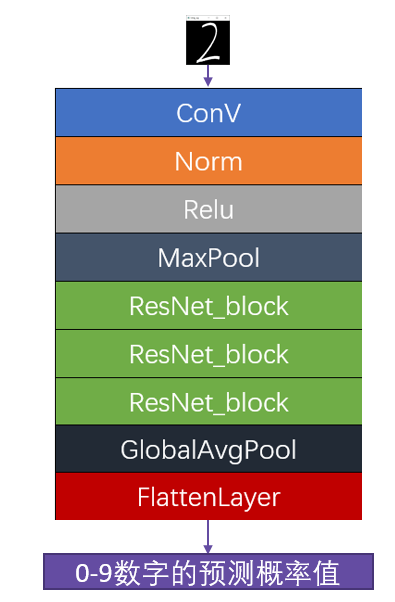
本文的网络结构如下图所示,代码见第五节:
4.3训练网络
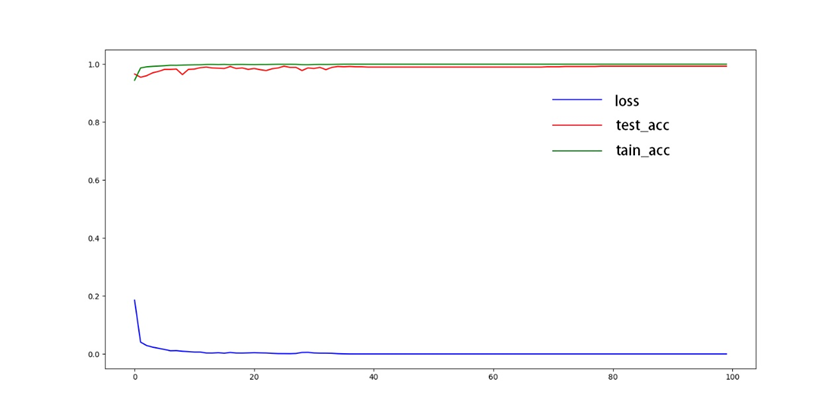
本文设置训练次数为100个循环,其实网络的训练过程是这样的:
- 给网络模型“喂”数据(图像+标签)
- 网络根据“喂”来的数据不断自我修正权重
- 本文一共“喂”100次1万张图像
- RTX2070上耗时2h
训练结果如下:
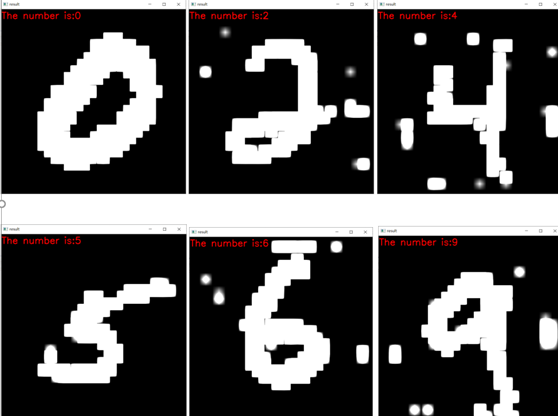
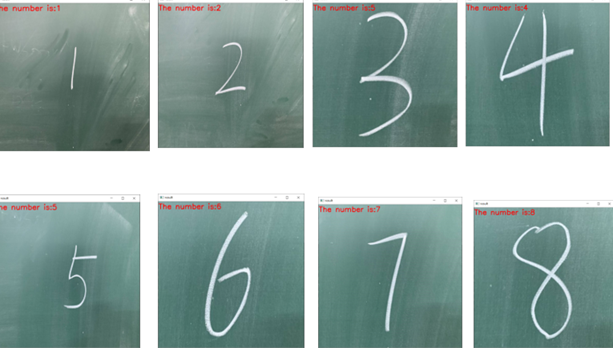
4.4测试网络
- 随机选取数据集中37张图片进行检测
- 正确率为36/37
- 选取其中6张进行展示
4.5图像预处理
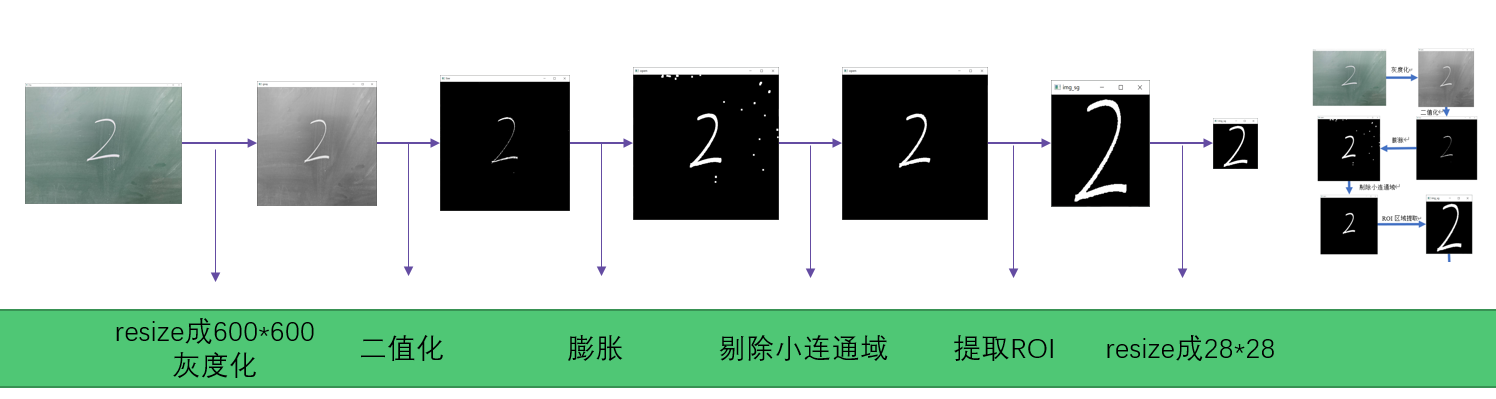
- 全部采取传统机器视觉的方法
- 速度“飞快”,仅做以上操作处理速度高达200fps
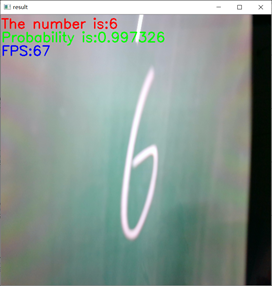
4.6传入网络进行计算
- 手写0-9的数字除了3识别不了其余均能识别
- 检测速度高达60fps
5.代码实现
5.1文件说明
- dataset文件夹存放的是训练数据集
- logs文件夹为训练结束后权重文件所在
- real_img、real_img_resize、test_imgs为用来测试的图片文件夹
- 下面的py文件为本文代码
5.2使用方法
5.3 训练模型
5.4使用训练好的模型测试网络
5.5调用摄像头实时检测
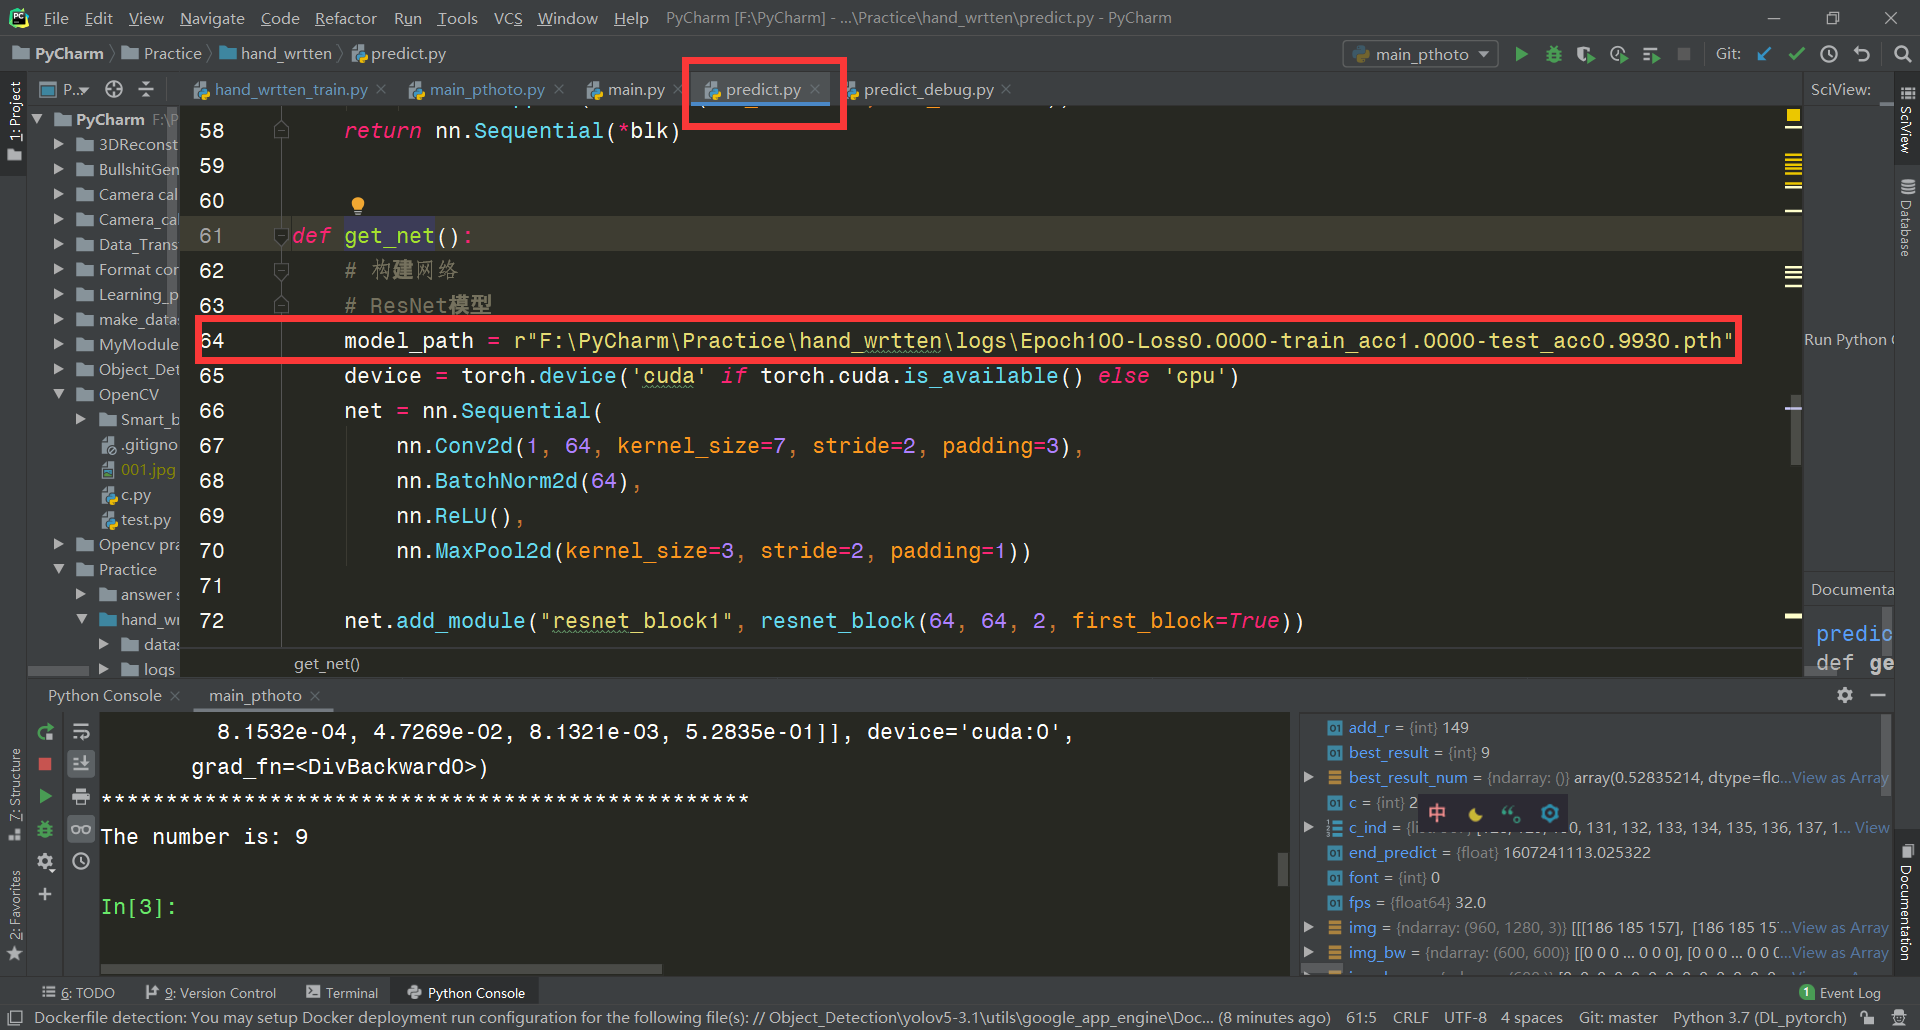
代码存在于main.py文件下,使用方法和5.4节图片检测一致,修改predict.py文件中权重片路径需要修改为自己在5.3步中训练得到的.pth文件路径,如图所示
再运行main.py文件即可,可以看到载入网络模型后开始调用摄像头,并开始检测
6.附录
# author:Hurricane # date: 2020/11/4 # E-mail: import numpy as np import struct import matplotlib.pyplot as plt import cv2 as cv import random import torch from torch import nn, optim import torch.nn.functional as F # import d2lzh_pytorch as d2l import time from tqdm import tqdm # 训练集文件 train_images_idx3_ubyte_file = 'F:/PyCharm/Practice/hand_wrtten/dataset/train-images.idx3-ubyte' # 训练集标签文件 train_labels_idx1_ubyte_file = 'F:/PyCharm/Practice/hand_wrtten/dataset/train-labels.idx1-ubyte' # 测试集文件 test_images_idx3_ubyte_file = 'F:/PyCharm/Practice/hand_wrtten/dataset/t10k-images.idx3-ubyte' # 测试集标签文件 test_labels_idx1_ubyte_file = 'F:/PyCharm/Practice/hand_wrtten/dataset/t10k-labels.idx1-ubyte' # 读取数据部分 def decode_idx3_ubyte(idx3_ubyte_file): bin_data = open(idx3_ubyte_file, 'rb').read() offset = 0 fmt_header = '>iiii' # 因为数据结构中前4行的数据类型都是32位整型,所以采用i格式,但我们需要读取前4行数据,所以需要4个i。我们后面会看到标签集中,只使用2个ii。 magic_number, num_images, num_rows, num_cols = struct.unpack_from(fmt_header, bin_data, offset) print('图片数量: %d张, 图片大小: %d*%d' % (num_images, num_rows, num_cols)) # 解析数据集 image_size = num_rows * num_cols offset += struct.calcsize(fmt_header) # 获得数据在缓存中的指针位置,从前面介绍的数据结构可以看出,读取了前4行之后,指针位置(即偏移位置offset)指向0016。 print(offset) fmt_image = '>' + str( image_size) + 'B' # 图像数据像素值的类型为unsigned char型,对应的format格式为B。这里还有加上图像大小784,是为了读取784个B格式数据,如果没有则只会读取一个值(即一副图像中的一个像素值) print(fmt_image, offset, struct.calcsize(fmt_image)) images = np.empty((num_images, 28, 28)) # plt.figure() for i in tqdm(range(num_images)): image = np.array(struct.unpack_from(fmt_image, bin_data, offset)).reshape((num_rows, num_cols)).astype(np.uint8) # images[i] = cv.resize(image, (96, 96)) images[i] = image # print(images[i]) offset += struct.calcsize(fmt_image) return images def decode_idx1_ubyte(idx1_ubyte_file): bin_data = open(idx1_ubyte_file, 'rb').read() offset = 0 fmt_header = '>ii' magic_number, num_images = struct.unpack_from(fmt_header, bin_data, offset) print('图片数量: %d张' % (num_images)) # 解析数据集 offset += struct.calcsize(fmt_header) fmt_image = '>B' labels = np.empty(num_images) for i in tqdm(range(num_images)): labels[i] = struct.unpack_from(fmt_image, bin_data, offset)[0] offset += struct.calcsize(fmt_image) return labels def load_train_images(idx_ubyte_file=train_images_idx3_ubyte_file): return decode_idx3_ubyte(idx_ubyte_file) def load_train_labels(idx_ubyte_file=train_labels_idx1_ubyte_file): return decode_idx1_ubyte(idx_ubyte_file) def load_test_images(idx_ubyte_file=test_images_idx3_ubyte_file): return decode_idx3_ubyte(idx_ubyte_file) def load_test_labels(idx_ubyte_file=test_labels_idx1_ubyte_file): return decode_idx1_ubyte(idx_ubyte_file) # 构建网络部分 class Residual(nn.Module): # 本类已保存在d2lzh_pytorch包中方便以后使用 def __init__(self, in_channels, out_channels, use_1x1conv=False, stride=1): super(Residual, self).__init__() self.conv1 = nn.Conv2d(in_channels, out_channels, kernel_size=3, padding=1, stride=stride) self.conv2 = nn.Conv2d(out_channels, out_channels, kernel_size=3, padding=1) if use_1x1conv: self.conv3 = nn.Conv2d(in_channels, out_channels, kernel_size=1, stride=stride) else: self.conv3 = None self.bn1 = nn.BatchNorm2d(out_channels) self.bn2 = nn.BatchNorm2d(out_channels) def forward(self, X): Y = F.relu(self.bn1(self.conv1(X))) Y = self.bn2(self.conv2(Y)) if self.conv3: X = self.conv3(X) return F.relu(Y + X) class GlobalAvgPool2d(nn.Module): # 全局平均池化层可通过将池化窗口形状设置成输入的高和宽实现 def __init__(self): super(GlobalAvgPool2d, self).__init__() def forward(self, x): return F.avg_pool2d(x, kernel_size=x.size()[2:]) def resnet_block(in_channels, out_channels, num_residuals, first_block=False): # num_residuals:残差数 if first_block: assert in_channels == out_channels # 第一个模块的通道数同输入通道数一致 blk = [] for i in range(num_residuals): if i == 0 and not first_block: blk.append(Residual(in_channels, out_channels, use_1x1conv=True, stride=2)) else: blk.append(Residual(out_channels, out_channels)) return nn.Sequential(*blk) def evaluate_accuracy(img, label, net): device = torch.device('cuda' if torch.cuda.is_available() else 'cpu') acc_sum, n = 0.0, 0 with torch.no_grad(): X = torch.unsqueeze(img, 1) if isinstance(net, torch.nn.Module): net.eval() # 评估模式, 这会关闭dropout acc_sum += (net(X.to(device)).argmax(dim=1) == label.to(device)).float().sum().cpu().item() net.train() # 改回训练模式 else: # 自定义的模型, 3.13节之后不会用到, 不考虑GPU if ('is_training' in net.__code__.co_varnames): # 如果有is_training这个参数 # 将is_training设置成False acc_sum += (net(X, is_training=False).argmax(dim=1) == label).float().sum().item() else: acc_sum += (net(X).argmax(dim=1) == label).float().sum().item() n += label.shape[0] return acc_sum / n class FlattenLayer(torch.nn.Module): def __init__(self): super(FlattenLayer, self).__init__() def forward(self, x): # x shape: (batch, *, *, ...) return x.view(x.shape[0], -1) if __name__ == '__main__': print("train:") train_images_org = load_train_images().astype(np.float32) train_labels_org = load_train_labels().astype(np.int64) print("test") test_images = load_test_images().astype(np.float32)[0:1000] test_labels = load_test_labels().astype(np.int64)[0:1000] # 数据转换为Tensor train_images = torch.from_numpy(train_images_org) train_labels = torch.from_numpy(train_labels_org) test_images = torch.from_numpy(test_images) test_labels = torch.from_numpy(test_labels) # test_images = load_test_images() # test_labels = load_test_labels() # 查看前十个数据及其标签以读取是否正确 for i in range(5): j = random.randint(0, 60000) print("now, show the number of image[{}]:".format(j), int(train_labels_org[j])) img = train_images_org[j] img = cv.resize(img, (600, 600)) cv.imshow("image", img) cv.waitKey(0) cv.destroyAllWindows() print('all done!') print("*" * 50) # ResNet模型 net = nn.Sequential( nn.Conv2d(1, 64, kernel_size=7, stride=2, padding=3), nn.BatchNorm2d(64), nn.ReLU(), nn.MaxPool2d(kernel_size=3, stride=2, padding=1)) net.add_module("resnet_block1", resnet_block(64, 64, 2, first_block=True)) net.add_module("resnet_block2", resnet_block(64, 128, 2)) net.add_module("resnet_block3", resnet_block(128, 256, 2)) net.add_module("global_avg_pool", GlobalAvgPool2d()) # GlobalAvgPool2d的输出: (Batch, 512, 1, 1) net.add_module("fc", nn.Sequential(FlattenLayer(), nn.Linear(256, 10))) # 测试网络 X = torch.rand((1, 1, 28, 28)) for name, layer in net.named_children(): X = layer(X) print(name, ' output shape:/t', X.shape) # 训练 device = torch.device('cuda' if torch.cuda.is_available() else 'cpu') lr, num_epochs = 0.001, 100 optimizer = torch.optim.Adam(net.parameters(), lr=lr) batch_size = 1000 net = net.to(device) print("training on ", device) loss = torch.nn.CrossEntropyLoss() loop_times = round(60000 / batch_size) train_acc_plot = [] test_acc_plot = [] loss_plot = [] for epoch in range(num_epochs): train_l_sum, train_acc_sum, n, batch_count, start = 0.0, 0.0, 0, 0, time.time() for i in tqdm(range(1, loop_times)): x = train_images[(i - 1) * batch_size:i * batch_size] y = train_labels[(i - 1) * batch_size:i * batch_size] x = torch.unsqueeze(x, 1) # 对齐维度 X = x.to(device) y = y.to(device) y_hat = net(X) l = loss(y_hat, y) optimizer.zero_grad() l.backward() optimizer.step() train_l_sum += l.cpu().item() train_acc_sum += (y_hat.argmax(dim=1) == y).sum().cpu().item() n += y.shape[0] batch_count += 1 test_acc = evaluate_accuracy(test_images, test_labels, net) print('epoch %d, loss %.4f, train acc %.3f, test acc %.3f, time %.1f sec' % (epoch + 1, train_l_sum / batch_count, train_acc_sum / n, test_acc, time.time() - start)) torch.save(net.state_dict(), 'logs/Epoch%d-Loss%.4f-train_acc%.4f-test_acc%.4f.pth' % ( (epoch + 1), train_l_sum / batch_count, train_acc_sum / n, test_acc)) print("save successfully") test_acc_plot.append(test_acc) train_acc_plot.append(train_acc_sum / n) loss_plot.append(train_l_sum / batch_count) x = range(0,100) plt.plot(x,test_acc_plot,'r') plt.plot(x, train_acc_plot, 'g') plt.plot(x, loss_plot, 'b') print("*" * 50) main_pthoto.py
# author:Hurricane # date: 2020/11/6 # E-mail: import cv2 as cv import numpy as np import os from Pre_treatment import get_number as g_n import predict as pt from time import time from Pre_treatment import softmax net = pt.get_net() orig_path = r"F:\PyCharm\Practice\hand_wrtten\real_img_resize" img_list = os.listdir(orig_path) # img_path = r'F:\PyCharm\Practice\hand_wrtten\real_img\7.jpg' for img_name in img_list: since = time() img_path = os.path.join(orig_path, img_name) img = cv.imread(img_path) img_bw = g_n(img) img_bw_c = img_bw.sum(axis=1) / 255 img_bw_r = img_bw.sum(axis=0) / 255 r_ind, c_ind = [], [] for k, r in enumerate(img_bw_r): if r >= 5: r_ind.append(k) for k, c in enumerate(img_bw_c): if c >= 5: c_ind.append(k) img_bw_sg = img_bw[ c_ind[0]:c_ind[-1],r_ind[0]:r_ind[-1]] leng_c = len(c_ind) leng_r = len(r_ind) side_len = leng_c + 20 add_r = int((side_len-leng_r)/2) img_bw_sg_bord = cv.copyMakeBorder(img_bw_sg,10,10,add_r,add_r,cv.BORDER_CONSTANT,value=[0,0,0]) # 展示图片 cv.imshow("img", img_bw) cv.imshow("img_sg", img_bw_sg_bord) c = cv.waitKey(1) & 0xff img_in = cv.resize(img_bw_sg_bord, (28, 28)) result_org = pt.predict(img_in, net) result = softmax(result_org) best_result = result.argmax(dim=1).item() best_result_num = max(max(result)).cpu().detach().numpy() if best_result_num <= 0.5: best_result = None # 显示结果 img_show = cv.resize(img, (600, 600)) end_predict = time() fps = np.ceil(1 / (end_predict - since)) font = cv.FONT_HERSHEY_SIMPLEX cv.putText(img_show, "The number is:" + str(best_result), (1, 30), font, 1, (0, 0, 255), 2) cv.putText(img_show, "Probability is:" + str(best_result_num), (1, 60), font, 1, (0, 255, 0), 2) cv.putText(img_show, "FPS:" + str(fps), (1, 90), font, 1, (255, 0, 0), 2) cv.imshow("result", img_show) cv.waitKey(1) print(result) print("*" * 50) print("The number is:", best_result) main.py
# author:Hurricane # date: 2020/11/6 # E-mail: import cv2 as cv import numpy as np import os from Pre_treatment import get_number as g_n from Pre_treatment import get_roi import predict as pt from time import time from Pre_treatment import softmax # 实时检测视频 capture = cv.VideoCapture(0,cv.CAP_DSHOW) capture.set(3, 1920) capture.set(4, 1080) net = pt.get_net() # img_path = r'F:\PyCharm\Practice\hand_wrtten\real_img\7.jpg' while (True): ret, frame = capture.read() since = time() if ret: # frame = cv.imread(img_path) img_bw = g_n(frame) img_bw_sg = get_roi(img_bw) # 展示图片 cv.imshow("img", img_bw_sg) c = cv.waitKey(1) & 0xff if c == 27: capture.release() break img_in = cv.resize(img_bw_sg, (28, 28)) result_org = pt.predict(img_in, net) result = softmax(result_org) best_result = result.argmax(dim=1).item() best_result_num = max(max(result)).cpu().detach().numpy() if best_result_num <= 0.5: best_result = None # 显示结果 img_show = cv.resize(frame, (600, 600)) end_predict = time() fps = round(1/(end_predict-since)) font = cv.FONT_HERSHEY_SIMPLEX cv.putText(img_show, "The number is:" + str(best_result), (1, 30), font, 1, (0, 0, 255), 2) cv.putText(img_show, "Probability is:" + str(best_result_num), (1, 60), font, 1, (0, 255, 0), 2) cv.putText(img_show, "FPS:" + str(fps), (1, 90), font, 1, (255, 0, 0), 2) cv.imshow("result", img_show) cv.waitKey(1) print(result) print("*" * 50) print("The number is:", best_result) else: print("please check camera!") break Pre_treatment.py
# author:Hurricane # date: 2020/11/6 # E-mail: import cv2 as cv import numpy as np import os def get_number(img): img_gray = cv.cvtColor(img, cv.COLOR_RGB2GRAY) img_gray_resize = cv.resize(img_gray, (600, 600)) ret, img_bw = cv.threshold(img_gray_resize, 200, 255, cv.THRESH_BINARY) kernel = np.ones((3, 3), np.uint8) # img_open = cv.morphologyEx(img_bw,cv.MORPH_CLOSE,kernel) img_open = cv.dilate(img_bw, kernel, iterations=2) num_labels, labels, stats, centroids = \ cv.connectedComponentsWithStats(img_open, connectivity=8, ltype=None) for sta in stats: if sta[4] < 1000: cv.rectangle(img_open, tuple(sta[0:2]), tuple(sta[0:2] + sta[2:4]), (0, 0, 255), thickness=-1) return img_open def get_roi(img_bw): img_bw_c = img_bw.sum(axis=1) / 255 img_bw_r = img_bw.sum(axis=0) / 255 all_sum = img_bw_c.sum(axis=0) if all_sum != 0: r_ind, c_ind = [], [] for k, r in enumerate(img_bw_r): if r >= 5: r_ind.append(k) for k, c in enumerate(img_bw_c): if c >= 5: c_ind.append(k) if len(r_ind)==0 or len(c_ind)==0: return img_bw img_bw_sg = img_bw[c_ind[0]:c_ind[-1], r_ind[0]:r_ind[-1]] leng_c = len(c_ind) leng_r = len(r_ind) side_len = max(leng_c, leng_r) + 20 if leng_c == side_len: add_r = int((side_len - leng_r) / 2) add_c = 10 else: add_r = 10 add_c = int((side_len - leng_c) / 2) img_bw_sg_bord = cv.copyMakeBorder(img_bw_sg, add_c, add_c, add_r, add_r, cv.BORDER_CONSTANT, value=[0, 0, 0]) return img_bw_sg_bord else: return img_bw def softmax(X): X_exp = X.exp() partition = X_exp.sum(dim=1, keepdim=True) return X_exp / partition predict.py
# author:Hurricane # date: 2020/11/5 # E-mail: # -------------------------------------# # 对单张图片进行预测 # -------------------------------------# import numpy as np import struct import matplotlib.pyplot as plt import cv2 as cv import random import torch from torch import nn, optim import torch.nn.functional as F class Residual(nn.Module): # 本类已保存在d2lzh_pytorch包中方便以后使用 def __init__(self, in_channels, out_channels, use_1x1conv=False, stride=1): super(Residual, self).__init__() self.conv1 = nn.Conv2d(in_channels, out_channels, kernel_size=3, padding=1, stride=stride) self.conv2 = nn.Conv2d(out_channels, out_channels, kernel_size=3, padding=1) if use_1x1conv: self.conv3 = nn.Conv2d(in_channels, out_channels, kernel_size=1, stride=stride) else: self.conv3 = None self.bn1 = nn.BatchNorm2d(out_channels) self.bn2 = nn.BatchNorm2d(out_channels) def forward(self, X): Y = F.relu(self.bn1(self.conv1(X))) Y = self.bn2(self.conv2(Y)) if self.conv3: X = self.conv3(X) return F.relu(Y + X) class GlobalAvgPool2d(nn.Module): # 全局平均池化层可通过将池化窗口形状设置成输入的高和宽实现 def __init__(self): super(GlobalAvgPool2d, self).__init__() def forward(self, x): return F.avg_pool2d(x, kernel_size=x.size()[2:]) def resnet_block(in_channels, out_channels, num_residuals, first_block=False): # num_residuals:残差数 if first_block: assert in_channels == out_channels # 第一个模块的通道数同输入通道数一致 blk = [] for i in range(num_residuals): if i == 0 and not first_block: blk.append(Residual(in_channels, out_channels, use_1x1conv=True, stride=2)) else: blk.append(Residual(out_channels, out_channels)) return nn.Sequential(*blk) class FlattenLayer(torch.nn.Module): def __init__(self): super(FlattenLayer, self).__init__() def forward(self, x): # x shape: (batch, *, *, ...) return x.view(x.shape[0], -1) def get_net(): # 构建网络 # ResNet模型 model_path = r"F:\PyCharm\Practice\hand_wrtten\logs\Epoch100-Loss0.0000-train_acc1.0000-test_acc0.9930.pth" device = torch.device('cuda' if torch.cuda.is_available() else 'cpu') net = nn.Sequential( nn.Conv2d(1, 64, kernel_size=7, stride=2, padding=3), nn.BatchNorm2d(64), nn.ReLU(), nn.MaxPool2d(kernel_size=3, stride=2, padding=1)) net.add_module("resnet_block1", resnet_block(64, 64, 2, first_block=True)) net.add_module("resnet_block2", resnet_block(64, 128, 2)) net.add_module("resnet_block3", resnet_block(128, 256, 2)) net.add_module("global_avg_pool", GlobalAvgPool2d()) # GlobalAvgPool2d的输出: (Batch, 512, 1, 1) net.add_module("fc", nn.Sequential(FlattenLayer(), nn.Linear(256, 10))) # 测试网络 # X = torch.rand((1, 1, 28, 28)) # for name, layer in net.named_children(): # X = layer(X) # print(name, ' output shape:\t', X.shape) # 加载网络模型 print("Load weight into state dict...") stat_dict = torch.load(model_path, map_location=device) net.load_state_dict(stat_dict) net.to(device) net.eval() print("Load finish!") return net def predict(img, net): device = torch.device('cuda' if torch.cuda.is_available() else 'cpu') img_in = torch.from_numpy(img) img_in = torch.unsqueeze(img_in, 0) img_in = torch.unsqueeze(img_in, 0).to(device) img_in = img_in.float() result_org = net(img_in) return result_org 7.结束语
版权声明:本文内容由互联网用户自发贡献,该文观点仅代表作者本人。本站仅提供信息存储空间服务,不拥有所有权,不承担相关法律责任。如发现本站有涉嫌侵权/违法违规的内容, 请联系我们举报,一经查实,本站将立刻删除。
发布者:全栈程序员-站长,转载请注明出处:https://javaforall.net/208082.html原文链接:https://javaforall.net


