
之前已经写过一篇文章简要介绍了图数据库Neo4j的概念,没看过的读者可以在此点链接《图数据库Neo4j简介》。本文主要讲解图数据库在真实项目中的实践应用,取自于我参与的真实项目代码。
后端用的是图数据库Neo4j来存节点和关系,前端用的是D3来画图。前后端交互是通过json数据来完成的,即Neo4j查出的结果组装成json后,传递给D3来画图。
1 Neo4j
首先看一下pom文件相关代码,如下:
      org.neo4j.driver


      neo4j-java-driver


      1.5.0
如图所示,我用的是neo4j-java-driver连接的Neo4j,当然也可以选择其他方式。例如Spring-Data-Neo4j等连接方式(只不过我所在项目中的spring版本和Spring-Data-Neo4j版本冲突,所以不能使用)。
然后是加载驱动的代码如下:
private static void driverConnect() { InputStream in = GraphDriverManager.class.getClassLoader().getResourceAsStream(LOCAL); Properties p = new Properties(); try { p.load(in); } catch (IOException e) { e.printStackTrace(); } String url = p.getProperty("neo4j.url"); String userName = p.getProperty("neo4j.username"); String passWord = p.getProperty("neo4j.password"); // 使用 basic authentication方式创建连接 try { driver = GraphDatabase.driver(url, AuthTokens.basic(userName, passWord), Config.build().withMaxConnectionLifetime(30, TimeUnit.MINUTES).withMaxConnectionPoolSize(50).withConnectionAcquisitionTimeout(2, TimeUnit.MINUTES).toConfig()); resetFlag(); } catch (Exception e) { logger.error("图数据库连接异常",e); //当数据库连接异常时,把标志位写进文件,做提示用。 ErrorConnectPut(); } }java连接Neo4j的方式有三种:bolt、http和https,我选用的是bolt协议。同时为了方便,将Neo4j的url、用户名和密码做成properties文件来读取。
最后就是具体的调用代码了。如下所示:
@Override public Map

     , Set

      > searchAllPathsOfTwoNodes(String firstLabel, String firstName, String secondLabel, String secondName) { Map

       , Set

        > searchResults = null; Driver driver = driverManager.getDriver(); try (Session session = driver.session()) { searchResults = session.readTransaction(tx -> { return standardGraphDao.searchAllPathsOfTwoNodes(tx, firstLabel, firstName, secondLabel, secondName); }); } catch (Exception e) { throw new RuntimeException(e); } return searchResults; }
用内部类和lambda表达式的方式调用DAO层的代码。正如在之前文章中所提,应避免写出循环开闭事务的代码,应将循环放进DAO层里。
但是该种写法只是示例写法,用在实际的项目中会有很大的效率问题。假如在该方法中还需要调用test方法,那么不可避免的是test方法中仍然需要获取事务,这就会有嵌套事务的情况出现,在一些方法比较复杂和大数据量的执行下,效率会直线下降。解决办法是统一使用写事务(用写事务来代替读事务用以实现统一的事务获取,目前我还没有发现相关的bug),只有在最外面的方法才获取事务,里面如果有方法调用,则将事务tx一同作为参数传递过去,这样在整个方法中只有一次获取事务的情况出现。
但这样虽然解决了效率问题,在整个service层的开发却变得异常糟糕:充斥着大量的try…catch…业务无关语句。很自然的想到,可以用AOP进行改造,改造结果如下:
@Around("pointCut()") public Object around(ProceedingJoinPoint jp) { MethodSignature msig = (MethodSignature) jp.getSignature(); Method method = msig.getMethod(); Object returnType = method.getReturnType(); try { Field txField = StandardGraphDao.class.getDeclaredField("tx"); txField.setAccessible(true); Driver driver = driverManager.getDriver(); try (Session session = driver.session()) { returnType = session.writeTransaction(tx -> { try { txField.set(StandardGraphDao.class.newInstance(), tx); return jp.proceed(); } catch (Throwable e) { throw new RuntimeException(e); } }); } catch (Exception e) { if (LOGGER.isErrorEnabled()) { LOGGER.error(e.toString()); } checkSynchronize(); } txField.set(StandardGraphDao.class.newInstance(), null); } catch (NoSuchFieldException | IllegalAccessException | InstantiationException e) { throw new RuntimeException(e); } return returnType; }在切面类中加入上述的环绕通知,用注解来驱动,其中return jp.proceed();是真正调用的service层方法代码。同时利用反射来对方法返回值和事务tx赋值。改造完成后service层的代码如下:
@Override @Neo4jTransactional public void saveInfoSubject(List

     standardVOList) { if (standardVOList == null) { throw new NullArgumentException("standardVOList为空"); } for (StandardVO standardVO : standardVOList) { standardGraphDao.saveInfoSubjectNode(standardVO, StandardGraphConstant.NODE_LABEL_INFOSUBJECT); } }
@Neo4jTransactional是我自定义的注解,有了它就可以启动之前设定好的AOP。由上可以看到,service层的代码去掉了try…catch…语句,变得很清爽,和普通方法调用无异。DAO层相关代码如下:
/ * * Title: searchAllPathsOfTwoNodes  * Description: 查找某两个节点是否有关系(全部路径)  * @param firstLabel * @param firstName * @param secondLabel * @param secondName * @return   参数说明 * @author houyishuang * @date 2018年1月21日 */ public Map

     , Set

      > searchAllPathsOfTwoNodes(String firstLabel, String firstName, String secondLabel, String secondName) { Map

       , Set

        > returnMap = new HashMap<>(16); String cypher = "MATCH (a:" + firstLabel + "{name:$firstName}), (b:" + secondLabel + "{name:$secondName}), p = allShortestPaths((a)-[*]-(b)) RETURN p"; List

         records = tx.run(cypher, parameters("firstName", firstName, "secondName", secondName)).list(); if (!records.isEmpty()) { for (Record searchResult : records) { Map

          , Set

           > map = StandardGraphUtils.getIdsFromPath(searchResult.values().get(0).toString()); returnMap = StandardGraphUtils.pathMapMerge(returnMap, map); } } return returnMap; }
该方法实现的功能是查询两个节点之间的全部路径。可以看到,直接用传过来的参数拼装成cypher语句,到Neo4j中查询出结果,然后组装成想要的格式返回即可。
其中StandardGraphUtils工具类的部分代码如下所示,仅供参考:
import java.util.HashMap; import java.util.HashSet; import java.util.Map; import java.util.Set; import java.util.regex.Matcher; import java.util.regex.Pattern; / * * Classname: StandardGraphUtils  * Description: 知识图谱工具类; * @author houyishuang * @date 2018年1月12日 */ public class StandardGraphUtils { / * 节点匹配 */ private static final String NODE = "node<(.*)>"; / * 节点匹配 */ private static final String NODES = "\\[node<(.*)>, node<(.*)>\\]"; / * 路径匹配 */ private static final String PATH = "path\\[(.*)\\]"; / * 路径匹配 */ private static final String SUB_PATH = "\\((.*)\\).?-\\[(.*):.*\\]-.?\\((.*)\\)"; //... private StandardGraphUtils() {} / * * Title: getIdFromNode  * Description: 节点匹配  * @param node * @return 参数说明 * @author houyishuang * @date 2018年1月18日 */ public static String getIdFromNode(String node) { String result = null; Pattern r = Pattern.compile(NODE); Matcher m = r.matcher(node); if (m.find()) { result = m.group(1); } return result; } / * * Title: getIdsFromNode  * Description: 节点匹配  * @param node * @return 参数说明 * @author houyishuang * @date 2018年1月19日 */ public static Map

     getIdsFromNode(String node) { Map

      results = new HashMap<>(16); String result1 = null; String result2 = null; Pattern r = Pattern.compile(NODES); Matcher m = r.matcher(node); if (m.find()) { result1 = m.group(1); result2 = m.group(2); } results.put(result1, result2); return results; } / * *
     Title: getIdsFromPath  *
     Description: 路径匹配  * @param path * @return 参数说明 * @author houyishuang * @date 2018年1月21日 */ public static Map

       , Set

        > getIdsFromPath(String path) { Map

         , Set

          > returnMap = new HashMap<>(16); Set

           nodeIdList = new HashSet<>(); Set

            relIdList = new HashSet<>(); String result = null; Pattern r = Pattern.compile(PATH); Matcher m = r.matcher(path); if (m.find()) { result = m.group(1); } String[] resultArray = result.split(", "); for (String rs : resultArray) { Pattern r1 = Pattern.compile(SUB_PATH); Matcher m1 = r1.matcher(rs); if (m1.find()) { String result1 = m1.group(1); String result2 = m1.group(2); String result3 = m1.group(3); nodeIdList.add(result1); relIdList.add(result2); nodeIdList.add(result3); } } returnMap.put(nodeIdList, relIdList); return returnMap; } / * *
           Title: pathMapMerge  *
           Description: 路径map合并  * @param returnMap * @param map * @return 参数说明 * @author houyishuang * @date 2018年2月5日 */ public static Map

             , Set

              > pathMapMerge(Map

               , Set

                > returnMap, Map

                 , Set

                  > map) { Set

                   returnNodeIdList = null; Set

                    returnRelIdList = null; Set

                     nodeIdList = null; Set

                      relIdList = null; if (returnMap.isEmpty() && map.isEmpty()) { return null; } if (returnMap.isEmpty()) { return map; } if (map.isEmpty()) { return returnMap; } for (Map.Entry

                       , Set

                        > entry : returnMap.entrySet()) { returnNodeIdList = entry.getKey(); returnRelIdList = entry.getValue(); } for (Map.Entry

                         , Set

                          > entry : map.entrySet()) { nodeIdList = entry.getKey(); relIdList = entry.getValue(); } returnMap.clear(); map.clear(); returnNodeIdList.addAll(nodeIdList); returnRelIdList.addAll(relIdList); returnMap.put(returnNodeIdList, returnRelIdList); return returnMap; } //... }
同时之前在切面类中对事务tx赋值就是对下面DAO层的tx属性赋值,这样就可以像上述searchAllPathsOfTwoNodes方法中那样,用事务去执行cypher了。
@Component public class StandardGraphDao { / * Neo4j事务 */ private static Transaction tx; //do something... } 在之后的学习工作中知道,上述的tx静态变量写法还是存在着线程安全的问题的。解决办法是将tx用ThreadLocal包装起来。但使用ThreadLocal时必须确保get和set方法在同一次请求中才行。
2 D3
之所以决定要用D3而不是ECharts,主要是觉得D3的灵活性更大一些,可以做一些定制化的需求。而ECharts的功能都已经给你提供了,想要定制化比较困难一些。当然,D3相对于来说更难上手,所以这里先普及一些D3的基本概念。
D3是一个JavaScript的函数库,是用来做数据可视化的。D3的全称是Data-Driven Document,数据驱动的文档。D3的核心是数据和元素之间的绑定,这点需要读者多进行理解消化。下面讲解一个核心概念:update、enter和exit。
既然D3做的是数据和元素之间的绑定,那如果数组长度和元素数量不一致,就会带来三个选择集:update、enter和exit,如下图所示:
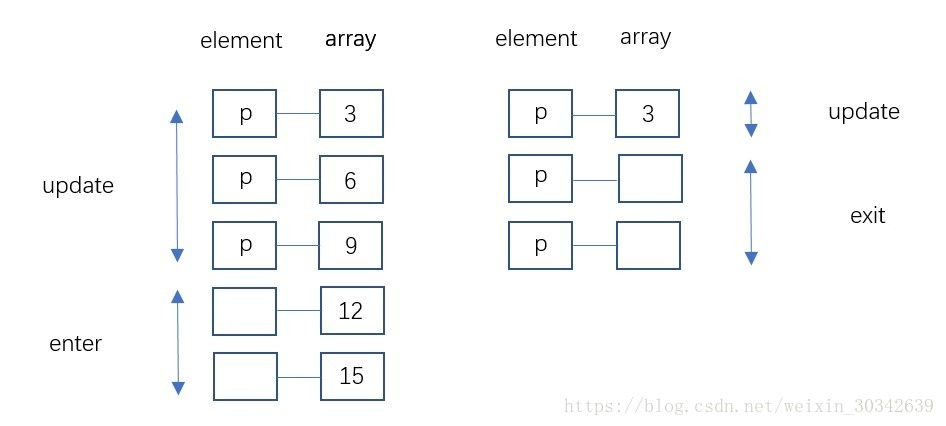

由图可知,没有被元素绑定的多余数据叫做enter;没有数据对应、多余的元素叫做exit;元素和数据一一对应的部分叫做update。
enter代表没有足够的元素,因此处理方法是添加元素;如果存在多余的元素,没有数据与之对应,那么就需要删除元素。所以可以看到,在D3中,数据是最为重要的。可以删元素,但是不能删除数据。
但是如果不知道数组的长度,如何为update、enter、exit提供处理方案呢?其实,数组长度和元素数量的大小并不重要。在多数可视化中,无论哪一边大,
- update所代表的元素都该“更新”。
- enter所代表的元素都该“添加”。
- exit所代表的元素都该“删除”。
因此,这种数据绑定(Data-Join)允许开发者在不知道新数据长度的情况下更新图形。将这种类似的处理方案总结为一个模板,代码如下:
var dataset = [ 10, 20, 30 ]; var p = d3.select("body").selectAll("p"); // 绑定数据后,分别返回update、enter、exit部分 var update = p.data(dataset); var enter = update.enter(); var exit = update.exit(); // 1.update部分的处理方法 update.text(function(d) { return d; }); // 2.enter部分的处理方法 enter.append("p").text(function(d) { return d; }); // 3.exit部分的处理方法 exit.remove();需要注意的是exit.remove方法。D3中将数据和元素进行绑定,默认采用的是从上到下的顺序。也就是说来一个数据,就和一个元素绑定。这在没有exit.remove出现的场景中是没有问题的。但当有删除元素的情况出现的话,默认的绑定规则可能会出错。比如说原来是a对1、b对2、c对3,我删除了数据2,理论上应该变成a对1、c对3、b没有数据对应,所以是exit。但是,如前所说,默认绑定规则是从上到下,所以实际上变成了a对1、b对3、c没有数据与之对应。结果c变成了exit,导致了错误。解决办法就是不采用默认的绑定规则,改用按照某种规律进行绑定,如下:
nodes = nodes.data(force.nodes(),function(d) { return d.inst_cd; });如上所示nodes是按照inst_cd进行绑定,这样再删除数据的时候,就不会出现删除元素错误的情况出现了。
明白了update、enter和exit这三个概念,再来理解D3就容易多了。本例用的是D3的力导向图(Force-Directed Graph)。力导向图是绘图的一种算法,在二维或三维空间里配置节点,节点之间用线连接,称为连线。各连线的长度几乎相等,且尽可能不相交。节点和连线都被施加了力的作用,力是根据节点和连线的相对位置计算的。根据力的作用,来计算节点和连线的运动轨迹,并不断降低它们能量,最终达到一种能量很低的安定状态。
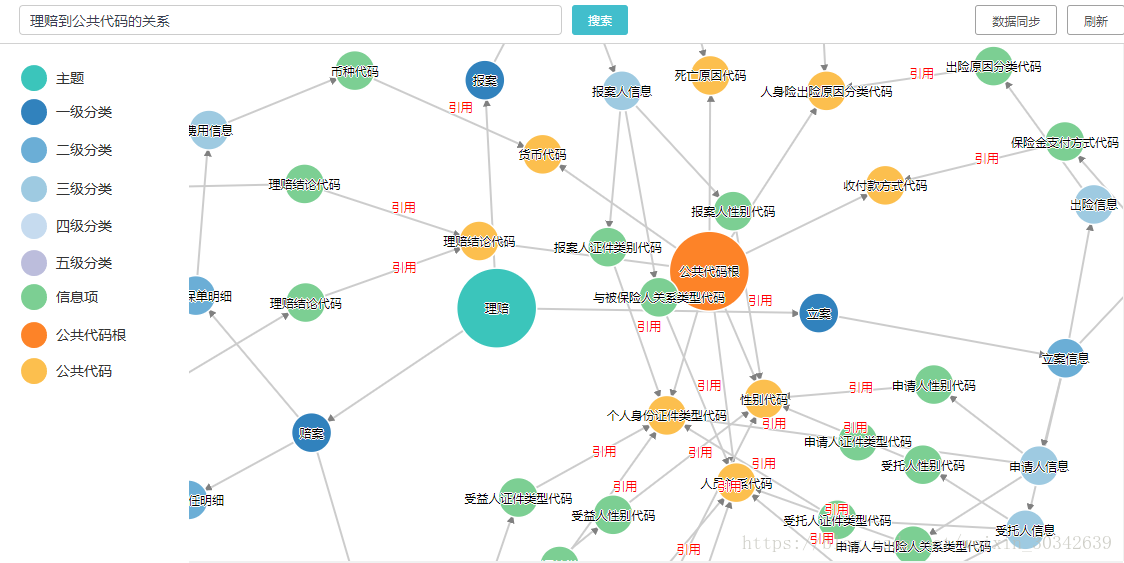
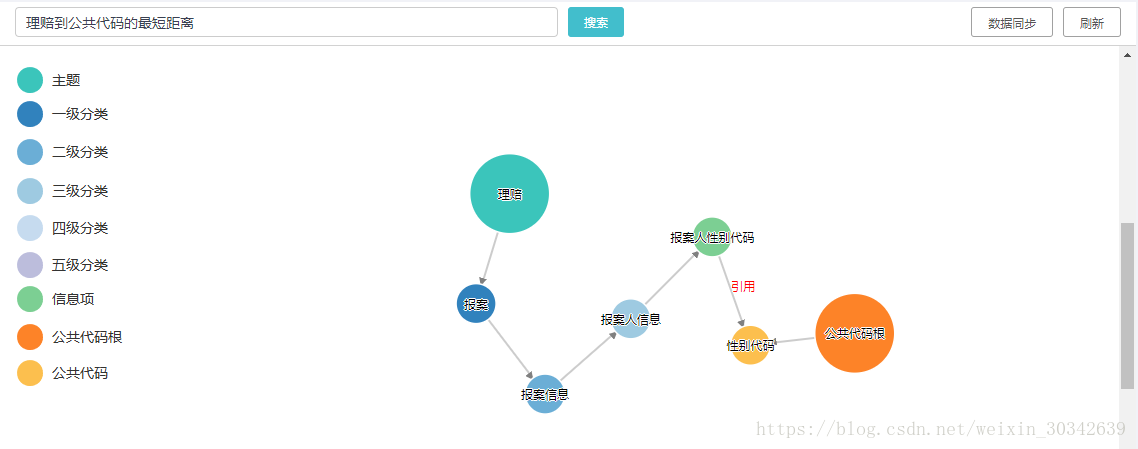
function showInfo(metaID,analyseType){ var height = 1500; var width = 1500; nodes_data =[]; edges_data =[]; edgeWidth = 2; r1 = 40; r2 = 20; color = d3.scale.category20(); $.ajax({ type:"post", url:__contextPath+"/standard/standardGraph/initGraph.d", async:true, cache:false, success:function(result){ if(result==null || result==""){ return ""; }else{ arr=eval('('+result+')'); } nodes_data=arr.nodes; edges_data=arr.links; edges_data.forEach(function (link) { nodes_data.forEach(function(node){ if(link.source==node.inst_cd){ link.source=node; } if(link.target==node.inst_cd){ link.target=node; } }) }); svg = d3.select("#standardgraph").append("svg") .attr("width", width) .attr("height", height); force = d3.layout.force() .nodes(nodes_data) .links(edges_data) .size([width, height]) .linkDistance(function(d){ if(d.target.model =="CommonCodeRoot" || d.target.model =="InfoSubject"){ return 300; }else{ return 100; } }) // .friction(0.8) .charge(-1000) .on("start",forceStart) .on("tick", tick) .start(); // 箭头 drawMarker(); drawLinks(); drawNodes(); // 标签 drawNodes_lables(); drawLinks_text(); function zoomed(){ // svg.attr("transform","translate("+d3.event.translate+")scale("+d3.event.scale+")") svg.attr("transform","translate("+d3.event.translate+")") } // d3.event.translate 是平移的坐标值,d3.event.scale 是缩放的值 var zoom = d3.behavior.zoom() .scaleExtent([-10,10])// 用于设置最小和最大的缩放比例 .on("zoom",zoomed); // svg.call(zoom); } }) } 上图所示是我在实际项目中参与完成的、用D3力导向图画出图形的部分代码。后台向前台传进json数据,前台拿到json数据进行处理画图。
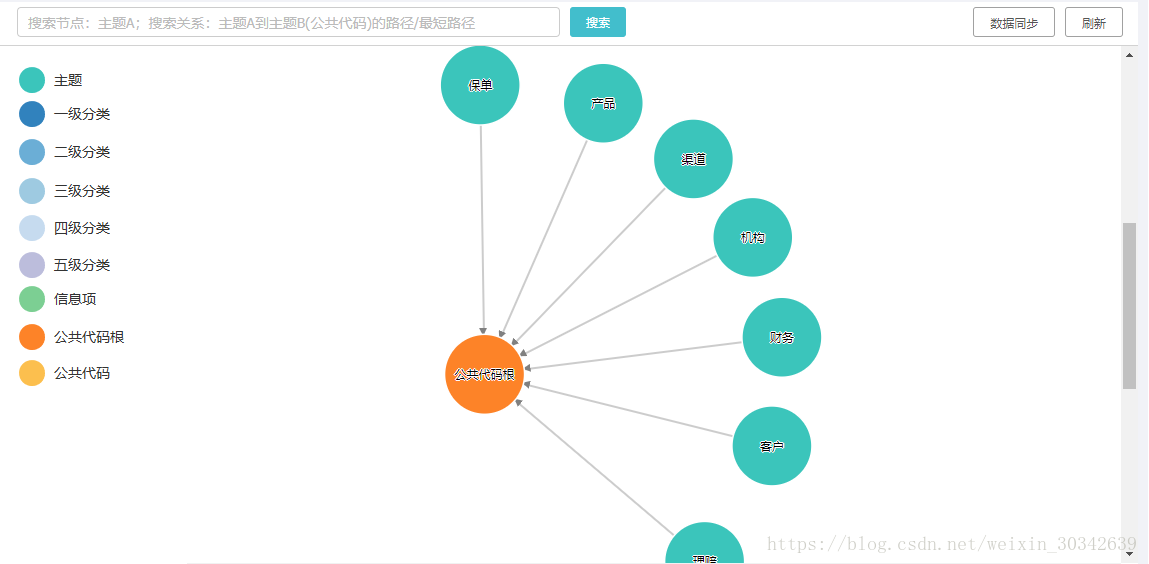
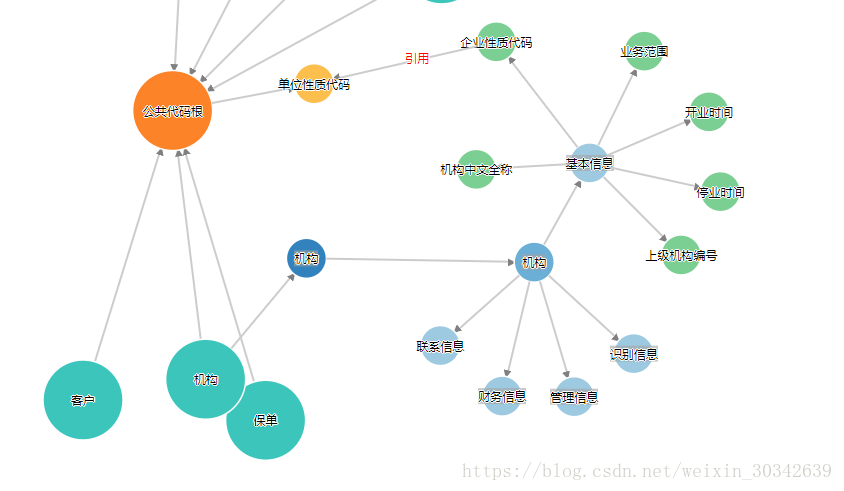
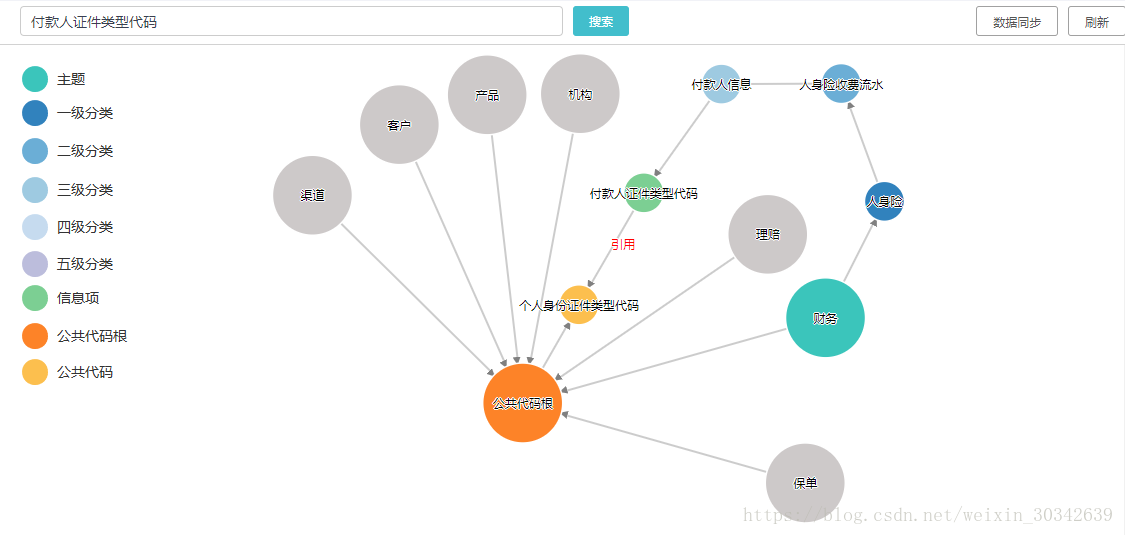
3 展示
最后的成果如下:
注:即使经过了上述的优化,最终的执行速度依然算不上快。以上方案仅适用于没有使用Spring Boot的项目,在Spring Boot的项目中会有Neo4j的相关依赖,可以考虑使用相关API来进行开发。
发布者:全栈程序员-站长,转载请注明出处:https://javaforall.net/209138.html原文链接:https://javaforall.net


