
LaTex简介
TeX 是由Donald Knuth创造的基于底层编程语言的电子排版系统[1](TEX是Honeywell公司在1980年为其Text Executive文本处理系统注册的商标,它与 TeX是两回事)。使用TeX可以对版面做精细的操作,生成精美的文档。TeX提供版面编辑的底层命令,但是使用时操作复杂,工作效率不高. TeX允许用这些底层命令定义出可以执行复杂操作的扩展命令. LaTex是由Leslie Lamport开发的的TeX扩展命令集合[5]。LaTexj通过整合常用的版面设置操作,降低排版的工作量和难度。 LaTex 强大的排版功能,特别是对科技文档的支持,已经使它成为撰写科研论文的事实上的标准[5]。
TeX系统生成的是DVI(Device Independent)文件。随着pdf文件格式的流形,LaTex在支持DVI文件格式的同时也可生成PDF格式文件。
TeX在不同的硬件和操作系统上有不同的实现版本。目前Unix/Linux上常用的TeX系统是teTeX,Windows中有MiKTeX和fpTeX。CTeX是中文套装[4]。下面仅简要介绍在使用LaTex中一些常见问题。
LaTex 与 Word
Word 是微软公司推出的一款文档和文字处理软件,它也具有较强的排版功能。与LaTex相比,Word最大优势是其”所见既所得”的特点,因而入门门槛低。另一方面Word的语法和拼写错误检查等能力比LaTex强。
LaTex作为一款排版系统,格式控制、公式编辑方面比Word好用。LaTex生成的文档比Word文档更美观。LaTex的入门门槛比较高,使用LaTex不仅要编辑文本,整理文档格式,还要处理编译过程中出现的bugs,如果使用中文,更要注意GBK,UTF-8等文档编码这些琐碎问题。另外LaTex做的幻灯片没有Word做出来的好看。
LaTex 和 Word两款软件针对的用户群体不一样,在文字处理和文档排版方面有不同的理念。 两者在功能上有许多重合之处,各有优势和不足。
LaTex 命令架构
Tex环境中,字符,图片等内容都放在隐形的盒子(box)容器内。这些盒子根据Tex和Latex的默认规则以及相关命令粘结成更大的盒子。字符组合成单词,单词组合出语句。语句在放入页面盒子时,根据版面格式分解成行列。
LaTex提供不同层次的命令帮助用户设置文档版面。它最底层是大约300个TeX基础命令,例如 \hbox, \vskip等。
LaTex的核心是一组建立在TeX基础命令上的宏命令,例如 \documentclass, \usepackage, \begin.等。
再往上就是类文件,例如foo.cls等。当\documentclass{foo}时,就是加载foo.cls文件。
再往上是扩展包, 例如pic.sty等。我们可以使用\usepackage命令加载扩展包。
安装
Latex的衍生版本众多,中文环境中常用的时CTex。下载地址为
http://www.ctex.org/CTeXDownload Ctex套装中自带Latex编辑器WinEdt
LaTex文件格式简介
TeX文件样例
下面是一个TeX文件的简单样例:
This is an example of TeX file format. An example of mathematical formulaion: $ ds = \sqrt{dx^2 + dy^2} $ \bye - 将上述内容保存在一文本文件中,例如: foo.tex.
- 在Windows控制台环境中,使用
tex foo.tex 既可生成相应的foo.dvi文件。
LaTex文件样例
下面一个样例[3]展示了LaTex文件的基本结构:
\documentclass[12pt, letterpaper]{article} \usepackage[utf8]{inputenc} \usepackage{comment} % Title \title{Document Title} \author{Nobody \thanks{Somebody}} \date{Some Date} \begin{document} \begin{titlepage} \maketitle \end{titlepage} \tableofcontents \begin{abstract} This is a simple paragraph at the beginning of the document. A brief introduction about the main subject. \end{abstract} First document. This is a simple example, with no extra parameters or packages included. % Comments \begin{comment} This text won't show up in the compiled pdf this is just a multi-line comment. Useful to, for instance, comment out slow-rendering while working on the draft. \end{comment} \end{document} LaTex文件结构
文件拆分
当文档内容的结构复杂,需要分别保存在多个LaTex文件时,可以使用\input 或\include命令构建文档结构。例如:
\input{filename1} 或者
\include{filename1} [6]”\input{filename} imports the commands from filename.tex into the target file; it’s equivalent to typing all the commands from filename.tex right into the current file where the \input line is.”
[6]”\include{filename} essentially does a \clearpage before and after \input{filename}, together with some magic to switch to another .aux file, and omits the inclusion at all if you have an \includeonly without the filename in the argument. This is primarily useful when you have a big project on a slow computer; changing one of the include targets won’t force you to regenerate the outputs of all the rest.”
[6]”\include{filename} gets you the speed bonus, but it also can’t be nested, can’t appear in the preamble, and forces page breaks around the included text.”
导言部分 LaTex命令简介
preamble(导言)部分通常用于定义文档的格式、语言等。常用的LaTex命令主要有\documentclass,\usepackage等。下面分别对几个常用的命令做简单介绍。
\documentclass
\documentclass命令是用于设置LaTex文件所生成文档的格式. 其命令语法如下所示:
\documentclass[options]{class} 常用的文档格式有:
| Class | 简介 |
|---|---|
| article | 科技论文,报告,软件文档等 |
| IEEEtran | IEEE Transactions 格式. |
| proc | 法律文书 |
| report | 长篇报告(如:学位论文) |
| book | 书籍 |
| slides | 幻灯片 |
| memoir | 传记 |
| letter | 信件 |
| beamer | PPT |
文档格式修正项
| Options | 简介 |
|---|---|
| 12pt | 文档正文使用的字体大小(默认为10pt) |
| a4paper, letterpaper | 页面规格(默认为letterpaper或a4paper) |
| fleqn | Typesets displayed formulas left-aligned instead of centered. |
| leqno | Places the numbering of formulas on the left hand side instead of the right. |
| titlepage, notitlepage | Specifies whether a new page should be started after the document title or not. The article class does not start a new page by default, while report and book do. |
| twocolumn | Instructs LaTeX to typeset the document in two columns instead of one. |
| twoside, oneside | Specifies whether double or single sided output should be generated. The classes article and report are single sided and the book class is double sided by default. Note that this option concerns the style of the document only. The option twoside does not tell the printer you use that it should actually make a two-sided printout. |
| landscape | Changes the layout of the document to print in landscape mode. |
| openright, openany | Makes chapters begin either only on right hand pages or on the next page available. This does not work with the article class, as it does not know about chapters. The report class by default starts chapters on the next page available and the book class starts them on right hand pages. |
| draft | makes LaTeX indicate hyphenation and justification problems with a small square in the right-hand margin of the problem line so they can be located quickly by a human. It also suppresses the inclusion of images and shows only a frame where they would normally occur. |
例如:
\documentclass[12pt, a4paper]{article} 意思是正文字体大小为12pt, 页面规格是A4, 使用article文档格式.
\usepackage
\usepackage命令设置在编译LaTex文件时要导入的扩展包,例如:
\usepackage[utf8]{inputenc} \usepackage{comment} 封面格式
\title{Document Title} \author{Nobody \thanks{Somebody}} \date{Some Date} 设置所要生成文档的封面内容: 文档名,作者,日期等(这只是设置了封面格式,生成封面的是\maketitle命令)。
注释
% Comments 保留字符
# $ % ^ & _ { } \ 这些字符(reserved characters)在Latex中有特殊的意义,要想在生成的文档中显示这些字符,Latex文档中这些字符前加反斜杠” \ \backslash \” :
\# \$ \% \^ \& \_ \{ \} 因为两个反斜杠”\\”在Latex中是换行命令,可使用
$\backslash$ 输出反斜杠 \ \backslash \
~波浪线(tidle)在LaTeX中是插入空格命令,可用数学公式环境的$ \sim $向TeX文档中插入波浪线.
正文部分LaTex命令模块简介
生成封面
\begin{titlepage} \maketitle \end{titlepage} 按照在preamble中设置的封面格式生成文档封面
生成目录
\tableofcontents 生成文档目录
页码
设置页码数字类型
\pagenumbering{digit type} 其中digit type有:
-
arabic 阿拉伯数字(1,2,3,4),默认样式 -
roman 小写罗马数字(i,ii,iii,iv) -
Roman 大写罗马数字(I,II,III,IV) -
alph 小写拉丁字母(a,b,c,d) -
Aiph 大写拉丁字母(A,B,C,D)
设置页码可使用
\setcounter{page}{page number} 如果想让当前页不标页码,可使用
\thispagestyle{empty} 例如,如果在封面不标记页码,目录页使用小写罗马数字标记页码,正文部分使用阿拉伯数字标记页码
\begin{document} %% Making title pate \begin{titlepage} \maketitle \thispagestyle{empty} \end{titlepage} %% Contents \pagenumbering{roman} \tableofcontents \newpage \pagenumbering{arabic} \setcounter{page}{1} 版面设置
空白
下面是LaTex插入空格命令小结[24]
\, inserts a \thinspace (equivalent to .16667em) in text mode, or \thinmuskip (equivalent to 3mu) in math mode; \! inserts a negative \thinmuskip in math mode; \> inserts \medmuskip (equivalent to 4.0mu plus 2.0mu minus 4.0mu) in math mode; \; inserts \thickmuskip (equivalent to 5.0mu plus 5.0mu) in math mode; \: is equivalent to \> (see above); \enspace inserts a space of .5em in text or math mode; \quad inserts a space of 1em in text or math mode; \uad inserts a space of 2em in text or math mode; \kern

    inserts a skip of

     (may be negative) in text or math mode (a plain TeX skip); \hskip

      (similar to \kern); \hspace{

       } inserts a space of length

        (may be negative) in math or text mode (a LaTeX \hskip); \hphantom{

         } inserts space of length equivalent to

          in math or text mode. Should be \protected when used in fragile commands (like \caption and sectional headings); \ inserts what is called a "control space" (in text or math mode); (直接键入空格) inserts an inter-word space in text mode (and is gobbled in math mode). Similarly for \space and { }. ~ inserts an "unbreakable" space (similar to an HTML  ) (in text or math mode); \hfill inserts a so-called "rubber length" or stretch between elements (in text or math mode). Note that you may need to provide a type of anchor to fill from/to;
段落行间距
使用{setspace}扩展包. 例如
\documentclass[UTF8]{article} \usepackage{setspace} \begin{document} %%双倍行间距 \begin{spacing}{2.0} 段落内容。 \end{spacing} %%单倍行间距 \begin{spacing}{1.0} 段落内容。 \end{spacing} \end{document} 段落间空白
\hspace{1cm} \vspace{5pt} 居中
\begin{center} ... \end{center} 左对齐
\begin{flushleft} ... \end{flushleft} 右对齐
\begin{flushright} ... \end{flushright} 样例
\begin{center} 登鹳雀楼 \\ ~~~~~~~~ {\footnotesize 王之涣} \\ \hfill \\ 白日依山尽 \\ 黄河入海流 \\ 欲穷千里目 \\ 更上一层楼 \\ \end{center} \begin{flushleft} 这一行在左侧 \\ 这一行也要在左侧 \\ \end{flushleft} \begin{flushright} 这一行在右侧 \\ 这一行也要在右侧 \\ \end{flushright} verbatim 居中显示
\usepackage{verbatimbox} 用verbbox环境界定显示内容,然后可通过\theverbbox引用这个verbbox环境对象。
\begin{verbbox} #include

    void main() { printf("Hello World! \n"); } \end{verbbox} \begin{figure}[ht] \centering %% 居中显示 \theverbbox \end{figure}
同理,也可以使用flushleft, flushright 等命令实现左对齐和右对齐等效果。
线框
使用\fbox给文字加线框; 使用\parbox给段落添加线框.
\fbox{A} \hfill \fbox{ Use $\backslash fbox$ environment for creating line box. } \begin{center} \fbox{ Box lies in center. However } \end{center} \begin{center} \fbox{ \parbox{\textwidth}{ \begin{center} This is a \\ Full size box \\ \end{center} } } \end{center} \begin{center} \fbox{ \parbox{0.4\textwidth}{ \begin{center} This is a \\ Small size box \\ \end{center} } } \end{center} 图片插入及引用
下面样例展示如何在文档中插入图片并在文中通过图片编号引用图片。
\usepackage[pdftex]{graphicx} % 设置图片文件存放路径 \graphicspath{
  {../figures} \begin{document} % 在正文中引用图片时使用\ref In Figure \ref{fig:foo} \begin{figure} %设置对齐格式 \centering %图片居于页面中部 %指定图形大小和图形名称 \includegraphics [width=0.8,height=2.5]{foo.png} %设置标题 \caption{Foo} %设置图形引用名称 \label{fig:foo} \end{figure} \end{document}
有关插入图形的更多设置请参阅[9]
表格
Latex中使用tabular环境定义表格, 例如[15]
\begin{tabular}{llr} \hline \multicolumn{2}{c}{Item} \\ \cline{1-2} Animal & Description & Price (\$) \\ \hline Gnat & per gram & 13.65 \\ & each & 0.01 \\ Gnu & stuffed & 92.50 \\ Emu & stuffed & 33.33 \\ Armadillo & frozen & 8.99 \\ \hline \end{tabular} 表格对齐格式
首先要在第一行设置表格中各个单元对齐格式。
\begin{tabular}[pos]{table spec} table spec选项
| 选项 | 释意 | 样例 |
|---|---|---|
| l | 左对齐 | {l c r} |
| c | 居中 | {l c r} |
| r | 右对齐 | {l c r} |
| p{‘width’} | 置顶 | {l c p{5cm}} |
| m{‘width’} | 纵向居中 | {l c m{5cm}} |
| b{‘width’} | 置底 | {l c b{5cm}} |
| | | 纵向分隔线 | {l | c |r } |
| || | 纵向双分割线 | {|| l | c |r ||} |
在table spec选项中可使用 >{\format} 设置字体
pos 选项通常用于设置表格单元中显示内容相对于其基线的纵向位置.一般不使用这个选项.
从第二行开始设置表格每一行中列向单元的数量,对齐格式等相关配置.
| 选项 | 释意 |
|---|---|
| & | 列分隔 |
| \ | 新列 |
| \hline | 画一条水平线 |
| \newline | 在列中换行 |
| \cline{i-j} | 在水平方向从第 i 列 到 第 j 列画横线段 |
表格中行间距
\arraystretch 命令可以设置行间距(默认值是1.0),例如
\renewcommand{\arraystretch}{1.5} 使用\noalign{\smallskip} 也可以改变行间距. \smallskip 命令等价于\vspace{smallskipamount}。smallskipamount的大小依赖于文档类型. 与\smallskip 命令类似的还有\medskip,\bigskip . 另外,也可以在每一行尾的 换行符 后设置行间距。 例如
\begin{tabular}{c} \hline Normal \\ \hline smallskip(under the characters) \\ \noalign{\smallskip} \hline \noalign{\smallskip} smallskip(over the characters) \\ \hline \noalign{\medskip} medskip \\ \hline \noalign{\bigskip} bigskip \\ \hline 0.5cm \\[0.5cm] \hline \end{tabular} 三线表样例
Latex中默认的线条宽度是0.4pt, 如果想要使用粗一点的线条,可以使用 booktabs环境包. 这需要在Latex文档的导言部分添加命令:
\usepackage{booktabs} 样例如下所示
\begin{table}[h] \centering \begin{tabular}{ccc} \toprule Name & ID & Gender\\ \midrule Tom & 001& Male\\ Rose & 002& Female\\ \bottomrule \end{tabular} \caption{这是一张三线表} \end{table} 有关表格的更多设置请参阅[15]
浮动体
| 描述符 | 期望位置 |
|---|---|
| h | 将浮动体放在这里(Latex会根据其排版美学做调整) Place the float here, i.e., approximately at the same point it occurs in the source text (however, not exactly at the spot) ) |
| t | 将浮动体放在页的顶部 Position at the top of the page. |
| b | 将浮动体放在页的底部 Position at the bottom of the page. |
| p | 将浮动体单独成页 Put on a special page for floats only. |
| ! | 忽略LaTeX的排版美学内置参数 Override internal parameters LaTeX uses for determining “good” float positions. |
| H | 将浮动体强制放在这里 Places the float at precisely the location in the LaTeX code. Requires the float package,i.e., \usepackage{float}. This is somewhat equivalent to !ht. |
画图
Latex中的绘图工具有picture扩展包, tikz扩展包等. 其中picture扩展包是标准扩展包。正文中可直接使用picture包命令绘图,而使用tikz扩展包时则需要在导言中添加
\usepackage{tikz} picture扩展包
picture扩展包中命令主要分为两类: 绘图环境设置命令和绘图命令。 绘制的基本图形有: 直线段,带箭头直线段,二阶贝塞尔曲线段,圆及椭圆等. 下面是一个picture扩展包使用样例
\setlength{\unitlength}{1cm} \thicklines \begin{picture}(10,6) \put(2,2.2){\line(1,0){6}} \put(2,2.2){\circle{2}} \put(6,2.2){\oval(4,2)[r]} \end{picture} 绘图环境设置命令
\begin{picture}(width,height)(x-offset,y-offset) picture扩展包默认所绘制图形的坐标范围是二维矩形. width,height分别设定图形绘制范围的宽度和高度, 度量单位由
\setlength{\unitlength}{1cm} 设定 (\setlength不是 picture扩展包的命令). \unitlength 默认单位是 1pt.
x-offset和y-offset是\begin{picture}命令的可选项, 它们分别设定左下角点的横向坐标值和纵向坐标值
picture中基本绘图命令有
\put(x, y){object} \qbezier(x1, y1)(x2, y2)(x3, y3) \multiput(x, y)(dx, dy){n}{object} 基本图形有:
线段
\put(x, y){ \line(x1, y1){length} } \setlength{\unitlength}{5cm} \begin{picture}(1,1) \put(0,0){\line(0,1){1}} \put(0,0){\line(1,0){1}} \put(0,0){\line(1,1){1}} \put(0,0){\line(1,2){.5}} \put(0,0){\line(1,3){.3333}} \put(0,0){\line(1,4){.25}} \put(0,0){\line(1,5){.2}} \put(0,0){\line(1,6){.1667}} \put(0,0){\line(2,1){1}} \put(0,0){\line(2,3){.6667}} \put(0,0){\line(2,5){.4}} \put(0,0){\line(3,1){1}} \put(0,0){\line(3,2){1}} \put(0,0){\line(3,4){.75}} \put(0,0){\line(3,5){.6}} \put(0,0){\line(4,1){1}} \put(0,0){\line(4,3){1}} \put(0,0){\line(4,5){.8}} \put(0,0){\line(5,1){1}} \put(0,0){\line(5,2){1}} \put(0,0){\line(5,3){1}} \put(0,0){\line(5,4){1}} \put(0,0){\line(5,6){.8333}} \put(0,0){\line(6,1){1}} \put(0,0){\line(6,5){1}} \end{picture} 带箭头线段
\put(x, y){\vector(x1, y1){length}} (x1, y1) – 线段的方向向量. 方向向量中元素仅限于在(−4, −3, … , 3, 4) 中取值. x1 与 y1要互质.如下所示:
\setlength{\unitlength}{0.75mm} \begin{picture}(60,40) \put(30,20){\vector(1,0){30}} \put(30,20){\vector(4,1){20}} \put(30,20){\vector(3,1){25}} \put(30,20){\vector(2,1){30}} \put(30,20){\vector(1,2){10}} \thicklines \put(30,20){\vector(-4,1){30}} \put(30,20){\vector(-1,4){5}} \thinlines \put(30,20){\vector(-1,-1){5}} \put(30,20){\vector(-1,-4){5}} \end{picture} 圆形
\put(x, y){\circle{diameter}} 字符
\put(0.7,0.3){$A$} 例如:
\setlength{\unitlength}{0.8cm} \begin{picture}(6,5) \thicklines \put(1,0.5){\line(2,1){3}} \put(4,2){\line(-2,1){2}} \put(2,3){\line(-2,-5){1}} \put(0.7,0.3){$A$} \put(4.05,1.9){$B$} \put(1.7,2.95){$C$} \put(3.1,2.5){$a$} \put(1.3,1.7){$b$} \put(2.5,1.05){$c$} \put(0.3,4){$F=\sqrt{s(s-a)(s-b)(s-c)}$} \put(3.5,0.4){$\displaystyle s:=\frac{a+b+c}{2}$} \end{picture} 椭圆
\put(x, y){\oval(w, h)} \put(x, y){\oval(w, h)[position]} 二阶贝塞尔曲线
\qbezier(x1, y1)(x, y)(x2, y2) \multiput(x, y)(dx, dy ){n}{object} 例如
\linethickness{0.075mm} \multiput(0,0)(1,0){26} {\line(0,1){20}} 用户自定义图形
\newsavebox{foo} 声明 一个名为foo的盒子.
\savebox{foo}(width,height)[position]{content} 定义 盒子foo
\put(x, y){\usebox{foo}} 调用盒子foo
例如:
\newsavebox{\foldera} \savebox{\foldera} (40,32)[bl]{% definition \multiput(0,0)(0,28){2} {\line(1,0){40}} \multiput(0,0)(40,0){2} {\line(0,1){28}} \put(1,28){\oval(2,2)[tl]} \put(1,29){\line(1,0){5}} \put(9,29){\oval(6,6)[tl]} \put(9,32){\line(1,0){8}} \put(17,29){\oval(6,6)[tr]} \put(20,29){\line(1,0){19}} \put(39,28){\oval(2,2)[tr]} } \newsavebox{\folderb} \savebox{\folderb} (40,32)[l]{% definition \put(0,14){\line(1,0){8}} \put(8,0){\usebox{\foldera}} } \setlength{\unitlength}{0.5mm} \begin{picture}(120,168) \put(34,26){\line(0,1){102}} \put(14,128){\usebox{\foldera}} \multiput(34,86)(0,-37){3} {\usebox{\folderb}} \end{picture} savebox与 {picture}环境没有依赖关系。将savebox的定义放在 {picture}环境之外,那么整个文档都可以使用这个savebox。
样例
下面是几个使用picture环境画图的样例[22]
\setlength{\unitlength}{1mm} \begin{picture}(120,68) \put(0,28){\vector(1,0){115}} \put(116,27){$x_A$} \put(53,7){\vector(0,1){61}} \put(46,66){$ct_A$} \put(2,27){\line(3,1){110}} \multiput(53,28)(-12,12){2}{\circle*{2}} \put(77,52){\circle*{2}} \put(53,28){\vector(-1,1){11}} \put(53,28){\vector(1,1){23}} \put(54,23){$E_1$} \put(35,41){$E_2$} \put(71,53){$E_3$} \put(28,2){$B'$} \multiput(30,7)(2,6){9}{\line(1,3){1.5}} \put(44,2){$B$} \put(46,7){\line(1,3){17.5}} \put(51,2){$A$} \put(60,2){$B''$} \multiput(62,7)(2,6){9}{\line(1,3){1.5}} \put(83,54){\line(1,-1){5}} \put(89,48){Gerade der} \put(89,44){Gleichzeitigkeit} \put(15,54){$\alpha=\alpha'$} \put(15,52){\line(1,0){10}} % draw_arc P1=(54/43) P2=(53/40) P3=(53/41) r=25 \qbezier(60.906,51.717)(57.057,53.000)(53.000,53.000) % draw_arc P1=(54/43) P2=(53/40) P3=(53/41) r=26 \qbezier(61.222,52.666)(57.219,54.000)(53.000,54.000) % \put(57.219,66.000){\makebox(0,0){$\alpha$}} \put(58.000,56.500){\makebox(0,0){$\alpha$}} % draw_arc P1=(6/40) P2=(5/40) P3=(8/41) r=20 \qbezier(25.000,28.000)(25.000,31.246)(23.974,34.325) % draw_arc P1=(6/40) P2=(5/40) P3=(8/41) r=21 \qbezier(26.000,28.000)(26.000,31.408)(24.922,34.641) \put(29.000,32.408){\makebox(0,0){$\alpha'$}} \end{picture} 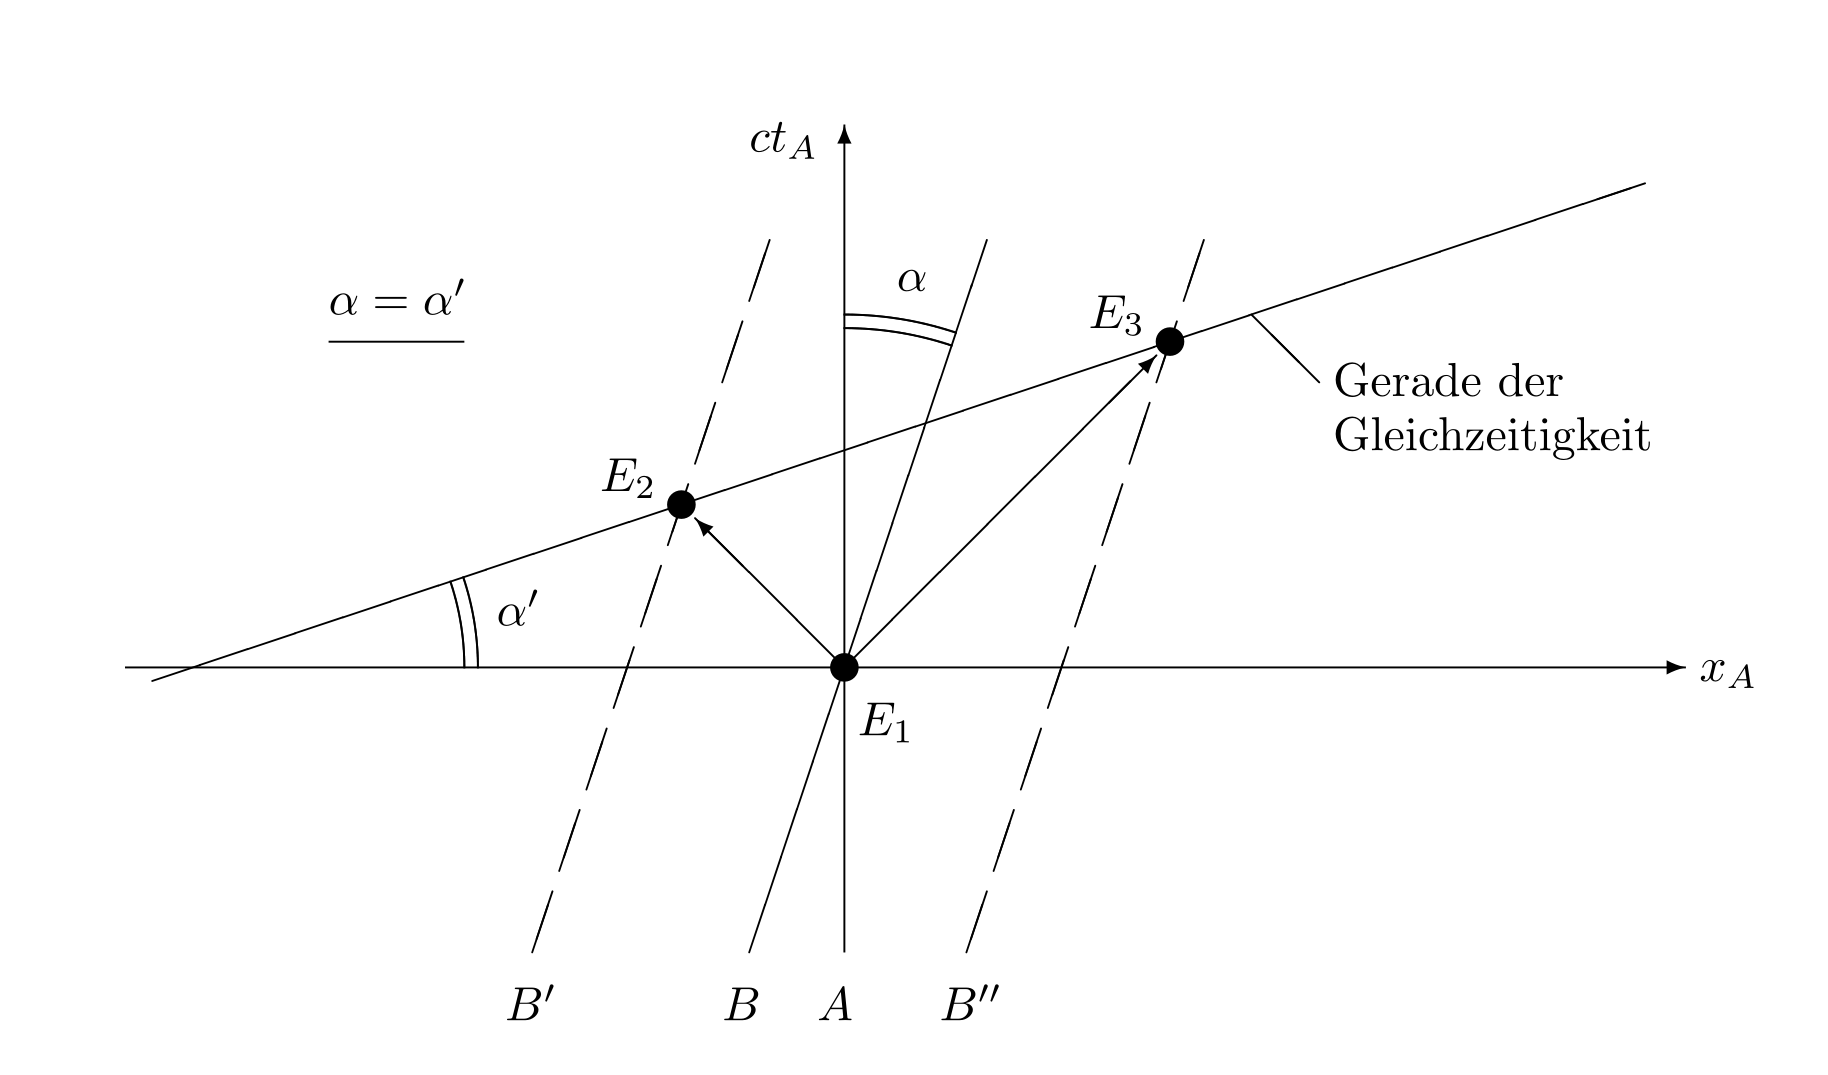

\setlength{\unitlength}{1mm} \begin{picture}(96,38) \put(0,12){\vector(1,0){91}} \put(92,11){$x_L$} \put(6,10){$\underbrace{\rule{4cm}{0cm}}$} \put(26,5){\makebox(0,0){$v\cdot\Delta t_L$}} \multiput(1,12)(0,20){2}{\line(1,0){10}} \multiput(1,12)(10,0){2}{\line(0,1){20}} \multiput(41,12)(0,20){2}{\line(1,0){10}} \multiput(41,12)(10,0){2}{\line(0,1){20}} \multiput(6,12)(40,0){2}{\circle*{2}} \put(46,32){\circle*{2}} \put(46,12){\line(0,1){20}} \put(6,12){\vector(2,1){39}} \put(18,25){$c\cdot\Delta t_L$} \put(46,32){\vector(2,-1){39}} \put(46,22){\line(2,-1){8}} \put(54.5,16){$h=c\cdot\Delta\tau$} \end{picture} 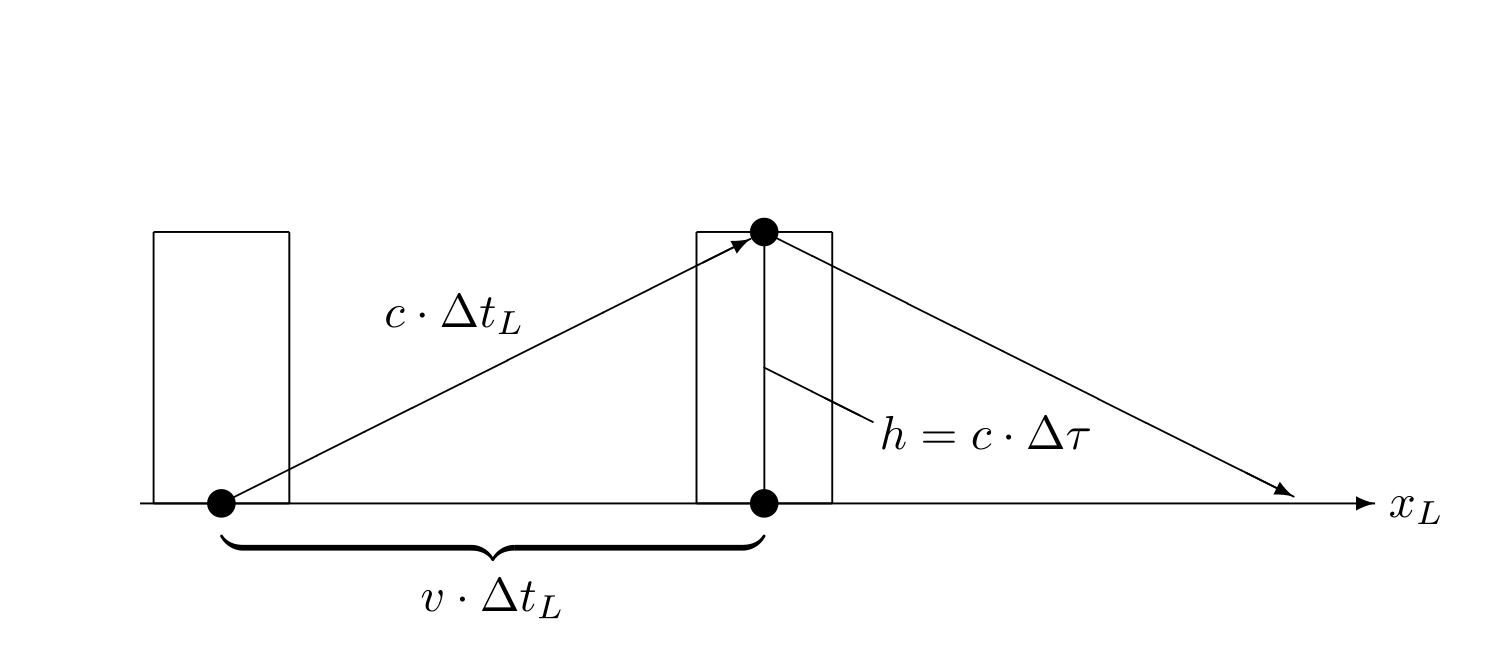
\setlength{\unitlength}{1mm} \begin{picture}(93,46) \put( 0,14){\vector(1,0){60}} \put(61,13){$x$} \put(20,4){\vector(0,1){37}} \put(19,43){$y$} \put(50,34){\circle*{2}} \put(52,35){$P$} \multiput(20,34)(4,0){8}{\line(1,0){2}} \put(14.5,33.5){$y_P$} \multiput(50,14)(0,4){5}{\line(0,1){2}} \put(48,11){$x_P$} \put( 2,8){\vector(3,1){56}} \put(59,26.5){$x'$} \multiput(50,34)(1.9,-5.7){2} {\line(1,-3){1.2}} \put(52,22){$x_P'$} \multiput(50,34)(-5.8,-1.933){6} {\line(-3,-1){3.6}} \put(12,21){$y_P'$} \put(22,8){\vector(-1,3){10.5}} \put(10,41){$y'$} \end{picture} 
tikz包
使用tikz包绘制基本图形样例[16]
绘图环境的坐标系
(1cm, 10pt) 也可以使用极坐标(polar coordinates)
(30:1cm) 中文字符
在tikz环境中使用中文,可以用CJKutf8环境,tex文件保存格式为utf8, 通过\mbox{}在tikz环境中插入中文字符. 例如:
\path (0,4.6) node[left] {\mbox{中文}} 直线段
\draw (0,0) -- (4,0); 多个相连的直线段
\draw (0,0) -- (4,0) -- (4,4) -- (0,4) -- (0,0); 封闭的直线段环
\draw (0,0) -- (4,0) -- (4,4) -- (0,4) -- cycle; 贝塞尔曲线
\draw (0,0) .. controls (0,4) and (4,0) .. (4,4); 抛物线
\draw (0,0) parabola (4,4); 圆弧
\draw (3,0) arc (0:75:3cm); 圆
\draw (2,2) circle (3cm); 椭圆
\draw (2,2) ellipse (3cm and 1cm); 矩形
\draw (0,0) rectangle (4,4); 设置线型
\draw[red,thick,dashed] (2,2) circle (3cm); 网格
\draw[step=1cm,gray,very thin] (-2,-2) grid (6,6); 无边界网格(缩小绘图范围,达到消隐网格边界的效果)
\draw[step=1cm,gray,very thin] (-1.9,-1.9) grid (5.9,5.9); 坐标轴
\draw[thick,->] (0,0) -- (4.5,0); \draw[thick,->] (0,0) -- (0,4.5); 端点带标注坐标轴
\draw[thick,->] (0,0) -- (4.5,0) node[anchor=north west] {x axis}; \draw[thick,->] (0,0) -- (0,4.5) node[anchor=south east] {y axis}; 坐标轴刻度
\foreach \x in {0,1,2,3,4} \draw (\x cm,1pt) -- (\x cm,-1pt) node[anchor=north] {$\x$}; \foreach \y in {0,1,2,3,4} \draw (1pt,\y cm) -- (-1pt,\y cm) node[anchor=east] {$\y$}; Kjell Magne Fauske提供的使用tikz包画图样例:
\documentclass[UTF8]{article} \usepackage{tikz} \begin{document} \newpage \pagestyle{empty} % 3D Cone % Author: Gene Ressler. Adapted to TikZ by Kjell Magne Fauske. % See http://www.frontiernet.net/~eugene.ressler/ for more details. % The following code is generated by Sketch. I have edited it a bit % to make it easier to read. \begin{tikzpicture} \tikzstyle{conefill} = [fill=blue!20,fill opacity=0.8] \tikzstyle{ann} = [fill=white,font=\footnotesize,inner sep=1pt] \tikzstyle{ghostfill} = [fill=white] \tikzstyle{ghostdraw} = [draw=black!50] \filldraw[conefill](-.775,1.922)--(-1.162,.283)--(-.274,.5) --(-.183,2.067)--cycle; \filldraw[conefill](-.183,2.067)--(-.274,.5)--(.775,.424) --(.516,2.016)--cycle; \filldraw[conefill](.516,2.016)--(.775,.424)--(1.369,.1) --(.913,1.8)--cycle; \filldraw[conefill](-.913,1.667)--(-1.369,-.1)--(-1.162,.283) --(-.775,1.922)--cycle; \draw(1.461,.107)--(1.734,.127); \draw[arrows=<->](1.643,1.853)--(1.643,.12); \filldraw[conefill](.913,1.8)--(1.369,.1)--(1.162,-.283) --(.775,1.545)--cycle; \draw[arrows=->,line width=.4pt](.274,-.5)--(0,0)--(0,2.86); \draw[arrows=-,line width=.4pt](0,0)--(-1.369,-.1); \draw[arrows=->,line width=.4pt](-1.369,-.1)--(-2.1,-.153); \filldraw[conefill](-.516,1.45)--(-.775,-.424)--(-1.369,-.1) --(-.913,1.667)--cycle; \draw(-1.369,.073)--(-1.369,2.76); \draw(1.004,1.807)--(1.734,1.86); \filldraw[conefill](.775,1.545)--(1.162,-.283)--(.274,-.5) --(.183,1.4)--cycle; \draw[arrows=<->](0,2.34)--(-.913,2.273); \draw(-.913,1.84)--(-.913,2.447); \draw[arrows=<->](0,2.687)--(-1.369,2.587); \filldraw[conefill](.183,1.4)--(.274,-.5)--(-.775,-.424) --(-.516,1.45)--cycle; \draw[arrows=<-,line width=.4pt](.42,-.767)--(.274,-.5); \node[ann] at (-.456,2.307) {$r_0$}; \node[ann] at (-.685,2.637) {$r_1$}; \node[ann] at (1.643,.987) {$h$}; \path (.42,-.767) node[below] {$x$} (0,2.86) node[above] {$y$} (-2.1,-.153) node[left] {$z$}; % Second version of the cone \begin{scope}[xshift=3.5cm] \filldraw[ghostdraw,ghostfill](-.775,1.922)--(-1.162,.283)--(-.274,.5) --(-.183,2.067)--cycle; \filldraw[ghostdraw,ghostfill](-.183,2.067)--(-.274,.5)--(.775,.424) --(.516,2.016)--cycle; \filldraw[ghostdraw,ghostfill](.516,2.016)--(.775,.424)--(1.369,.1) --(.913,1.8)--cycle; \filldraw[ghostdraw,ghostfill](-.913,1.667)--(-1.369,-.1)--(-1.162,.283) --(-.775,1.922)--cycle; \filldraw[ghostdraw,ghostfill](.913,1.8)--(1.369,.1)--(1.162,-.283) --(.775,1.545)--cycle; \filldraw[ghostdraw,ghostfill](-.516,1.45)--(-.775,-.424)--(-1.369,-.1) --(-.913,1.667)--cycle; \filldraw[ghostdraw,ghostfill](.775,1.545)--(1.162,-.283)--(.274,-.5) --(.183,1.4)--cycle; \filldraw[fill=red,fill opacity=0.5](-.516,1.45)--(-.775,-.424)--(.274,-.5) --(.183,1.4)--cycle; \fill(-.775,-.424) circle (2pt); \fill(.274,-.5) circle (2pt); \fill(-.516,1.45) circle (2pt); \fill(.183,1.4) circle (2pt); \path[font=\footnotesize] (.913,1.8) node[right] {$i\hbox{$=$}0$} (1.369,.1) node[right] {$i\hbox{$=$}1$}; \path[font=\footnotesize] (-.645,.513) node[left] {$j$} (.228,.45) node[right] {$j\hbox{$+$}1$}; \draw (-.209,.482)+(-60:.25) [yscale=1.3,->] arc(-60:240:.25); \fill[black,font=\footnotesize] (-.516,1.45) node [above] {$P_{00}$} (-.775,-.424) node [below] {$P_{10}$} (.183,1.4) node [above] {$P_{01}$} (.274,-.5) node [below] {$P_{11}$}; \end{scope} \end{tikzpicture} \end{document} 动画
使用LaTex在pdf文件中插入动画需要{animate}扩展包,可在LaTex文件引导区添加
\usepackage{animate} 插入动画命令\animategraphics的语法是
\animategraphics[

    ]{ }{

     }{

      }{

       }
< frame rate>定义动画的帧速,< file basename>图形文件名的基, < first>、< last>图形文件起始和结束的序号。例如:panda0.png, panda1.png, …, panda100.png
样例:
\animategraphics[ autoplay,loop,controls, width=.7\textwidth, height=.7\textheight ]{4}{./pandagif/panda}{0}{100} 其中动画图片panda0.png, panda1.png, …, panda100.png都保存在pandagif文件夹中
时间轴(timeline)
画时间轴
下面这个例子[23]基于table画竖向时间轴. 只使用了xcolor扩展包,
\documentclass{article} \usepackage{xcolor} \newcommand\ytl[2]{ \parbox[b]{8em}{\hfill{\color{cyan}\bfseries\sffamily #1}~$\cdots\cdots$~}\makebox[0pt][c]{$\bullet$}\vrule\quad \parbox[c]{4.5cm}{\vspace{7pt}\color{red!40!black!80}\raggedright\sffamily #2.\\[7pt]}\\[-3pt]} \begin{document} \begin{table} \caption{Timeline of something.} \centering \begin{minipage}[t]{.7\linewidth} \color{gray} \rule{\linewidth}{1pt} \ytl{1947}{AT and T Bell Labs develop the idea of cellular phones} \ytl{1968}{Xerox Palo Alto Research Centre envisage the `Dynabook'} \ytl{1971}{Busicom 'Handy-LE' Calculator} \ytl{1973}{First mobile handset invented by Martin Cooper} \ytl{1978}{Parker Bros. Merlin Computer Toy} \ytl{1981}{Osborne 1 Portable Computer} \ytl{1982}{Grid Compass 1100 Clamshell Laptop} \ytl{1983}{TRS-80 Model 100 Portable PC} \ytl{1984}{Psion Organiser Handheld Computer} \ytl{1991}{Psion Series 3 Minicomputer} \bigskip \rule{\linewidth}{1pt}% \end{minipage}% \end{table} \end{document} 显示效果如下: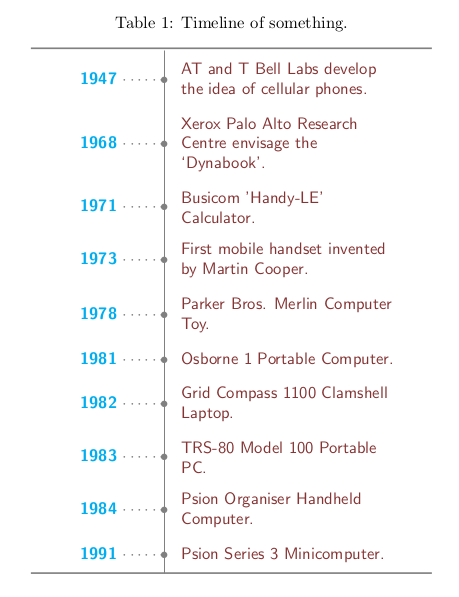
流程图
使用tikz宏包画流程图样例如下:
\documentclass[UTF8]{article} %% 在导言中设置tikz扩展包 \usepackage{tikz} \usetikzlibrary{arrows, shapes.geometric, decorations.pathmorphing, backgrounds, positioning, fit, petri, automata} \begin{document} \thispagestyle{empty} % 在正文中定义流程图中控件样式 \tikzstyle{startstop} = [rectangle, rounded corners, minimum width=3cm, minimum height=1cm,text centered, draw=black, fill=red!30] \tikzstyle{io} = [trapezium, trapezium left angle=70, trapezium right angle=110, minimum width=3cm, minimum height=1cm, text centered, draw=black, fill=blue!30] \tikzstyle{process} = [rectangle, minimum width=3cm, minimum height=1cm, text centered, draw=black, fill=orange!30] \tikzstyle{decision} = [diamond, minimum width=3cm, minimum height=1cm, text centered, draw=black, fill=green!30] \tikzstyle{Data} = [rectangle, rounded corners, minimum width=3cm, minimum height=1cm,text centered, draw=black, fill=red!30] \tikzstyle{arrow} = [thick,->,>=stealth] %% 设置流程图内容 \begin{tikzpicture}[node distance=2cm] %定义流程图具体控件 \node (start) [startstop] {Start}; \node (in1) [io, below of=start] {Input}; \node (pro1) [process, below of=in1] {Process 1}; \node (dec1) [decision, below of=pro1, yshift=-0.5cm] {Decision 1}; \node (pro2a) [process, below of=dec1, yshift=-0.5cm] {Process 2a}; \node (pro2b) [process, right of=dec1, xshift=2cm] {Process 2b}; \node (out1) [io, below of=pro2a] {Output}; \node (stop) [startstop, below of=out1] {Stop}; %连接控件 \draw [arrow](start) -- (in1); \draw [arrow](in1) -- (pro1); \draw [arrow](pro1) -- (dec1); \draw [arrow](dec1) -- (pro2a); \draw [arrow](dec1) -- (pro2b); \draw [arrow](dec1) -- node[anchor=east] {yes} (pro2a); \draw [arrow](dec1) -- node[anchor=south] {no} (pro2b); \draw [arrow](pro2b) |- (pro1); \draw [arrow](pro2a) -- (out1); \draw [arrow](out1) -- (stop); \end{tikzpicture} \end{document} 数学公式
按照数学公式在文中的位置可分为两种: 行中公式和独立公式.
行中公式
行中公式可使用如下两种形式:
毕达哥拉斯定理 \begin{math} x^{2}+y^{2}=z^{2} \end{math}又称勾股定理。 或
毕达哥拉斯定理 $ x^{2}+y^{2}=z^{2} $又称勾股定理。 独立公式
独立公式可使用
$$ v = v^{1}e_{1} + v^{2}e_{2} + v^{3}e_{3} = v^{i}e_{i}, i = 1,2,3 $$ 或 \begin{equation} v = v^{1}e_{1} + v^{2}e_{2} + v^{3}e_{3} = v^{i}e_{i}, i = 1,2,3 \end{equation} 数学公式显示样式
有些数学符号会根据文档中上下文的不同而改变其显示形式。例如,在正文环境中和在独立数学公式环境中,分式会有不同的显示样式.
$f(x) = \sum_{n=0}^{10} \frac{x}{n!}$ \\ $$ f(x) = \sum_{n=0}^{10} \frac{x}{n!} $$ 
例如:
In-line math components can be set with independent math display style $f(x) = \displaystyle \sum_{n=0}^{10} \frac{x}{n!}$, and vice versa: $$ f(x) = \scriptstyle \sum_{n=0}^{10} \frac{x}{n!} $$ 
引用公式
在文中引用公式编号可使用以下方式
\begin{equation}\label{eq:Pythagorean theorem} x^{2}+y^{2}=z^{2} \end{equation} 公式\ref{eq:Pythagorean theorem}是毕达哥拉斯定理,在中国又称勾股定理。 在数学公式中插入中文
使用\mbox{}可在数学公式中插入中文。
$$ \mbox{例如:} x_{1}, x_{2}, \cdots, x_{N} $$ 多行公式
$$ \left [ \begin{array}{cc} v^{i} e_{i} & v^{i} e_{j} \\ v^{j} e_{i} & v^{j} e_{j} \\ \end{array} \right ] $$ $$ \left \{ \begin{array}{r c l} (f + g)(x) & = & f(x) + g(x) \\ (\alpha f)(x) & = & \alpha f(x) \\ (fg)(x) & = & f(x)g(x) \\ \end{array} \right . $$ 多行公式也可以在{eqnarray}环境实现,例如:
\begin{eqnarray} w(0) & = & 0 \\ \frac{\partial w}{\partial x}\Big |_{x=0} & = & 0 \\ \end{eqnarray} 下标
- 一般数学公式中下标可以使用
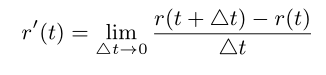
$$ s = \int_{a}^{b} |\dot{x}(t)| dt $$ - 有时需要将下标放在正下方, 如果是数学符号,可使用$ \limits$命令
$$ r'(t) = \lim \limits_{\triangle t \rightarrow 0} \frac{ r(t + \triangle t) - r(t)}{ \triangle t }$$
- 如果是普通符号,那么要用KaTeX parse error: Expected group after ‘\mathop’ at end of input: \mathop先转成数学符号再用$\limits$
长竖线
数学公式中的竖线高度可通过 “\big” “\Big” “\bigg” “\Bigg” 调整。
$$ \frac{\partial w}{\partial x}\Big |_{x=0} = 0 $$ 根号
The square root of 100 is $\sqrt{100}=10$. \\ The cubic root of 64 is $\sqrt[3]{64}=4$. 页脚注释和页边注释
页脚注释
在正文中添加页脚注释的命令是:\footnote, 例如:
正文内容\footnote{注释内容} Latex会按顺序为脚注设置编号。
也可以使用\footnotemark和\footnotetext 添加页脚注释,例如:
在这里添加页脚注释角标\footnotemark %% ... 在这里设置注释内容\footnotetext{注释内容} \footnote脚注命令不能在数学公式,表格,子页面等环境中使用。如果想在表格中引用页脚注释,可参考下面的例子:
正文内容\footnote{注释内容\label{fnote}} 在这里也引用与上边脚注相同的角标 \textsuperscript{\ref{fnote}} 页边注释
在正文中添加页边注释的命令是:\marginpar, 例如:
\marginpar{注释内容} 关于页脚注释和页边注释命令的使用以及其它内容请参考[19]
枚举项编号样式
使用{enumitem}扩展包
\usepackage{enumitem} \begin{enumerate}[label=(\alph*)] \item an apple \item a banana \item a carrot \item a durian \end{enumerate} \begin{enumerate}[label=(\Alph*)] \item an apple \item a banana \item a carrot \item a durian \end{enumerate} \begin{enumerate}[label=(\roman*)] \item an apple \item a banana \item a carrot \item a durian \end{enumerate} 使用参考文献
Latex中参考文献命令格式是[7]:
 \begin{thebibliography}{9}
\bibitem{latexcompanion}
Michel Goossens, Frank Mittelbach, and Alexander Samarin.
\textit{The \LaTeX\ Companion}.
Addison-Wesley, Reading, Massachusetts, 1993.

\bibitem{einstein}
Albert Einstein.
\textit{Zur Elektrodynamik bewegter K{\"o}rper}. (German)
[\textit{On the electrodynamics of moving bodies}].
Annalen der Physik, 322(10):891–921, 1905.

\bibitem{knuthwebsite}
Knuth: Computers and Typesetting,
\\\texttt{http://www-cs-faculty.stanford.edu/\~{}uno/abcde.html}
\end{thebibliography}
注意:\bibitem命令中 参考文献引用名中可以有空格。
Bibtex是常用的参考文献管理工具。Bibtex将参考文献条目内容保存在一个.bib后缀文件中。 Bibtex能根据参考文献在正文中被引用的顺序自动过滤并调整文献编号,因此不同论文中可以使用同一个bib文件。 Bibtex使用的参考文献格式如下所示[7][8]:
@article{name1,
     author = {Auther 1 and Auther 2},
     title = {The \LaTeX\ Companion},
     journal = {Journal name},
     volume = {49},
     pages = {409-436},
     year = {19xx},
     abstract = {摘要主要是给自己参考, 这一项不是必须的}
}
@book{name2,
     author = {Auther 1 and Auther 2},
     title = {The TeX Book},
     publisher = "Springer",
     year = {19xx},
     abstract = {摘要}
}
@article{einstein,
    author =       "Albert Einstein",
    title =        "{Zur Elektrodynamik bewegter K{\"o}rper}. ({German})
        [{On} the electrodynamics of moving bodies]",
    journal =      "Annalen der Physik",
    volume =       "322",
    number =       "10",
    pages =        "891--921",
    year =         "1905",
    DOI =          "http://dx.doi.org/10.1002/andp.19053221004"
}

@book{latexcompanion,
    author    = "Michel Goossens and Frank Mittelbach and Alexander Samarin",
    title     = "The \LaTeX\ Companion",
    year      = "1993",
    publisher = "Addison-Wesley",
    address   = "Reading, Massachusetts"
}

@misc{knuthwebsite,
    author    = "Donald Knuth",
    title     = "Knuth: Computers and Typesetting",
    url       = "http://www-cs-faculty.stanford.edu/\~{}uno/abcde.html"
}

@article{article,
  author  = {Peter Adams},
  title   = {The title of the work},
  journal = {The name of the journal},
  year    = 1993,
  number  = 2,
  pages   = {201-213},
  month   = 7,
  note    = {An optional note},
  volume  = 4
}

@book{book,
  author    = {Peter Babington},
  title     = {The title of the work},
  publisher = {The name of the publisher},
  year      = 1993,
  volume    = 4,
  series    = 10,
  address   = {The address},
  edition   = 3,
  month     = 7,
  note      = {An optional note},
  isbn      = {3257227892}
}

@booklet{booklet,
  title        = {The title of the work},
  author       = {Peter Caxton},
  howpublished = {How it was published},
  address      = {The address of the publisher},
  month        = 7,
  year         = 1993,
  note         = {An optional note}
}

@conference{conference,
  author       = {Peter Draper},
  title        = {The title of the work},
  booktitle    = {The title of the book},
  year         = 1993,
  editor       = {The editor},
  volume       = 4,
  series       = 5,
  pages        = 213,
  address      = {The address of the publisher},
  month        = 7,
  organization = {The organization},
  publisher    = {The publisher},
  note         = {An optional note}
}

@inbook{inbook,
  author       = {Peter Eston},
  title        = {The title of the work},
  chapter      = 8,
  pages        = {201-213},
  publisher    = {The name of the publisher},
  year         = 1993,
  volume       = 4,
  series       = 5,
  address      = {The address of the publisher},
  edition      = 3,
  month        = 7,
  note         = {An optional note}
}

@incollection{incollection,
  author       = {Peter Farindon},
  title        = {The title of the work},
  booktitle    = {The title of the book},
  publisher    = {The name of the publisher},
  year         = 1993,
  editor       = {The editor},
  volume       = 4,
  series       = 5,
  chapter      = 8,
  pages        = {201-213},
  address      = {The address of the publisher},
  edition      = 3,
  month        = 7,
  note         = {An optional note}
}

@manual{manual,
  title        = {The title of the work},
  author       = {Peter Gainsford},
  organization = {The organization},
  address      = {The address of the publisher},
  edition      = 3,
  month        = 7,
  year         = 1993,
  note         = {An optional note}
}

@mastersthesis{mastersthesis,
  author       = {Peter Harwood},
  title        = {The title of the work},
  school       = {The school of the thesis},
  year         = 1993,
  address      = {The address of the publisher},
  month        = 7,
  note         = {An optional note}
}

@misc{misc,
  author       = {Peter Isley},
  title        = {The title of the work},
  howpublished = {How it was published},
  month        = 7,
  year         = 1993,
  note         = {An optional note}
}

@phdthesis{phdthesis,
  author       = {Peter Joslin},
  title        = {The title of the work},
  school       = {The school of the thesis},
  year         = 1993,
  address      = {The address of the publisher},
  month        = 7,
  note         = {An optional note}
}

@proceedings{proceedings,
  title        = {The title of the work},
  year         = 1993,
  editor       = {Peter Kidwelly},
  volume       = 4,
  series       = 5,
  address      = {The address of the publisher},
  month        = 7,
  organization = {The organization},
  publisher    = {The name of the publisher},
  note         = {An optional note}
}

@techreport{techreport,
  author       = {Peter Lambert},
  title        = {The title of the work},
  institution  = {The institution that published},
  year         = 1993,
  number       = 2,
  address      = {The address of the publisher},
  month        = 7,
  note         = {An optional note}
}

@unpublished{unpublished,
  author       = {Peter Marcheford},
  title        = {The title of the work},
  note         = {An optional note},
  month        = 7,
  year         = 1993
}
在preamble中添加(不加这个命令也能用)
\usepackage{cite} 在正文中引用时方法如下:
\begin{document} \cite{name1}"The geometric definition of dot product is coordinate independent, ..."\cite{latexcompanion,knuthwebsite} \medskip %% IEEEtran是参考文献显示格式 \bibliographystyle{IEEEtran} %% foo is the bib file name \bibliography{foo} \end{document} 注意:
1) 应用多个文献时,例如:\cite{latexcompanion,knuthwebsite}, 参考文献引用名之间用逗号分隔,不能插入空格。
2) \bibliography{foo} 中使用文件名(本例中是foo),不能带.bib后缀.
Beamer样例
%~~~~~~~~~~~~~~~~~~~~~~~~~~~~~~~~~~~~~~~~~~~~~~ % 设置文档类型为 beamer %~~~~~~~~~~~~~~~~~~~~~~~~~~~~~~~~~~~~~~~~~~~~~~ \documentclass{beamer} \usepackage{beamerthemesplit} \usepackage{animate} \title{Example Presentation Created with the Beamer Package} \author{Till Tantau} \date{\today} \begin{document} %~~~~~~~~~~~~~~~~~~~~~~~~~~~~~~~~~~~~~~~~~~~~~~ % TITLE PAGE %~~~~~~~~~~~~~~~~~~~~~~~~~~~~~~~~~~~~~~~~~~~~~~ \frame{\titlepage} \section*{Outline} \frame{\tableofcontents} \section{Introduction} \subsection{Overview of the Beamer Class} %~~~~~~~~~~~~~~~~~~~~~~~~~~~~~~~~~~~~~~~~~~~~~~ % 使用 frame 命令生成一页 %~~~~~~~~~~~~~~~~~~~~~~~~~~~~~~~~~~~~~~~~~~~~~~ \frame { \frametitle{Features of the Beamer Class} \begin{itemize} \item<1-> Normal LaTeX class. \item<2-> Easy overlays. \item<3-> No external programs needed. \end{itemize} } \begin{frame}{Metropolis title formats} supports 4 different title formats: \begin{itemize} \item Regular \item \textsc{Small caps} \item \textsc{all small caps} \item ALL CAPS \end{itemize} They can either be set at once for every title type or individually. \end{frame} %~~~~~~~~~~~~~~~~~~~~~~~~~~~~~~~~~~~~~~~~~~~~~ % 公式于图片并列 %~~~~~~~~~~~~~~~~~~~~~~~~~~~~~~~~~~~~~~~~~~~~~ \begin{frame}{Euler–Bernoulli 梁理论} \begin{figure}[H] \begin{minipage}{0.48\linewidth} \centerline{\includegraphics[width=4.0cm]{foo.PNG}} \end{minipage} \hfill \begin{minipage}{.48\linewidth} $ \displaystyle \frac{d^{2}}{dx^{2}} (EI_{y} \frac{d^{2} \omega}{dx^{2}}) = q$ \end{minipage} \caption{Euler–Bernoulli 方程} \label{zrotate} \end{figure} \end{frame} %~~~~~~~~~~~~~~~~~~~~~~~~~~~~~~~~~~~~~~~~~~~~~ % 插入代码片段, 需要使用 fragile %~~~~~~~~~~~~~~~~~~~~~~~~~~~~~~~~~~~~~~~~~~~~~ \begin{frame} [fragile] \frametitle{Code} \begin{verbatim} int main (int argc, char* argv[]) { printf("Hello world. \n"); return 0; } \end{verbatim} \end{frame} %~~~~~~~~~~~~~~~~~~~~~~~~~~~~~~~~~~~~~~~~~~~~~ % 插入动画 %~~~~~~~~~~~~~~~~~~~~~~~~~~~~~~~~~~~~~~~~~~~~~ \begin{frame} \animategraphics[ autoplay,loop,controls, width=.7\textwidth, height=.7\textheight ]{4}{/pandagif/panda}{0}{100} \end{frame} \end{document} 字体与字号
Latex的字体由小到大分别为
\tiny \scriptsize \footnotesize \small \normalsize \large \Large \LARGE \huge \Huge {\tiny Hello}\\ {\scriptsize Hello}\\ {\footnotesize Hello}\\ {\small Hello}\\ {\normalsize Hello}\\ {\large Hello}\\ {\Large Hello}\\ {\LARGE Hello}\\ {\huge Hello}\\ {\Huge Hello}\\ 如果需要在大范围调整,可使用\begin{}和\end{} 命令。 例如:
\begin{footnotesize} The package uses new font size other than default size. \end{footnotesize} \documentclass[12pt, letterpaper]{article} 中文排版通常使用字号,例如:五号字,六号字等。 字号与pt的关系如下所列:
\begin{tabular}{lll} \hline 七号 & 5.25pt & 1.845mm \\ 六号 & 7.875pt & 2.768mm \\ 小五号 & 9pt & 3.163mm \\ 五号 & 10.5pt & 3.69mm \\ 小四号 & 12pt & 4.2175mm \\ 四号 & 13.75pt & 4.83mm \\ 三号 & 15.75pt & 5.53mm \\ 二号 & 21pt & 7.38mm \\ 一号 & 27.5pt & 9.48mm \\ 小初号 & 36pt & 12.65mm \\ 初号 & 42pt & 14.76mm \\ \hline \end{tabular} 设置字号的命令
\zihao{5} \zihao{-5} 常用的中文字体有
\kaishu 楷体 \songti 宋体 \heiti 黑体 \fangsong 仿宋 \lishu 隶书 \youyuan 幼圆 颜色
设置字符颜色, 字符框颜色和背景色
使用\textcolor命令,可以基于红,黄,蓝三原色改变字符颜色
\textcolor[rgb]{0.00,0.50,1.00}{text} \textcolor[RGB]{0,128,255}{text} \usepackage{xcolor} 使用样例:
\textcolor{blue}{text} {\color{red}some text} 设置字符背景色
\colorbox{blue}{text} 设置字符框颜色和背景色
\fcolorbox{blue}{yellow}{text} 自定义颜色名
通过\definecolor命令可以自定义颜色名. \definecolor命令的语法是:
\definecolor{name}{model}{color-spec} 例如:
\definecolor{orange}{rgb}{1,0.5,0} 设置verbatim环境中字符颜色
\usepackage{fancyvrb} \usepackage{xcolor} 使用样例
\color{blue} \begin{verbatim} The characters' color have been chenged to blue. \end{verbatim} \color{black} %% 改回原来的颜色 \color 命令会改变从它所在行开始知道页面结束所有文档内容中字符的颜色。
LaTex文件编码格式与使用中文
要在Latex环境中使用中文,首先要选择tex文件的编码(encoding)方式,常用的有UTF-8和GBK等。在Windows中,使用WinEdt编辑UTF-8格式tex文件时,修改配置文件(Options -> Options Interface -> Language, Unicode, Sorting -> Unicode(UTF-8) Support )中UTF8FILTER项
UTF8FILTER="Tex;UTF-8|ACP;EDT;INI;" % !Mode:: "TeX:UTF-8" Latex环境中使用中文需要注意的一点是: Latex编辑器读入文件的使用的编码格式一定要与该文件的编码格式一致。
- 使用CJK中文包(UTF8格式)
\documentclass[UTF8]{article} \usepackage{CJK} \begin{document} \begin{CJK}{UTF8}{song} Hello, World! 世界, 你好! \emph{世界, 你好!} \textbf{世界, 你好!} {\CJKfamily{hei} 黑体} {\CJKfamily{kai} 楷体} {\CJKfamily{li} 隶书} {\CJKfamily{fs} 仿宋} {\CJKfamily{song} 仿宋} \end{CJK} \end{document} 第一行$ \documentclass $ 后的 [ U T F 8 ] [UTF8] [UTF8] 指定编辑器按照UTF8格式读入该文件,所以也要以UTF8格式保存该文件。
- 使用CTEX中文包(UTF8格式)
\documentclass[UTF8]{article} \usepackage{CTEX} \begin{document} \section{字体设置} {\kaishu 楷体} {\songti 宋体} {\heiti 黑体} {\fangsong 仿宋} {\lishu 隶书} {\youyuan 幼圆} \end{document} - 使用CJK中文包(GBK格式)
\documentclass{article} \usepackage{CJK} \begin{document} \begin{CJK*}{GBK}{song} Hello, World! 世界, 你好! \emph{世界, 你好!} \textbf{世界, 你好!} \end{CJK*} \end{document} - 输入中文繁体字
在Windows 10操作系统中,使用微软拼音输入法, 通过 Ctrl + Shift + f 可以转换中文繁/简体
LaTeX文件编译
常用的LaTeX文件编辑软件有WinEdt等,也可以自己动手编译,例如使用Windows的批处理,使用Visual Studio的make等.
使用WinEdt
Shift+Ctrl+P
Windows 10中使用批处理编译
使用 Windows的 记事本(在文件资源管理器中打开文件夹(如D:\foo), 点击鼠标右键->新建->文本文档), 也可以使用别的编译软件如Notepad++等。写入以下命令
pdflatex %1 bibtex %1 pdflatex %1 pdflatex %1 start %1.pdf cd d:\foo foo.bat Visual Studio的make
下面是一例用于编译LaTeX文件的Makefile文件:
BINPATH = D:\CTEX\MiKTeX\miktex\bin\ TeX = $(BINPATH)\pdflatex.exe TeX_FLAGS = -shell-escape -interaction=nonstopmode -file-line-error PRE = $(TeX) -ini -job-name="preamble" "&pdflatex preamble.tex\dump" BIB = $(BINPATH)\bibtex.exe FileName = main all: $(FileName).pdf main.pdf: $(FileName).tex $(TeX) $(TeX_FLAGS) $(FileName).tex $(BIB) $(FileName).tex $(TeX) $(FileName).tex $(TeX) $(FileName).tex clean: del $(FileName).pdf del $(FileName).log 常见编译错误
“豢\documentclass{article}”
在Windows系统中,当文档中需要插入中文字符时,需将Latex文件使用UTF-8编码保存。如果使用Windows系统自带的记事本编辑Latex文件,经常遇到下面的编译错误:
豢\documentclass{article} 出现这种编译错误的原因是因为 Windows 会在 UTF 编码的文件最开始加一个 BOM。
“Too Many Unprocessed Floats”
如果一浮动对象不能被立即处理,它就会被放到未处理的浮动对象队列@freelist 中,
@freelist 一般只保存18个未处理浮动对象,当未处理的浮动对象的数目过多时,就会出现”Too Many Unprocessed Floats”错误[10]。
解决办法:
- 调整文本
- 在浮动图形对象之间加入 \clearpage
- 将浮动图形对象改为非浮动图形对象[11]
使用WinEdt打开UTF-8格式文件,文件的中文字符显示为乱码
解决办法:
在Document->Document Setting->Format->File Format中选择UTF-8格式
或者在在该文件的开始处添加一行
% !Mode:: "TeX:UTF-8" 参考文献
后记
人类社会历经石器时代, 青铜时代, 铁器时代, 机器时代,电气时代,直到现在的电子信息时代. 人类将对自然界和人类社会探索和研究 转化为知识, 用文字记录下来. 文字的出现标识人类文明的起点. 知识的增长不仅依赖人类对未知世界的探索,也依赖于承载文明的工具. 从结绳刻木, 到龟甲,兽骨, 陶器, 兽皮,竹简, 丝绢, 纸张, 电子计算机, 从刻刀,到笔墨, 活字印刷, 到电子软件, 人类在发现知识的同时也努力改进传承知识的工具.
知识是人类文明的承载体,是人类改变个体命运的强大武器。知识是人类社会划分阶层的重要标尺. 知识曾经是贵族的专享, 二千多年前的孔子提出”有教无类”, 打破了贵族对知识的垄断.
感谢那些伟大的程序员. 他(她)们花费时间和精力发明TeX, 开发一系列相关扩展包和辅助工具,将其扩展为LaTex等分支。 他(她)们将私人知识产权的劳动成果奉献为公共财产,供全社会免费使用。 这种大公无私的精神,在物欲横流, 弱肉强食的丛林社会中格外耀眼。他(她)们奉献的不仅是排版软件,更是计算机时代传播知识的工具. 他(她)们无私的奉献使得一些人不再因为金钱而失去获取知识的权力, 也给这些人通过知识改变命运的机会. 这是对人类文明发展的有力推动。
人类文明一直加速发展. 特别从工业革命开始, 出现了牛顿,伏尔泰,康德,达尔文等一大批伟大的思想家, 科学家。在此期间,中国人对人类文明发展做出的贡献于严重落后于我们占世界人口的比重。在国内, 学习LaTex的需求一般源自研究生撰写论文的压力。 能坚持读到这里,你有很大概率是其中的一员。 希望你即使成不了牛顿那样的伟人,至少也要做一个具有奉献精神的人, 能让这个世界变得更美好, 更公平。
发布者:全栈程序员-站长,转载请注明出处:https://javaforall.net/221577.html原文链接:https://javaforall.net


