
文章目录
AlexNet简介
AlexNet的贡献点:
- 首次使用GPU加速网络训练
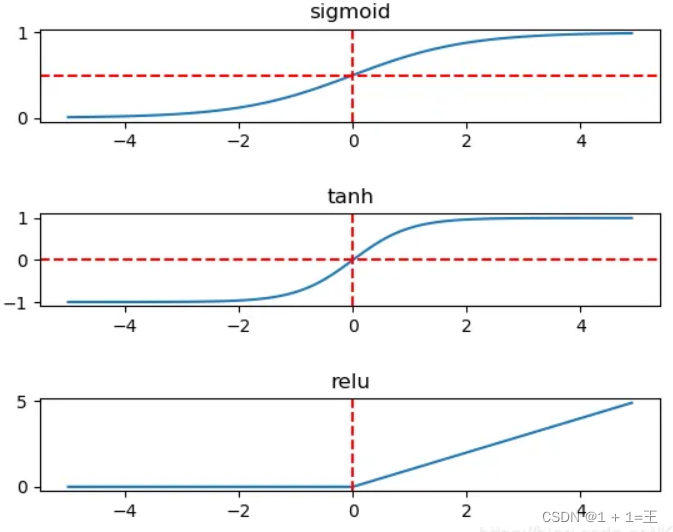
- 使用ReLU激活函数,代替不是传统的Sigmoid和Tanh,解决了Sigmoid的梯度消失问题,使收敛更快。

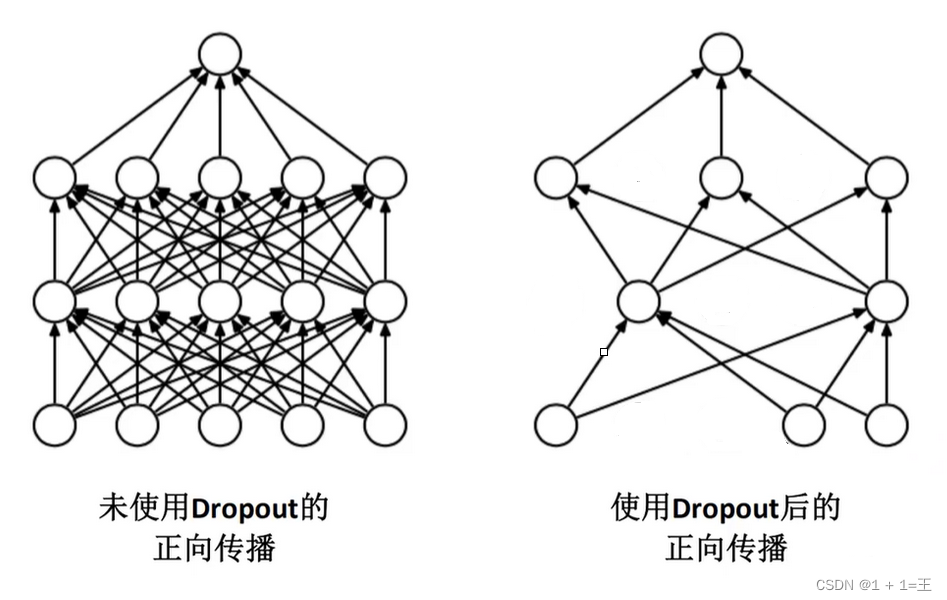
- 训练时使用Dropout随机忽略一部分神经元,以减少模型过拟合。
- 使用了LRN局部响应归一化提高准确率。
- 在CNN中使用重叠的最大池化,提升了特征的丰富性。
AlexNet网络结构解析
卷积层1(Conv + ReLU + MaxPool)
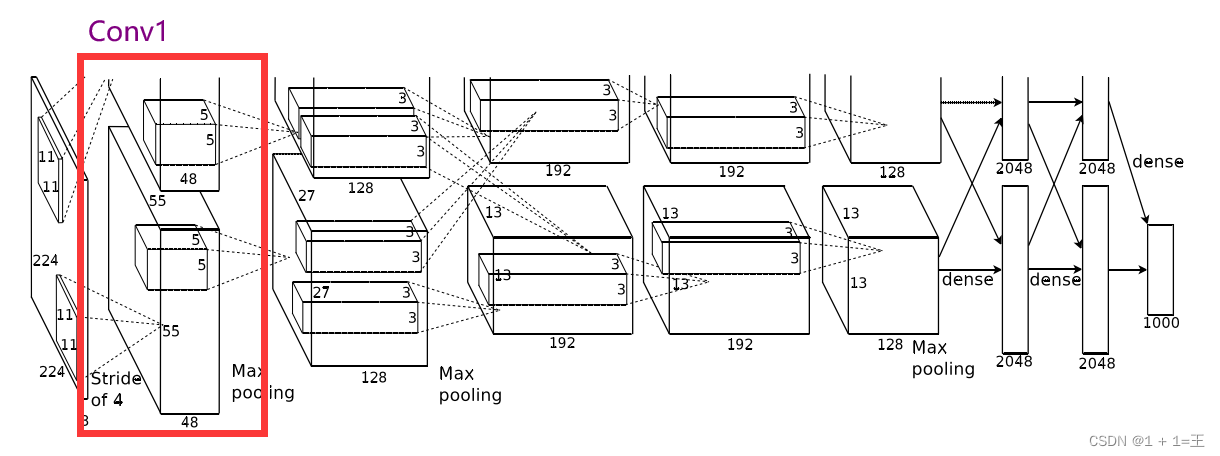
Conv1使用卷积核大小为11,步距为4,padding为2。
输入大小:【3,224,224】
输出大小:【48,55,55】
N = (W-F+2P)/ S + 1 = (224-11+2*2)/4+1=55。
卷积之后跟着一个ReLU激活,激活之后接着一个最大池化上采样,池化核大小为3,步距为2,池化后输出大小为【48,27,27】。
PyTorch表述本层为:
# input[3, 224, 224] nn.Conv2d(3, 48, kernel_size=11, stride=4, padding=2), # output[48, 55, 55] nn.ReLU(inplace=True), nn.MaxPool2d(kernel_size=3, stride=2), # output[48, 27, 27] 卷积层2(Conv + ReLU + MaxPool)
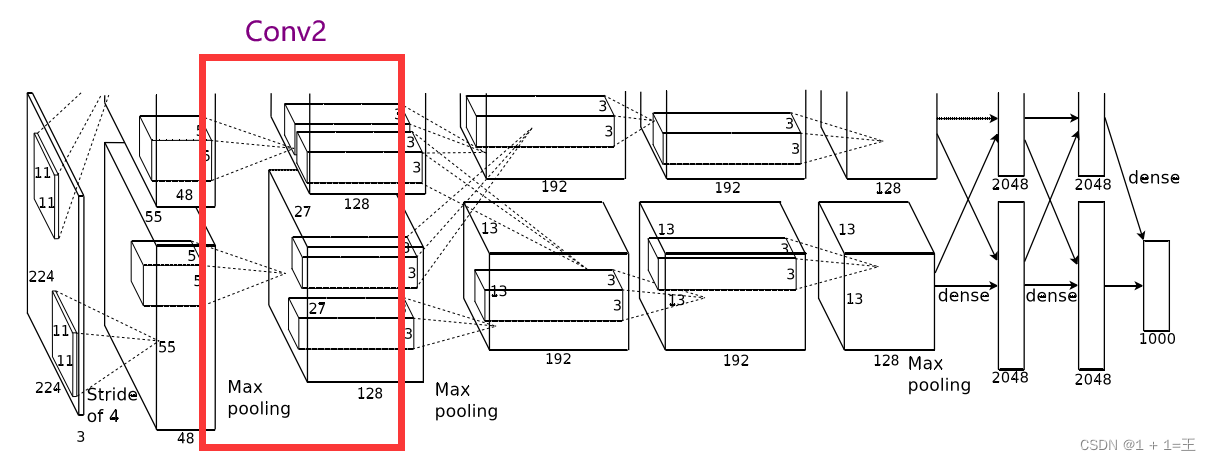
卷积之后跟着一个ReLU激活,激活之后接着一个最大池化上采样,池化核大小为3,步距为2,池化后输出大小为【128,13,13】。
PyTorch表述本层为:
# input[48,27,27] nn.Conv2d(48, 128, kernel_size=5, padding=2), # output[128, 27, 27] nn.ReLU(inplace=True), nn.MaxPool2d(kernel_size=3, stride=2), # output[128, 13, 13] 卷积层3(Conv + ReLU )

Conv3使用卷积核大小为3,步距为1,padding为1。
输入大小:【128, 13, 13】
输出大小:【192,13,13】
N = (W-F+2P)/ S + 1 = (13-3+1*2)/1+1=13。
卷积之后跟着一个ReLU激活,没有池化。
PyTorch表述本层为:
# input[128, 13, 13] nn.Conv2d(128, 192, kernel_size=3, padding=1), # output[192, 13, 13] nn.ReLU(inplace=True), 卷积层4(Conv + ReLU )
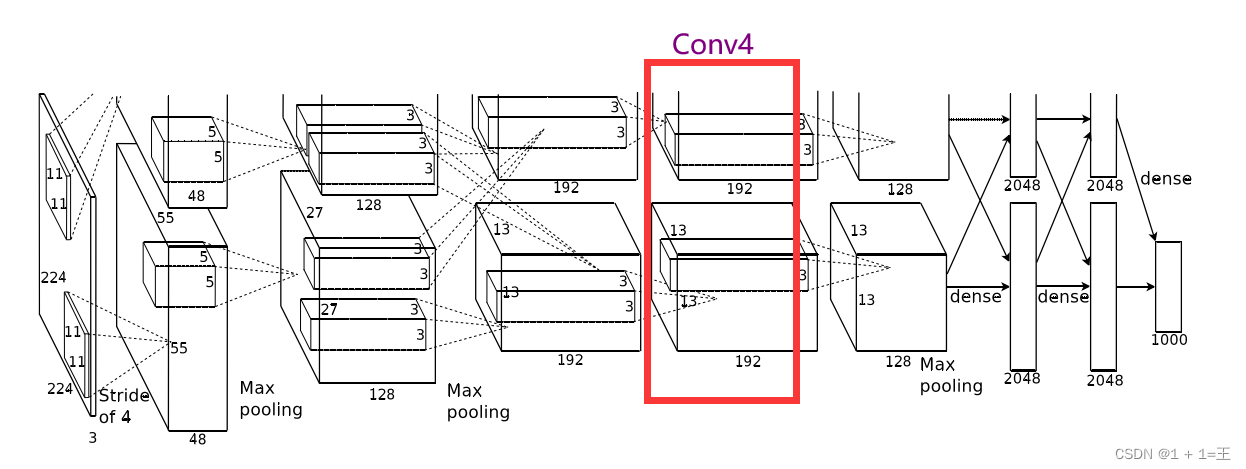
卷积之后跟着一个ReLU激活,没有池化。
PyTorch表述本层为:
# input[192, 13, 13] nn.Conv2d(192, 192, kernel_size=3, padding=1), # output[192, 13, 13] nn.ReLU(inplace=True), 卷积层5(Conv + ReLU + MaxPool)
卷积之后跟着一个ReLU激活,激活之后接着一个最大池化上采样,池化核大小为3,步距为2,池化后输出大小为【128,6,6】。
PyTorch表述本层为:
# input[192, 13, 13] nn.Conv2d(192, 128, kernel_size=3, padding=1), # output[128, 13, 13] nn.ReLU(inplace=True), nn.MaxPool2d(kernel_size=3, stride=2), # output[128, 6, 6] 第5个卷积层之后,就是三个全连接层。
FC1
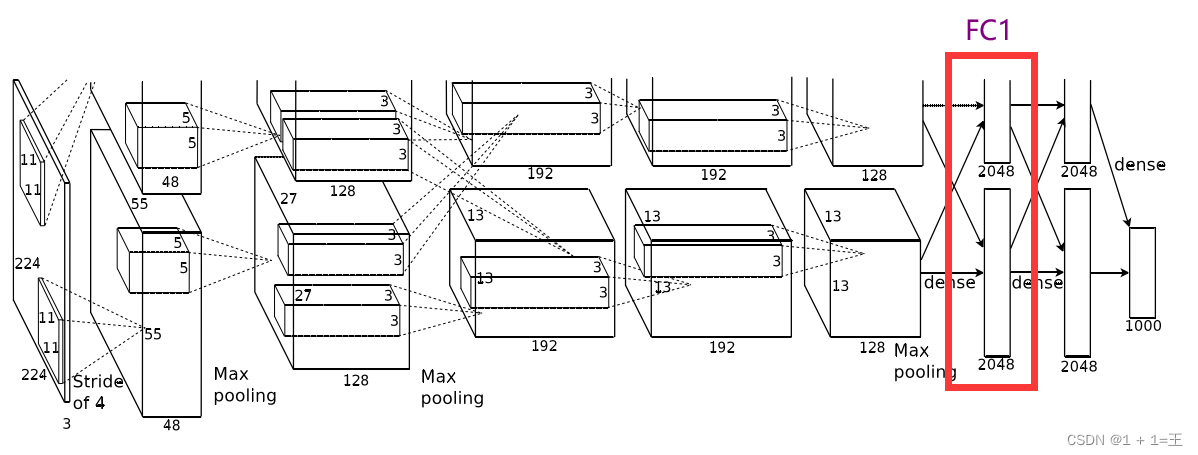
全连接FC1之前先进行一次Dropout。
FC1之后进行一次ReLU激活。
PyTorch表述本层为:
nn.Dropout(p=0.5), nn.Linear(128 * 6 * 6, 2048), nn.ReLU(inplace=True), FC2
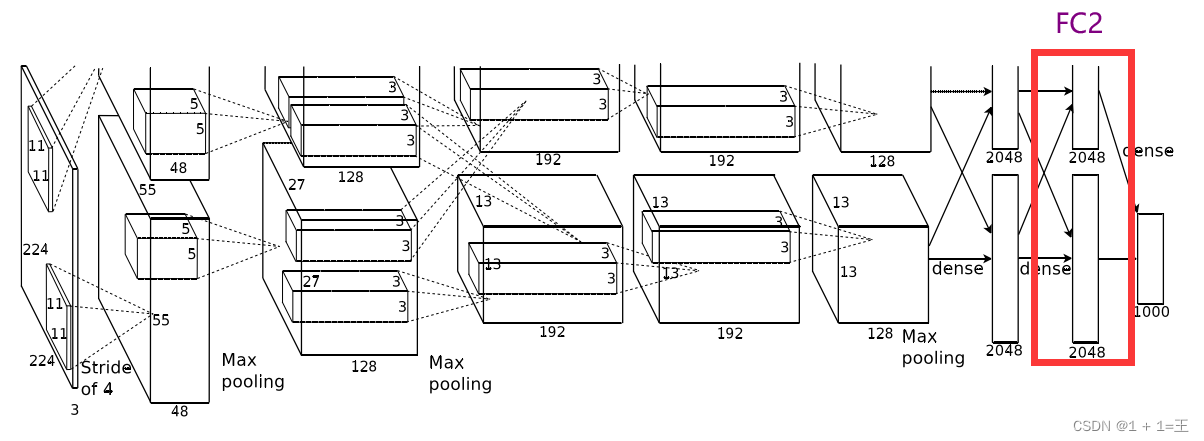
全连接FC2之前先进行一次Dropout。
FC1之后进行一次ReLU激活。
PyTorch表述本层为:
nn.Dropout(p=0.5), nn.Linear(2048, 2048), nn.ReLU(inplace=True), FC3
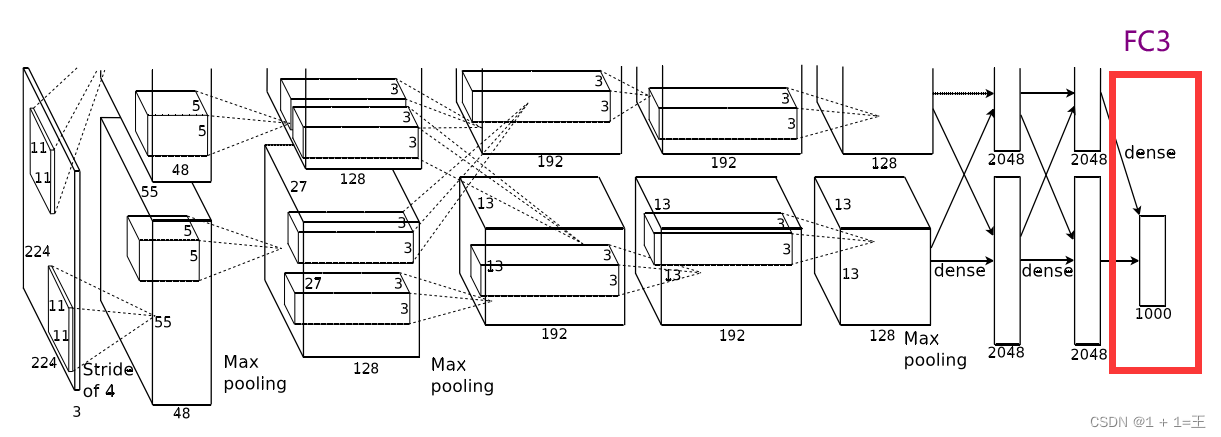
nn.Linear(2048, 1000), 使用PyTorch搭建AlexNet网络结构
前面在网络结构解析的时候,都已经给出了每一层的代码表述。
init
这里我们使用nn.Sequential将5个卷积层放在一起,定义为features(义为提取特征);将3个全连接层放在一起,定义为classifier(义为分类)。
def __init__(self): super(AlexNet, self).__init__() self.features = nn.Sequential( nn.Conv2d(3, 48, kernel_size=11, stride=4, padding=2), # output[48, 55, 55] nn.ReLU(inplace=True), nn.MaxPool2d(kernel_size=3, stride=2), # output[48, 27, 27] nn.Conv2d(48, 128, kernel_size=5, padding=2), # output[128, 27, 27] nn.ReLU(inplace=True), nn.MaxPool2d(kernel_size=3, stride=2), # output[128, 13, 13] nn.Conv2d(128, 192, kernel_size=3, padding=1), # output[192, 13, 13] nn.ReLU(inplace=True), nn.Conv2d(192, 192, kernel_size=3, padding=1), # output[192, 13, 13] nn.ReLU(inplace=True), nn.Conv2d(192, 128, kernel_size=3, padding=1), # output[128, 13, 13] nn.ReLU(inplace=True), nn.MaxPool2d(kernel_size=3, stride=2), # output[128, 6, 6] ) self.classifier = nn.Sequential( nn.Dropout(p=0.5), nn.Linear(128 * 6 * 6, 2048), nn.ReLU(inplace=True), nn.Dropout(p=0.5), nn.Linear(2048, 2048), nn.ReLU(inplace=True), nn.Linear(2048, num_classes), ) forward
然后定义正向传播过程
def forward(self, x): x = self.features(x) # 5个卷积层 x = torch.flatten(x, start_dim=1) # 将3维展平成一维,进行全连接 x = self.classifier(x) # 3个全连接层 return x 完整代码
class AlexNet(nn.Module): def __init__(self): super(AlexNet, self).__init__() self.features = nn.Sequential( nn.Conv2d(3, 48, kernel_size=11, stride=4, padding=2), # output[48, 55, 55] nn.ReLU(inplace=True), nn.MaxPool2d(kernel_size=3, stride=2), # output[48, 27, 27] nn.Conv2d(48, 128, kernel_size=5, padding=2), # output[128, 27, 27] nn.ReLU(inplace=True), nn.MaxPool2d(kernel_size=3, stride=2), # output[128, 13, 13] nn.Conv2d(128, 192, kernel_size=3, padding=1), # output[192, 13, 13] nn.ReLU(inplace=True), nn.Conv2d(192, 192, kernel_size=3, padding=1), # output[192, 13, 13] nn.ReLU(inplace=True), nn.Conv2d(192, 128, kernel_size=3, padding=1), # output[128, 13, 13] nn.ReLU(inplace=True), nn.MaxPool2d(kernel_size=3, stride=2), # output[128, 6, 6] ) self.classifier = nn.Sequential( nn.Dropout(p=0.5), nn.Linear(128 * 6 * 6, 2048), nn.ReLU(inplace=True), nn.Dropout(p=0.5), nn.Linear(2048, 2048), nn.ReLU(inplace=True), nn.Linear(2048, 1000), ) def forward(self, x): x = self.features(x) x = torch.flatten(x, start_dim=1) x = self.classifier(x) return x model = AlexNet(); print(model) 发布者:全栈程序员-站长,转载请注明出处:https://javaforall.net/230334.html原文链接:https://javaforall.net


