
一、业务需求描述
二、业务前期准备
三、业务正式开发
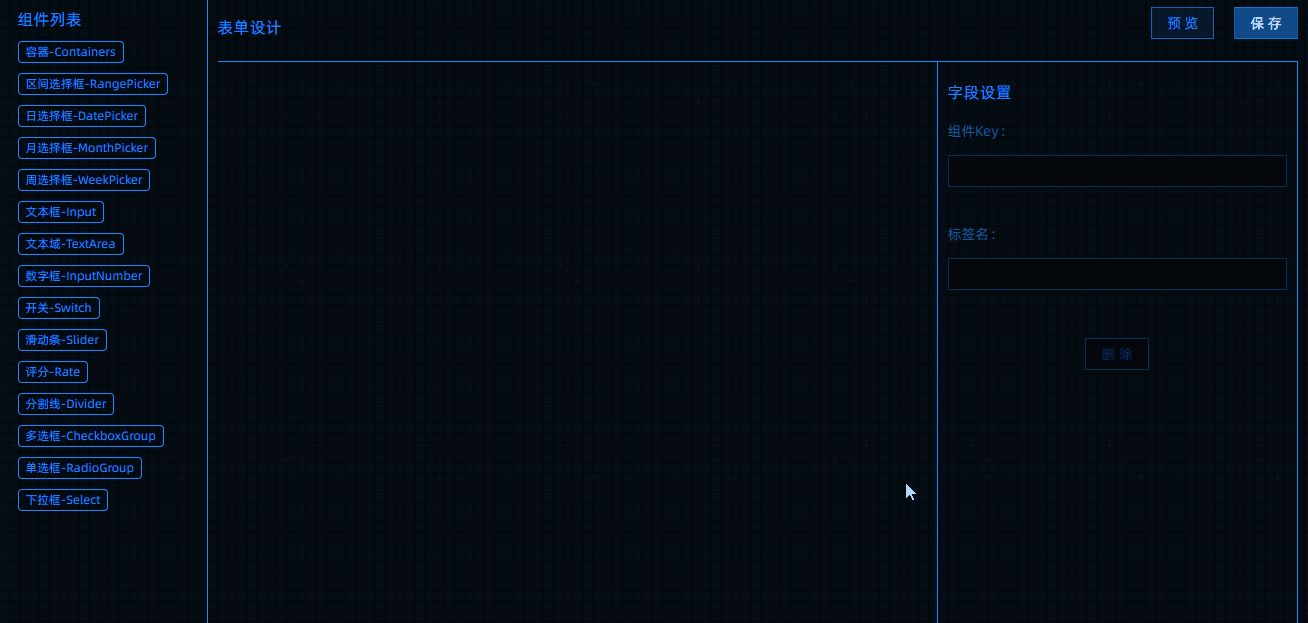
1. 效果预览图如下

2. 代码附上(不提供样式)
①CustomForm/index.js
 import React, { useEffect, useState } from 'react'; import { Tag, Layout, Button, Modal, Divider, Form, Input, Select } from 'antd'; import Sortable from 'react-sortablejs'; import _ from 'lodash'; import uniqueId from 'lodash/uniqueId'; import update from 'immutability-helper'; import './index.less'; import { indexToArray, getItem, setInfo, isPath, getCloneItem, itemRemove, itemAdd } from './utils'; import { formItemData, GlobalComponent } from './config'; import EditableTable from '../../components/EditableTable'; const { Header, Sider, Content, Footer } = Layout; const { Option } = Select; const sortableOption = { animation: 150, fallbackOnBody: true, swapThreshold: 0.65, group: { name: 'formItem', pull: true, put: true, }, }; const CustomForm = () => { const [itemData, setItemData] = useState(Array); // 组件数据 const [isShowModal, setIsShowModal] = useState(false); // 弹框是否显示 const [curItemKey, setCurItemKey] = useState(String); // 当前选中组件的Key const [curItemName, setCurItemName] = useState(String); // 当前选中组件的Name const [curItemType, setCurItemType] = useState(String); // 当前选中组件的Type const [isChoose, setIsChoose] = useState(false); // 组件是否处于选中状态 useEffect(() => { }, []); const handleSubmit = () => { }; const handlePreview = () => { console.log('itemData:'+JSON.stringify(itemData)) setIsChoose(false) setIsShowModal(true) }; const handleLabelChange = (e) => { const val = e.target.value; setCurItemName(val); itemData[curItemKey].label = val; setItemData(...[itemData]); } const handleDel = () => { let newTreeData = itemRemove(curItemKey, itemData); setCurItemKey(''); setCurItemName(''); setCurItemType(''); setItemData([...newTreeData]) } const sortableChoose = (e) => { console.log(e) setIsChoose(true); const curKey = e.item.getAttribute('data-id'); const curName = e.item.firstChild.innerText; const curType = e.item.getAttribute('type'); setCurItemKey(curKey); setCurItemName(curName); setCurItemType(curType) }; // 拖拽的添加方法 const sortableAdd = e => { // 组件名或路径 const nameOrIndex = e.clone.getAttribute('data-id'); // 父节点路径 const parentPath = e.path[1].getAttribute('data-id'); // 拖拽元素的目标路径 const { newIndex } = e; // 新路径 为根节点时直接使用index const newPath = parentPath ? `${parentPath}-${newIndex}` : newIndex; console.log('nameOrIndex:'+nameOrIndex,'parentPath:'+parentPath,'newIndex:'+newIndex,'newPath:'+newPath) // 判断是否为路径 路径执行移动,非路径为新增 if (isPath(nameOrIndex)) { // 旧的路径index const oldIndex = nameOrIndex; // 克隆要移动的元素 const dragItem = getCloneItem(oldIndex, itemData) // 比较路径的上下位置 先执行靠下的数据 再执行靠上数据 if (indexToArray(oldIndex) > indexToArray(newPath)) { // 删除元素 获得新数据 let newTreeData = itemRemove(oldIndex, itemData); // 添加拖拽元素 newTreeData = itemAdd(newPath, newTreeData, dragItem) // 更新视图 setItemData([...newTreeData]) return } // 添加拖拽元素 let newData = itemAdd(newPath, itemData, dragItem) // 删除元素 获得新数据 newData = itemRemove(oldIndex, newData); setItemData([...newData]) return } // 新增流程 创建元素 => 插入元素 => 更新视图 const id = nameOrIndex const newItem = _.cloneDeep(formItemData.find(item => (item.name === id))) // 为容器或者弹框时增加子元素 if ( newItem.name === 'Containers') { const ComponentsInfo = _.cloneDeep(GlobalComponent[newItem.name]) // 判断是否包含默认数据 newItem.children = [ComponentsInfo] } let Data = itemAdd(newPath, itemData, newItem) setItemData([...Data]) }; // 拖拽的排序方法 const sortableUpdate = e => { // 交换数组 const { newIndex, oldIndex } = e; // 父节点路径 const parentPath = e.path[1].getAttribute('data-id'); // 父元素 根节点时直接调用data let parent = parentPath ? getItem(parentPath, itemData) : itemData; // 当前拖拽元素 const dragItem = parent[oldIndex]; // 更新后的父节点 parent = update(parent, { $splice: [[oldIndex, 1], [newIndex, 0, dragItem]], }); // 最新的数据 根节点时直接调用data const Data = parentPath ? setInfo(parentPath, itemData, parent) : parent // 调用父组件更新方法 setItemData([...Data]) }; // 递归函数 const loop = (arr, index) => { return ( arr.map((item, i) => { const indexs = index === '' ? String(i) : `${index}-${i}`; if (item) { if (item.children) { return ( <div {...item.attr} data-id={indexs} key={indexs}> <Sortable key={uniqueId()} style={
  { minHeight: 100, margin: 10 }} ref={c => c && c.sortable} options={
  { ...sortableOption, onUpdate: e => sortableUpdate(e), onAdd: e => sortableAdd(e), onChoose: e => sortableChoose(e), onSort: e => setIsChoose(false), }} > { loop(item.children, indexs) } </Sortable> </div> ) } const ComponentInfo = GlobalComponent[item.name] return ( <div data-id={indexs} key={indexs} type={item.name} className='formItemStyle' style={(isChoose && indexs === curItemKey) ? {border: '1px solid #FF3333'} : {}} > { item.name !== 'Divider' && <div className='formItemLabel'>{ isChoose ? (indexs === curItemKey ? curItemName : item.label) : item.label}</div> } { renderDiffComponents(item, indexs, ComponentInfo) } </div> ) } else { return null } }) ) }; const renderDiffComponents = (item, indexs, ComponentInfo) => { switch (item.name) { case 'Divider': return <ComponentInfo key={indexs} {...item.attr}></ComponentInfo> case 'Select': return ( <ComponentInfo key={indexs} defaultValue={item.attr.defaultValue}> { item.attr.options.map(subItem => <Option key={subItem.key} value={subItem.value + ''}>{ subItem.label }</Option>) } </ComponentInfo> ) default: return <ComponentInfo key={indexs} {...item.attr} /> } } const getDataSource = (options) => { itemData[curItemKey].attr.options = [...options]; setItemData([...itemData]) } return ( <div className='formMain'> <Layout className='firstLayout'> <Sider style={
  { padding: 10 }}> <h3 className='textHead'>组件列表</h3> <Sortable options = {
  { group:{ name: 'formItem', pull: 'clone', put: false, }, sort: false, }} > { formItemData.map(item => ( <div data-id={item.name} key={item.name} style={
  { marginTop: 10 }} > <Tag>{item.label + '-' + item.name}</Tag> </div> )) } </Sortable> </Sider> <Layout className='secondLayout'> <Header> <div className='headerWrapper'> <h3 className='textHead' style={
  { float: 'left' }}>表单设计</h3> <Button className='formBtn' type='primary' onClick={handleSubmit}>保存</Button> <Button className='formBtn' onClick={handlePreview}>预览</Button> </div> <Divider /> </Header> <Content style={
  { marginTop: 15 }}> <Layout className='thirdLayout'> <Content> <Sortable className='formContent' ref={c => c && c.sortable} options={
  { ...sortableOption, onUpdate: e => sortableUpdate(e), onAdd: e => sortableAdd(e), onChoose: e => sortableChoose(e), onSort: e => setIsChoose(false), }} key={uniqueId()} > { loop(itemData, '')} </Sortable> </Content> <Sider className='itemInfo'> <Header> <h3 className='textHead'>字段设置</h3> </Header> <Content> <Form className='itemForm'> <Form.Item label="组件Key"> <Input value={curItemKey} disabled /> </Form.Item> <Form.Item label="标签名"> <Input value={curItemName} disabled={!isChoose} onChange={handleLabelChange} /> </Form.Item> { ['CheckboxGroup', 'RadioGroup', 'Select'].includes(curItemType) && <EditableTable getDataSource={getDataSource} curItemKey={curItemKey} options={itemData[curItemKey].attr.options} disabled={!isChoose} /> } </Form> </Content> <Footer style={
  { border: 'none' }}> <Button className='delBtn' onClick={handleDel} disabled={!isChoose}>删除</Button> </Footer> </Sider> </Layout> </Content> </Layout> </Layout> { isShowModal && <Modal title='表单预览' visible={true} onCancel={() => setIsShowModal(false)} onOk={() => setIsShowModal(false)} > { loop(itemData, '') } </Modal> } </div> ); } export default CustomForm;
② CustomForm/utils.js
import _ from 'lodash'; / * 将下标数组转为数组 * @param {String|Number} pathStr 字符串类型的树路径 例:2-3-4 * return {Array} 数组类型 */ const indexToArray = pathStr => `${pathStr}`.split('-').map(n => +n); / * * @param {String} index 下标路径 * @param {Array} cards treeData * @return {object} 返回详情对象 */ const getCloneItem = (index, cards) => { const arr = indexToArray(index); let result = {}; arr.forEach(n => { result = cards[n]; cards = result.children; }); return _.cloneDeep(result); } / * 根据下标获取父节点 * @param {String} index 下标路径 * @param {Array} cards treeData * @return {object} 返回详情对象 */ const getItem = (pathIndex, cards) => { const arr = indexToArray(pathIndex) // 嵌套节点删除 let parent; if (arr.length === 0) { return cards } arr.forEach((item, index) => { if (index === 0) { parent = cards[item] } else { parent = parent.children[item] } }) if (parent.children) return parent.children return parent } const getParent = (pathIndex, cards) => { const arr = indexToArray(pathIndex) // 嵌套节点删除 let parent; arr.pop() if (arr.length === 0) { return cards } arr.forEach((item, index) => { if (index === 0) { parent = cards[item] } else { parent = parent.children[item] } }) if (parent.children) return parent.children return parent } / * 根据路径删除数据 * @param {*} index * @param {*} cards * @return {*} */ const itemRemove = (index, cards) => { let parent = getParent(index, cards); let arr = indexToArray(index) let getIndex = arr.pop() if (parent.children) { parent.children.splice(getIndex, 1) return cards } parent.splice(getIndex, 1) return cards } / * * @param {*} index * @param {*} cards * @param {*} item */ const itemAdd = (index, cards, item) => { let parent = getParent(index, cards); let arr = indexToArray(index) let getIndex = arr.pop() if (parent.children) { parent.children.splice(getIndex, 0, item) return cards } parent.splice(getIndex, 0, item) return cards } / * 根据index设置排序 * @param {Array} arr 节点路径的数组格式 * @param {Array} treeData 树节点数据 * @param {object} param 要替换的数据 */ const setInfo = (arrPath, treeData, param) => { const arr = indexToArray(arrPath) treeData = _.cloneDeep(treeData); let parent; arr.forEach((item, index) => { if (index == 0) { parent = treeData[item] } else { parent = parent.children[item] } }) parent.children = param return treeData } / * * @param {*} pathIndex */ const isPath = pathIndex => { let result = true indexToArray(pathIndex).forEach(item => { if (isNaN(item)) { result = false return false } }) return result } / * 判断hover的路径是否为自己的子元素 * @param {String} dragIndex * @param {String} hoverIndex */ const isChildrenPath = (dragIndex, hoverIndex) => { let dragIndexArr = String(dragIndex).split('-') let hoverIndexArr = String(hoverIndex).split('-') if (hoverIndexArr > dragIndexArr) { let sliceArr = hoverIndexArr.slice(0, dragIndexArr.length) if (sliceArr.join('-') === dragIndexArr.join('-')) { return true } } return false } / * 根据数组路径 生成所有父级别的路径 * @param {String} index */ const generatePathArr = index => { let arr = [] let indexArr = String(index).split('-'); let data = Array.from(indexArr) indexArr.forEach((item, i) => { data.pop() arr.push(Array.from(data).join('-')) }) arr.pop() return arr } export { indexToArray, getParent, setInfo, isChildrenPath, generatePathArr, isPath, getCloneItem, getItem, itemRemove, itemAdd }③Custom/config.js
import { Rate, Input, Divider, DatePicker, InputNumber, Switch, Slider, Checkbox, Radio, Select } from 'antd'; const { MonthPicker, RangePicker, WeekPicker } = DatePicker; const { TextArea } = Input; const CheckboxGroup = Checkbox.Group; const RadioGroup = Radio.Group; const options = []; for (let i = 0; i < 3; i++) { options.push({ key: i.toString(), label: `选项 ${i}`, value: i.toString() }); } const GlobalComponent = { Divider, DatePicker, RangePicker, MonthPicker, WeekPicker, Input, TextArea, InputNumber, Switch, Slider, CheckboxGroup, RadioGroup, Select, Rate, }; const formItemData = [ { name: 'Containers', attr: { style: { border: '1px solid #40a9ff' } }, label: '容器' }, { name: 'RangePicker', attr: { style: { width: '100%' }, defaultValue: undefined }, label: '区间选择框' }, { name: 'DatePicker', attr: { style: { width: '100%' }, defaultValue: undefined }, label: '日选择框' }, { name: 'MonthPicker', attr: { style: { width: '100%' }, defaultValue: undefined, placeholder: '请选择月份' }, label: '月选择框' }, { name: 'WeekPicker', attr: { style: { width: '100%', }, defaultValue: undefined, placeholder: '请选择周期' }, label: '周选择框' }, { name: 'Input', attr: { defaultValue: '', placeholder: '请输入' }, label: '文本框' }, { name: 'TextArea', attr: { defaultValue: '', placeholder: '请输入' }, label: '文本域' }, { name: 'InputNumber', attr: { defaultValue: undefined, }, label: '数字框' }, { name: 'Switch', attr: { style: { width: 44, }, defaultValue: false, }, label: '开关' }, { name: 'Slider', attr: { style: { width: '100%', padding: '0' }, defaultValue: 10 }, label: '滑动条' }, { name: 'Rate', attr: { style: { width: '100%', color: '#47FECF' }, defaultValue: 0 }, label: '评分' }, { name: 'Divider', attr: {}, label: '分割线' }, { name: 'CheckboxGroup', attr: { options: options, defaultValue: [] }, label: '多选框' }, { name: 'RadioGroup', attr: { options: options, defaultValue: options[0].value }, label: '单选框' }, { name: 'Select', attr: { options: options, defaultValue: options[0].value }, label: '下拉框' }, ]; export { formItemData, GlobalComponent, options }④组件EditableTable/index.js
import React from 'react'; import PropTypes from 'prop-types'; import { Table, Input, InputNumber, Form, Button } from 'antd'; import './index.less'; const EditableContext = React.createContext(); class EditableCell extends React.Component { getInput = () => { if (this.props.inputType === 'number') { return <InputNumber />; } return <Input />; }; renderCell = ({ getFieldDecorator }) => { const { editing, dataIndex, title, inputType, record, index, children, ...restProps } = this.props; return ( <td {...restProps}> {editing ? ( <Form.Item style={
  { margin: 0 }}> {getFieldDecorator(dataIndex, { rules: [ { required: true, message: `请输入 ${title}!`, }, ], initialValue: record[dataIndex], })(this.getInput())} </Form.Item> ) : ( children )} </td> ); }; render() { return <EditableContext.Consumer>{this.renderCell}</EditableContext.Consumer>; } } class EditableTable extends React.Component { constructor(props) { super(props); const { options } = this.props; this.state = { data: options, editingKey: '', count: options.length }; this.columns = [ { title: '显示值', dataIndex: 'label', width: '30%', editable: true, }, { title: '传递值', dataIndex: 'value', width: '20%', editable: true, }, { title: '操作', dataIndex: 'operation', render: (text, record) => { const { editingKey } = this.state; const editable = this.isEditing(record); return editable ? ( <span> <EditableContext.Consumer> {form => ( <a onClick={() => this.save(form, record.key)} style={
  { marginRight: 15 }} > 保存 </a> )} </EditableContext.Consumer> <a onClick={() => this.cancel(record.key)}>取消</a> </span> ) : ( <span> <a disabled={editingKey !== ''} onClick={() => this.edit(record.key)}>编辑</a> <a style={
  { marginLeft: 15, color: '#FF3333' }} onClick={() => this.delete(record.key)}>删除</a> </span> ); }, }, ]; } componentDidUpdate({ curItemKey }) { if (curItemKey !== this.props.curItemKey) { this.setState({ data: this.props.options }) } } isEditing = record => record.key === this.state.editingKey; cancel = () => { this.setState({ editingKey: '' }); }; save(form, key) { form.validateFields((error, row) => { if (error) { return; } const newData = [...this.state.data]; const index = newData.findIndex(item => key === item.key); if (index > -1) { const item = newData[index]; newData.splice(index, 1, { ...item, ...row, }); } else { newData.push(row); } this.props.getDataSource(newData) this.setState({ data: newData, editingKey: '' }); }); } edit(key) { this.setState({ editingKey: key }); } delete = key => { const data = [...this.state.data]; this.props.getDataSource(data.filter(item => item.key !== key)) this.setState({ data: data.filter(item => item.key !== key) }); }; add = () => { const { count, data } = this.state; const newData = { key: count, label: `选项 ${count}`, value: count }; this.props.getDataSource([...data, newData]) this.setState({ data: [...data, newData], count: count + 1, }); }; render() { const components = { body: { cell: EditableCell, }, }; const columns = this.columns.map(col => { if (!col.editable) { return col; } return { ...col, onCell: record => ({ record, inputType: col.dataIndex === 'value' ? 'number' : 'text', dataIndex: col.dataIndex, title: col.title, editing: this.isEditing(record), }), }; }); return ( <EditableContext.Provider value={this.props.form}> <Button disabled={this.props.disabled} onClick={this.add} type="primary" style={
  { marginBottom: 16 }}>添加选项</Button> <Table components={components} bordered dataSource={this.state.data} columns={columns} rowClassName="editable-row" pagination={false} /> </EditableContext.Provider> ); } } const EditableFormTable = Form.create()(EditableTable); EditableCell.propTypes = { editing: PropTypes.bool, dataIndex: PropTypes.string, title: PropTypes.string, inputType: PropTypes.string, record: PropTypes.object, index: PropTypes.string, children: PropTypes.array.isRequired, restProps: PropTypes.object, } EditableTable.propTypes = { form: PropTypes.object.isRequired, getDataSource: PropTypes.func.isRequired, curItemKey: PropTypes.string.isRequired, options: PropTypes.array, disabled: PropTypes.bool.isRequired } export default EditableFormTable
3. 其他工具
①lodash(https://www.lodashjs.com/)。是一个一致性、模块化、高性能的 JavaScript 实用工具库,它可以通过降低 array、number、objects、string 等等的使用难度从而让 JavaScript 变得更简单。
②immutability-helper(https://github.com/kolodny/immutability-helper)。它可以更改数据副本而不更改原始源。
版权声明:本文内容由互联网用户自发贡献,该文观点仅代表作者本人。本站仅提供信息存储空间服务,不拥有所有权,不承担相关法律责任。如发现本站有涉嫌侵权/违法违规的内容, 请联系我们举报,一经查实,本站将立刻删除。
发布者:全栈程序员-站长,转载请注明出处:https://javaforall.net/232701.html原文链接:https://javaforall.net


