
一.python中的slic函数
def slic(image, n_segments=100, compactness=10., max_iter=10, sigma=0, spacing=None, multichannel=True, convert2lab=None, enforce_connectivity=True, min_size_factor=0.5, max_size_factor=3, slic_zero=False): """Segments image using k-means clustering in Color-(x,y,z) space. Parameters ---------- image : 2D, 3D or 4D ndarray Input image, which can be 2D or 3D, and grayscale or multichannel (see `multichannel` parameter). n_segments : int, optional The (approximate) number of labels in the segmented output image. compactness : float, optional 控制颜色和空间之间的平衡,约高越方块,和图关系密切,最好先确定指数级别,再微调 Balances color proximity and space proximity. Higher values give more weight to space proximity, making superpixel shapes more square/cubic. In SLICO mode, this is the initial compactness. This parameter depends strongly on image contrast and on the shapes of objects in the image. We recommend exploring possible values on a log scale, e.g., 0.01, 0.1, 1, 10, 100, before refining around a chosen value. max_iter : int, optional 最大k均值迭代次数 Maximum number of iterations of k-means. sigma : float or (3,) array-like of floats, optional 图像每个维度进行预处理时的高斯平滑核宽。若给定为标量值,则同一个值运用到各个维度。0意味 着不平滑。如果“sigma”是标量的,并且提供了手动体素间距,则自动缩放它(参见注释部分)。 Width of Gaussian smoothing kernel for pre-processing for each dimension of the image. The same sigma is applied to each dimension in case of a scalar value. Zero means no smoothing. Note, that `sigma` is automatically scaled if it is scalar and a manual voxel spacing is provided (see Notes section). spacing : (3,) array-like of floats, optional 代表沿着图像每个维度的体素空间。默认情况下,slic假定均匀的空间(沿x,y,z轴相同的体素分辨 率),这个参数控制在k均值聚类中各轴距离的权重 The voxel spacing along each image dimension. By default, `slic` assumes uniform spacing (same voxel resolution along z, y and x). This parameter controls the weights of the distances along z, y, and x during k-means clustering. multichannel : bool, optional 二进制参数,代表图像的最后一个轴代表多通道还是另一个空间维度 Whether the last axis of the image is to be interpreted as multiple channels or another spatial dimension. convert2lab : bool, optional 二进制参数,判断输入需要在分割之前转到LAB颜色空间。输入必须是RGB。当多通道参数为True, 输入图片的通道数为3时,该参数默认为True Whether the input should be converted to Lab colorspace prior to segmentation. The input image *must* be RGB. Highly recommended. This option defaults to ``True`` when ``multichannel=True`` *and* ``image.shape[-1] == 3``. enforce_connectivity: bool, optional 二进制参数,控制生成的分割块连接或不连接 Whether the generated segments are connected or not min_size_factor: float, optional 与分割目标数有关的要删去的最小分割块比率,(大概是小于长*宽*高/目标数量 的分割结果会被融 合掉) Proportion of the minimum segment size to be removed with respect to the supposed segment size ```depth*width*height/n_segments``` max_size_factor: float, optional 最大融合比率上限 Proportion of the maximum connected segment size. A value of 3 works in most of the cases. slic_zero: bool, optional 不知所谓的零参数 Run SLIC-zero, the zero-parameter mode of SLIC. [2]_ Returns ------- labels : 2D or 3D array Integer mask indicating segment labels. Raises ------ ValueError If ``convert2lab`` is set to ``True`` but the last array dimension is not of length 3. Notes ----- * If `sigma > 0`, the image is smoothed using a Gaussian kernel prior to segmentation. * If `sigma` is scalar and `spacing` is provided, the kernel width is divided along each dimension by the spacing. For example, if ``sigma=1`` and ``spacing=[5, 1, 1]``, the effective `sigma` is ``[0.2, 1, 1]``. This ensures sensible smoothing for anisotropic images. 如果有平滑参数sigma和体素空间参数spacing,那么空间体素参数会对平滑参数有平分的影响,比如 1/[5,1,1]=[0.2,1,1] * The image is rescaled to be in [0, 1] prior to processing. 图像在预处理之前会被处理为[0,1]之间的标量 * Images of shape (M, N, 3) are interpreted as 2D RGB images by default. To interpret them as 3D with the last dimension having length 3, use `multichannel=False`. (M,N,3)的图像默认为2维(RGB的图像),要想被理解为3维图需要设置多通道参数=False References ---------- .. [1] Radhakrishna Achanta, Appu Shaji, Kevin Smith, Aurelien Lucchi, Pascal Fua, and Sabine Süsstrunk, SLIC Superpixels Compared to State-of-the-art Superpixel Methods, TPAMI, May 2012. .. [2] http://ivrg.epfl.ch/research/superpixels#SLICO Examples -------- >>> from skimage.segmentation import slic >>> from skimage.data import astronaut >>> img = astronaut() >>> segments = slic(img, n_segments=100, compactness=10) Increasing the compactness parameter yields more square regions: >>> segments = slic(img, n_segments=100, compactness=20) """ 干正事啦 image = img_as_float(image) is_2d = False #2D灰度图 if image.ndim == 2: # 2D grayscale image image = image[np.newaxis, ..., np.newaxis] is_2d = True #比如2D RGB的图 elif image.ndim == 3 and multichannel: # Make 2D multichannel image 3D with depth = 1 image = image[np.newaxis, ...] is_2d = True #比如3D图 elif image.ndim == 3 and not multichannel: # Add channel as single last dimension image = image[..., np.newaxis] #控制聚类时各轴权重 if spacing is None: spacing = np.ones(3) elif isinstance(spacing, (list, tuple)): spacing = np.array(spacing, dtype=np.double) #高斯平滑 if not isinstance(sigma, coll.Iterable): sigma = np.array([sigma, sigma, sigma], dtype=np.double) sigma /= spacing.astype(np.double)#有可能发生的体素除 elif isinstance(sigma, (list, tuple)): sigma = np.array(sigma, dtype=np.double) #高斯滤波处 if (sigma > 0).any(): # add zero smoothing for multichannel dimension sigma = list(sigma) + [0] image = ndi.gaussian_filter(image, sigma) #多通道RGB图且需要转lab,用rab2lab即可实现 if multichannel and (convert2lab or convert2lab is None): if image.shape[-1] != 3 and convert2lab: raise ValueError("Lab colorspace conversion requires a RGB image.") elif image.shape[-1] == 3: image = rgb2lab(image) depth, height, width = image.shape[:3] # initialize cluster centroids for desired number of segments #为实现目标分割块数,初始化聚类中心。 #grid_* 相当于index #slices是根据目标数量分的块,有取整需要 grid_z, grid_y, grid_x = np.mgrid[:depth, :height, :width] slices = regular_grid(image.shape[:3], n_segments) step_z, step_y, step_x = [int(s.step if s.step is not None else 1) for s in slices] segments_z = grid_z[slices] segments_y = grid_y[slices] segments_x = grid_x[slices] segments_color = np.zeros(segments_z.shape + (image.shape[3],)) segments = np.concatenate([segments_z[..., np.newaxis], segments_y[..., np.newaxis], segments_x[..., np.newaxis], segments_color], axis=-1).reshape(-1, 3 + image.shape[3]) segments = np.ascontiguousarray(segments) # we do the scaling of ratio in the same way as in the SLIC paper # so the values have the same meaning step = float(max((step_z, step_y, step_x))) ratio = 1.0 / compactness #我类个去,分割时方不方的骚操作 image = np.ascontiguousarray(image * ratio) labels = _slic_cython(image, segments, step, max_iter, spacing, slic_zero) #把过小过小的处理一下 if enforce_connectivity: segment_size = depth * height * width / n_segments min_size = int(min_size_factor * segment_size) max_size = int(max_size_factor * segment_size) labels = _enforce_label_connectivity_cython(labels, min_size, max_size) if is_2d: labels = labels[0] return labels二、注意事项
1.要不要转化到LAB空间是可以调的,当然啦不转的结果就是方方正正的空间分割,和内容毫无关系,比如下图
convert2lab or convert2lab is None 这段代码可以看出来,不传参数和传参数为True都是转到lab了,完美。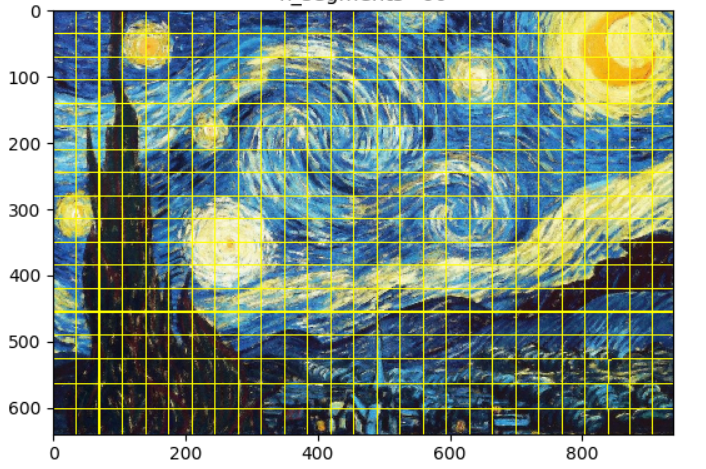

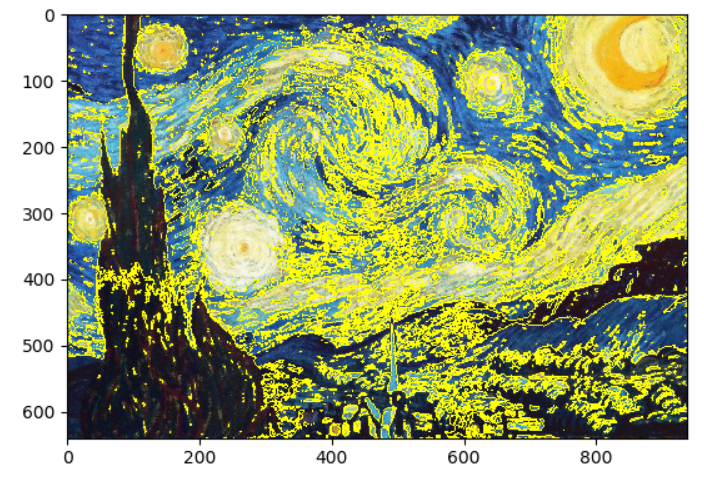
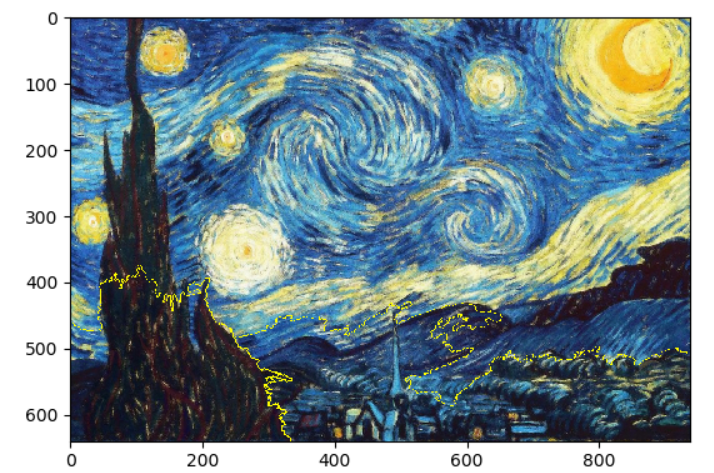
2.分割结果比设置的少是因为做了一下后处理,调一下enforce_connectivity就变多啦,但不是一定分割结果和设置数量一样的。比如下图,设置分割20,参数设置为False结果为12块,参数设置为True就是3块
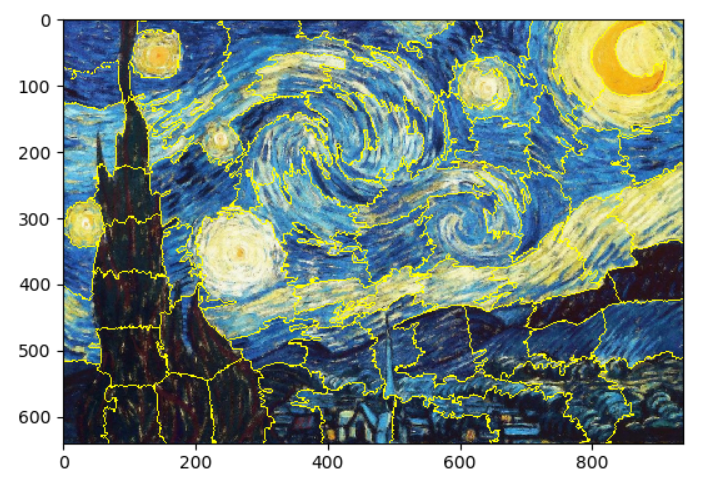
分割目标数量恰当的话(比如100),是这样的:
三、SLCI的使用
from __future__ import division from skimage.segmentation import slic,mark_boundaries from skimage import io import matplotlib.pyplot as plt import numpy as np img = io.imread("imgs\style\DTD\\denoised_starry.jpg") print(img.shape) segments = slic(img, n_segments=100, compactness=20,enforce_connectivity=True,convert2lab=True) print(segments.shape) n_liantong=segments.max()+1 print('n_liantong:',n_liantong) area=np.bincount(segments.flat) w,h=segments.shape print(area/(w*h)) print((max(area/(w*h))),(min(area/(w*h)))) out=mark_boundaries(img,segments) plt.subplot(111) plt.imshow(out) plt.show()四、参考一的代码做修改
相对导入报错:
ValueError: attempted relative import beyond top-level package
调用关系需要做一下修改,
原:
from ..util import img_as_float, regular_grid from ..segmentation._slic import (_slic_cython, _enforce_label_connectivity_cython) from ..color import rgb2lab修改后:
from skimage.util import img_as_float, regular_grid from skimage.segmentation._slic import (_slic_cython, _enforce_label_connectivity_cython) from skimage.color import rgb2lab
版权声明:本文内容由互联网用户自发贡献,该文观点仅代表作者本人。本站仅提供信息存储空间服务,不拥有所有权,不承担相关法律责任。如发现本站有涉嫌侵权/违法违规的内容, 请联系我们举报,一经查实,本站将立刻删除。
发布者:全栈程序员-站长,转载请注明出处:https://javaforall.net/233429.html原文链接:https://javaforall.net


