
docker使用教程相关系列 目录
目录
容器网络访问原理图
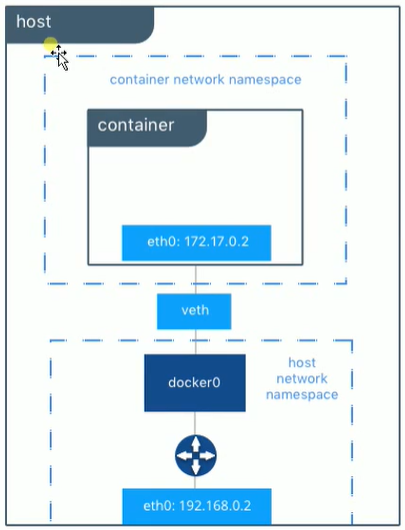

首先我们会有这个 宿主机命名空间 eth0(我们的公网 IP或内网 IP),然后 我们的容器 container 通过 veth 虚拟设备队(他的作用 就相当于管道,这头进 另一头出),来分配的 容器的网络命名空间。
我们查看一下:
[root@izbp1izjo7pl5ccghnbdiuz ~]# ifconfig br-642af1c223ad: flags=4099<UP,BROADCAST,MULTICAST> mtu 1500 inet 172.18.0.1 netmask 255.255.0.0 broadcast 172.18.255.255 ether 02:42:32:2e:f0:0a txqueuelen 0 (Ethernet) RX packets 37 bytes 7182 (7.0 KiB) RX errors 0 dropped 0 overruns 0 frame 0 TX packets 50 bytes 5440 (5.3 KiB) TX errors 0 dropped 0 overruns 0 carrier 0 collisions 0 docker0: flags=4163<UP,BROADCAST,RUNNING,MULTICAST> mtu 1500 inet 172.17.0.1 netmask 255.255.0.0 broadcast 172.17.255.255 ether 02:42:c4:5e:de:d7 txqueuelen 0 (Ethernet) RX packets 39854 bytes (2.2 MiB) RX errors 0 dropped 0 overruns 0 frame 0 TX packets 40372 bytes (101.5 MiB) TX errors 0 dropped 0 overruns 0 carrier 0 collisions 0 eth0: flags=4163<UP,BROADCAST,RUNNING,MULTICAST> mtu 1500 inet 172.16.57.19 netmask 255.255.240.0 broadcast 172.16.63.255 ether 00:16:3e:0b:5c:f3 txqueuelen 1000 (Ethernet) RX packets bytes (4.1 GiB) RX errors 0 dropped 0 overruns 0 frame 0 TX packets bytes (4.5 GiB) TX errors 0 dropped 0 overruns 0 carrier 0 collisions 0 lo: flags=73<UP,LOOPBACK,RUNNING> mtu 65536 inet 127.0.0.1 netmask 255.0.0.0 loop txqueuelen 1000 (Local Loopback) RX packets 2262 bytes (280.5 KiB) RX errors 0 dropped 0 overruns 0 frame 0 TX packets 2262 bytes (280.5 KiB) TX errors 0 dropped 0 overruns 0 carrier 0 collisions 0 # 在这里 ---------------------------------------------------------------------- veth58e889a: flags=4163<UP,BROADCAST,RUNNING,MULTICAST> mtu 1500 | ether 56:70:7f:96:bd:42 txqueuelen 0 (Ethernet) | RX packets 37 bytes 7182 (7.0 KiB) | RX errors 0 dropped 0 overruns 0 frame 0 | TX packets 50 bytes 5440 (5.3 KiB) | TX errors 0 dropped 0 overruns 0 carrier 0 collisions 0 | ---------------------------------------------------------------------- 有了 veth就保证了 容器能够和宿主机进行通信。
网络访问的过程图
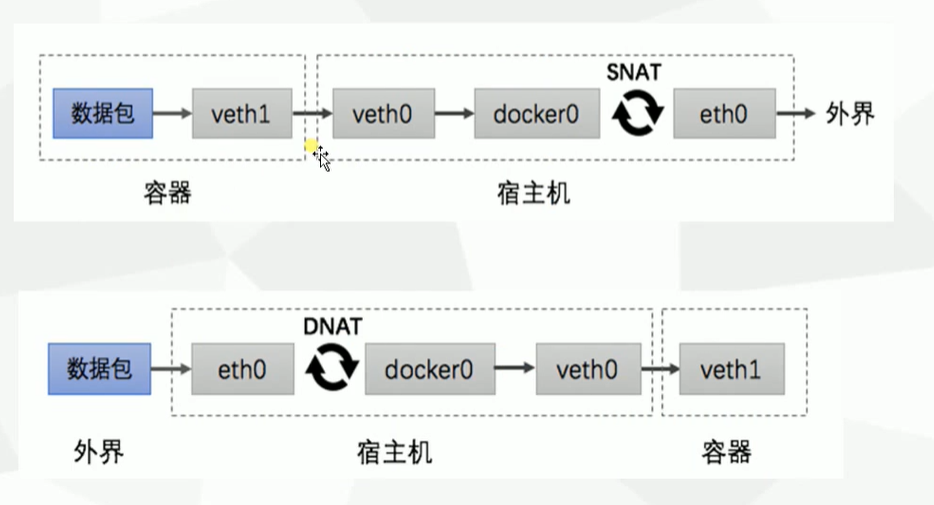
解析从 容器到外界:
进入到容器的伪终端,然后 ping百度
此时 docker exec -it busybox bash 进入到容器操作也是可以的
[root@izbp1izjo7pl5ccghnbdiuz ~]# docker run -it busybox / # / # ping www.baidu.com PING www.baidu.com (180.101.49.12): 56 data bytes 64 bytes from 180.101.49.12: seq=0 ttl=49 time=10.944 ms 64 bytes from 180.101.49.12: seq=1 ttl=49 time=11.067 ms 容器将请求发送到宿主机的过程
容器内: route是路由表的意思
首先由容器内部的 eth0(也就是veth1),发送给容器的网关 route里的 eth0(也就是宿主机的网卡 veth0)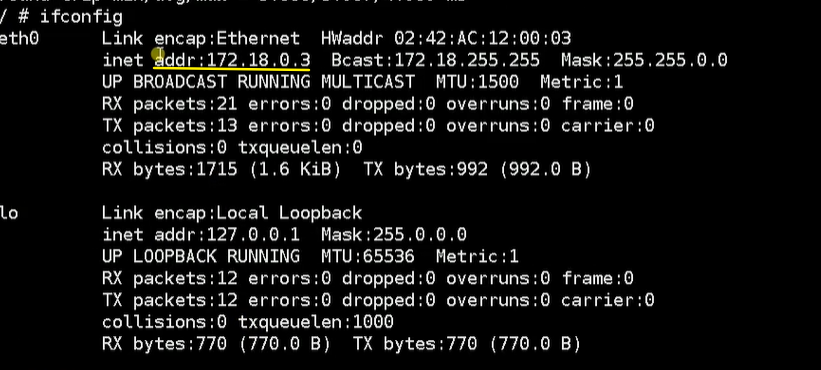
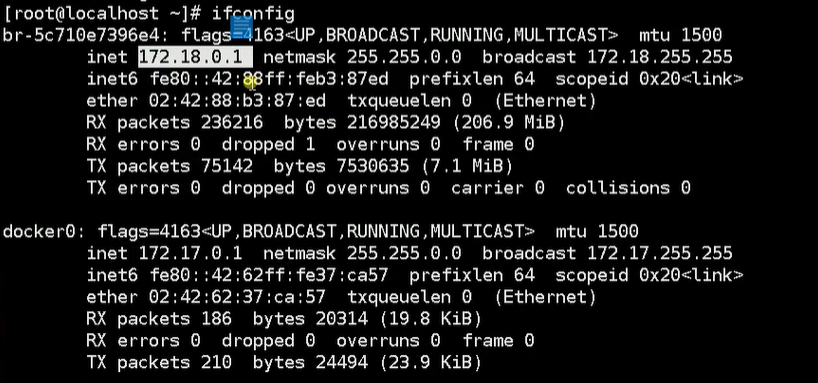
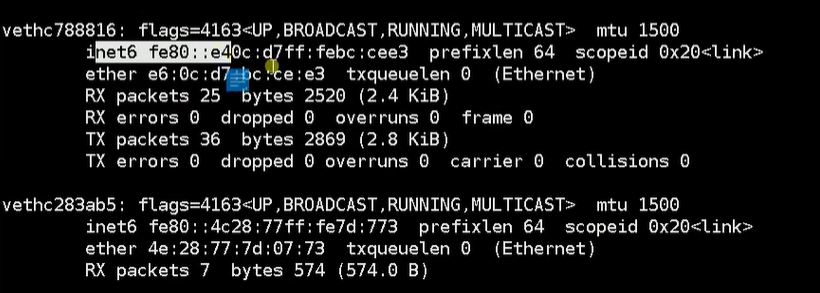
刚才说到了:route里的 eth0(也就是宿主机的网卡 veth0),那么在 宿主机上是如何展示 的容器的连接通道 eth0(veth0)。
cethc就是了
外界到容器:
这个就很OK了,看操作图 都能理解个大概。
iptables -vnL # 格式太乱 iptables-save docker 的网络主要是利用了 iptables 来进行实现的
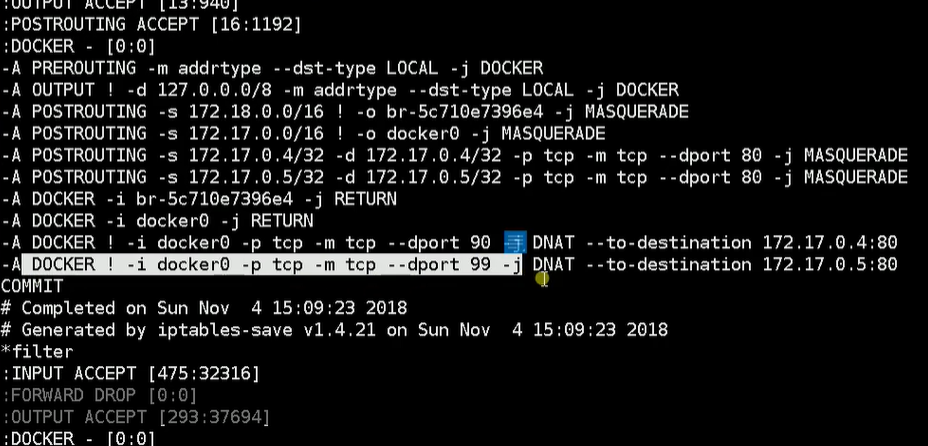
我们看合格 99端口啊,大概意思就是 外部访问宿主机IP 的请求,通过DNAT 将目的地转换到我们的 容器网关接口。
这个呢 就是识别我们的容器端口,找到对应的 veth1
DOCKER SNAT与DNAT
容器访问外部实现
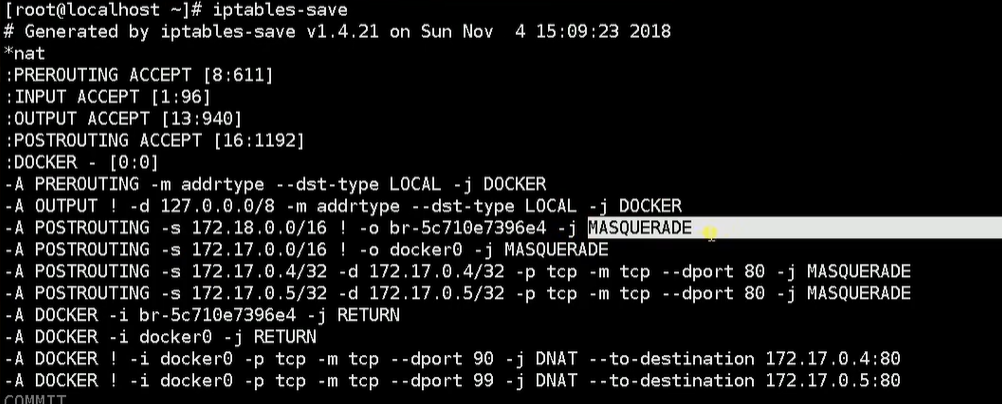
容器所有到外部网络的连接,源地址都会被 NAT 成本地系统的 IP 地址。这是使用 iptables 的源地址伪装操作实现的。
$ sudo iptables -t nat -nL ... Chain POSTROUTING (policy ACCEPT) target prot opt source destination MASQUERADE all -- 172.17.0.0/16 !172.17.0.0/16 ... 其中,上述规则将所有源地址在 172.17.0.0/16 网段,目标地址为其他网段(外部网络)的流量动态伪装为从系统网卡发出。MASQUERADE 跟传统 SNAT 的好处是它能动态从网卡获取地址。
外部访问容器实现
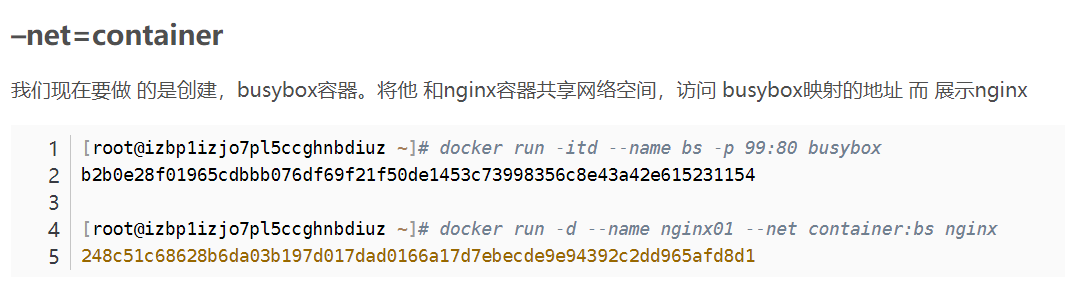
容器允许外部访问,可以在 docker run 时候通过 -p 或 -P 参数来启用。
不管用那种办法,其实也是在本地的 iptable 的 nat 表中添加相应的规则。
使用 -P 时:
$ iptables -t nat -nL ... Chain DOCKER (2 references) target prot opt source destination DNAT tcp -- 0.0.0.0/0 0.0.0.0/0 tcp dpt:49153 to:172.17.0.2:80 使用 -p 80:80 时:
$ iptables -t nat -nL Chain DOCKER (2 references) target prot opt source destination DNAT tcp -- 0.0.0.0/0 0.0.0.0/0 tcp dpt:80 to:172.17.0.2:80 注意:
这里的规则映射了 0.0.0.0,意味着将接受主机来自所有接口的流量。用户可以通过 -p IP:host_port:container_port 或 -p IP::port 来指定允许访问容器的主机上的 IP、接口等,以制定更严格的规则。
{ "ip": "0.0.0.0" }
发布者:全栈程序员-站长,转载请注明出处:https://javaforall.net/233706.html原文链接:https://javaforall.net


