
大家好,又见面了,我是全栈君。
1、github下载地址
原作者: https://github.com/chrisbanes/Android-PullToRefresh
我自己的: https://github.com/zyj1609wz/Android-PullToRefresh
2、使用方法
listview 布局文件
<LinearLayout xmlns:android="http://schemas.android.com/apk/res/android" xmlns:tools="http://schemas.android.com/tools" android:id="@+id/container" android:layout_width="match_parent" android:layout_height="match_parent" android:orientation="vertical" tools:context="com.example.aa.MainActivity" tools:ignore="MergeRootFrame" >

    <com.handmark.pulltorefresh.library.PullToRefreshListView xmlns:ptr="http://schemas.android.com/apk/res-auto" android:id="@+id/listview" android:layout_width="fill_parent" android:layout_height="fill_parent" android:gravity="center" android:listSelector="#00000000" ptr:ptrMode="both" />

</LinearLayout>
常用的方法
package com.example.aa;
import java.util.ArrayList;
import java.util.List;
import com.handmark.pulltorefresh.library.PullToRefreshBase;
import com.handmark.pulltorefresh.library.PullToRefreshBase.Mode;
import com.handmark.pulltorefresh.library.PullToRefreshBase.OnLastItemVisibleListener;
import com.handmark.pulltorefresh.library.PullToRefreshBase.OnRefreshListener;
import com.handmark.pulltorefresh.library.PullToRefreshListView;
import android.support.v7.app.ActionBarActivity;
import android.text.format.DateUtils;
import android.widget.ListView;
import android.widget.Toast;
import android.os.AsyncTask;
import android.os.Bundle;

public class MainActivity extends ActionBarActivity {
    PullToRefreshListView pullToRefreshListView  ;
    ListView listView  ;

    @Override
    protected void onCreate(Bundle savedInstanceState) {
        super.onCreate(savedInstanceState);
        setContentView(R.layout.activity_main);

        pullToRefreshListView = (PullToRefreshListView) findViewById( R.id.listview ) ;

        pullToRefreshListView.setOnRefreshListener( new OnRefreshListener<ListView>() {

            @Override
            public void onRefresh(PullToRefreshBase<ListView> refreshView) {
                String label = DateUtils.formatDateTime(getApplicationContext(), System.currentTimeMillis(),
                        DateUtils.FORMAT_SHOW_TIME | DateUtils.FORMAT_SHOW_DATE | DateUtils.FORMAT_ABBREV_ALL ) ;

                //最后一次刷新的时间
                refreshView.getLoadingLayoutProxy().setLastUpdatedLabel( "上次刷新时间   " + label);

                //设置刷新图标 下拉的时候显示的内容
                refreshView.getLoadingLayoutProxy().setLoadingDrawable(getResources().getDrawable( R.drawable.ic_launcher) );

                //下拉完成后,还没有刷新时 显示的内容
                refreshView.getLoadingLayoutProxy().setReleaseLabel( "默默地么么哒!!" );

                //松开手,正在刷新时 ,显示的内容
                refreshView.getLoadingLayoutProxy().setRefreshingLabel(  "啦啦啦啦啦" );

                Toast.makeText( MainActivity.this , "刷新了",  Toast.LENGTH_SHORT ).show();
                new GetDataTask().execute(  ) ;
            }
        });

        //listview 滑到 最后一项
        pullToRefreshListView.setOnLastItemVisibleListener( new OnLastItemVisibleListener() {
            @Override
            public void onLastItemVisible() {
                Toast.makeText( MainActivity.this , "listview到底了",  Toast.LENGTH_SHORT ).show() ;
            }
        });

        pullToRefreshListView.setMode( Mode.PULL_FROM_START );

        listView = pullToRefreshListView.getRefreshableView() ;

        listView.setAdapter( new Adapter( this , getData() ));

        /**
         * 程序进来就执行刷新数据,自动执行刷新
         */
        pullToRefreshListView.setRefreshing();

    }

    /**
     * @author admin
     *  pullToRefreshListView.onRefreshComplete();  这一句最好放在异步里面写
     *
     */
    private class GetDataTask extends AsyncTask<Void, Void, String> {
        @Override
        protected String doInBackground(Void... params) {
            try {
                Thread.sleep( 500 );
            } catch (InterruptedException e) {
            }
            return "" ;
        }

        @Override
        protected void onPostExecute(String result) {
            super.onPostExecute(result);
            pullToRefreshListView.onRefreshComplete();
        }
    }

    List<String> getData(){
        List<String> list = new ArrayList<String>() ;
        for( int i = 0 ; i < 100 ; i ++) {
            list.add( "ddd") ;
        }
        return list ;
    }

}
刷新模式
    //向下拉
 pullToRefreshListView.setMode( Mode.PULL_FROM_START ); //向上拉
 pullToRefreshListView.setMode( Mode.PULL_FROM_END ); //同时使用 下拉 和 上拉
 pullToRefreshListView.setMode( Mode.BOTH ); /不启用刷新功能
    pullToRefreshListView.setMode( Mode.DISABLED );
获取当前的刷新模式
//获取当前的刷新模式
if( pullToRefreshListView.getMode() == Mode.BOTH ){ Toast.makeText( MainActivity.this , "当前的刷新模式是 " + pullToRefreshListView.getMode() , Toast.LENGTH_SHORT ).show(); }
设置刷新时的声音
         /**
         * Add Sound Event Listener
         */
        SoundPullEventListener<ListView> soundListener = new SoundPullEventListener<ListView>(this);
        soundListener.addSoundEvent(State.PULL_TO_REFRESH, R.raw.a1 );   //开始刷新显示的声音
        soundListener.addSoundEvent(State.RESET, R.raw.a2 );             //刷新完成后,显示的声音
        soundListener.addSoundEvent(State.REFRESHING, R.raw.a3 );        //正在刷新显示的声音
        pullToRefreshListView.setOnPullEventListener(soundListener);

设置 下拉刷新 和 上拉加载 更多 的监听方法
    pullToRefreshListView.setOnRefreshListener( new Refresh() ) ; /** * 监听方法 * @author admin */
    class Refresh implements OnRefreshListener2<ListView> { //下拉
 @Override public void onPullDownToRefresh(PullToRefreshBase<ListView> refreshView) { } //上拉
 @Override public void onPullUpToRefresh(PullToRefreshBase<ListView> refreshView) { } }
设置正在刷新时,listview是否可以滚动
   //正在刷新的时候,listView 禁止滚动
   pullToRefreshListView.setScrollingWhileRefreshingEnabled( false ); //正在刷新的时候,listView 可以滚动
    pullToRefreshListView.setScrollingWhileRefreshingEnabled( true );
设置刷新时显示的字体的颜色
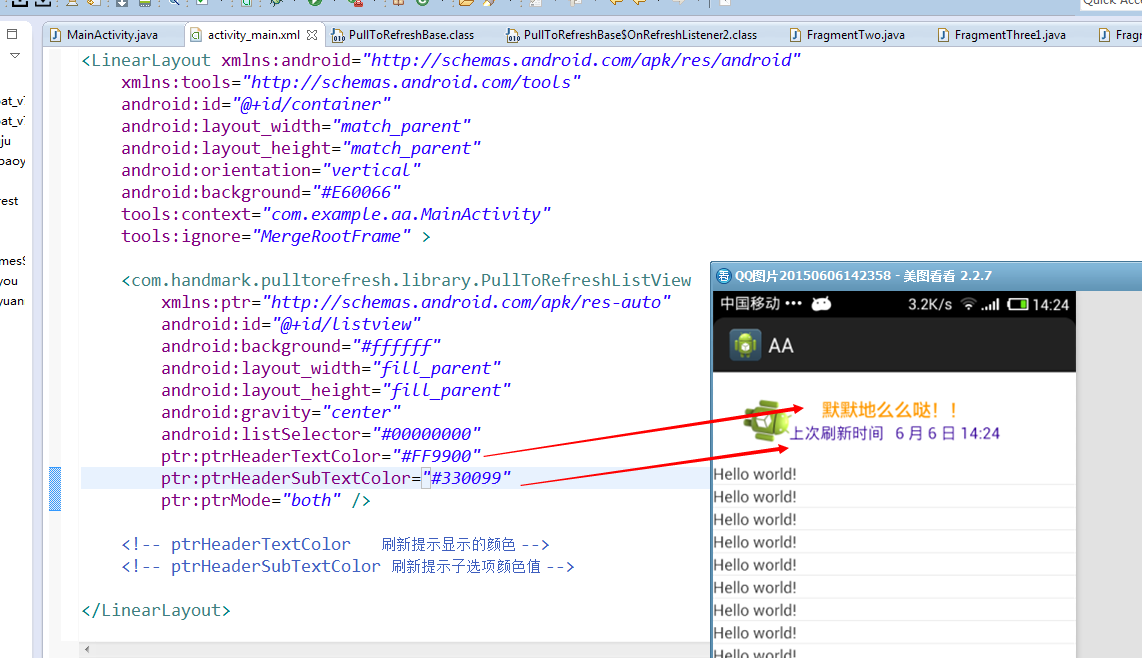
<LinearLayout xmlns:android="http://schemas.android.com/apk/res/android"
    xmlns:tools="http://schemas.android.com/tools"
    android:id="@+id/container"
    android:layout_width="match_parent"
    android:layout_height="match_parent"
    android:orientation="vertical"
    tools:context="com.example.aa.MainActivity"
    tools:ignore="MergeRootFrame" >

    <com.handmark.pulltorefresh.library.PullToRefreshListView
        xmlns:ptr="http://schemas.android.com/apk/res-auto"
        android:id="@+id/listview"
        android:background="#ffffff"
        android:layout_width="fill_parent"
        android:layout_height="fill_parent"
        android:gravity="center"
        android:listSelector="#00000000"
        ptr:ptrHeaderTextColor="#FF9900"
        ptr:ptrHeaderSubTextColor="#330099"
        ptr:ptrMode="both" />

    <!-- ptrHeaderTextColor   刷新提示显示的颜色 -->
    <!-- ptrHeaderSubTextColor 刷新提示子选项颜色值 -->

</LinearLayout>
运行结果
分别设置 下拉 和 上拉 显示的字体
        //得到下拉时候显示的ILoadingLayout
        ILoadingLayout startLayout = pullToRefreshListView.getLoadingLayoutProxy( true , false ) ; startLayout.setPullLabel("你可劲拉,拉...下拉");// 刚下拉时,显示的提示
        startLayout.setRefreshingLabel("好嘞,正在刷新...下拉");// 刷新时
        startLayout.setReleaseLabel("你敢放,我就敢刷新...下拉");// 下来达到一定距离时,显示的提示 //得到上拉时候显示的ILoadingLayout
        ILoadingLayout endLayout = pullToRefreshListView.getLoadingLayoutProxy( false , true ) ; endLayout.setPullLabel("你可劲拉,拉... 上拉");// 刚下拉时,显示的提示
        endLayout.setRefreshingLabel("好嘞,正在刷新...上拉");// 刷新时
        endLayout.setReleaseLabel("你敢放,我就敢刷新...上拉");// 下来达到一定距离时,显示的提示
常用的 xml 配置
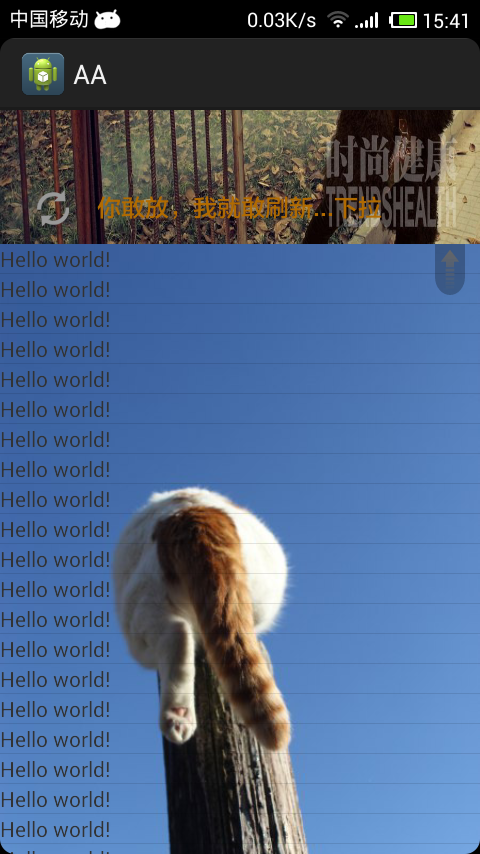
<LinearLayout xmlns:android="http://schemas.android.com/apk/res/android"
    xmlns:tools="http://schemas.android.com/tools"
    android:id="@+id/container"
    android:layout_width="match_parent"
    android:layout_height="match_parent"
    android:orientation="vertical"
    tools:context="com.example.aa.MainActivity"
    tools:ignore="MergeRootFrame" >

    <com.handmark.pulltorefresh.library.PullToRefreshListView
        xmlns:ptr="http://schemas.android.com/apk/res-auto"
        android:id="@+id/listview"
        android:layout_width="fill_parent"
        android:layout_height="fill_parent"
        android:background="#ffffff"
        android:gravity="center"
        android:listSelector="#00000000"
        ptr:ptrHeaderBackground="@drawable/background"
        ptr:ptrHeaderSubTextColor="#330099"
        ptr:ptrHeaderTextColor="#B26B00"
        ptr:ptrListViewExtrasEnabled="false"
        ptr:ptrMode="both"
        ptr:ptrRefreshableViewBackground="@drawable/b2"
        ptr:ptrRotateDrawableWhilePulling="false"
        ptr:ptrScrollingWhileRefreshingEnabled="true"
        ptr:ptrShowIndicator="true" />

    <!-- ptrHeaderTextColor   刷新提示显示的颜色 -->
    <!-- ptrHeaderSubTextColor 刷新提示子选项颜色值 -->
    <!-- ptr:ptrHeaderBackground 上拉背景图 -->
    <!-- ptrShowIndicator    右上角显示的小图标 -->
    <!-- ptrRefreshableViewBackground  整个listview的背景 -->
    <!-- ptrScrollingWhileRefreshingEnabled  刷新的时候,是否允许ListView或GridView滚动。觉得为true比较好。 -->
    <!-- ptrListViewExtrasEnabled  Footer以何种方式加入mPullRefreshListView,true为headView方式加入,就是滚动时刷新头部会一起滚动。 -->
    <!-- ptrRotateDrawableWhilePulling  当动画设置为rotate时,下拉是是否旋转。 -->

    <!-- ptr:ptrAnimationStyle  的取值:flip(翻转动画), rotate(旋转动画) 。 -->
    <!-- ptr:ptrDrawable  则就是设置图标了。 -->

</LinearLayout>
运行结果
3、不太常用的东西
1、如何 关闭 log 日志输出 ?
PullToRefresh 默认是开启日志输出的 。 在 PullToRefreshBase 里面可以看到 static final boolean DEBUG = true ;
true : 输出日志 。 false : 不输出日志
版权声明:本文内容由互联网用户自发贡献,该文观点仅代表作者本人。本站仅提供信息存储空间服务,不拥有所有权,不承担相关法律责任。如发现本站有涉嫌侵权/违法违规的内容, 请联系我们举报,一经查实,本站将立刻删除。
发布者:全栈程序员-站长,转载请注明出处:https://javaforall.net/108491.html原文链接:https://javaforall.net


