
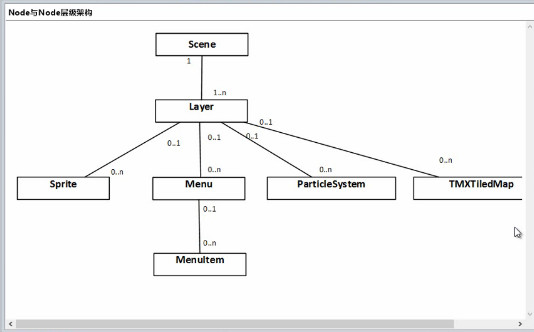
Node之间的关系:

场景AppDelegate.cpp又要由导演去调用然后进行表演:
    // create a scene. it's an autorelease object
    auto scene = HelloWorld::createScene();

    // run
    director->runWithScene(scene);
这里层里面的场景HelloWorldScene.cpp里面的内容:
#include "HelloWorldScene.h"

USING_NS_CC;

Scene* HelloWorld::createScene()
{
    // 'scene' is an autorelease object
    auto scene = Scene::create();

    // 'layer' is an autorelease object
    auto layer = HelloWorld::create();

    // add layer as a child to scene
    scene->addChild(layer);

    // return the scene
    return scene;
}

// on "init" you need to initialize your instance
bool HelloWorld::init()
{
    //
    // 1. super init first
    if ( !Layer::init() )
    {
        return false;
    }

    Size visibleSize = Director::getInstance()->getVisibleSize();
    Vec2 origin = Director::getInstance()->getVisibleOrigin();

    /////
    // 2. add a menu item with "X" image, which is clicked to quit the program
    //    you may modify it.
    //每一个addChild会创建出一个添加的层
    // add a "close" icon to exit the progress. it's an autorelease object
    auto closeItem = MenuItemImage::create(
                                           "CloseNormal.png",
                                           "CloseSelected.png",
                                           CC_CALLBACK_1(HelloWorld::menuCloseCallback, this));

    closeItem->setPosition(Vec2(origin.x + visibleSize.width - closeItem->getContentSize().width/2 ,
                                origin.y + closeItem->getContentSize().height/2));

    // create menu, it's an autorelease object
    auto menu = Menu::create(closeItem, NULL);
    menu->setPosition(Vec2::ZERO);
    this->addChild(menu, 1);

    /////
    // 3. add your codes below...

    // add a label shows "Hello World"
    // create and initialize a label

    auto label = Label::createWithTTF("Hello sunzhiyan", "fonts/arial.ttf", 24);

    // position the label on the center of the screen
    label->setPosition(Vec2(origin.x + visibleSize.width/2,
                            origin.y + visibleSize.height - label->getContentSize().height));

    // add the label as a child to this layer
    this->addChild(label, 1);

    auto label1= Label::createWithTTF("88888888888888", "fonts/arial.ttf", 40);

    // position the label on the center of the screen
    label1->setPosition(Vec2(origin.x + visibleSize.width / 3,
        origin.y + visibleSize.height - label1->getContentSize().height));

    // add the label as a child to this layer
    this->addChild(label1, 1);

    //创建一个精灵
    auto sprite = Sprite::create("sun.jpg");

    //设置精灵的显示位置
    sprite->setPosition(Vec2(visibleSize.width/2 + origin.x, visibleSize.height/2 + origin.y));

    // 将精灵添加到层里面
    this->addChild(sprite, 0);

    return true;
}


void HelloWorld::menuCloseCallback(Ref* pSender)
{
    Director::getInstance()->end();

#if (CC_TARGET_PLATFORM == CC_PLATFORM_IOS)
    exit(0);
#endif
}
版权声明:本文内容由互联网用户自发贡献,该文观点仅代表作者本人。本站仅提供信息存储空间服务,不拥有所有权,不承担相关法律责任。如发现本站有涉嫌侵权/违法违规的内容, 请联系我们举报,一经查实,本站将立刻删除。
发布者:全栈程序员-站长,转载请注明出处:https://javaforall.net/109300.html原文链接:https://javaforall.net


