
一、MSMQ介绍和安装消息队列
关于MSMQ详细的介绍请大家向
http://www.baidu.com/ 或
http://www.g.cn/ 等专家咨询。
使用消息队列的优点:稳定、消息优先级、脱机能力以及安全性。
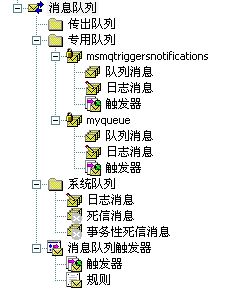
消息队列分为用户创建的队列(专用队列)和系统队列,用户队列分为,。我是Windows XP,看下图所示(myQueue为自己创建的消息队列,msmqtriggersnotifiations为通用队列):

对消息队列有了简单的了解后,使用
MSMQ进行软件开发需要安装
MSMQ,安装完后就该进入实际的开发阶段。具体的安装过程就是在控制面板里“添加/删除程序”下“添加/删除Windows组件”,完成添加就OK。安装完成后就可以通过交互界添加新的消息队列,详细如下图:

出了上面这种交互界面来创建
MSMQ外,也可以通过编程来完成,.NET框架里的MessageQueue类下有一静态方法Create,用来完成消息队列的创建,其定义如下:

//
2
//
摘要:
3
//
在指定的路径中创建非事务性“消息队列”队列。
4
//
5
//
参数:
6
//
path:
7
//
要创建的队列的路径。
8
//
9
//
返回结果:
10
//
表示新队列的 System.Messaging.MessageQueue。
11
public
static
MessageQueue Create(
string
path);
12
//
13
//
摘要:
14
//
在指定的路径中创建事务性或非事务性“消息队列”队列。
15
//
16
//
参数:
17
//
transactional:
18
//
如果创建事务性队列,为 true;如果创建非事务性队列,则为 false。
19
//
20
//
path:
21
//
要创建的队列的路径。
22
//
23
//
返回结果:
24
//
表示新队列的 System.Messaging.MessageQueue。
25
public
static
MessageQueue Create(
string
path,
bool
transactional);
实现消息队列的创建简单代码(C#),创建一个名为”myQueue”的非事务性”消息队列”,如下:
MessageQueue.Create(
@”
.\private$\myQueue
“
);
二、创建、删除和管理队列
在.NET环境下编写Message Queue程序的前提就是需要先安装MSMQ,本文之前已经作了详细的介绍。要开发MSMQ程序就必须学习一个很重要的类(MessageQueue),该类位于名称空间System.Messageing下。其中有几个常用的方法必须掌握:
–Create方法:创建使用指定路径的新消息队列。
–Delete方法:删除现有的消息队列。
–Existe方法:查看指定消息队列是否存在。
—
GetAllMessages()方法:得到队列中的所有消息。
–GetPublicQueues方法:在“消息队列”网络中定位消息队列。
–Peek/BeginPeek方法:查看某个特定队列中的消息队列,但不从该队列中移出消息。
–Receive/BeginReceive方法:检索指定消息队列中最前面的消息并将其从该队列中移除。
–Send方法:发送消息到指定的消息队列。
–Purge方法:清空指定队列的消息。
上述列举的方法在此就不作详细介绍,大家可以通过下面的示例程序中来体会他们各自的功能。
三、发送和序列化消息
MSMQ消息队列中定义的消息由一个主体(body)和若干属性构成。消息的主体可以由文本、二进制构成,根据需要还可以被加密。在MSMQ 中消息的大小不能够超过4MB。发送消息是通过Send方法来完成的,需要一个Message参数。
1、发送消息:
步骤:连接队列–>指定消息格式–>提供要发送的数据(主体)–>调用Send()方法将消息发送出去。详细见后面的示例程序。
2、序列化消息:
消息序列化可以通过.NET Framework附带的三个预定义格式化程序来完成:
— XMLMessageFormatter对象—-MessageQueue组件的默认格式化程序设置。
— BinaryMessageFormatter对象;
— ActiveXMessageFormatter对象;
由于后两者格式化后的消息通常不能为人阅读,所以我们经常用到的是XMLMessageFormatter对象。该对象构造方法有三种重载:
public
XmlMessageFormatter();
2
public
XmlMessageFormatter(
string
[] targetTypeNames);
3
public
XmlMessageFormatter(Type[] targetTypes);
如我们后面的示例程序中用到的序列化语句:
//
序列化为字符串
2

XmlMessageFormatter formatter
=
new
XmlMessageFormatter(
new
Type[]

{ typeof(string) }
);
四、读取和接收消息
1、读取消息:
也就是从指定队列中获取消息,详细请查看本文前面的关于消息操作的方法介绍。
2、接收消息有两种方式:
–> 通过Receive方法–具体功能请返回本文前面有详细介绍。
–> 通过Peek方法–具体功能请返回本文前面有详细介绍。
五、消息使用实例
通过上面一系列的介绍,了解了MessageQueue类和常用的方法后,下面我们通过一个简单的示例程序来分析消息队列的创建、发送消息以及接收消息等相关知识点:
1、通过Create方法创建使用指定路径的新消息队列

/**/
/// <summary>
2
 /// 通过Create方法创建使用指定路径的新消息队列
3
/// </summary>4
 /// <param name=”queuePath”></param>
5
public
static
void
Createqueue(
string
queuePath)
6
{
7
try8
 {
{9
if (!MessageQueue.Exists(queuePath))10
{11
MessageQueue.Create(@”.\private$\myQueue“);12
 }
}13
else14
{15
Console.WriteLine(queuePath + “已经存在!“);16
}17
}18
catch (MessageQueueException e)19
{20
Console.WriteLine(e.Message);21
}22
}
2、
连接消息队列并发送消息到队列
/**/
/// <summary>
2
/// 连接消息队列并发送消息到队列3
/// </summary>4
public
static
void
SendMessage()
5
{
6
try7
{8
//连接到本地的队列9
MessageQueue myQueue = new MessageQueue(“.\\private$\\myQueue“);10
11
Message myMessage = new Message();12
myMessage.Body = “消息内容“;13
myMessage.Formatter = new XmlMessageFormatter(new Type[] { typeof(string) });14
//发送消息到队列中15
myQueue.Send(myMessage);16
}17
catch (ArgumentException e)18
{19
Console.WriteLine(e.Message);20
}21
}
3、连接消息队列并从消息队列中接收消息
/**/
/// <summary>
2
/// 连接消息队列并从队列中接收消息3
/// </summary>4
public
static
void
ReceiveMessage()
5
{
6
//连接到本地队列7
MessageQueue myQueue = new MessageQueue(“.\\private$\\myQueue“);8
myQueue.Formatter = new XmlMessageFormatter(new Type[] { typeof(string) });9
try10
{11
//从队列中接收消息12
Message myMessage = myQueue.Receive();13
string context = (string)myMessage.Body; //获取消息的内容14
Console.WriteLine(“消息内容为:“ + context);15
}16
catch (MessageQueueException e)17
{18
Console.WriteLine(e.Message);19
}20
catch (InvalidCastException e)21
{22
Console.WriteLine(e.Message);23
}24
}
4、连接队列并清空队列的全部消息
/**/
/// <summary>
2
/// 清空指定队列的消息3
/// </summary>4
public
static
void
ClearMessage()
5
{
6
MessageQueue myQueue = new MessageQueue(“.\\private$\\myQueue“);7
myQueue.Purge();8
}
5、连接队列并获取队列的全部消息
/**/
///
<summary>
2
///
连接队列并获取队列的全部消息
3
///
</summary>
4
public
static
void
GetAllMessage()
5
{
6
//连接到本地队列7
MessageQueue myQueue = new MessageQueue(“.\\private$\\myQueue“);8
Message[] message = myQueue.GetAllMessages();9
XmlMessageFormatter formatter = new XmlMessageFormatter(new Type[] { typeof(string) });10
for (int i = 0; i < message.Length; i++)11
{12
message[i].Formatter = formatter;13
Console.WriteLine(message[i].Body.ToString());14
}15
}
上面依次的列举出来5个方法,这里我就不做测试了。上述方法全部通过测试的,我在后面提供个连接,没弄清楚的朋友可下载源程序自己去运行调试下。
本实例完整代码
1
using System;2
using System.Collections.Generic;3
using System.Text;4
using System.Messaging;5
6
namespace MSMQ7
{8
class Program9
{10
static void Main(string[] args)11
{12
Createqueue(“.\\myQueue“);13
SendMessage();14
GetAllMessage();15
//ReceiveMessage();16
}17
18
19
/**//// <summary>20
/// 通过Create方法创建使用指定路径的新消息队列21
/// </summary>22
/// <param name=”queuePath”></param>23
public static void Createqueue(string queuePath)24
{25
try26
{27
if (!MessageQueue.Exists(queuePath))28
{29
MessageQueue.Create(@”.\private$\myQueue“);30
}31
else32
{33
Console.WriteLine(queuePath + “已经存在!“);34
}35
}36
catch (MessageQueueException e)37
{38
Console.WriteLine(e.Message);39
}40
}41
42
/**//// <summary>43
/// 连接消息队列并发送消息到队列44
/// </summary>45
public static void SendMessage()46
{47
try48
{49
//连接到本地的队列50
MessageQueue myQueue = new MessageQueue(“.\\private$\\myQueue“);51
52
Message myMessage = new Message();53
myMessage.Body = “消息内容“;54
myMessage.Formatter = new XmlMessageFormatter(new Type[] { typeof(string) });55
//发送消息到队列中56
myQueue.Send(myMessage);57
}58
catch (ArgumentException e)59
{60
Console.WriteLine(e.Message);61
}62
}63
64
/**//// <summary>65
/// 连接消息队列并从队列中接收消息66
/// </summary>67
public static void ReceiveMessage()68
{69
//连接到本地队列70
MessageQueue myQueue = new MessageQueue(“.\\private$\\myQueue“);71
myQueue.Formatter = new XmlMessageFormatter(new Type[] { typeof(string) });72
try73
{74
//从队列中接收消息75
Message myMessage = myQueue.Receive();76
string context = (string)myMessage.Body; //获取消息的内容77
Console.WriteLine(“消息内容为:“ + context);78
}79
catch (MessageQueueException e)80
{81
Console.WriteLine(e.Message);82
}83
catch (InvalidCastException e)84
{85
Console.WriteLine(e.Message);86
}87
}88
89
/**//// <summary>90
/// 清空指定队列的消息91
/// </summary>92
public static void ClearMessage()93
{94
MessageQueue myQueue = new MessageQueue(“.\\private$\\myQueue“);95
myQueue.Purge();96
}97
98
/**//// <summary>99
/// 连接队列并获取队列的全部消息100
/// </summary>101
public static void GetAllMessage()102
{103
//连接到本地队列104
MessageQueue myQueue = new MessageQueue(“.\\private$\\myQueue“);105
Message[] message = myQueue.GetAllMessages();106
XmlMessageFormatter formatter = new XmlMessageFormatter(new Type[] { typeof(string) });107
for (int i = 0; i < message.Length; i++)108
{109
message[i].Formatter = formatter;110
Console.WriteLine(message[i].Body.ToString());111
}112
}113
}114
}115
六、复杂消息发送实例
通过上面一系列的介绍,对于简单消息的发送和接收及消息的管理应该都不会有什么问题了,下面我在介绍一下关于复杂的消息处理,现在有这样一个需求,要求通过消息队列将一本图书信息发送到队列里,然后从消息队列里读取出来。图书的基本信息包括图书编号、图书名称、图书作者以及图书定价,这样的一个复杂的对象类型怎么来传输呢?详细如下:
Book对象
1
namespace MSMQ.App2
{3
public class Book4
{5
private int _BookId;6
public int BookId7
{8
get { return _BookId; }9
set { _BookId = value; }10
}11
12
private string _BookName;13
public string BookName14
{15
get { return _BookName; }16
set { _BookName = value; }17
}18
19
private string _BookAuthor;20
public string BookAuthor21
{22
get { return _BookAuthor; }23
set { _BookAuthor = value; }24
}25
26
private double _BookPrice;27
public double BookPrice28
{29
get { return _BookPrice; }30
set { _BookPrice = value; }31
}32
}33
}
namespace
MSMQ.App
2
{
3
public class MsgQueue4
{5
/**//// <summary>6
/// 通过Create方法创建使用指定路径的新消息队列7
/// </summary>8
/// <param name=”queuePath”></param>9
public static void Createqueue(string queuePath)10
{11
try12
{13
if (!MessageQueue.Exists(queuePath))14
{15
MessageQueue.Create(@”.\private$\myQueue“);16
MessageBox.Show(“创建队列成功!“);17
}18
else19
{20
MessageBox.Show(queuePath + “已经存在!“);21
}22
}23
catch (MessageQueueException e)24
{25
MessageBox.Show(e.Message);26
}27
}28
29
/**//// <summary>30
/// 连接消息队列并发送消息到队列31
/// </summary>32
public static bool SendMessage(Book book)33
{34
bool flag = false;35
try36
{37
//连接到本地的队列38
MessageQueue myQueue = new MessageQueue(“.\\private$\\myQueue“);39
40
System.Messaging.Message myMessage = new System.Messaging.Message();41
myMessage.Body = book;42
myMessage.Formatter = new XmlMessageFormatter(new Type[] { typeof(MSMQ.App.Book) });43
//发送消息到队列中44
myQueue.Send(myMessage);45
flag = true;46
}47
catch (ArgumentException e)48
{49
MessageBox.Show(e.Message);50
}51
return flag;52
}53
54
/**//// <summary>55
/// 连接消息队列并从队列中接收消息56
/// </summary>57
public static string ReceiveMessage()58
{59
//连接到本地队列60
MessageQueue myQueue = new MessageQueue(“.\\private$\\myQueue“);61
myQueue.Formatter = new XmlMessageFormatter(new Type[] { typeof(MSMQ.App.Book) });62
try63
{64
//从队列中接收消息65
System.Messaging.Message myMessage = myQueue.Receive();66
Book book = (Book)myMessage.Body; //获取消息的内容67
return string.Format(“编号:{0},书名:{1},作者:{2},定价:{3}“,68
book.BookId,69
book.BookName,70
book.BookAuthor,71
book.BookPrice);72
}73
catch (MessageQueueException e)74
{75
MessageBox.Show(e.Message);76
}77
catch (InvalidCastException e)78
{79
MessageBox.Show(e.Message);80
}81
return null;82
}83
}84
}
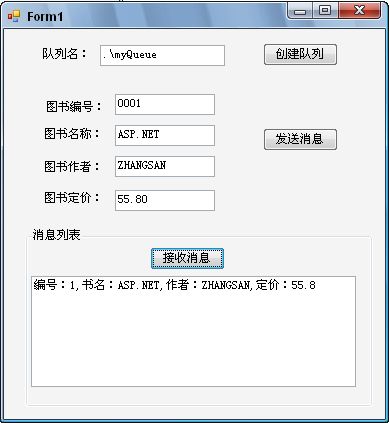
其实发送复杂的消息也就是在消息序列化上有些差别,别的地方与发送普通文本消息没什么大的变化,上面类里提供了创建队列,发送消息到队列,从队列获取消息三个方法,测试结果如下:
上示例中,完成了一个复杂类型的消息发送到队列及从队列中读取的演义,详细请下载代码查看:
点击这里下载本文示例代码
本文就简单介绍于此,更深入的学习MSMQ请查阅相关资料(如PetShop4里的定单处理策略)。
发布者:全栈程序员-站长,转载请注明出处:https://javaforall.net/110976.html原文链接:https://javaforall.net


