
SolrJ is an API that makes it easy for Java applications to talk to Solr. SolrJ hides a lot of the details of connecting to Solr and allows your application to interact with Solr with simple high-level methods.
The center of SolrJ is the org.apache.solr.client.solrj package, which contains just five main classes. Begin by creating a SolrClient, which represents the Solr instance you want to use. Then send SolrRequests or SolrQuerys and get back SolrResponses.
SolrClient is abstract, so to connect to a remote Solr instance, you’ll actually create an instance of either HttpSolrClient, or CloudSolrClient. Both communicate with Solr via HTTP, the difference is that HttpSolrClient is configured using an explicit Solr URL, while CloudSolrClient is configured using the zkHost String for a SolrCloud cluster.
Single node Solr client
String urlString = "http://localhost:8983/solr/techproducts";
SolrClient solr = new HttpSolrClient.Builder(urlString).build();
SolrCloud client
// Using a ZK Host String
String zkHostString = "zkServerA:2181,zkServerB:2181,zkServerC:2181/solr";
SolrClient solr = new CloudSolrClient.Builder().withZkHost(zkHostString).build();

// Using already running Solr nodes
SolrClient solr = new CloudSolrClient.Builder().withSolrUrl("http://localhost:8983/solr").build();
以上内容来自solr官网。
一、构建和运行SolrJ应用程序
对于用Maven构建的项目,
pom.xml配置:
<dependency>
  <groupId>org.apache.solr</groupId>
  <artifactId>solr-solrj</artifactId>
  <version>7.3.1</version>
</dependency>
如果不用maven构建项目,只需要将
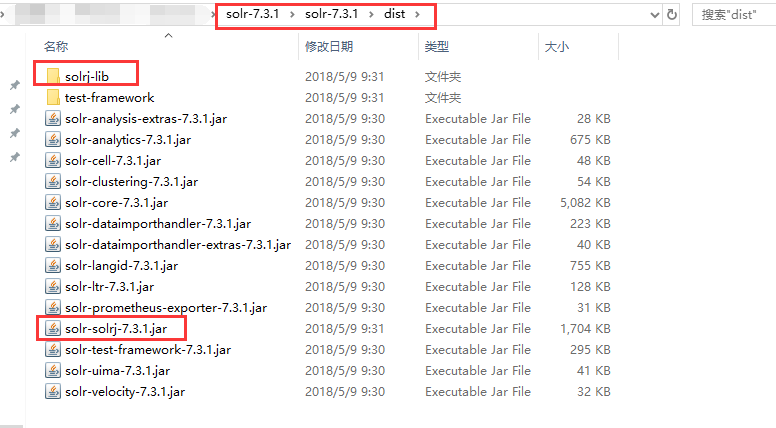
solr-solrj-7.3.1.jar 和 在dist/solrj-lib目录中的依赖包加入到项目中即可。

二、solr7 API
在solr5系之后跟solr4最大的区别是被发布成了一个独立的应用。而不再需要tomcat等容器。在其内部集成了jetty服务器,他可以通过bin目录的脚本直接运行启动。solr5有两种运行模式,独立模式和云模式,独立模式是以core来管理,云模式是以collection来管理。
SolrClient是一个抽象类,下边有很多被实现的子类,
HttpSolrClient是通用客户端。 可以与一个Solr节点直接通信。),
LBHttpSolrClient,CloudSolrClient,ConcurrentUpdateSolrClient
HttpSolrClient的创建需要用户指定一个或多个Solr基础URL,然后客户端使用Solr发送HTTP请求。
-
一个URL的路径指向一个特定的core/collection(例如,
http://host:8983/solr/core1) -
一个URL指向根Solr路径(例如,
http://host:8983/solr)。 当没有指定core/collection的基URL,可以请求任何core/collection,但受影响的core/collection必须指定collection的所有请求。
一般来说,如果你的 SolrClient 只会被用在一个core/collection,包括实体的路径是最方便的。
三、创建工程
创建个maven工程(普通的java工程都可以不过需要自己导包),添加依赖如下:
创建Test类,测试SolrJ相关API
1. 添加\修改索引
/*
根据id(唯一约束)域来更新Document的内容,如果根据id值搜索不到id域则会执行添加操作,如果找到则更新。
*/
@Test
public void addDocument() throws IOException, SolrServerException {
/*
步骤
1、创建 HttpSolrClient对象,通过它和Solr服务器建立连接。
2、 创建SolrInputDocument对象,然后通过它来添加域。
3、 通过HttpSolrClient对象将SolrInputDocument添加到索引库。
4、 提交。
*/
final String solrUrl = "http://localhost:8983/solr/test_Core";
//创建solrClient同时指定超时时间,不指定走默认配置
HttpSolrClient solrServer = new HttpSolrClient.Builder(solrUrl)
.withConnectionTimeout(10000)
.withSocketTimeout(60000)
.build();
// 2、 创建SolrInputDocument对象,然后通过它来添加域。
SolrInputDocument document = new SolrInputDocument();
// 第一个参数:域的名称,域的名称必须是在schema.xml中定义的
// 第二个参数:域的值
// 注意:id的域不能少
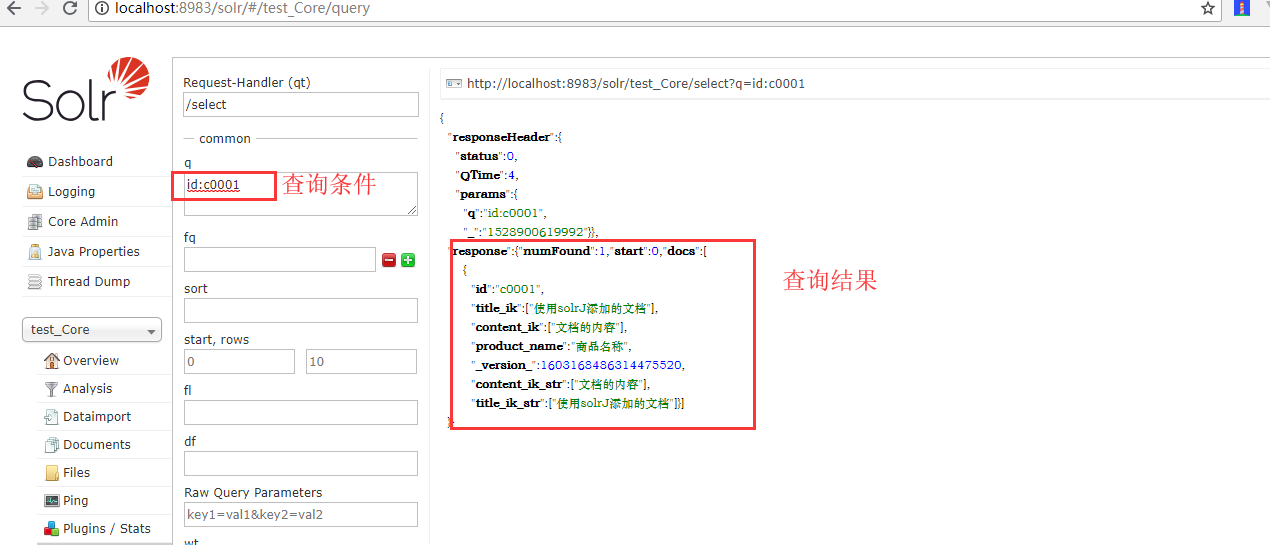
document.addField("id", "c0001");
document.addField("title_ik", "使用solrJ添加的文档");
document.addField("content_ik", "文档的内容");
document.addField("product_name", "商品名称");
// 3、 通过HttpSolrServer对象将SolrInputDocument添加到索引库。
solrServer.add(document);
// 4、 提交。
solrServer.commit();
}不同solr版本solrj 的创建方式有所不同
//solr4创建方式
//SolrServer solrServer = new HttpSolrServer("http://127.0.0.1:8983/solr");
//solr5创建方式,在url中指定core名称:core1
//HttpSolrClient solrServer=new HttpSolrClient("http://127.0.0.1:8983/solr/core1");
//solr7创建方式,在url中指定core名称:core1
HttpSolrClient solrServer= new HttpSolrClient.Builder("http://127.0.0.1:8983/solr/core1").build();
查询测试
删除索引( 根据ID删除)
//根据ID删除索引
@ Test
public void deleteDocument() throws IOException, SolrServerException {
final String solrUrl = "http://localhost:8983/solr/test_Core";
//创建solrClient同时指定超时时间,不指定走默认配置
HttpSolrClient solrServer = new HttpSolrClient.Builder(solrUrl)
.withConnectionTimeout(10000)
.withSocketTimeout(60000)
.build();
//根据ID删除
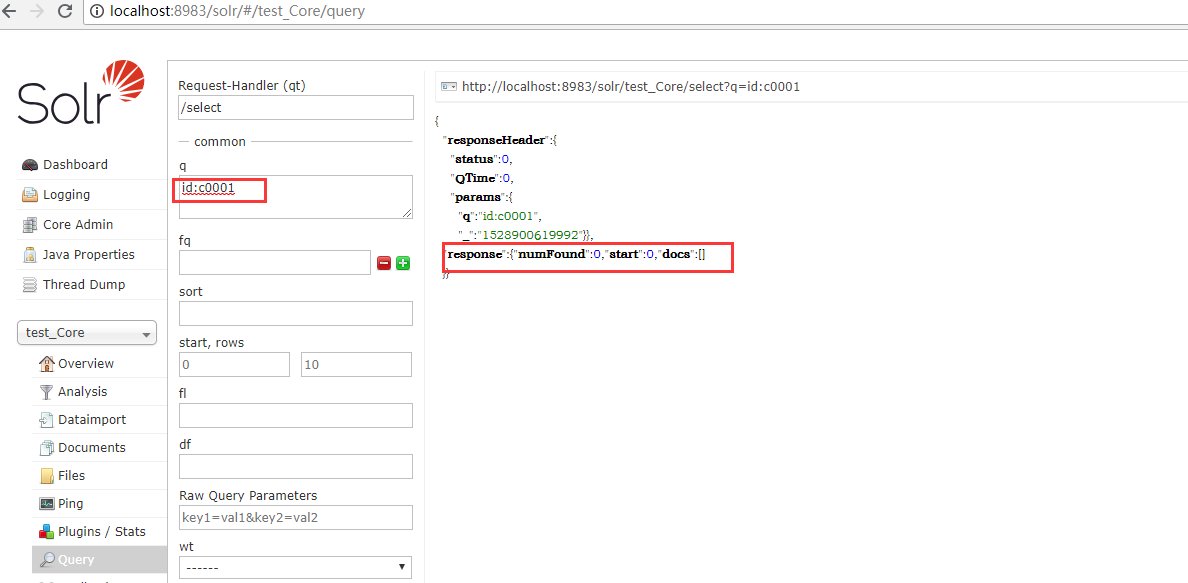
solrServer.deleteById("c0001");
//提交
solrServer.commit();
}查询测试
根据条件删除
//根据条件删除
    @Test
    public void deleteDocumentByQuery() throws Exception {

        final String solrUrl = "http://localhost:8983/solr/test_Core";
        //创建solrClient同时指定超时时间,不指定走默认配置
        // 1、 创建HttpSolrClient对象,通过它和Solr服务器建立连接。
        // 参数:solrUrl服务器的访问地址
        HttpSolrClient solrServer = new HttpSolrClient.Builder(solrUrl)
                .withConnectionTimeout(10000)
                .withSocketTimeout(60000)
                .build();
        // 根据ID删除
        solrServer.deleteByQuery("id:c0001");
        // 全部删除
        // server.deleteByQuery("*:*");
        // 提交
        solrServer.commit();
    }
简单查询
/**
     * 简单查询
     * @throws Exception
     */
    @Test
    public void queryIndex() throws Exception {
        final String solrUrl = "http://localhost:8983/solr/test_Core";
        //创建solrClient同时指定超时时间,不指定走默认配置
        // 1、 创建HttpSolrClient对象,通过它和Solr服务器建立连接。
        // 参数:solrUrl服务器的访问地址
        HttpSolrClient solrServer = new HttpSolrClient.Builder(solrUrl)
                .withConnectionTimeout(10000)
                .withSocketTimeout(60000)
                .build();

        // 创建SolrQuery对象
        SolrQuery query = new SolrQuery();
        // 设置查询条件,名称“q”是固定的且必须 的
        query.set("q", "id:2");

        // 调用server的查询方法,查询索引库
        QueryResponse response = solrServer.query(query);

        // 查询结果
        SolrDocumentList results = response.getResults();

        // 查询结果总数
        long cnt = results.getNumFound();
        System.out.println("查询结果总数:" + cnt);

        for (SolrDocument solrDocument : results) {
            System.out.println(solrDocument.get("id"));
            System.out.println(solrDocument.get("product_name"));
            System.out.println(solrDocument.get("product_sale_price"));
            System.out.println(solrDocument.get("product_sort_name"));
            System.out.println(solrDocument.get("product_pic"));

        }
    }
复杂查询
复杂查询中包括高亮的处理
/**
     * 复杂查询  包括高亮显示
     * @throws Exception
     */
    @Test
    public void queryIndex2() throws Exception {
        final String solrUrl = "http://localhost:8983/solr/test_Core";
        //创建solrClient同时指定超时时间,不指定走默认配置
        // 1、 创建HttpSolrClient对象,通过它和Solr服务器建立连接。
        // 参数:solrUrl服务器的访问地址
        HttpSolrClient solrServer = new HttpSolrClient.Builder(solrUrl)
                .withConnectionTimeout(10000)
                .withSocketTimeout(60000)
                .build();
        // 创建SolrQuery对象
        SolrQuery query = new SolrQuery();

        // 设置查询条件
        query.setQuery("钻石");
        // 设置过滤条件
        query.setFilterQueries("product_sort_name:幽默杂货");
        // 设置排序
        query.setSort("product_sale_price",SolrQuery.ORDER.desc);
        // 设置分页信息
        query.setStart(0);
        query.setRows(10);

        // 设置显得的域的列表
        query.setFields("id", "product_name", "product_sale_price",
                "product_sort_name", "product_pic");

        // 设置默认搜索域
        query.set("df", "product_name");

        // 设置高亮
        query.setHighlight(true);
        query.addHighlightField("product_name");
        query.setHighlightSimplePre("<em>");
        query.setHighlightSimplePost("</em>");

        // 调用server的查询方法,查询索引库
        QueryResponse response = solrServer.query(query);

        // 查询结果
        SolrDocumentList results = response.getResults();

        // 查询结果总数
        long cnt = results.getNumFound();
        System.out.println("查询结果总数:" + cnt);

        for (SolrDocument solrDocument : results) {
            System.out.println(solrDocument.get("id"));

            String productName = (String) solrDocument.get("product_name");

            //获取高亮列表
            Map<String, Map<String, List<String>>> highlighting = response
                    .getHighlighting();
            //获得本文档的高亮信息
            List<String> list = highlighting.get(solrDocument.get("id")).get(
                    "product_name");
            //如果有高亮,则把商品名称赋值为有高亮的那个名称
            if (list != null) {
                productName = list.get(0);
            }

            System.out.println(productName);
            System.out.println(solrDocument.get("product_sale_price"));
            System.out.println(solrDocument.get("product_sort_name"));
            System.out.println(solrDocument.get("product_pic"));

        }
    }
发布者:全栈程序员-站长,转载请注明出处:https://javaforall.net/111280.html原文链接:https://javaforall.net

![ArcGIS二次开发基础教程:开发环境配置教程(ArcEngine10.4+VS2019)[通俗易懂]](https://javaforall.net/wp-content/uploads/2020/11/2020110817443450-480x300.jpg)
