
大家好,又见面了,我是你们的朋友全栈君。
上一篇中我们对训练数据做了一些预处理,检测出人脸并保存在\pic\color\x文件夹下(x=1,2,3,…类别号),本文做训练和识别。为了识别,首先将人脸训练数据 转为灰度、对齐、归一化,再放入分类器(EigenFaceRecognizer),最后用训练出的model进行predict。
—————————————–
环境:vs2010+opencv 2.4.6.0
特征:eigenface
Input:一个人脸数据库,15个人,每人20个样本(左右)。
Output:人脸检测,并识别出每张检测到的人脸。
—————————————–
1. 为训练数据预处理( 转为灰度、对齐、归一化 )
- 转为灰度和对齐是后面做训练时EigenFaceRecognizer的要求;
- 归一化是防止光照带来的影响
在上一篇的 2.2 Prehelper.cpp文件中加入函数
void resizeandtogray(char* dir,int k, vector<Mat> &images, vector<int> &labels,
vector<Mat> &testimages, vector<int> &testlabels);
void resizeandtogray(char* dir,int K, vector<Mat> &images, vector<int> &labels, vector<Mat> &testimages, vector<int> &testlabels){ IplImage* standard = cvLoadImage("D:\\privacy\\picture\\photo\\2.jpg",CV_LOAD_IMAGE_GRAYSCALE); string cur_dir; char id[5]; int i,j; for(int i=1; i<=K; i++) { cur_dir = dir; cur_dir.append("gray\\"); _itoa(i,id,10); cur_dir.append(id); const char* dd = cur_dir.c_str(); CStatDir statdir; if (!statdir.SetInitDir(dd)) { puts("Dir not exist"); return; } cout<<"Processing samples in Class "<<i<<endl; vector<char*>file_vec = statdir.BeginBrowseFilenames("*.*"); for (j=0;j<file_vec.size();j++) { IplImage* cur_img = cvLoadImage(file_vec[j],CV_LOAD_IMAGE_GRAYSCALE); cvResize(cur_img,standard,CV_INTER_AREA); Mat cur_mat = cvarrToMat(standard,true),des_mat; cv::normalize(cur_mat,des_mat,0, 255, NORM_MINMAX, CV_8UC1); cvSaveImage(file_vec[j],cvCloneImage(&(IplImage) des_mat)); if(j!=file_vec.size()) { images.push_back(des_mat); labels.push_back(i); } else { testimages.push_back(des_mat); testlabels.push_back(i); } } cout<<file_vec.size()<<" images."<<endl; }}并在main中调用:
int main( )
{
	CvCapture* capture = 0;
	Mat frame, frameCopy, image;
	string inputName;
	int mode;

	char dir[256] = "D:\\Courses\\CV\\Face_recognition\\pic\\";
	//preprocess_trainingdata(dir,K); //face_detection and extract to file
	vector<Mat> images,testimages;
	vector<int> labels,testlabels;
	resizeandtogray(dir,K,images,labels,testimages,testlabels); //togray, normalize and resize

	system("pause");
	return 0;
}
2. 训练
有了vector<Mat> images,testimages; vector<int> labels,testlabels; 可以开始训练了,我们采用EigenFaceRecognizer建模。
在Prehelper.cpp中加入函数
Ptr<FaceRecognizer> Recognition(vector<Mat> images, vector<int> labels,vector<Mat> testimages, vector<int> testlabels);
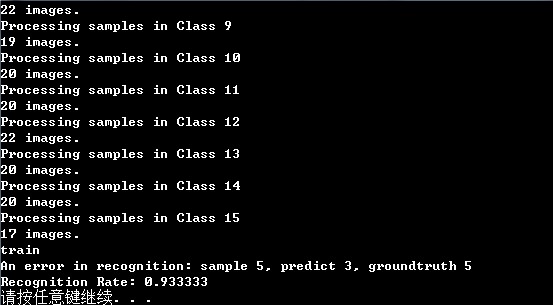
Ptr<FaceRecognizer> Recognition(vector<Mat> images, vector<int> labels, vector<Mat> testimages, vector<int> testlabels){ Ptr<FaceRecognizer> model = createEigenFaceRecognizer(10);//10 Principal components cout<<"train"<<endl; model->train(images,labels); int i,acc=0,predict_l; for (i=0;i<testimages.size();i++) { predict_l = model->predict(testimages[i]); if(predict_l != testlabels[i]) { cout<<"An error in recognition: sample "<<i+1<<", predict "<< predict_l<<", groundtruth "<<testlabels[i]<<endl; imshow("error 1",testimages[i]); waitKey(); } else acc++; } cout<<"Recognition Rate: "<<acc*1.0/testimages.size()<<endl; return model;}
Recognization()输出分错的样本和正确率,最后返回建模结果Ptr<FaceRecognizer> model
主函数改为:
int main( )
{
	CvCapture* capture = 0;
	Mat frame, frameCopy, image;
	string inputName;
	int mode;

	char dir[256] = "D:\\Courses\\CV\\Face_recognition\\pic\\";
	//preprocess_trainingdata(dir,K); //face_detection and extract to file
	vector<Mat> images,testimages;
	vector<int> labels,testlabels;
	//togray, normalize and resize; load to images,labels,testimages,testlabels
	resizeandtogray(dir,K,images,labels,testimages,testlabels);
	//recognition
	Ptr<FaceRecognizer> model = Recognition(images,labels,testimages,testlabels);
	char* dirmodel = new char [256];
	strcpy(dirmodel,dir); strcat(dirmodel,"model.out");
	FILE* f = fopen(dirmodel,"w");
	fwrite(model,sizeof(model),1,f);
	system("pause");
	return 0;
}
最终结果:一个错分样本,正确率93.3%


文章所用代码打包链接:http://download.csdn.net/detail/abcjennifer/7047853
关于Computer Vision更多的学习资料将继续更新,敬请关注本博客和新浪微博Rachel Zhang。
发布者:全栈程序员-站长,转载请注明出处:https://javaforall.net/137542.html原文链接:https://javaforall.net


