
大家好,又见面了,我是你们的朋友全栈君。
在使用
flowable框架的时候,首先需要引入
flowable的jar包,flowable maven仓库地址为:
<!– https://mvnrepository.com/artifact/org.flowable/flowable-engine –>
<dependency>
<groupId>org.flowable</groupId>
<artifactId>flowable-engine</artifactId>
<version>6.0.0.RC1</version>
</dependency>
新建flowable.cfg.xml文件,如下图所示:

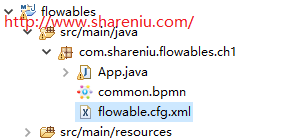
flowable.cfg.xml文件内容如下所示:
<beans xmlns="http://www.springframework.org/schema/beans"
       xmlns:xsi="http://www.w3.org/2001/XMLSchema-instance"
       xsi:schemaLocation="http://www.springframework.org/schema/beans
       http://www.springframework.org/schema/beans/spring-beans.xsd">
       <!--分享牛http://www.shareniu.com/ -->
 <bean id="dataSource"  class="com.alibaba.druid.pool.DruidDataSource">
		<property name="driverClassName">
			<value>com.mysql.jdbc.Driver</value>
		</property>
		<property name="url">
			<value>jdbc:mysql://127.0.0.1:3306/shareniuflowable?useUnicode=true&characterEncoding=UTF-8
			</value>
		</property>
		<property name="username">
			<value>root</value>
		</property>
		<property name="password" value="" />
		<!--  -->
	</bean>
	<!--分享牛http://www.shareniu.com/ -->
        <bean id="processEngineConfiguration"
          class="org.flowable.engine.impl.cfg.StandaloneProcessEngineConfiguration" >
        <property name="dataSource" ref="dataSource" />
         <property name="databaseSchemaUpdate" value="true" />
        </bean>
</beans>
新建测试类如下所示:
package com.shareniu.flowables.ch1;

import java.io.IOException;
import java.io.InputStream;

import org.flowable.engine.IdentityService;
import org.flowable.engine.ProcessEngine;
import org.flowable.engine.ProcessEngineConfiguration;
import org.flowable.engine.RepositoryService;
import org.flowable.engine.RuntimeService;
import org.flowable.engine.TaskService;
import org.flowable.engine.impl.cfg.ProcessEngineConfigurationImpl;
import org.flowable.engine.repository.Deployment;
import org.flowable.engine.repository.DeploymentBuilder;
import org.junit.Before;
import org.junit.Test;

/**
 * 分享牛http://www.shareniu.com/
 *
 */
public class App
{
	// 获取到Activiti ProcessEngine
		ProcessEngine processEngine = null;
		// 获取RepositoryService 实例对象
		RepositoryService repositoryService = null;
		// 资源名称
		String resourceName = "shareniu_addInputStream.bpmn";
		IdentityService identityService;
		RuntimeService runtimeService;
		TaskService taskService;
		@Before
		public void init() {
			InputStream in = App.class.getClassLoader().getResourceAsStream(
					"com/shareniu/flowables/ch1/flowable.cfg.xml");
			ProcessEngineConfiguration pcf = ProcessEngineConfiguration
					.createProcessEngineConfigurationFromInputStream(in);
			processEngine = pcf.buildProcessEngine();
			repositoryService = processEngine.getRepositoryService();
			identityService = processEngine.getIdentityService();
			runtimeService = processEngine.getRuntimeService();
			taskService = processEngine.getTaskService();
			ProcessEngineConfigurationImpl pc = (ProcessEngineConfigurationImpl) processEngine
					.getProcessEngineConfiguration();
		}
		@Test
		public void addInputStreamTest() throws IOException {
			// 定义的文件信息的流读取 分享牛http://www.shareniu.com/
			InputStream inputStream = App.class
					.getClassLoader().getResource("com/shareniu/flowables/ch1/common.bpmn").openStream();
			// 流程定义的分类 分享牛http://www.shareniu.com/
			String category = "shareniu_addInputStream";
			// 构造DeploymentBuilder对象
			DeploymentBuilder deploymentBuilder = repositoryService
					.createDeployment().category(category)
					.addInputStream(resourceName, inputStream);
			// 部署
			Deployment deploy = deploymentBuilder.deploy();
			System.out.println(deploy);

		}

}
运行上述代码,流程文档以及成功部署。
版权声明:本文内容由互联网用户自发贡献,该文观点仅代表作者本人。本站仅提供信息存储空间服务,不拥有所有权,不承担相关法律责任。如发现本站有涉嫌侵权/违法违规的内容, 请联系我们举报,一经查实,本站将立刻删除。
发布者:全栈程序员-站长,转载请注明出处:https://javaforall.net/143366.html原文链接:https://javaforall.net


