
大家好,又见面了,我是你们的朋友全栈君。
利用ViewPager+Fragment简单实现页面的切换

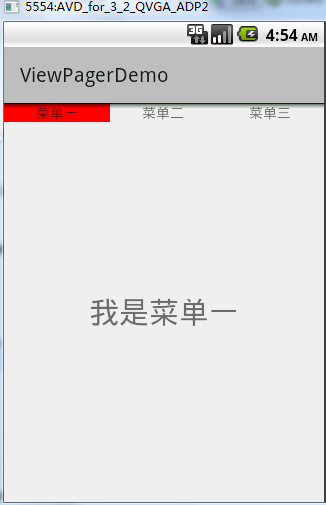
项目的大概组成:
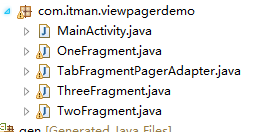
以下是代码的实现,首先在activity_main.xml新建菜单栏和ViewPager控件:
<LinearLayout xmlns:android="http://schemas.android.com/apk/res/android"
    xmlns:tools="http://schemas.android.com/tools"
    android:layout_width="match_parent"
    android:layout_height="match_parent"
    android:orientation="vertical"
    tools:context="com.itman.viewpagerdemo.MainActivity" >

    <LinearLayout
        android:layout_width="match_parent"
        android:layout_height="wrap_content"
        android:orientation="horizontal" >

        <TextView
            android:id="@+id/tv_item_one"
            android:layout_width="wrap_content"
            android:layout_height="wrap_content"
            android:layout_weight="1"
            android:gravity="center_horizontal"
            android:text="菜单一" />

        <TextView
            android:id="@+id/tv_item_two"
            android:layout_width="wrap_content"
            android:layout_height="wrap_content"
            android:layout_weight="1"
            android:gravity="center_horizontal"
            android:text="菜单二" />

        <TextView
            android:id="@+id/tv_item_three"
            android:layout_width="wrap_content"
            android:layout_height="wrap_content"
            android:layout_weight="1"
            android:gravity="center_horizontal"
            android:text="菜单三" />
    </LinearLayout>

    <android.support.v4.view.ViewPager
        android:id="@+id/myViewPager"
        android:layout_width="match_parent"
        android:layout_height="match_parent"
        android:layout_weight="1" />

</LinearLayout>
接下来就新建三个Fragment页面做好准备,Fragment的布局文件:
<RelativeLayout xmlns:android="http://schemas.android.com/apk/res/android"
    xmlns:tools="http://schemas.android.com/tools"
    android:layout_width="match_parent"
    android:layout_height="match_parent" >

    <TextView
        android:layout_width="match_parent"
        android:layout_height="match_parent"
        android:gravity="center"
        android:text="我是菜单一"
        android:textSize="30sp" />

</RelativeLayout>
Fragment的Java文件:
package com.itman.viewpagerdemo;

import android.os.Bundle;
import android.support.annotation.Nullable;
import android.support.v4.app.Fragment;
import android.view.LayoutInflater;
import android.view.View;
import android.view.ViewGroup;

public class OneFragment extends Fragment{

@Override
public View onCreateView(LayoutInflater inflater,
ViewGroup container,  Bundle savedInstanceState) {
View view = inflater.inflate(R.layout.fragment_one, null);
return view;
}

}
三个fragment页面都一样的,就不全部贴出来了,接下来就准备添加Fragment的适配器TabFragmentPagerAdapter:
package com.itman.viewpagerdemo;

import java.util.List;
import android.support.v4.app.Fragment;
import android.support.v4.app.FragmentManager;
import android.support.v4.app.FragmentPagerAdapter;

public class TabFragmentPagerAdapter extends FragmentPagerAdapter {
private FragmentManager mfragmentManager;
private List<Fragment> mlist;

public TabFragmentPagerAdapter(FragmentManager fm, List<Fragment> list) {
super(fm);
this.mlist = list;
}

@Override
public Fragment getItem(int arg0) {
return mlist.get(arg0);//显示第几个页面
}

@Override
public int getCount() {
return mlist.size();//有几个页面
}
}
准备工作完成,接下来是MainActivit.Java的代码实现:
package com.itman.viewpagerdemo;

import java.util.ArrayList;
import java.util.List;
import android.graphics.Color;
import android.os.Bundle;
import android.support.v4.app.Fragment;
import android.support.v4.view.ViewPager;
import android.support.v4.view.ViewPager.OnPageChangeListener;
import android.support.v7.app.ActionBarActivity;
import android.view.View;
import android.view.View.OnClickListener;
import android.widget.TextView;

public class MainActivity extends ActionBarActivity implements OnClickListener {

private TextView tv_item_one;
private TextView tv_item_two;
private TextView tv_item_three;
private ViewPager myViewPager;
private List<Fragment> list;
private TabFragmentPagerAdapter adapter;

@Override
protected void onCreate(Bundle savedInstanceState) {
super.onCreate(savedInstanceState);
setContentView(R.layout.activity_main);
InitView();

// 设置菜单栏的点击事件
tv_item_one.setOnClickListener(this);
tv_item_two.setOnClickListener(this);
tv_item_three.setOnClickListener(this);
myViewPager.setOnPageChangeListener(new MyPagerChangeListener());

//把Fragment添加到List集合里面
list = new ArrayList<>();
list.add(new OneFragment());
list.add(new TwoFragment());
list.add(new ThreeFragment());
adapter = new TabFragmentPagerAdapter(getSupportFragmentManager(), list);
myViewPager.setAdapter(adapter);
myViewPager.setCurrentItem(0);  //初始化显示第一个页面
tv_item_one.setBackgroundColor(Color.RED);//被选中就为红色
}

/**
* 初始化控件
*/
private void InitView() {
tv_item_one = (TextView) findViewById(R.id.tv_item_one);
tv_item_two = (TextView) findViewById(R.id.tv_item_two);
tv_item_three = (TextView) findViewById(R.id.tv_item_three);
myViewPager = (ViewPager) findViewById(R.id.myViewPager);
}

/**
* 点击事件
*/
@Override
public void onClick(View v) {
switch (v.getId()) {
case R.id.tv_item_one:
myViewPager.setCurrentItem(0);
tv_item_one.setBackgroundColor(Color.RED);
tv_item_two.setBackgroundColor(Color.WHITE);
tv_item_three.setBackgroundColor(Color.WHITE);
break;
case R.id.tv_item_two:
myViewPager.setCurrentItem(1);
tv_item_one.setBackgroundColor(Color.WHITE);
tv_item_two.setBackgroundColor(Color.RED);
tv_item_three.setBackgroundColor(Color.WHITE);
break;
case R.id.tv_item_three:
myViewPager.setCurrentItem(2);
tv_item_one.setBackgroundColor(Color.WHITE);
tv_item_two.setBackgroundColor(Color.WHITE);
tv_item_three.setBackgroundColor(Color.RED);
break;
}
}

/**
* 设置一个ViewPager的侦听事件,当左右滑动ViewPager时菜单栏被选中状态跟着改变
*
*/
public class MyPagerChangeListener implements OnPageChangeListener {

@Override
public void onPageScrollStateChanged(int arg0) {
}

@Override
public void onPageScrolled(int arg0, float arg1, int arg2) {
}

@Override
public void onPageSelected(int arg0) {
switch (arg0) {
case 0:
tv_item_one.setBackgroundColor(Color.RED);
tv_item_two.setBackgroundColor(Color.WHITE);
tv_item_three.setBackgroundColor(Color.WHITE);
break;
case 1:
tv_item_one.setBackgroundColor(Color.WHITE);
tv_item_two.setBackgroundColor(Color.RED);
tv_item_three.setBackgroundColor(Color.WHITE);
break;
case 2:
tv_item_one.setBackgroundColor(Color.WHITE);
tv_item_two.setBackgroundColor(Color.WHITE);
tv_item_three.setBackgroundColor(Color.RED);
break;
}
}
}

}
代码的注释很详细,也不是什么很难实现功能,有了基本实现的样例,大家就可以随意改动,变成自己喜欢的样式了。
版权声明:本文内容由互联网用户自发贡献,该文观点仅代表作者本人。本站仅提供信息存储空间服务,不拥有所有权,不承担相关法律责任。如发现本站有涉嫌侵权/违法违规的内容, 请发送邮件至 举报,一经查实,本站将立刻删除。
发布者:全栈程序员-站长,转载请注明出处:https://javaforall.net/163228.html原文链接:https://javaforall.net