
大家好,又见面了,我是你们的朋友全栈君。如果您正在找激活码,请点击查看最新教程,关注关注公众号 “全栈程序员社区” 获取激活教程,可能之前旧版本教程已经失效.最新Idea2022.1教程亲测有效,一键激活。
Jetbrains全系列IDE使用 1年只要46元 售后保障 童叟无欺
前言
pytest 运行完用例之后会生成一个 .pytest_cache 的缓存文件夹,用于记录用例的ids和上一次失败的用例。
方便我们在运行用例的时候加上–lf 和 –ff 参数,快速运行上一次失败的用例。
–lf, –last-failed 只重新运行上次运行失败的用例(或如果没有失败的话会全部跑)
–ff, –failed-first 运行所有测试,但首先运行上次运行失败的测试(这可能会重新测试,从而导致重复的fixture setup/teardown)
cache
pytest -h 查看命令行参数,关于 cache 参数的使用方式
> pytest -h

--lf, --last-failed   rerun only the tests that failed at the last
                      run (or all if none failed)
--ff, --failed-first  run all tests, but run the last failures first.
                      This may re-order tests and thus lead to repeated fixture                                   											setup/teardown.
--nf, --new-first     run tests from new files first, then the rest of the tests sorted by 												file mtime
--cache-show=[CACHESHOW]
                      show cache contents, don't perform collection or tests. Optional      											argument: glob(default: '*').
--cache-clear         remove all cache contents at start of test run.
参数说明:
- –lf 也可以使用
--last-failed仅运行上一次失败的用例 - –ff 也可以使用
--failed-first运行全部的用例,但是上一次失败的用例先运行 - –nf 也可以使用
--new-first根据文件插件的时间,新的测试用例会先运行 - –cache-show=[CACHESHOW] 显示.pytest_cache文件内容,不会收集用例也不会测试用例,选项参数: glob (默认: ‘*’)
- –cache-clear 测试之前先清空.pytest_cache文件
–cache-show
案例
def test_01():
    a = "hello"
    b = "hello"
    assert a == b


def test_02():
    a = "hello"
    b = "hello world"
    assert a == b


def test_03():
    a = "hello"
    b = "hello world"
    assert a in b


def test_04():
    a = "hello"
    b = "hello world"
    assert a not in b
命令行输入 运行完成后,会有2个用例失败,2个用例成功
collecting ...
 case/test_1.py ✓                                                                                                                                                                                         25% ██▌

 case/test_1.py ⨯✓                                                                                                                                                                                        75% ███████▌

 case/test_1.py ⨯                                                                                                                                                                                        100% ██████████
运行完成后,会在当前的目录生成一个 .pytest_cache 的缓存文件夹,层级结构如下
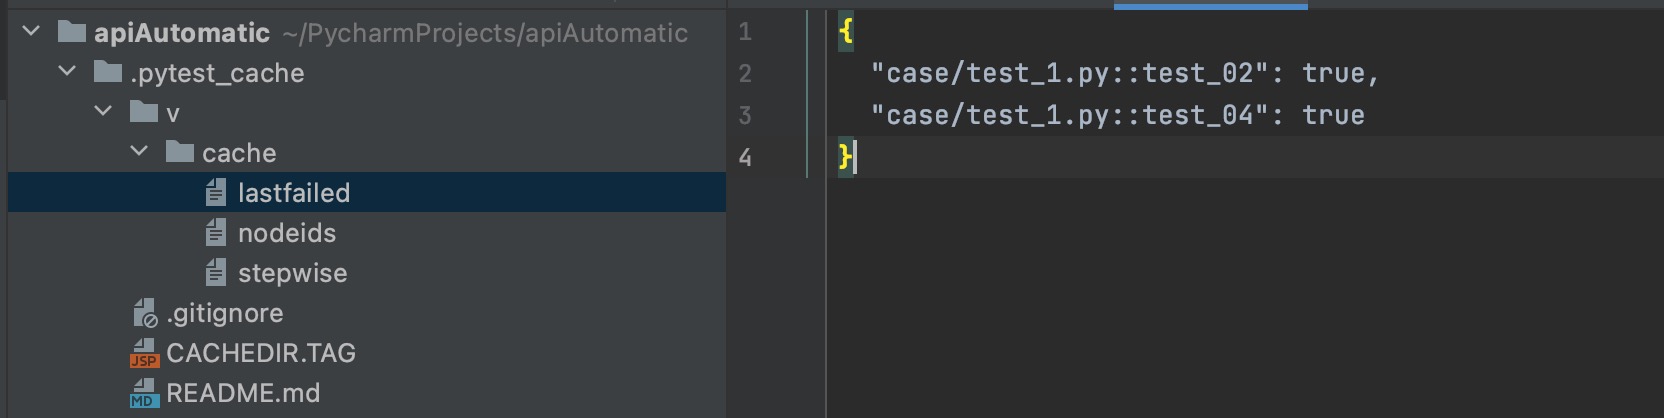

lastfailed 文件记录上一次运行失败的用例
{
  "test_x.py::test_02": true,
  "test_x.py::test_04": true
}
nodeids 文件记录所有用例的节点
[
  "test_x.py::test_01",
  "test_x.py::test_02",
  "test_x.py::test_03",
  "test_x.py::test_04"
]
于是可以通过 pytest –cache-show 命令查看cache目录
(pytest_env) ➜  apiAutomatic pytest --cache-show
Test session starts (platform: darwin, Python 3.7.6, pytest 6.2.1, pytest-sugar 0.9.4)
rootdir: /Users/jkc/PycharmProjects/apiAutomatic, configfile: pytest.ini
plugins: assume-2.4.2, sugar-0.9.4, rerunfailures-9.1.1, base-url-1.4.2, html-3.1.1, metadata-1.11.0, ordering-0.6, cov-2.10.1, repeat-0.9.1, xdist-2.2.0, forked-1.3.0, allure-pytest-2.8.29
cachedir: /Users/jkc/PycharmProjects/apiAutomatic/.pytest_cache
------------------------------------------------------------------------------------------------- cache values for '*' -------------------------------------------------------------------------------------------------
cache/lastfailed contains:
  {'case/test_1.py::test_02': True, 'case/test_1.py::test_04': True}
cache/nodeids contains:
  ['case/test_1.py::test_01',
   'case/test_1.py::test_02',
   'case/test_1.py::test_03',
   'case/test_1.py::test_04']
cache/stepwise contains:
  []
Results (0.02s):
–cache-clear
–cache-clear 用于在测试用例开始之前清空cache的内容
查看pytest关于cache的更多文档https://docs.pytest.org/en/latest/cache.html
发布者:全栈程序员-站长,转载请注明出处:https://javaforall.net/166363.html原文链接:https://javaforall.net


