
大家好,又见面了,我是你们的朋友全栈君。如果您正在找激活码,请点击查看最新教程,关注关注公众号 “全栈程序员社区” 获取激活教程,可能之前旧版本教程已经失效.最新Idea2022.1教程亲测有效,一键激活。
Jetbrains全系列IDE使用 1年只要46元 售后保障 童叟无欺
发现了一个问题:
QQuickView only supports loading of root objects that derive from QQuickItem.

If your example is using QML 2, (such as qmlscene) and the .qml file you
loaded has 'import QtQuick 1.0' or 'import Qt 4.7', this error will occur.

To load files with 'import QtQuick 1.0' or 'import Qt 4.7', use the
QDeclarativeView class in the Qt Quick 1 module.
QML:
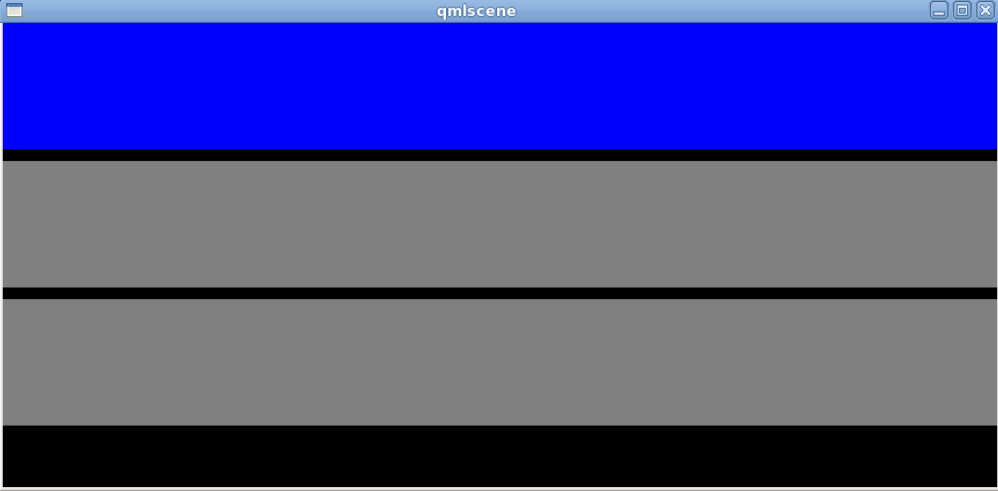
Window
{
    width: 360
    height: 360
    color:"black"
}
如果你发现了你的main.cpp是这个就会爆上面错误。
#include <QtGui/QGuiApplication>
#include "qtquick2applicationviewer.h"

int main(int argc, char *argv[])
{
    QGuiApplication app(argc, argv);

    QtQuick2ApplicationViewer viewer;
    viewer.setMainQmlFile(QStringLiteral("qml/QML_V2/main.qml"));
    viewer.showExpanded();

    return app.exec();
}
修改为:
#include <QGuiApplication>
#include <QQmlApplicationEngine>
#include <QQuickWindow>

int main(int argc, char *argv[])
{
    QGuiApplication app(argc, argv);
    QQmlApplicationEngine engine;
    engine.load(QUrl("qml/QML_V2/main.qml"));
    QObject *topLevel = engine.rootObjects().value(0);
    QQuickWindow *window = qobject_cast<QQuickWindow *>(topLevel);
    window->show();
    return app.exec();
}
……….QML web:直接给跪下了
https://qmlweb.github.io/
<1>Simple:
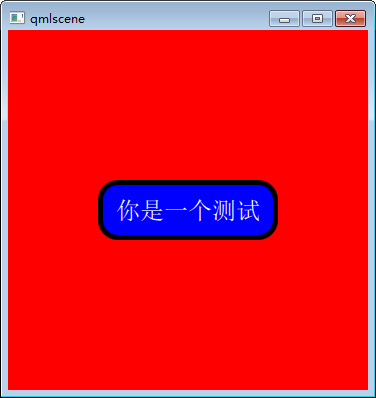


import QtQuick 2.0

Rectangle
{
    id:rootTangle
    width: 360
    height: 360
    color:"red"


    Rectangle
    {
        id:blueRec
        color:"#0000FF"
        opacity: 1
        width:rootTangle.width/2
        height:rootTangle.height/6
        //x:64
        //y:64
        anchors.centerIn: rootTangle
        //anchors.centerIn: parent
        border.color: "black"
        border.width: 5
        radius:20
        //gradient: Gradient
        //{
        //    GradientStop{position:0.0;color:"lightsteelblue"}
        //    GradientStop{position:1.0;color:"blue"}
        //}
    }


    MouseArea
    {
        //anchors.fill: parent //设置区域
        id:blueRectMouseArea
        anchors.fill:
        {
            blueRec
        }
        // 也可以写成anchors.fill:blueRec

        hoverEnabled: true;
        onEntered:
        {
            //blueRec.scale = 1.5
            blueRec.color = "brown"
            //blueRec.rotation = 45
            //ourText.rotation = 45
        }
        onExited:
        {
            //blueRec.scale = 1
            blueRec.color ="#0000FF"
            //blueRec.rotation = 0
            //ourText.rotation = 0
        }

        onClicked:
        {
            console.log(blueRec.color)
            console.log("test our data")
            //Qt.quit();
        }
    }


    Text
    {
        id:ourText
        //anchors.centerIn: parent
        anchors.centerIn: blueRectMouseArea
        text: "你是一个测试"
        //text: "你是一个<b>测试</b>" 设置测试为加黑字体
        color:"white"
        font.pixelSize: Math.round(blueRectMouseArea.height/2.5)
        //width:blueRec.width
        //wrapMode: Text.WordWrap
        //font.bold: true  设置所有的为bold
    }

}
View Code
<2> Animation image
import QtQuick 2.0
import QtQuick.Window 2.0
import QtQuick.Controls 1.1
Window
{
    id:root
    width: 360
    height: 360
    title:"Gearslogy"
    Column
    {
        Row
        {
            id:tools
            Button
            {
                id:button_01
                text:"Reset1"
                onClicked:
                {
                    display.fillMode = Image.Stretch
                    display.width = display.sourceSize.width
                    display.height = display.sourceSize.height
                    display.anchors.centerIn = viewPort
                    display.clip = false
                    console.log("Reset button");
                }
            }
            Button
            {
                id:button_02
                text:"fit to window"
                onClicked:
                {
                    display.fillMode = Image.Stretch
                    display.width = root.width
                    display.height = root.height
                    console.log("Reset button");
                }
            }
        }
        Rectangle
        {
            id:viewPort
            width: root.width
            height: root.height
            AnimatedImage
            {
                id:display
                anchors.centerIn: viewPort
                source:"images/img.gif"
            }
        }

    }
}
View Code
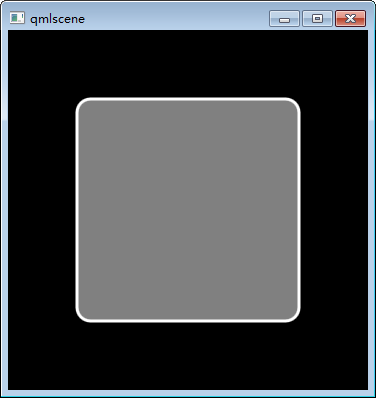
<3> Margins
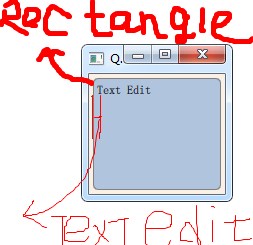
import QtQuick.Window 2.0
import QtQuick 2.2

Window
{
    width: 136
    height: 120
    color: "linen"

    Rectangle
    {
        color: "lightsteelblue"
        border.color: "gray"
        anchors.fill: parent
        anchors.margins: 4
        radius:5
        TextEdit
        {
            anchors.fill: parent
            id: input
            focus: true
            text: "Text Edit"
            anchors.margins: 4
        }
    }

}
View Code
<4> : key press event
按键移动小立方块
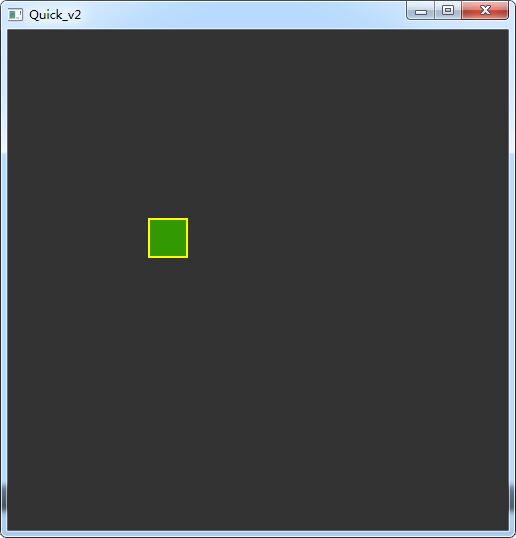
import QtQuick.Window 2.0
import QtQuick 2.2

Window
{
    width: 500
    height: 500
    color: "linen"
    Rectangle
    {
        id:root
        anchors.fill: parent
        color:"#333333"
        Rectangle
        {
            id:rec
            x:20
            y:20
            width:40
            height:40
            color:"#339900"
            border.color: "yellow"
            border.width: 2
        }
        Keys.onLeftPressed:
        {
            //console.log("left button")
            rec.x -= 8
        }
        focus: true

        Keys.onRightPressed: rec.x += 8
        Keys.onUpPressed: rec.y -= 8
        Keys.onDownPressed: rec.y += 8
        Keys.onPressed:
        {
            switch(event.key) {
            case Qt.Key_Plus:
                rec.scale += 0.2
                break;
            case Qt.Key_Minus:
                rec.scale -= 0.2
                break;
            }
        }
    }

}
View Code
<5>Flickable
 ‘
‘
import QtQuick 2.5
import QtQuick.Window 2.2

Item
{
    id:flicks
    width: Screen.width/2
    height:Screen.height/2
    Flickable
    {
        width:parent.width
        height: parent.height

        contentHeight: img.height + img2.height
        contentWidth: img.width
        boundsBehavior:Flickable.DragOverBounds
        Image
        {
            id:img
            //anchors.fill: parent
            source: "ttt.jpg"
        }

        Image
        {
            anchors.top: img.bottom
            id:img2
            //anchors.fill: parent
            source: "tt2.png"
        }

}

}
View Code
<6>NodeEdit: 节点字符串编辑
Node.qml:
import QtQuick 2.0

Item
{
    id:defNode
    property int dwidth
    property int dheight
    property string dname
    property string bgcolor
    property string dtext : "bad news"

    property int radius: 8
    width: dwidth
    height: dheight


   // main bound rect
    Rectangle
    {
        id:rect
        anchors.fill: parent
        border.color: "#FFFFFF"
        border.width: 1
        color:bgcolor
        radius:defNode.radius
        opacity: 0.9
        scale:parent.scale

    }

    // header rect
    Rectangle
    {
        id:header
        width:rect.width
        height: 20
        //color:"white"
        opacity: 0.7
        radius:defNode.radius
        scale: rect.scale

        gradient: Gradient
        {
            GradientStop { position: 0.0; color: "white" }
            GradientStop { position: 0.1; color: "white" }
            GradientStop { position: 0.3; color: "#BBBBBB" }
            GradientStop { position: 1.0; color: "lightsteelblue" }
        }
    }

    // circle output
    Rectangle
    {
        property int _radius : 15
       // var _radius = 5

        id:cicle
        radius:_radius
        width:_radius
        height:_radius
        opacity: 1
        anchors.horizontalCenter: rect.horizontalCenter
        anchors.top:rect.bottom
        border.color: "brown"
        border.width: 1


    }


    Text {
        anchors.centerIn: header
        id: nodeName
        text: defNode.dname
        color:"#FFFFFF"
        font.bold:true
    }

    // Edit Text is here
    Rectangle
    {
        id:myedit
        height : rect.height - header.height
        width : rect.width
        anchors.top: header.bottom
        opacity: 0.1

    }

    TextEdit
    {
        width:myedit.width
        text: defNode.dtext
        wrapMode: TextEdit.WrapAnywhere
        focus: true
        color:"#FFFFFF"
        opacity: 1
        anchors.fill: myedit
        anchors.margins: 6
        scale: rect.scale
    }


    MouseArea
    {
        property int isPress: 0
        property point clickPos: "0,0"
        id:marea
        anchors.fill: header
        hoverEnabled: true
        onEntered:
        {
            defNode.scale = 1.05
        }
        onExited:
        {
            defNode.scale =1
        }


        onPressed:
        {
            isPress = true
            clickPos = Qt.point(mouse.x,mouse.y)
            rect.border.color = "yellow"
        }

        onPositionChanged:
        {
            if(isPress)
            {
                var delta = Qt.point(mouse.x-clickPos.x, mouse.y-clickPos.y)
                defNode.x = defNode.x + delta.x
                defNode.y = defNode.y + delta.y
            }
        }
        onReleased:
        {
            isPress = false
            rect.border.color = "#FFFFFF"
        }

    }


}
View Code
main.qml:
import QtQuick 2.5
import QtQuick.Window 2.2


Window
{
    visible: true
    width: Screen.width / 2
    height: Screen.width / 2
    color:"black"
    // put main window it in the center
    x:Screen.width/2 - width/2
    y:Screen.height/2 - height/2


    Node
    {
        x:100
        y:200
        dwidth: 200
        dheight: 120
        dname:"Houdini"
        bgcolor: "black"
        dtext: "Note that the TextEdit does not implement scrolling, following the cursor to add flickable scrolling that follows the cursor:"

    }

    Node
    {

        x:600
        y:300
        dwidth: 100
        dheight: 120
        dname:"Maya"
        bgcolor: "#505050"
    }
    Node
    {
        x:400
        y:700
        dwidth: 300
        dheight: 100
        dname: "Shit"
        bgcolor: "#002266"
        dtext: "are you want shit"
    }


}
View Code

<7>通过上下键来更改颜色。焦点更改。
import QtQuick 2.5
import QtQuick.Window 2.2

Window
{
    id:root
    visible: true
    color:"black"
    Column
    {
        spacing: 10
        Rectangle
        {
            id:blueRect
            width: root.width
            height: 360/3.3
            KeyNavigation.up: yellowRect
            KeyNavigation.down: redRect
            color:
            {
                if(activeFocus)
                {
                    "blue"
                }
                else
                    "grey"

            }
            //color:activeFocus?"blue":"grey"
            /* and another write method
              if(activeFocus === true)
              {
                "blue"
              }
              else
                "grey"

              */
        }
        Rectangle
        {
            id:redRect
            width:root.width
            height: 360/3.3
            focus: true
            KeyNavigation.up: blueRect
            KeyNavigation.down: yellowRect
            color:
            {
                if(activeFocus)
                {
                    "red"
                }
                else
                    "grey"
            }
        }
        Rectangle
        {
            id:yellowRect
            width: root.width
            height: 360/3.3
            color:
            {
                if(activeFocus)
                {
                    "yellow"
                }
                else
                    "grey"

            }
            KeyNavigation.up: redRect
            KeyNavigation.down: blueRect
        }
    }
}
View Code
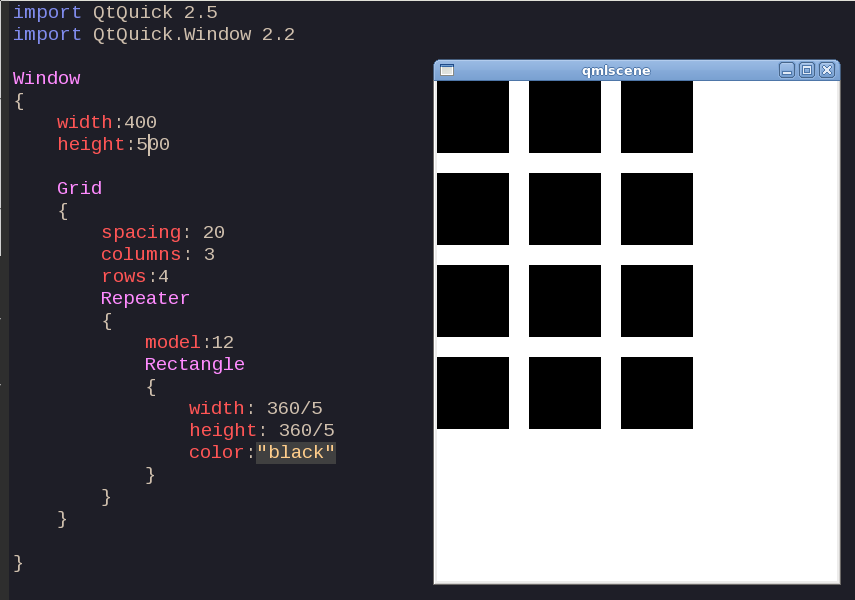
<8>repeater
<9>:Property and number animation in mouse event:
点击一次,执行一些动画。

import QtQuick 2.0
import QtQuick.Controls 1.1
Rectangle
{
    width: 600
    height: 150
    id:mainRect
    color:"darkGrey"
    Rectangle  // header
    {

        id:header
        height:40
        width:parent.width
        color:"black"
        opacity: 0.8
        anchors.top:parent.top
        anchors.margins: 2
        border
        {
            color:"brown"
        }
        radius:5

        Text
        {
            anchors.centerIn: parent
            text: "Target Animation Header"
            color:"white"
            font.bold: true
            font.pixelSize: 20
        }
    }
    Rectangle  //image
    {
        id:mainImage
        anchors.top: header.bottom
        width:mainRect.width
        height:mainRect.height
        border.color: "#529999"
        border.width: 2
        anchors.margins:2
        color:yellow
        Image
        {
            //width:parent.width
            //height:parent.height
            anchors.fill: parent
            anchors.margins: 2
            id: coreImage
            clip: true
            fillMode: Image.PreserveAspectCrop
            source: "img.jpg"
        }

    }


    MouseArea
    {
        anchors.fill: mainImage
        onClicked:
        {
            scaleAnimation.start()
            borderAnimation.start()
            //也可以一起控制
            //scaleAndOpacityAnimation.start()

            opacityAnimation.start()
        }
    }

    PropertyAnimation // control the scale animation
    {
        id:scaleAnimation
        target: mainImage
        property: "scale"
        from:0
        to:1
        duration:1000
        easing.type:Easing.OutBack

    }

    NumberAnimation // control the opacity animation
    {
        id:opacityAnimation
        target:mainImage
        property:"opacity"
        from:0
        to:1
        duration:1000
        easing.type:Easing.OutBack
    }

    PropertyAnimation // target more attribute....
    {
        id:borderAnimation
        target:mainImage
        properties: "border.color,color"
        from:"yellow"
        to:"#529999"
        duration:1000
        easing.type:Easing.OutBack
    }
    //
    PropertyAnimation
    {
        id:scaleAndOpacityAnimation
        target:mainImage
        properties: "scale,opacity"
        from:0
        to:1
        duration:1000
        easing.type:Easing.OutBack

    }

}
View Code
<10> 主要看如何制作state translate,放入onEntered,onExtered,比如网页的图片,鼠标hook过去就会略略放大。
import QtQuick 2.0
import QtQuick.Controls 1.1
Rectangle
{
    width: 600
    height: 150
    id:mainRect
    color:"darkGrey"
    Rectangle  // header
    {

        id:header
        height:40
        width:parent.width
        color:"black"
        opacity: 0.8
        anchors.top:parent.top
        anchors.margins: 2
        border
        {
            color:"brown"
        }
        radius:5

        Text
        {
            anchors.centerIn: parent
            text: "Target Animation Header"
            color:"white"
            font.bold: true
            font.pixelSize: 20
        }
    }


    Rectangle  //image
    {
        id:mainImage
        anchors.top: header.bottom
        width:mainRect.width
        height:mainRect.height
        //border.color: "#529999"
        //border.width: 5
        anchors.margins:3
        color:"transparent"
        radius:10

        Image
        {
            //width:parent.width
            //height:parent.height
            anchors.fill: parent
            anchors.margins: 3
            id: coreImage
            clip: true
            fillMode: Image.PreserveAspectCrop
            source: "img.jpg"

        }

        // 给一个属性创建state必须是子集
        states: [
            State
            {
                name: "in"
                PropertyChanges
                {
                    target: mainImage
                    color:"yellow"
                }
            },
            State
            {
                name: "out"
                PropertyChanges
                {
                    target: mainImage
                    color: "transparent"

                }
            }

        ]

        transitions: [
            Transition
            {
                from: "out"
                to: "in"
                ColorAnimation
                {
                    target: mainImage
                    duration: 1200
                }

            },
            Transition {
                from: "in"
                to: "out"
                ColorAnimation { target: mainImage; duration: 1200}

            }
        ]

    }


    MouseArea
    {
        anchors.fill: mainImage
        hoverEnabled: true
        onEntered:
        {
            console.log("Enter Function")
            mainImage.state = "in"
        }
        onExited:
        {
            console.log("Exit Function")
            mainImage.state = "out"
        }

        onClicked:
        {
            scaleAnimation.start()
            opacityAnimation.start()
        }
    }

    PropertyAnimation // control the scale animation
    {
        id:scaleAnimation
        target: mainImage
        property: "scale"
        from:0
        to:1
        duration:1000
        easing.type:Easing.OutBack

    }

    NumberAnimation // control the opacity animation
    {
        id:opacityAnimation
        target:mainImage
        property:"opacity"
        from:0
        to:1
        duration:1000
        easing.type:Easing.OutBack
    }


}
View Code
<11> 各种Animation on x大比拼.建立从入门到放弃的基础./序列动画
(1) animation on x
Rectangle
{
    id:root
    width: 360
    height: 360
    color:"black"
    Rectangle
    {
        id:greenRect
        width:50
        height:50
        color:"green"
        //第一种方法
        NumberAnimation on x
        {
            from : 0
            to : 1
            duration:1200
            loops:Animation.Infinite
        }

    }

    /*
    // 第二种方法
    NumberAnimation on x
    {
        target: greenRect;
        property: "x";
        from:0;
        to:100;
        duration: 1200;
        loops:Animation.Infinite
    }*/

    /*
    // 第三种方法
    NumberAnimation
    {
        running:true
        target:greenRect
        properties: "x"
        from:0
        to:100
        duration: 1200
        loops:Animation.Infinite
    }*/
View Code
(2) 序列动画
import QtQuick 2.0
Rectangle
{
    id:root
    width: 360
    height: 360
    color:"black"
    Rectangle
    {
        id:greenRect
        width:50
        height:50
        color:"green"
        //第一种方法
        /*
        NumberAnimation on x
        {
            from : 0
            to : 1
            duration:1200
            loops:Animation.Infinite
        }*/

    }
    SequentialAnimation
    {
        running: true
        loops: Animation.Infinite
        NumberAnimation  // first key is x:360-50=310 y:0  // move to pos(310,0)
        {
            target: greenRect
            property: "x"
            to:root.width-greenRect.width
            duration: 400
            //easing.type: Easing.InOutQuad
        }

        NumberAnimation  // 第二个关键帧是x:310 y:360-50=310 // move to pos(310,310)
        {
            target: greenRect
            property: "y"
            to:root.height-greenRect.height
            duration: 400
            //easing.type: Easing.InOutQuad
        }

        NumberAnimation  //第三个关键帧是: (0,310)
        {
            target: greenRect
            property: "x"
            to:0
            duration: 400
            //easing.type: Easing.InOutQuad
        }
        NumberAnimation  //第四个关键帧
        {
            target: greenRect
            property: "y"
            to:0
            duration: 400
            //easing.type: Easing.InOutQuad
        }

    }

}
View Code
(3)
点击鼠标,先旋转360,然后缩放1.5,然后变gray色。
如果再点击鼠标,旋转成0,然后缩放成1,然后变黄色。
注意是实现序列动画,所以一定是一个变化做完,然后做下一个变化。
import QtQuick 2.0

Rectangle
{
    id:root
    width: 360
    height: 360
    color :"black"

    property int rotState: 0
    property int _druation: 1200
    Rectangle
    {
        id:anRect
        width:150
        height:150
        color:"yellow"
        border.color: "white"
        border.width: 2
        radius:10
        anchors.centerIn: parent
        states:
        [
            State
            {
                name: "CLICEKED"
                PropertyChanges
                {
                    target: anRect
                    rotation:360
                    scale:1.5
                    color:"Gray"
                }
            },
            State
            {
                name:"RE_CLICEKD"
                PropertyChanges
                {
                    target: anRect
                    rotation:0
                    scale:1
                    color:"Yellow"
                }
            }

        ]

        transitions:
        [
            Transition{
                from:"CLICEKED"
                to:"RE_CLICEKD"
                SequentialAnimation  // set it's a sequential animation
                {
                    RotationAnimation
                    {
                        //target: anRect
                        duration: _druation
                        easing.type: Easing.OutBack
                    }
                    NumberAnimation
                    {
                        property: "scale"
                        duration: _druation
                        easing.type: Easing.OutBack
                    }
                    ColorAnimation
                    {
                        duration: _druation
                        easing.type: Easing.OutBack
                    }
                }
            },
            Transition{
                from: "RE_CLICEKD"
                to: "CLICEKED"
                SequentialAnimation  // set it's a sequential animation
                {
                    RotationAnimation
                    {
                        //target: anRect

                        duration: _druation
                        easing.type: Easing.OutBack
                    }
                    NumberAnimation
                    {
                        property: "scale"
                        duration: _druation
                        easing.type: Easing.OutBack
                    }
                    ColorAnimation
                    {
                        duration: _druation
                        easing.type: Easing.OutBack
                    }
                }


            }
        ]
    }


    MouseArea
    {
        id:mouseAREA
        anchors.fill: parent
        onClicked:
        {
            if(!rotState)
            {
                anRect.state = "CLICEKED"
                rotState=1
                console.log("CLICKED")
            }
            else
            {

                anRect.state = "RE_CLICEKD"
                rotState=0
                console.log("RE_CLIECKED")
            }


        }
    }
}
View Code
<12>C++交互。参考:http://www.cnblogs.com/findumars/p/6090850.html
myclass.h
#ifndef MYCLASS_H
#define MYCLASS_H

#include <QObject>

class MyClass : public QObject
{
    Q_OBJECT
    Q_ENUMS(BALL_COLOR)
public:
    explicit MyClass(QObject *parent = 0);

    enum BALL_COLOR
    {
        BALL_COLOR_YELLOW=0x0, //0x0
        BALL_COLOR_RED,//0x1
        BALL_COLOR_BLUE,//0x2
        BALL_COLOR_ALL//0x3

    };

signals:
    void begin();
    void changeColor( );
public slots:
    void doSometing();
    void doSometing(BALL_COLOR color);

private:
    BALL_COLOR _ballColor;

};

#endif // MYCLASS_H
myclass.cpp
#include "myclass.h"
#include <QDebug>
MyClass::MyClass(QObject *parent) :
    QObject(parent)
{
    qDebug() << "Create Our MyClass in default";
    _ballColor = BALL_COLOR_YELLOW;
}

void MyClass::doSometing()
{
    qDebug() << "this is c++ do someting";
}

void MyClass::doSometing(BALL_COLOR color)
{
    _ballColor = color;
    qDebug() << "this is c++ do with enum " << color;
    emit changeColor();   //注意发射了这个信号
}
main.cpp:
#include <QGuiApplication>
#include <QQmlApplicationEngine>
#include <QQuickWindow>
#include <QtQml>
#include "myclass.h"
int main(int argc, char *argv[])
{
    QGuiApplication app(argc, argv);

    qmlRegisterType<MyClass>("GLY.MyClass", 1, 0, "MyClass");  //QML导入的时候就是import GLY.MyClass 1.0 .创建成员MyClass
    QQmlApplicationEngine engine;
    engine.load(QUrl("qml/Quick_C++_01/main.qml"));
    QObject *topLevel = engine.rootObjects().value(0);
    QQuickWindow *window = qobject_cast<QQuickWindow *>(topLevel);


    window->show();
    return app.exec();
}
QML:
import QtQuick 2.0
import QtQuick.Window 2.0
import GLY.MyClass 1.0
Window
{
    width: 360
    height: 360
    Text {
        text: qsTr("Hello World")
        anchors.centerIn: parent
    }
    MouseArea
    {
        anchors.fill: parent
        onClicked:
        {
            myclass.begin() //use your c++ signal
        }
    }


    MyClass
    {

        //do not repeat signal 不要重复使用相同信号
        id: myclass
        //onBegin:doSometing() //use you c++ signal and slots
        onBegin: doSometing(MyClass.BALL_COLOR_ALL) //带有形参的slots
        onChangeColor: //注意每当点击会执行下面语句。因为在doSometing()执行了这个信号。
        {
            var msg = "Changed color....";
            console.log(msg)
        }
    }

}
结果:当点击左键:
Create Our MyClass in default
this is c++ do with enum 3
Changed color….
<13>: Q_INVOKABLE 成员函数.支持重载。
    Q_INVOKABLE void stop()
    {
        qDebug() << "Stop function";
    }
    Q_INVOKABLE void stop(int var)
    {
        qDebug() << "Stop function with " <<var ;
    }
QML也支持重载。
    MouseArea
    {
        anchors.fill: parent
        onClicked:
        {
            myclass.begin() //use your c++ signal
            myclass.stop() //直接调用一个函数.
            myclass.stop(1)
        }
    }
结果:
Stop function
Stop function with 1
<14>暴露私有成员给QML,也可以使用Q_INVOKABLE来获取设置成员
myclass.h
//定义QML访问成员变量为m_ballnum
    Q_PROPERTY(float m_ballnum READ getBallNum WRITE setBallNum NOTIFY ballNumChanged)

    Q_INVOKABLE float invokeGetBallNum()
    {
        //qDebug() << "use Q_INVOKABLE get ball num" << _ballNum ;
        return _ballNum;
    }

    const float getBallNum() //const 可选可不选
    {
        qDebug() << "C++ getball num is " << _ballNum;
        return _ballNum;
    }
    void setBallNum(float ballNum) //ballNum 参数可引用,可不引用
    {
        qDebug() << "C++ setball num is " <<ballNum;
        _ballNum = ballNum;
        emit ballNumChanged();
    }


private:
    float _ballNum;
QML:
    MouseArea
    {
        anchors.fill: parent
        onClicked:
        {
            myclass.m_ballnum = 10 //调用C++设置ball num
            console.log("use the Q_INVOKABLE method get ball num",myclass.invokeGetBallNum())

        }
    }

    MyClass
    {

        id: myclass
        onBallNumChanged:
        {
            console.log("get ball num is " ,m_ballnum) //调用C++ getBallNum方法。
        }

    }
输出:
C++ setball num is 10
C++ getball num is 10
get ball num is 10
use the Q_INVOKABLE method get ball num 10
<15> C++修改QML的物体
简单的QML: 如果要修改里面的Rectangle.ObjectName:”rect”是必须要给的
Window
{
    width: 360
    height: 460

    Rectangle
    {
        objectName: "rect"
        id:cenRect
        anchors.centerIn: parent
        color:"black"
        width:100
        height:100
    }
}
Main.cpp中
#include <QGuiApplication>
#include <QQmlApplicationEngine>
#include <QQuickWindow>
#include <QtQml>
#include "myclass.h"
int main(int argc, char *argv[])
{
    QGuiApplication app(argc, argv);

    qmlRegisterType<MyClass>("GLY.MyClass", 1, 0, "MyClass");
    QQmlApplicationEngine engine("qml/Quick_C++_01/main.qml");


    QObject *topLevel = engine.rootObjects().value(0);//指向第一个QML父窗口
    QQuickWindow *window = qobject_cast<QQuickWindow *>(topLevel);


    QObject *object = topLevel;
    //读取父窗口的高度宽度 使用object->property()
    qDebug() << "width value is" << object->property("width").toInt();
    qDebug() << "height value is" << object->property("height").toInt();

    // object->setProperty() 设置宽度
    object->setProperty("width",500);


    // modile file height use QQmlProperty::write
    QQmlProperty::write(object, "height", 500);
    // read the height use QQmlProperty::read
    qDebug() << "height value is" << QQmlProperty::read(object, "height").toInt();

    //设置rect物体的颜色。
    QObject *rect = object->findChild<QObject*>("rect");
    if(rect)
    {
        rect->setProperty("color","yellow");
    }


    window->show();

    return app.exec();
}
<16>:QML种信号和槽,C++访问QML信号和槽
(1)
QML信号和槽使用:
Window
{
    width: 360
    height: 460
    signal qmlSignal(string msg,int value)
    function qmlFunction(msg,val)
    {
        console.log(msg,val)
        return "THIS IS QML Return"
    }
    onQmlSignal:
    {

        console.log("QML SIGANL FUNCTION",msg,value)
        var rqml = qmlFunction(msg,value)
        console.log(rqml)

    }
    MouseArea
    {
        anchors.fill: parent
        onClicked:
        {
            qmlSignal("Hello World",2)

        }
    }
}
View Code
结果:
QML SIGANL FUNCTION Hello World 2
Hello World 2
THIS IS QML Return
(2)
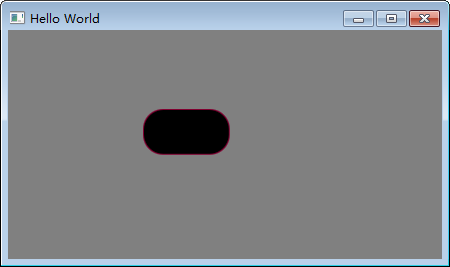
<17>移动并缩放一个rect另外一个方法,并且后面跟随一个rect,以光滑速度跟随SmoothedAnimation和Behavior的使用方法。
        Behavior on x
        {
            SmoothedAnimation{velocity: 500}
        }
        Behavior on y
        {
            SmoothedAnimation{velocity: 500}
        }
完整代码:
import QtQuick 2.0
import QtQuick.Window 2.0

Window
{
    visible: true
    width: 640
    height: 480
    title: qsTr("Hello World")
    color:"gray"


    Rectangle
    {

        // fllowRect 以光滑速度跟随rect
        id:fllowRect
        width: rect.width-20
        height:rect.height-20
        x:rect.x-5
        y:rect.y-5
        color:"brown"
        Behavior on x
        {
            SmoothedAnimation{velocity: 500}
        }
        Behavior on y
        {
            SmoothedAnimation{velocity: 500}
        }

    }


    Rectangle
    {
        id:rect
        width:parent.width/5
        height:parent.height/5
        color:"black"
        border.color: "#800030"
        radius:20
    }


    function zoomIn()
    {
        rect.scale += 0.25;
    }
    function zoomOut()
    {
        rect.scale -= 0.25;
    }
    function debugRectSize() // scale do not change rect size
    {
        console.log("rect size is ",rect.width,"|",rect.height)
    }


    MouseArea
    {
        id:area
        anchors.fill: rect
        drag.target: rect
        drag.axis: Drag.XAndYAxis

        onPositionChanged:
        {
            console.log("rect pos is " ,rect.x,"|" ,rect.y)
        }

        onWheel:
        {
            if (wheel.modifiers & Qt.ControlModifier)
            {
                if (wheel.angleDelta.y > 0)
                    zoomIn();
                else
                    zoomOut();
            }
            debugRectSize()
        }

    }

}
View Code
<18> 各种dialog…
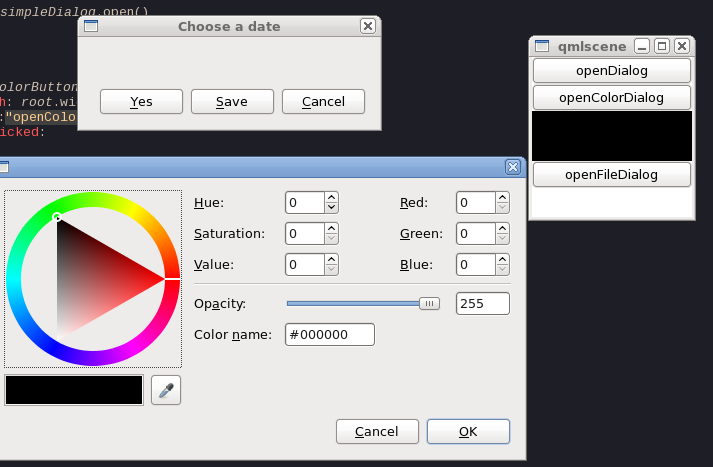
import QtQuick 2.5
import QtQuick.Window 2.2
import QtQuick.Controls 1.4
import QtQuick.Dialogs 1.2
Window
{
    id:root
    visible: true
    Column
    {
        Button
        {
            width: root.width
            text:"openDialog"
            onClicked:
            {
                simpleDialog.open()
            }
        }
        Button
        {
            id:colorButton
            width: root.width
            text:"openColorDialog"
            onClicked:
            {
                simpleColorDialog.open()
            }
        }
        Rectangle
        {
            id:colorArea
            width: root.width
            height:50
            border.color: "black"
            color:simpleColorDialog.color
        }

        Button
        {
            id:fileButton
            width: root.width
            text:"openFileDialog"
            onClicked:
            {
                simpleFileDialog.open()
            }
        }

    }


    Dialog
    {
        function test()
        {
            console.log("this is a test")
        }
        id: simpleDialog
        //visible: true
        title: "Choose a date"
        standardButtons: StandardButton.Save | StandardButton.Cancel | StandardButton.Yes

        onAccepted:
        {
            console.log("accpet")
        }
        onYes:
        {
            console.log("yes")

        }
        onRejected:
        {
            console.log("cancel")
            this.close()
            this.test()
        }
    }

    ColorDialog
    {
        id:simpleColorDialog
        showAlphaChannel: true
        onAccepted:
        {
            colorArea.color = this.color
        }
    }

    FileDialog
    {
        id:simpleFileDialog
        title: "Please choose a file"
        folder: shortcuts.home
        nameFilters: "*.o,*.cpp"
        onAccepted: {
            console.log("You chose: " + simpleFileDialog.fileUrls)
        }
        onRejected: {
            console.log("Canceled")
        }


    }


}
View Code
<19> model设计.MVC
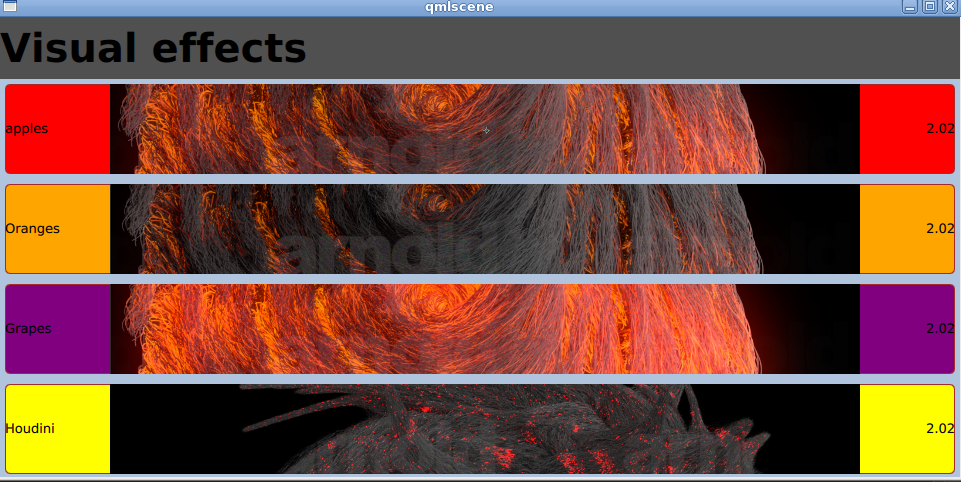
Header.qml
import QtQuick 2.0

Rectangle
{
    width: parent.width
    height: 62
    color:"#505050"

    Text
    {
        text: "Visual effects"
        anchors.left: parent.left
        anchors.verticalCenter: parent.verticalCenter
        font.bold: true
        font.pixelSize: 40

    }
}
View Code
MyDel.qml
import QtQuick 2.0
import QtQuick.Window 2.0
import "Utils.js" as Utils
Item
{
    width: parent.width
    height: 100

    Rectangle
    {
        id:rect
        anchors.fill: parent
        border.color: "brown"
        border.width: 1
        anchors.margins: 5
        radius:5

        /*
        MouseArea
        {
            id:areaMouse
            anchors.fill: rect
            hoverEnabled: true
            onEntered:
            {
                rect.scale = 1.02
                border.color =  "black"
            }
            onExited:
            {
                border.color =  "brown"
                rect.scale = 1
            }
        }*/

        Text
        {
            text: name
            anchors.verticalCenter: parent.verticalCenter

        }
        Text
        {
            text:p
            anchors.verticalCenter: parent.verticalCenter
            anchors.right: parent.right
        }

        color:c
        Image
        {
            id:mainImage
            source:s
            x:parent.x + 100
            width:parent.width-200
            height:parent.height
            fillMode: Image.PreserveAspectCrop
            clip: true
            onStatusChanged:
            {
                if(status === Image.Error)
                {
                    source = Utils.fallBackImage
                }
            }

            scale:status===Image.Ready?1:0

            Behavior on scale
            {
                NumberAnimation
                {
                    from:0
                    to:1
                    duration: 1200
                    easing.type:Easing.OutBack

                }
            }


            /*

            //only construct when borning
            NumberAnimation on scale
            {
                from:0
                to:1
                duration: 1000
                easing.type: Easing.OutBounce
            }
            NumberAnimation on opacity {
                from:0
                to:1
                duration: 1000
                easing.type: Easing.OutBack
            }*/


        }

        /*
        Behavior on scale //
        {
            NumberAnimation
            {
                from:0.9
                to:1
                duration: 1200
                easing.type: Easing.OutBack
            }

        }*/


    }


}
View Code
MyMod.qml
import QtQuick 2.0

ListModel
{
    ListElement
    {
        name:"apples"
        c:"red"
        p:2.02
        s:"images/1.png"
    }
    ListElement
    {
        name:"Oranges"
        c:"orange"
        p:2.02
        s:"images/2.png"
    }
    ListElement
    {
        name:"Grapes"
        c:"purple"
        p:2.02
        s:"images/3.png"
    }
    ListElement
    {
        name:"Houdini"
        c:"Yellow"
        p:2.02
        s:"images/4.jpg"
    }


}
View Code
Main.qml
import QtQuick 2.0

Rectangle
{
    width: 960
    height: 460
    color: "lightsteelblue"


    ListView
    {
        width:parent.width
        height:parent.height

        header: Header
        {

        }


        model: mod
        //delegate:Text
        //{
        //    text: name
        //}

        delegate:MyDel
        {

        }
    }

    MyMod
    {
        id:mod
    }
}
View Code
如何给Model里面添加数据:
    Button
    {
        width: parent.width
        text: "Add Random accpet"
        onClicked:
        {/*
            name:"Houdini"
            c:"Yellow"
            p:2.02
            s:"images/4.jpg"*/
            var element = {"name":"TTTT","c":"gray","p":2.01,"s":"images/4.jpg"}
            mod.append(element)
        }
    }
    Button
    {
        y:20
        width: parent.width
        text:"remove all"
        onClicked:
        {
            mod.clear()
        }
    }
<20>绘图板
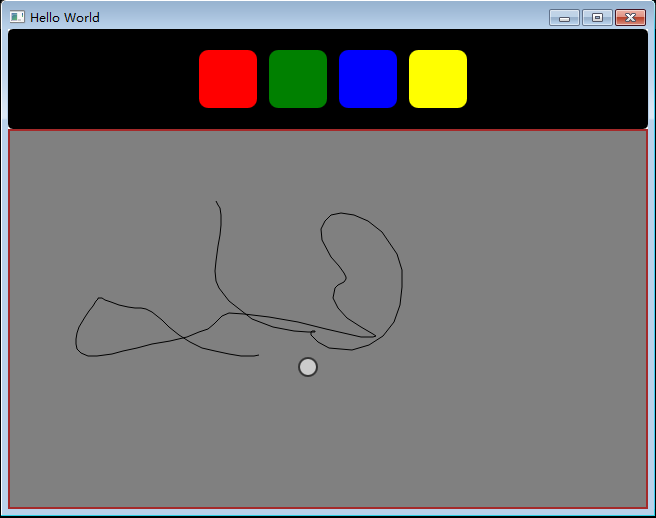
import QtQuick 2.6
import QtQuick.Window 2.2
import QtQuick.Controls 1.0
import QtQuick.Dialogs 1.2
Window
{
    visible: true
    width: 640
    height: 480
    title: qsTr("Hello World")


    Rectangle  // header
    {
        id:menuRect
        width: parent.width
        height: 100
        color:"black"
        border.color: "black"
        border.width: 1
        radius:5


        anchors.margins: 20
        property int rad: 10
        property int borderw: 1
        Rectangle
        {
            id:red
            color:"red"
            width: 60
            height: 60
            x:(parent.width - width)/2-100
            y:(parent.height - height)/2
            radius:parent.rad
            border.width: parent.borderw
            MouseArea
            {
                anchors.fill: parent
                onClicked: line.pcolor = parent.color
            }

        }
        Rectangle
        {
            id:green
            color:"green"
            width: 60
            height: 60
            x:red.x+70
            y:(parent.height - height)/2
            radius: parent.rad
            border.width: parent.borderw
            MouseArea
            {
                anchors.fill: parent
                onClicked: line.pcolor = parent.color
            }
        }
        Rectangle
        {
            id:blue
            width: 60
            height: 60
            color:"blue"
            x:green.x+70
            y:(parent.height - height)/2
            radius: parent.rad
            border.width: parent.borderw
            MouseArea
            {
                anchors.fill: parent
                onClicked: line.pcolor = parent.color
            }
        }
        Rectangle
        {
            id:yellowRect
            width: 60
            height: 60
            color:"yellow"
            x:blue.x+70
            y:(parent.height - height)/2
            radius: parent.rad
            border.width: parent.borderw
            MouseArea
            {
                anchors.fill: parent
                onClicked: line.pcolor = parent.color
            }
        }

    }
    Rectangle //vis the paint
    {
        anchors.fill: line
        color:"gray"
        border.color: "brown"
        border.width: 2
    }


    FileDialog
    {
        sidebarVisible: true
        id:saveDialog
        title: "Please choose a file"
        folder: shortcuts.home
        selectExisting: false
        onAccepted: {
            var path = Qt.resolvedUrl(saveDialog.fileUrl)

            console.log("You chose: " + path )

        }
        onRejected: {
            console.log("Canceled")
        }

    }


    Canvas
    {
        id:line
        width: parent.width
        height: parent.height-100
        y:100

        property int lineWidth: 1
        property int lastX: 0
        property int lastY: 0
        property int isPaint: 0
        property string pcolor: "black"

        onPaint:
        {
            if(isPaint === 1)
            {
                var ctx =getContext("2d")
                ctx.lineWidth = lineWidth
                ctx.strokeStyle = pcolor
                ctx.fillRule = Qt.WindingFill
                ctx.createPattern(Qt.Dense3Pattern)
                ctx.beginPath();
                ctx.moveTo(lastX,lastY)
                lastX = area.mouseX
                lastY = area.mouseY
                ctx.lineTo(lastX,lastY)
                ctx.stroke()
            }
        }
        MouseArea
        {
            id:area
            anchors.fill: parent
            anchors.margins: 2
            acceptedButtons:Qt.LeftButton | Qt.RightButton
            onPressed:
            {
                if(mouse.button === Qt.LeftButton)
                {
                    line.isPaint = 1
                    line.lastX = mouse.x //instead use->mouseX
                    line.lastY = mouseY //mouseY
                    console.log("pressed");
                }
                else
                {
                   if( mouse.modifiers & Qt.ControlModifier  && mouse.button === Qt.RightButton ) // CTRL+RIGHTBUTTON delete the Canvas
                    {
                        console.log("Clear content")
                        var ctx = line.getContext("2d")
                        ctx.reset()
                        line.requestPaint()
                        ctx.reset()
                        line.isPaint = 0
                    }
                   if( mouse.modifiers & Qt.AltModifier  && mouse.button === Qt.RightButton ) // Clt+RIGHTBUTTON save
                    {
                        saveDialog.open()
                    }
                }
            }

            onPositionChanged:
            {
                if(line.isPaint===1)
                {
                    console.log("move")
                    line.requestPaint()
                }
                mouseRoundArea.x = mouseX - mouseRoundArea.width/2
                mouseRoundArea.y = mouseY - mouseRoundArea.height/2
            }
            onReleased:
            {
                if(mouse.button === Qt.LeftButton)
                {

                    console.log("released")
                    line.isPaint = 0
                }

            }


            hoverEnabled :true
            onEntered:
            {
                mouseRoundArea.scale = 1
                mouseRoundArea.x = mouseX - mouseRoundArea.width/2
                mouseRoundArea.y = mouseY - mouseRoundArea.height/2
            }
            onExited:
            {
                mouseRoundArea.scale = 0
            }

            onWheel:
            {
                if (wheel.modifiers & Qt.ControlModifier)
                {
                    if (wheel.angleDelta.y > 0)
                    {
                        mouseRoundArea.width +=1
                        mouseRoundArea.height +=1
                        mouseRoundArea.radius = mouseRoundArea.width
                        line.lineWidth  +=1

                    }

                    else
                    {
                        mouseRoundArea.width -=1
                        mouseRoundArea.height -=1
                        mouseRoundArea.radius = mouseRoundArea.width
                        line.lineWidth  -=1
                        if(line.lineWidth<=0)
                        {
                            line.lineWidth = 1
                        }
                    }
                }

            }


            Rectangle
            {
                id:mouseRoundArea
                width: 20
                height: 20
                border.width: 2
                radius:20
                opacity: 0.6

            }
        }
    }
}
View Code
<21>其他
等待一个构件准备好事件:
 Component.onCompleted: {
                    // Do something interesting here...
                    console.log(fileName)
View Code
部署Qt含有qml文件必须:
windeployqt helloqml.exe --qmldir D:\plugin_dev\Houdini\PlayblastForHoudini\HoudiniPlayBlast\HoudiniPlayBlast
CanvasAPI:
1,draw fill circle
onPaint: {
             var ctx = getContext("2d");
             ctx.reset();
             var cx = width / 2;
             var cy = height / 2;

             ctx.lineWidth = 5;
             ctx.strokeStyle = "red";
             ctx.beginPath();
             ctx.fillStyle = "black";
             ctx.moveTo(cx, cy);
             ctx.arc(cx, cy, width / 2, 0, Math.PI*2, false);
             ctx.closePath();
             ctx.stroke();
             ctx.fill();

         }
View Code
2,draw fill circle from stackflow
/*
         onPaint: {
             var ctx = getContext("2d");
             ctx.reset();

             var centreX = width / 2;
             var centreY = height / 2;

             ctx.beginPath();
             ctx.fillStyle = "black";
             ctx.moveTo(centreX, centreY);
             ctx.arc(centreX, centreY, width / 4, 0, Math.PI * 0.5, false);
             ctx.lineTo(centreX, centreY);
             ctx.fill();

             ctx.beginPath();
             ctx.fillStyle = "red";
             ctx.moveTo(centreX, centreY);
             ctx.arc(centreX, centreY, width / 4, Math.PI * 0.5, Math.PI * 2, false);
             ctx.lineTo(centreX, centreY);
             ctx.fill();
         }*/
View Code
3,
看了google materializecss 必须实现之。。。原理很简单
Achive google materialize flow effects use QML

import QtQuick 2.0

Item {
    id:main
    width: 320;
    height:50;

    x:100;
    y:100;
    Rectangle{
        anchors.fill: parent
        color:Qt.rgba(0.1,0.5,0.5,1);
    }

    Canvas {
        id:fluidContainer
         anchors.fill: parent

         property int cy: 0;
         property int cx: 0;
         property int radius: 0;
         property color flowColor: Qt.rgba(1,0.5,1,0.9);

         onRadiusChanged: {
             requestPaint();
         }
         onCxChanged: {
             requestPaint();
         }
         onCyChanged: {
             requestPaint();
         }

         onPaint: {
             var ctx = getContext("2d");
             ctx.reset();

             ctx.strokeStyle = "red";
             ctx.beginPath();
             ctx.fillStyle = flowColor;
             ctx.moveTo(cx, cy);
             if(radius<0)radius=0;

             ctx.arc(cx, cy, radius, 0, Math.PI*2);
             ctx.closePath();
             ctx.fill();

         }
     }

    MouseArea{
        anchors.fill: main;
        onClicked: {
            if(fluidContainer.visible===false){
                fluidContainer.visible=true;
            }

            var x = mouse.x;
            var y = mouse.y;
            fluidContainer.cx = x;
            fluidContainer.cy = y;
            ani.start();

        }
    }

    PropertyAnimation{
        id:ani
        target: fluidContainer;
        property: "radius";
        from:0;
        to:main.width;
        duration:600;
        easing.type: Easing.OutSine;
        onStopped: {
            fluidContainer.visible=false;
        }

    }


}
View Code
发布者:全栈程序员-站长,转载请注明出处:https://javaforall.net/166626.html原文链接:https://javaforall.net


