
大家好,又见面了,我是你们的朋友全栈君。如果您正在找激活码,请点击查看最新教程,关注关注公众号 “全栈程序员社区” 获取激活教程,可能之前旧版本教程已经失效.最新Idea2022.1教程亲测有效,一键激活。
Jetbrains全系列IDE稳定放心使用
linux 搭建 nginx正向代理
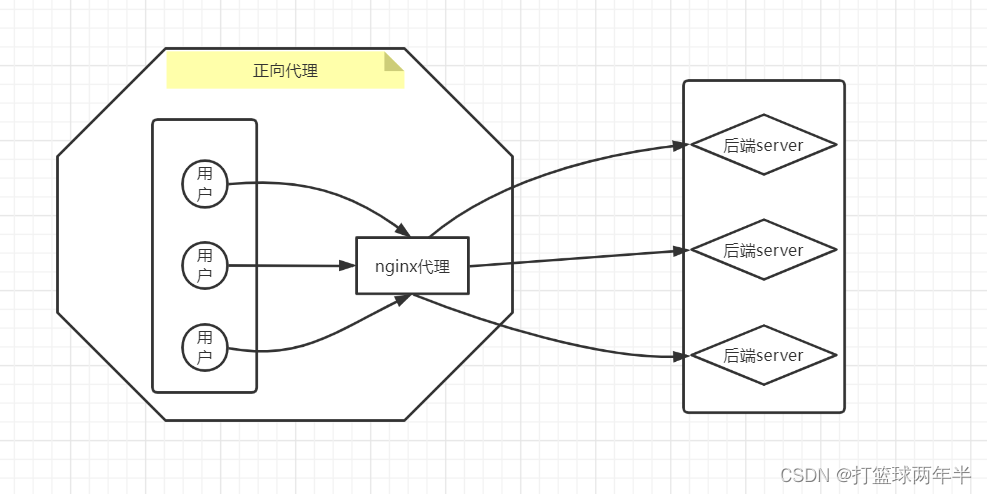
一、正向代理俗称VPN,图示如下:

二、实验机器

三、安装nginx 环境
3.1安装依赖
yum -y install pcre-devel zlib-devel gcc gcc+c++ make openssl-devel pcre-devel zlib-devel patch
3.2 下载正向代理模块(这个模块可能不适合其他版本nginx)
mkdir -p /nginx-proxy
cd /nginx-proxy
wget https://github.com/chobits/ngx_http_proxy_connect_module/archive/refs/heads/master.zip
unzip ngx_http_proxy_connect_module-master.zip
如果下载失败可用百度云:
链接:https://pan.baidu.com/s/1tN1qsdsvXqIDX3jYkzWriA
提取码:q885
3.3安装nginx,并安装正向代理模块
下载解压nginx
cd /nginx-proxy
wget https://nginx.org/download/nginx-1.20.1.tar.gz
tar --no-same-owner -zxvf  nginx-1.20.1.tar.gz
PS:一定要先进入nginx 解压目录,再执行patch命令
cd /nginx-proxy/nginx-1.20.1
patch -p1 < /nginx-proxy/ngx_http_proxy_connect_module-master/patch/proxy_connect_rewrite_101504.patch

编译,除正向代理模块外,其他看自己需求安装
PS:/usr/local/nginx默认安装目录
cd /nginx-proxy/nginx-1.20.1
./configure --prefix=/usr/local/nginx   \
--with-http_ssl_module  --with-http_flv_module \
--with-http_stub_status_module --with-http_gzip_static_module \
--with-pcre  --add-module=/nginx-proxy/ngx_http_proxy_connect_module-master
make && make install
3.4 nginx.conf 配置正向代理
cd /usr/local/nginx/conf/
vim nginx.conf
worker_processes  auto;
events {

    worker_connections  1024;
}
http {

    include       mime.types;
    default_type  application/octet-stream;
    sendfile        on;
    keepalive_timeout  65;
    proxy_set_header HOST $host;
    proxy_buffers 256 4k;
    proxy_max_temp_file_size 0k;
    proxy_connect_timeout 30;
    proxy_send_timeout 60;
    proxy_read_timeout 60;
    proxy_next_upstream error timeout invalid_header http_502;
############################################################
   # 配置http正向代理
   server {

        resolver 8.8.8.8;      #指定DNS服务器IP地址
        listen 8000;
        server_name  localhost;
        location / {

                proxy_pass http://$host$request_uri;     #设定代理服务器
    }
}
############################################################
   # 配置https正向代理
   server {

        resolver 8.8.8.8;       #指定DNS服务器IP地址
        listen 4430;
        server_name  localhost;
        location / {

                proxy_pass https://$host$request_uri;    #设定代理服务器的协议和地址
    }
}
############################################################
   server {


        error_page   500 502 503 504  /50x.html;
        location = /50x.html {

            root   html;
        }
    }
}
3.5 启动nginx
检查配置文件
/usr/local/nginx/sbin/nginx -t
启动、停止、重载命令
/usr/local/nginx/sbin/nginx
/usr/local/nginx/sbin/nginx -s stop
/usr/local/nginx/sbin/nginx -s reload
查看端口
[root@node1 conf]# netstat -lanp | grep 8000
tcp        0      0 0.0.0.0:8000            0.0.0.0:*               LISTEN      14634/nginx: master
[root@node1 conf]# netstat -lanp | grep 4430
tcp        0      0 0.0.0.0:4430            0.0.0.0:*               LISTEN      14634/nginx: master
四、验证
4.1 202 上面配置正向代理
echo  "export http_proxy=192.168.199.201:8000" >>/etc/profile
echo  "export https_proxy=192.168.199.201:4430" >>/etc/profile
source /etc/profile
4.2 对比 202 和 203 分别访问 https 和http
###########################################
https 结果如下
###########################################
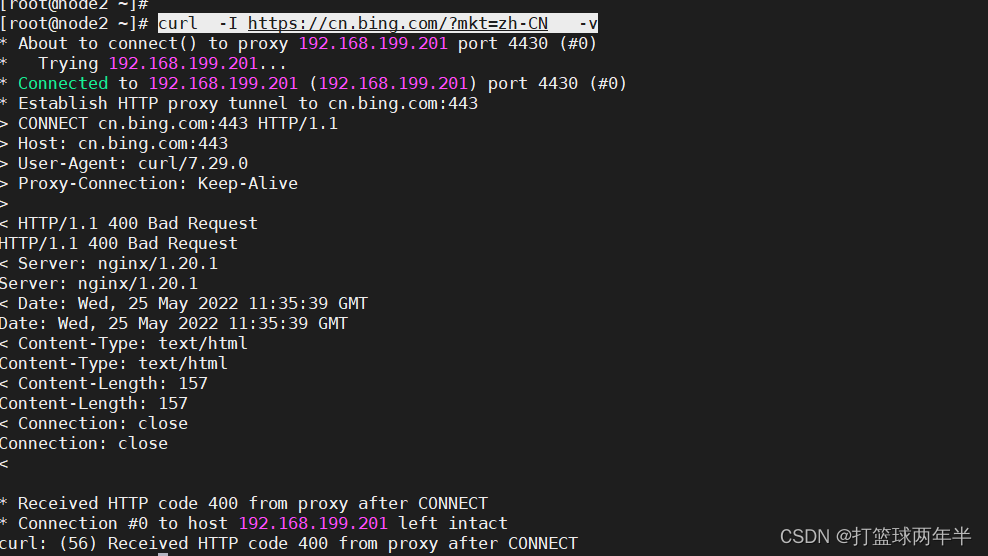
202上,可以看出解析IP为代理机192.168.199.201,测试成功
curl -I https://cn.bing.com/?mkt=zh-cn -v
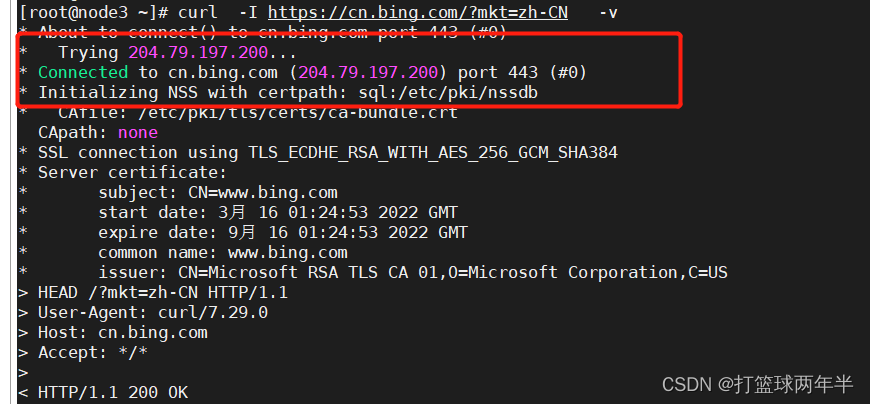
203上,解析IP为本机公网IP
###########################################
http 也是成功的,就不贴了
###########################################
版权声明:本文内容由互联网用户自发贡献,该文观点仅代表作者本人。本站仅提供信息存储空间服务,不拥有所有权,不承担相关法律责任。如发现本站有涉嫌侵权/违法违规的内容, 请联系我们举报,一经查实,本站将立刻删除。
发布者:全栈程序员-站长,转载请注明出处:https://javaforall.net/184321.html原文链接:https://javaforall.net


