
大家好,又见面了,我是你们的朋友全栈君。如果您正在找激活码,请点击查看最新教程,关注关注公众号 “全栈程序员社区” 获取激活教程,可能之前旧版本教程已经失效.最新Idea2022.1教程亲测有效,一键激活。
Jetbrains全系列IDE稳定放心使用
⚡插播一条老家自产的糖心苹果,多个品种,欢迎选购!有问题随时私信我⚡:
??来自雪域高原的馈赠——海拔2000米的大凉山高原生态糖心苹果??
https://blog.csdn.net/qq_15969343/article/details/126107252
#2018/06/04 更新
使用官方的权重只检测特定的类别看这里:
Mask_RCNN:使用COCO权重进行特定类别预测(只标记出你需要的类别)
#以下为原文:
今天我们来说一下,如何使用自己训练出来的Mask_RCNN模型,或是官方自己的模型权重来进行预测:
该Mask_RCNN版本基于:Python3,Keras,TensorFlow,我使用的具体版本为:
- Python 3.6.3
- TensorFlow 1.7
- Keras 2.1.5
tensorflow安装:
Mask-RCNN :
1.加载模块以及载入模型权重:
import os
import sys
import random
import math
import numpy as np
import skimage.io
import matplotlib
import matplotlib.pyplot as plt

import coco
import utils
import model as modellib
import visualize
from config import Config

# Root directory of the project
ROOT_DIR = os.getcwd()

# Directory to save logs and trained model
MODEL_DIR = os.path.join(ROOT_DIR, "logs")

# Local path to trained weights file
MODEL_WEIGHT_PATH = os.path.join(ROOT_DIR, "mask_rcnn_val_all.h5")  #这里输入模型权重的路径
# Download COCO trained weights from Releases if needed
if not os.path.exists(MODEL_WEIGHT_PATH):
    utils.download_trained_weights(MODEL_WEIGHT_PATH)

# Directory of images to run detection on
IMAGE_DIR = os.path.join(ROOT_DIR, "samples\\balloon\\datasets\\balloon\\val2")   #这是输入你要预测图片的路径
2.根据自己训练时候的配置,从Config类中继承创建一个新类:
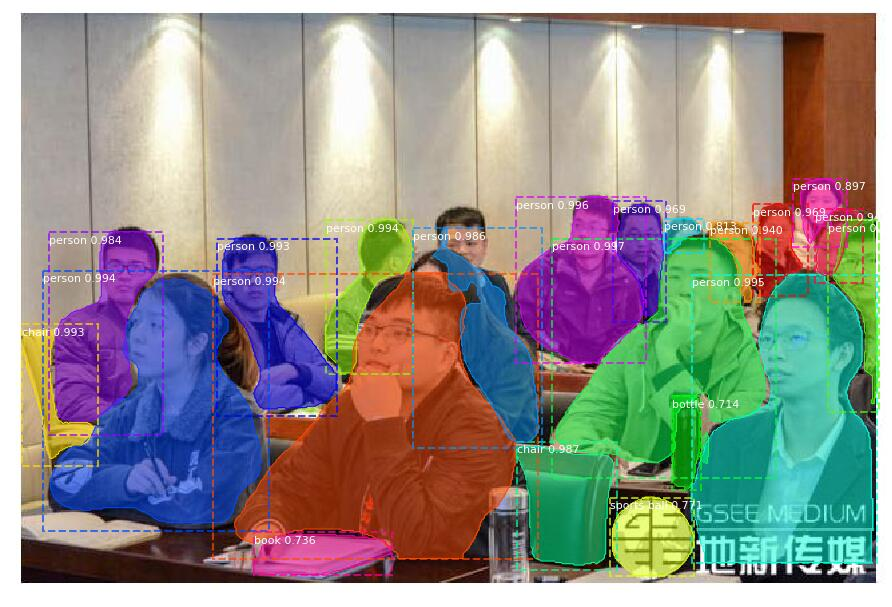
例如,我要检测的物体有5种:’person’, ‘book’, ‘chair’, ‘bottle’, ‘sports bag’再加上背景则一共是6种:
class somethingConfig(Config):
    """Configuration for training on MS COCO.
    Derives from the base Config class and overrides values specific
    to the COCO dataset.
    """
    # Give the configuration a recognizable name
    NAME = "something"

    # We use a GPU with 12GB memory, which can fit two images.
    # Adjust down if you use a smaller GPU.
    IMAGES_PER_GPU = 2

    # Uncomment to train on 8 GPUs (default is 1)
    # GPU_COUNT = 8

    # Number of classes (including background)
    NUM_CLASSES = 1 + 5  # COCO has 80 classes
3.根据上面的类,新建一个专门用于预测的类:
class InferenceConfig(somethingConfig):
    # Set batch size to 1 since we'll be running inference on
    # one image at a time. Batch size = GPU_COUNT * IMAGES_PER_GPU
    GPU_COUNT = 1
    IMAGES_PER_GPU = 1

config = InferenceConfig()
4.载入图像,进行预测:
# Create model object in inference mode.
model = modellib.MaskRCNN(mode="inference", model_dir=MODEL_DIR, config=config)

# Load weights trained on MS-COCO
model.load_weights(MODEL_WEIGHT_PATH, by_name=True)

# COCO Class names
# Index of the class in the list is its ID. For example, to get ID of
# the teddy bear class, use: class_names.index('teddy bear')
class_names = ['BG', 'person', 'book', 'chair', 'bottle', 'sports bag']

# Load a random image from the images folder
file_names = next(os.walk(IMAGE_DIR))[2]
for x in range(len(file_names)):
    image = skimage.io.imread(os.path.join(IMAGE_DIR, file_names[x]))

# Run detection
    results = model.detect([image], verbose=1)

# Visualize results
    r = results[0]
    visualize.display_instances(image, r['rois'], r['masks'], r['class_ids'],
                            class_names, r['scores'])
5.预测结果:
都看到这里了,还不赶紧点赞,评论,收藏走一波?
版权声明:本文内容由互联网用户自发贡献,该文观点仅代表作者本人。本站仅提供信息存储空间服务,不拥有所有权,不承担相关法律责任。如发现本站有涉嫌侵权/违法违规的内容, 请联系我们举报,一经查实,本站将立刻删除。
发布者:全栈程序员-站长,转载请注明出处:https://javaforall.net/188795.html原文链接:https://javaforall.net


