
大家好,又见面了,我是你们的朋友全栈君。如果您正在找激活码,请点击查看最新教程,关注关注公众号 “全栈程序员社区” 获取激活教程,可能之前旧版本教程已经失效.最新Idea2022.1教程亲测有效,一键激活。
Jetbrains全家桶1年46,售后保障稳定
Learning Deep Structured Semantic Models for Web Search using Clickthrough Data以及其后续文章
A Multi-View Deep Learning Approach for Cross Domain User Modeling in Recommendation Systems的实现Demo。
1. 数据
DSSM,对于输入数据是Query对,即Query短句和相应的展示,展示中分点击和未点击,分别为正负样,同时对于点击的先后顺序,也是有不同赋值,具体可参考论文。
对于我的Query数据本人无权开放,还请自行寻找数据。
2. word hashing
原文使用3-grams,对于中文,我使用了uni-gram,因为中文本身字有一定代表意义(也有论文拆笔画),对于每个gram都使用one-hot编码代替,最终可以大大降低短句维度。
3. 结构
结构图:
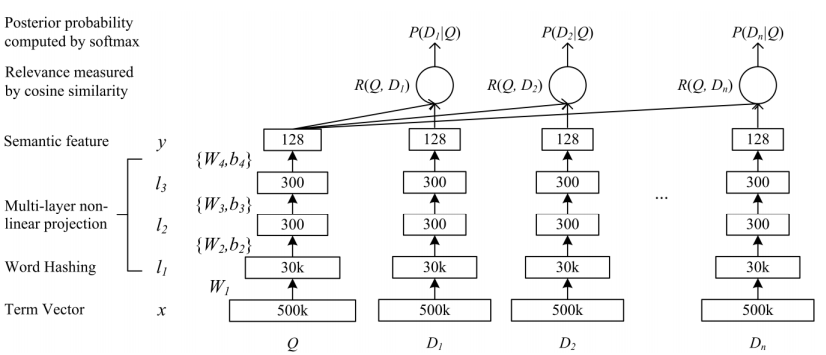

- 把条目映射成低维向量。
- 计算查询和文档的cosine相似度。
3.1 输入
这里使用了TensorBoard可视化,所以定义了name_scope:
with tf.name_scope('input'):
    query_batch = tf.sparse_placeholder(tf.float32, shape=[None, TRIGRAM_D], name='QueryBatch')
    doc_positive_batch = tf.sparse_placeholder(tf.float32, shape=[None, TRIGRAM_D], name='DocBatch')
    doc_negative_batch = tf.sparse_placeholder(tf.float32, shape=[None, TRIGRAM_D], name='DocBatch')
    on_train = tf.placeholder(tf.bool)
3.2 全连接层
我使用三层的全连接层,对于每一层全连接层,除了神经元不一样,其他都一样,所以可以写一个函数复用。
l n = W n x + b 1 l_n = W_n x + b_1 ln=Wnx+b1
def add_layer(inputs, in_size, out_size, activation_function=None):
    wlimit = np.sqrt(6.0 / (in_size + out_size))
    Weights = tf.Variable(tf.random_uniform([in_size, out_size], -wlimit, wlimit))
    biases = tf.Variable(tf.random_uniform([out_size], -wlimit, wlimit))
    Wx_plus_b = tf.matmul(inputs, Weights) + biases
    if activation_function is None:
        outputs = Wx_plus_b
    else:
        outputs = activation_function(Wx_plus_b)
    return outputs
其中,对于权重和Bias,使用了按照论文的特定的初始化方式:
	wlimit = np.sqrt(6.0 / (in_size + out_size))
    Weights = tf.Variable(tf.random_uniform([in_size, out_size], -wlimit, wlimit))
    biases = tf.Variable(tf.random_uniform([out_size], -wlimit, wlimit))
Batch Normalization
def batch_normalization(x, phase_train, out_size):
    """ Batch normalization on convolutional maps. Ref.: http://stackoverflow.com/questions/33949786/how-could-i-use-batch-normalization-in-tensorflow Args: x: Tensor, 4D BHWD input maps out_size: integer, depth of input maps phase_train: boolean tf.Varialbe, true indicates training phase scope: string, variable scope Return: normed: batch-normalized maps """
    with tf.variable_scope('bn'):
        beta = tf.Variable(tf.constant(0.0, shape=[out_size]),
                           name='beta', trainable=True)
        gamma = tf.Variable(tf.constant(1.0, shape=[out_size]),
                            name='gamma', trainable=True)
        batch_mean, batch_var = tf.nn.moments(x, [0], name='moments')
        ema = tf.train.ExponentialMovingAverage(decay=0.5)

        def mean_var_with_update():
            ema_apply_op = ema.apply([batch_mean, batch_var])
            with tf.control_dependencies([ema_apply_op]):
                return tf.identity(batch_mean), tf.identity(batch_var)

        mean, var = tf.cond(phase_train,
                            mean_var_with_update,
                            lambda: (ema.average(batch_mean), ema.average(batch_var)))
        normed = tf.nn.batch_normalization(x, mean, var, beta, gamma, 1e-3)
    return normed
单层
with tf.name_scope('FC1'):
    # 激活函数在BN之后,所以此处为None
    query_l1 = add_layer(query_batch, TRIGRAM_D, L1_N, activation_function=None)
    doc_positive_l1 = add_layer(doc_positive_batch, TRIGRAM_D, L1_N, activation_function=None)
    doc_negative_l1 = add_layer(doc_negative_batch, TRIGRAM_D, L1_N, activation_function=None)

with tf.name_scope('BN1'):
    query_l1 = batch_normalization(query_l1, on_train, L1_N)
    doc_l1 = batch_normalization(tf.concat([doc_positive_l1, doc_negative_l1], axis=0), on_train, L1_N)
    doc_positive_l1 = tf.slice(doc_l1, [0, 0], [query_BS, -1])
    doc_negative_l1 = tf.slice(doc_l1, [query_BS, 0], [-1, -1])
    query_l1_out = tf.nn.relu(query_l1)
    doc_positive_l1_out = tf.nn.relu(doc_positive_l1)
    doc_negative_l1_out = tf.nn.relu(doc_negative_l1)
······
合并负样本
with tf.name_scope('Merge_Negative_Doc'):
    # 合并负样本,tile可选择是否扩展负样本。
    doc_y = tf.tile(doc_positive_y, [1, 1])
    for i in range(NEG):
        for j in range(query_BS):
            # slice(input_, begin, size)切片API
            doc_y = tf.concat([doc_y, tf.slice(doc_negative_y, [j * NEG + i, 0], [1, -1])], 0)
3.3 计算cos相似度
with tf.name_scope('Cosine_Similarity'):
    # Cosine similarity
    # query_norm = sqrt(sum(each x^2))
    query_norm = tf.tile(tf.sqrt(tf.reduce_sum(tf.square(query_y), 1, True)), [NEG + 1, 1])
    # doc_norm = sqrt(sum(each x^2))
    doc_norm = tf.sqrt(tf.reduce_sum(tf.square(doc_y), 1, True))

    prod = tf.reduce_sum(tf.multiply(tf.tile(query_y, [NEG + 1, 1]), doc_y), 1, True)
    norm_prod = tf.multiply(query_norm, doc_norm)

    # cos_sim_raw = query * doc / (||query|| * ||doc||)
    cos_sim_raw = tf.truediv(prod, norm_prod)
    # gamma = 20
    cos_sim = tf.transpose(tf.reshape(tf.transpose(cos_sim_raw), [NEG + 1, query_BS])) * 20
3.4 定义损失函数
with tf.name_scope('Loss'):
    # Train Loss
    # 转化为softmax概率矩阵。
    prob = tf.nn.softmax(cos_sim)
    # 只取第一列,即正样本列概率。
    hit_prob = tf.slice(prob, [0, 0], [-1, 1])
    loss = -tf.reduce_sum(tf.log(hit_prob))
    tf.summary.scalar('loss', loss)
3.5选择优化方法
with tf.name_scope('Training'):
    # Optimizer
    train_step = tf.train.AdamOptimizer(FLAGS.learning_rate).minimize(loss)
3.6 开始训练
# 创建一个Saver对象,选择性保存变量或者模型。
saver = tf.train.Saver()
# with tf.Session(config=config) as sess:
with tf.Session() as sess:
    sess.run(tf.global_variables_initializer())
    train_writer = tf.summary.FileWriter(FLAGS.summaries_dir + '/train', sess.graph)
    start = time.time()
    for step in range(FLAGS.max_steps):
        batch_id = step % FLAGS.epoch_steps
        sess.run(train_step, feed_dict=feed_dict(True, True, batch_id % FLAGS.pack_size, 0.5))
GitHub完整代码 https://github.com/InsaneLife/dssm
Multi-view DSSM实现同理,可以参考GitHub:multi_view_dssm
CSDN原文:http://blog.csdn.net/shine19930820/article/details/79042567
注意:
由于之前代码api过时,已更新最新代码于:https://github.com/InsaneLife/dssm/blob/master/dssm_rnn.py 数据处理代码data_input.py 和数据data 已经更新,由于使用了rnn,所以输入非bag of words方式。
发布者:全栈程序员-站长,转载请注明出处:https://javaforall.net/200895.html原文链接:https://javaforall.net


