
clusterProfiler是Y叔的代表作之一,是基因富集分析的不二之选,已引用3200+,网上无数教程,我也来贡献一份,写一份最通用的小白友好型的
1 GO注释
将要进行注释的基因组蛋白序列上传到eggNOG-mapper 网站,按网站提示操作,完成后下载 query_seqs.fa.emapper.annotations文件。
2 手动处理注释结果
3 处理数据为clusterProfiler要求格式
3.1 读取注释数据并进行处理,得到背景文件。clusterProfiler要求的背景文件TERM2GENE需要包含两列,第一列为GOid,第二列为基因id;我们从eggNOG下载处理后的文件,每个基因对应多个GOid,要对其进行处理。
#载入所有所需R包 library(clusterProfiler) library(enrichplot) library(ggplot2) library(stringr) #读取数据 egg <- read.table("go_files.txt",sep="\t",header=T, stringsAsFactors = FALSE) #提取id列 gene_ids <- egg$query_name #有的基因没有注释到会显示为 "",需使用逻辑值索引去除未注释到的 eggnog_lines_with_go <- egg$GOs!= "" #将一个GeneId对应多个GOId的宽数据格式转换位长数据格式 eggnog_annoations_go <- str_split(egg[eggnog_lines_with_go,]$GOs, ",") gene_to_go <- data.frame(gene = rep(gene_ids[eggnog_lines_with_go], times = sapply(eggnog_annoations_go, length)), term = unlist(eggnog_annoations_go)) term2gene1 <- gene_to_go[, c(2, 1)] 进一步处理,将间接注释补全,将GOid翻译为GOterm与GOontology。
#为直接注释补充为间接注释 term2gene <- buildGOmap(term2gene1) #将GoId转换为GoTerm go2term <- go2term(term2gene$GO) #将GoId转换为GoOnt go2ont <- go2ont(term2gene$GO) 3.2 读取gene列表,感兴趣的基因存为gene1.txt文件,存为一列。
gene1 <- read.table("gene1.txt", header = FALSE, stringsAsFactors = FALSE) gene1 <- gene1$V1[1:nrow(gene1)] 4 富集分析
使用enricher函数进行富集分析,这里设置pvalueCutoff = 1, qvalueCutoff = 1以展示所有结果。
df <- enricher(gene = gene1, TERM2GENE = term2gene, TERM2NAME = go2term, pvalueCutoff = 1, qvalueCutoff = 1) 5 结果可视化
clusterProfiler提供了丰富的可视化方法,并支持ggplot2图形语法进行进一步修改,这里使用气泡图与网络图作为展示。
#dotplot 气泡图 #横轴为GeneRatio,代表该GO term下富集到的基因个数占列表基因总数的比例 #纵轴为富集到的GO Terms的描述信息,showCategory指定展示的GO Terms的个数 p1 <- dotplot(df, showCategory = 15 ,title = "barplot for enricher") p1 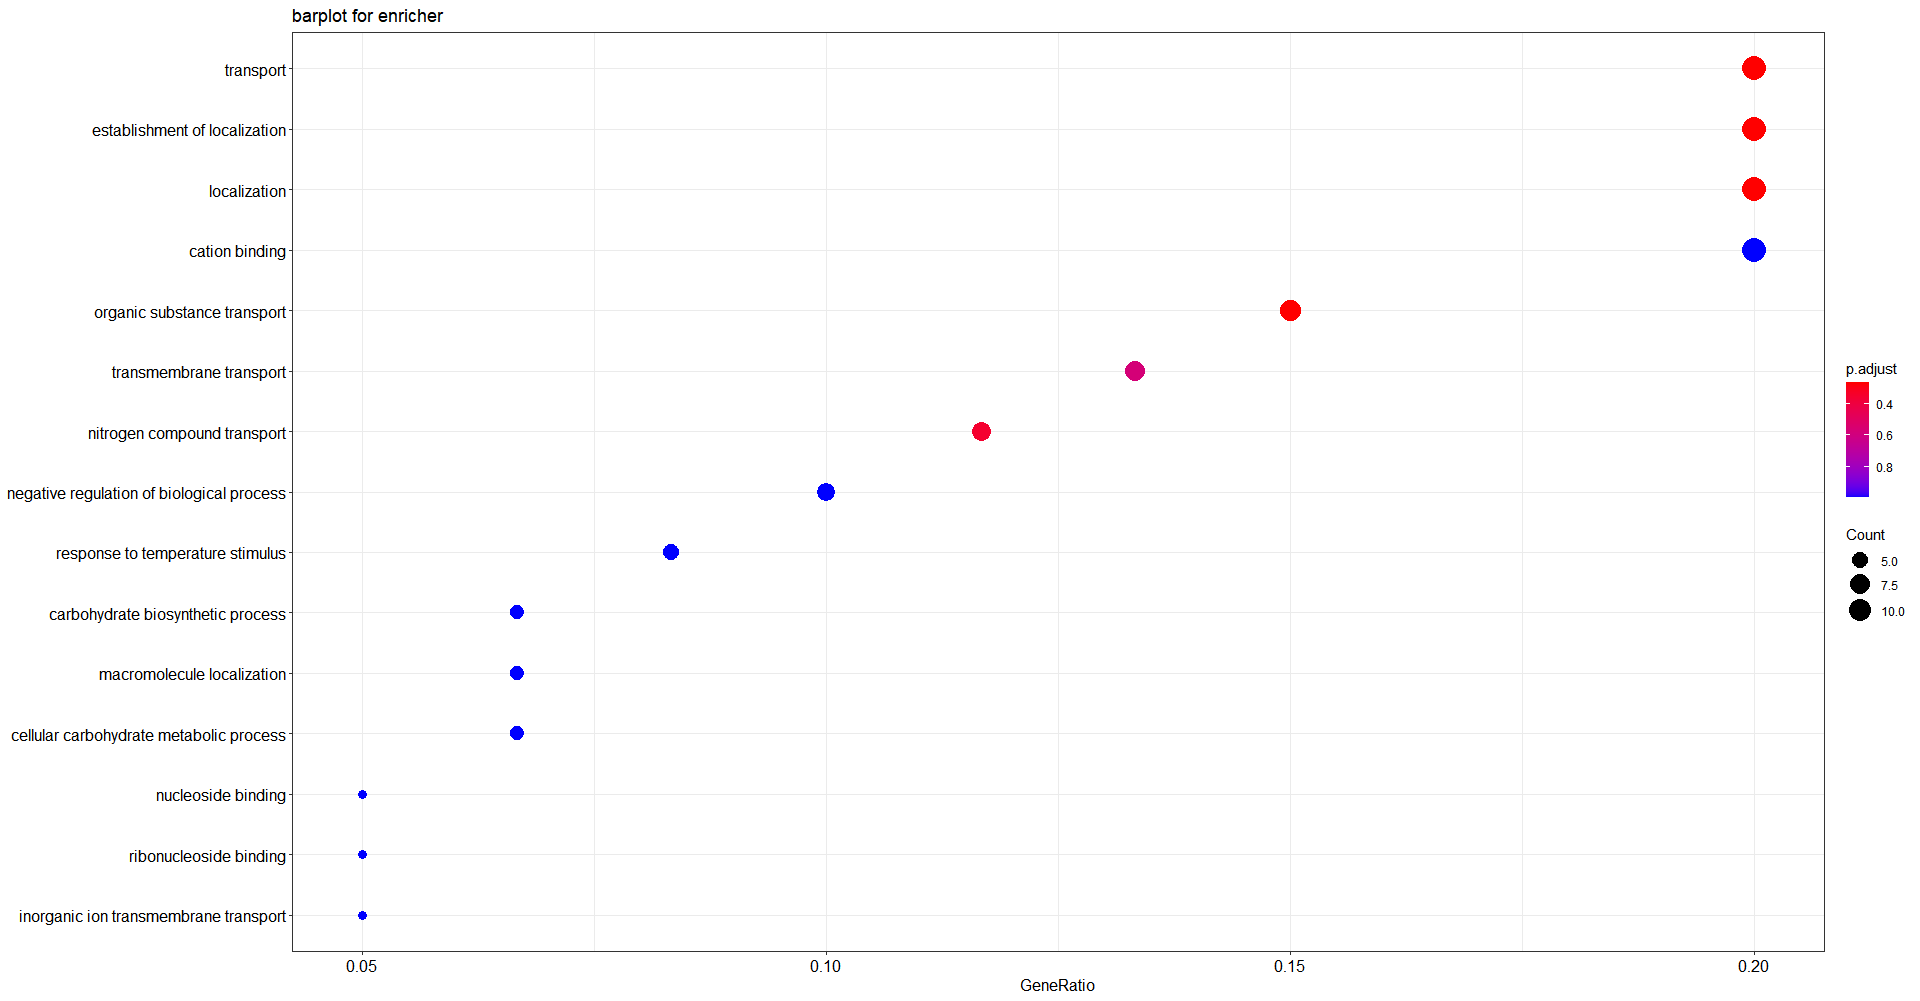

#分别重新设置点的颜色,点的大小,Y轴标签的换行 p2 <- p1 + scale_color_continuous(low = "purple", high = "green") + scale_size(range = c(5, 15)) + scale_y_discrete(labels = function(y) str_wrap(y, width = 20)) p2 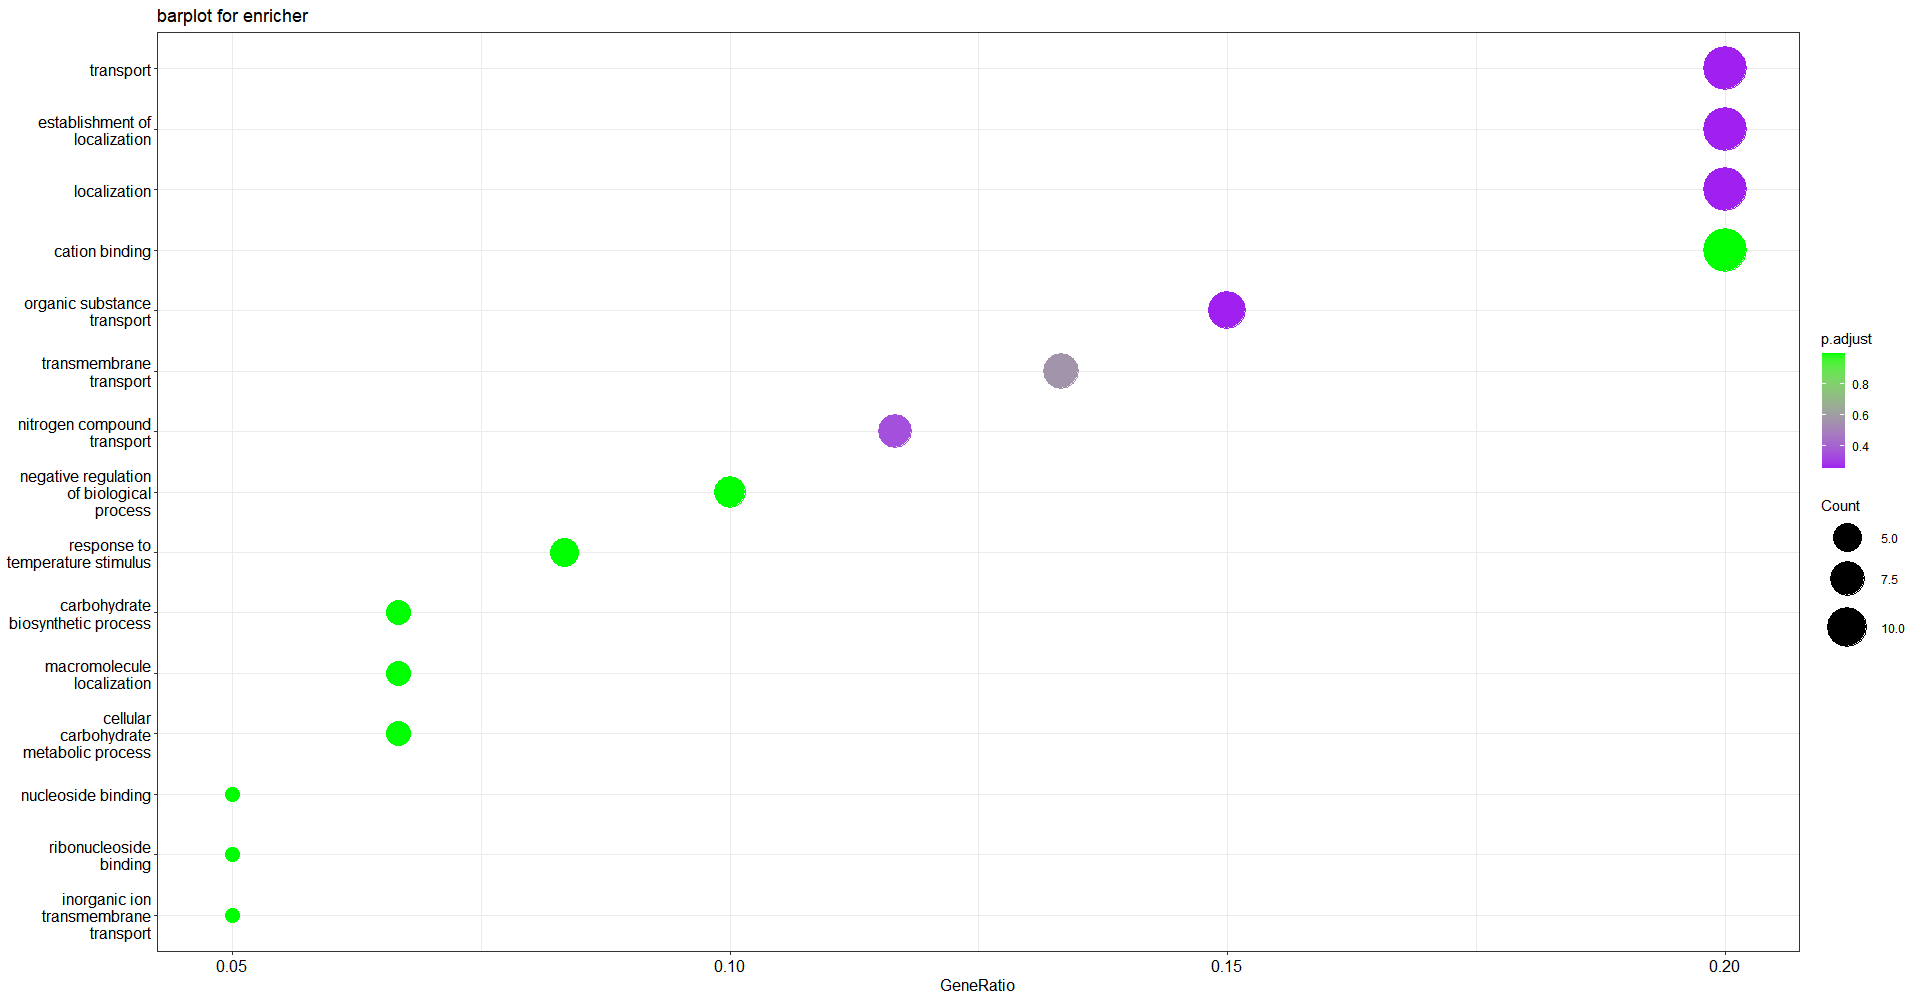
#cnetplot 关系网络图 #barplot和dotplot都只显示了最显著的GO terms,cnetplot可显示哪些基因参与了这些terms #灰色的点代表基因,黄色的点代表富集到的GO terms #如果一个基因位于一个GO Terms下,则将该基因与GO连线 #黄色节点的大小对应富集到的基因个数,默认showCategory设置top5富集到的GO terms #设置node_label为:"category", "gene", "all"(默认), "none"来控制标签显示 p3 <- cnetplot(df, node_label = "all", showCategory = 6) p3 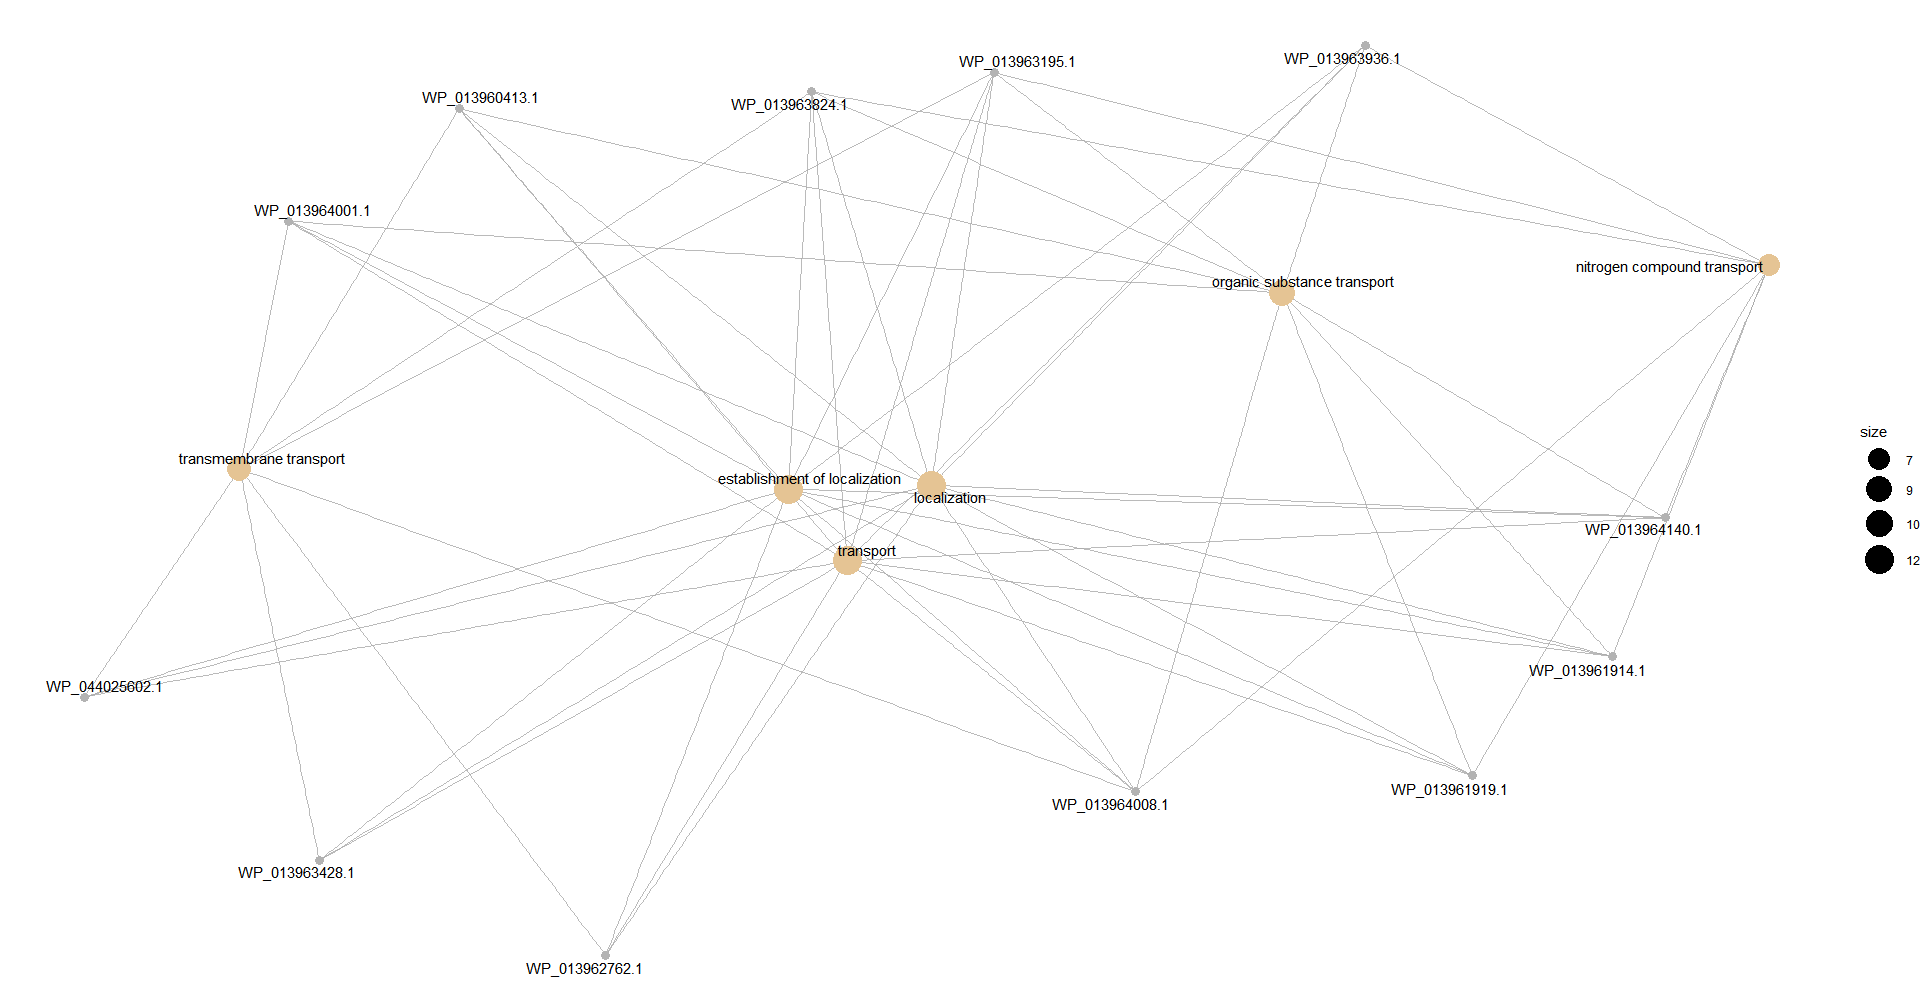
#设置circular = TRUE展示为环形 p4 <- cnetplot(df, circular = TRUE, colorEdge = TRUE, node_label = "category", showCategory = 6) p4 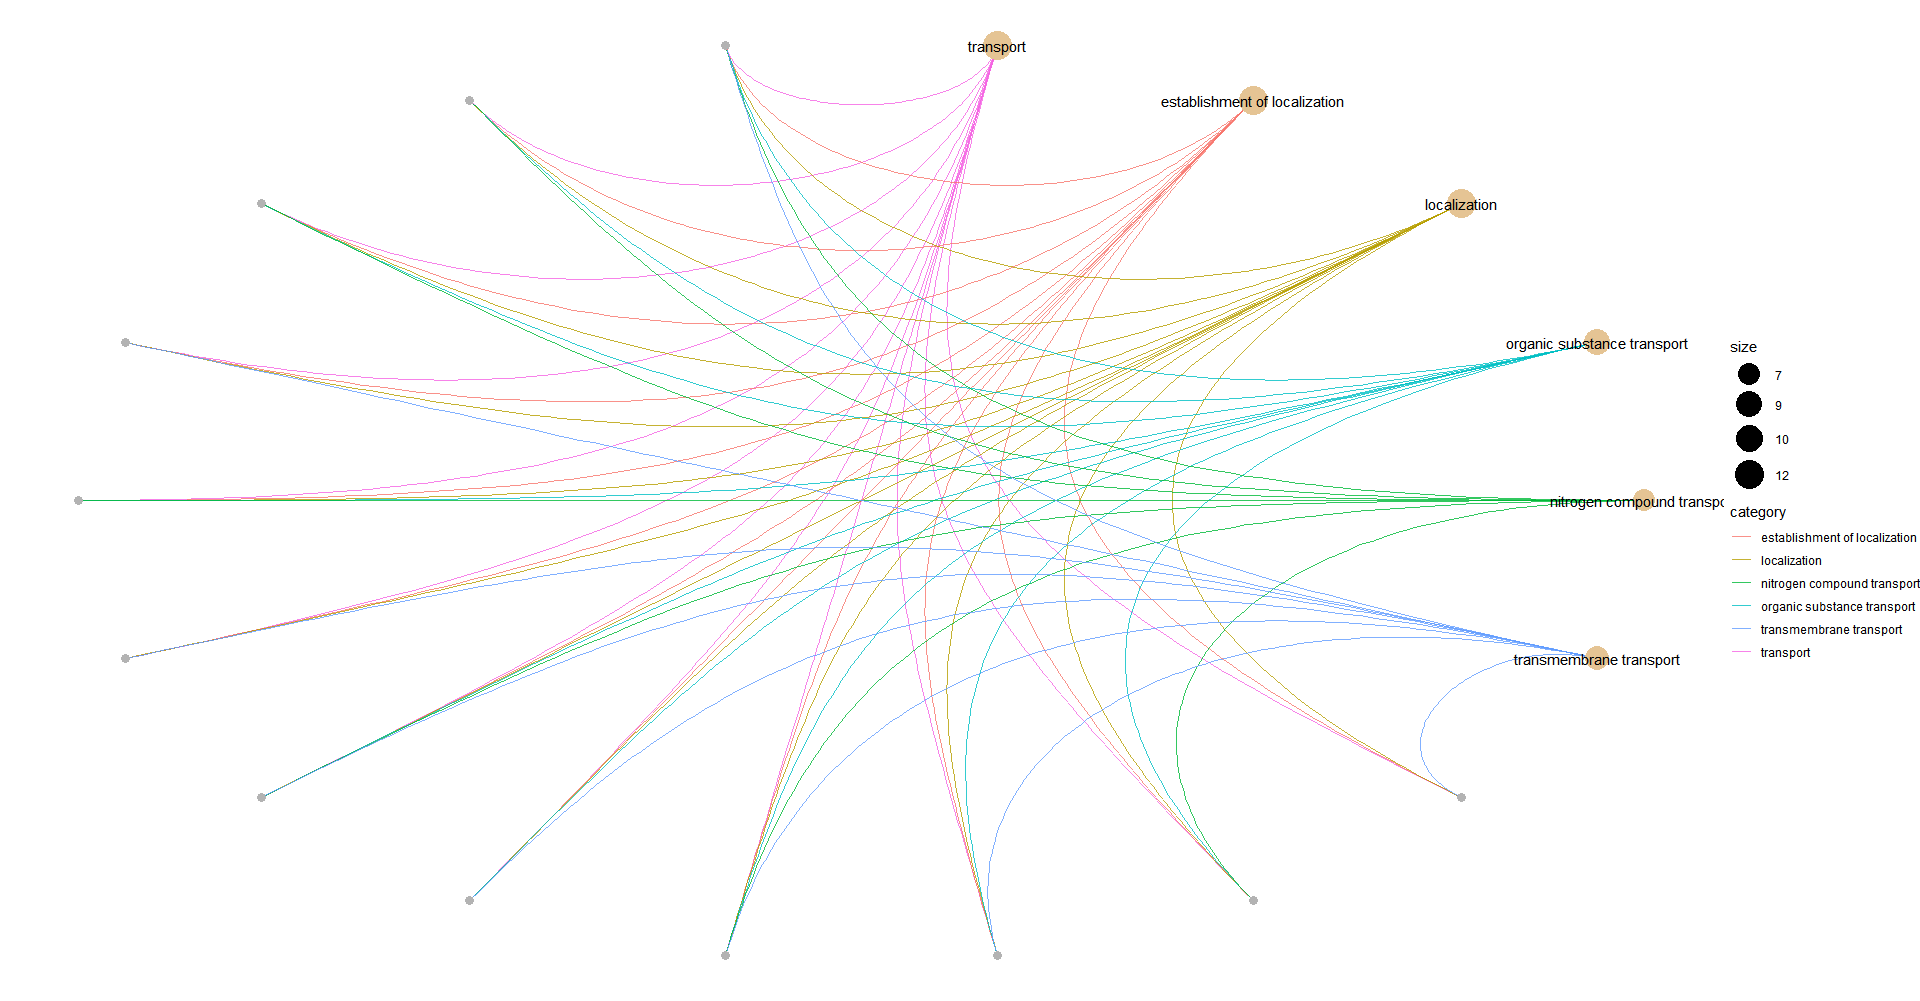
6 有转录组基因表达量的时候
有时候我们通过转录组测得了基因的表达量,这时候可以把表达量信息整合到分析中,体现在结果里。
#读取基因表达量文件,第一列为geneid,第二例为表达量,然后按clusterProfiler包的要求处理 d <- read.table("biaoda_files.txt", header = FALSE, sep = "\t") geneList <- d[,2] names(geneList) <- as.character(d[,1]) geneList <- sort(geneList, decreasing = TRUE) 结果可视化的时候,可以通过添加foldChange = geneList参数将基因标签颜色与表达量相关连。
#设置基因标签颜色与表达量相关 foldChange=geneList,并调整基因点的颜色、大小 p5 <- cnetplot(df, node_label = "all", showCategory = 6, foldChange = geneList, circular = TRUE, colorEdge = TRUE) +scale_color_continuous(low = "green", high = "red") + scale_size(range = c(5, 15)) p5 
p6 <- emapplot(df2,pie="count", pie_scale=1, layout="kk") p6 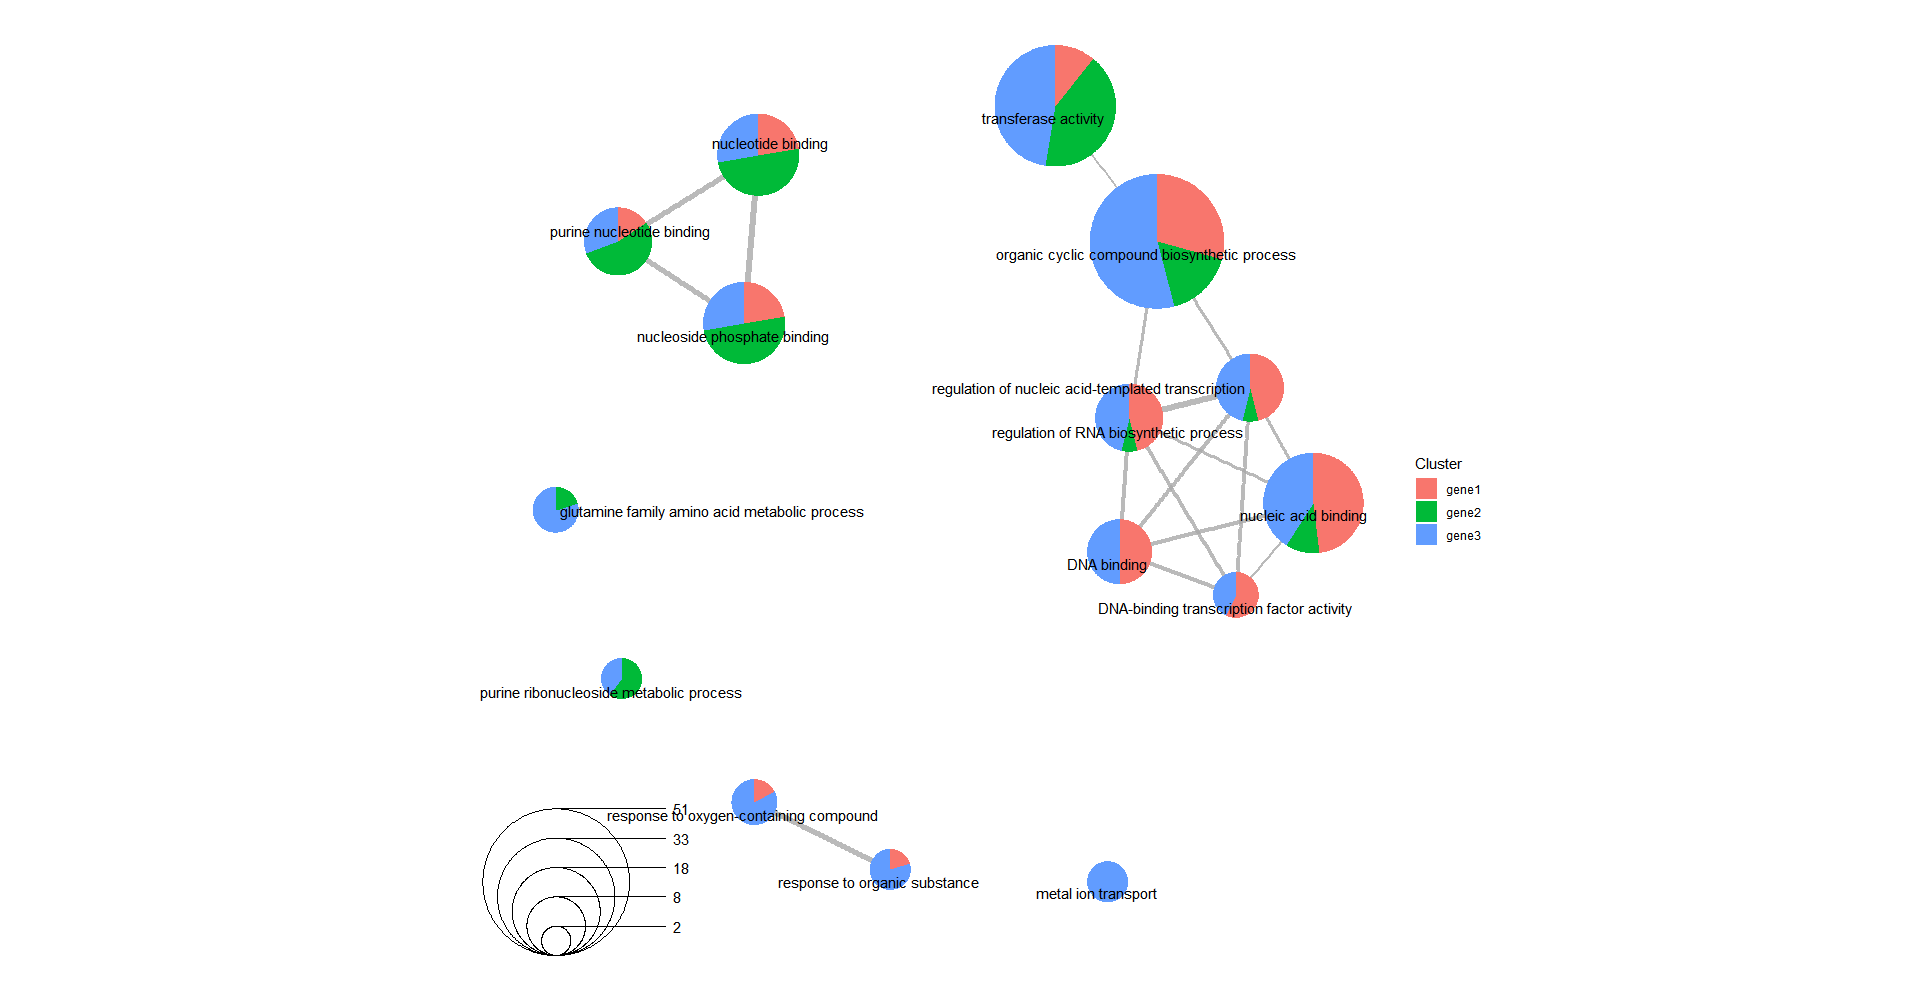
7 多个基因集一起比较
有时候我们希望将多个基因集在一起进行比较,compareCluster函数为我们提供了这样的功能
#读入多个基因集,第二个 gene2 <- read.table("0.txt", header = FALSE) gene2 <- gene2$V1[1:nrow(gene2)] #第三个 gene3 <- read.table("50.txt", header = FALSE) gene3 <- gene3$V1[1:nrow(gene3)] #将多个基因集合并为一个list gene_cluster = list(gene1 = gene1, gene2 = gene2, gene3 = gene3) 使用compareCluster函数进行比较分析
df2 <- compareCluster(gene_cluster, fun = 'enricher',TERM2GENE = term2gene, TERM2NAME = go2term,pvalueCutoff = 1, qvalueCutoff = 1) 结果可视化
p7 <- dotplot(df3, showCategory = 5) + scale_y_discrete(labels = function(y) str_wrap(y, width = 50)) + scale_size(range = c(3, 10)) + scale_color_continuous(low = "purple", high = "green") p6 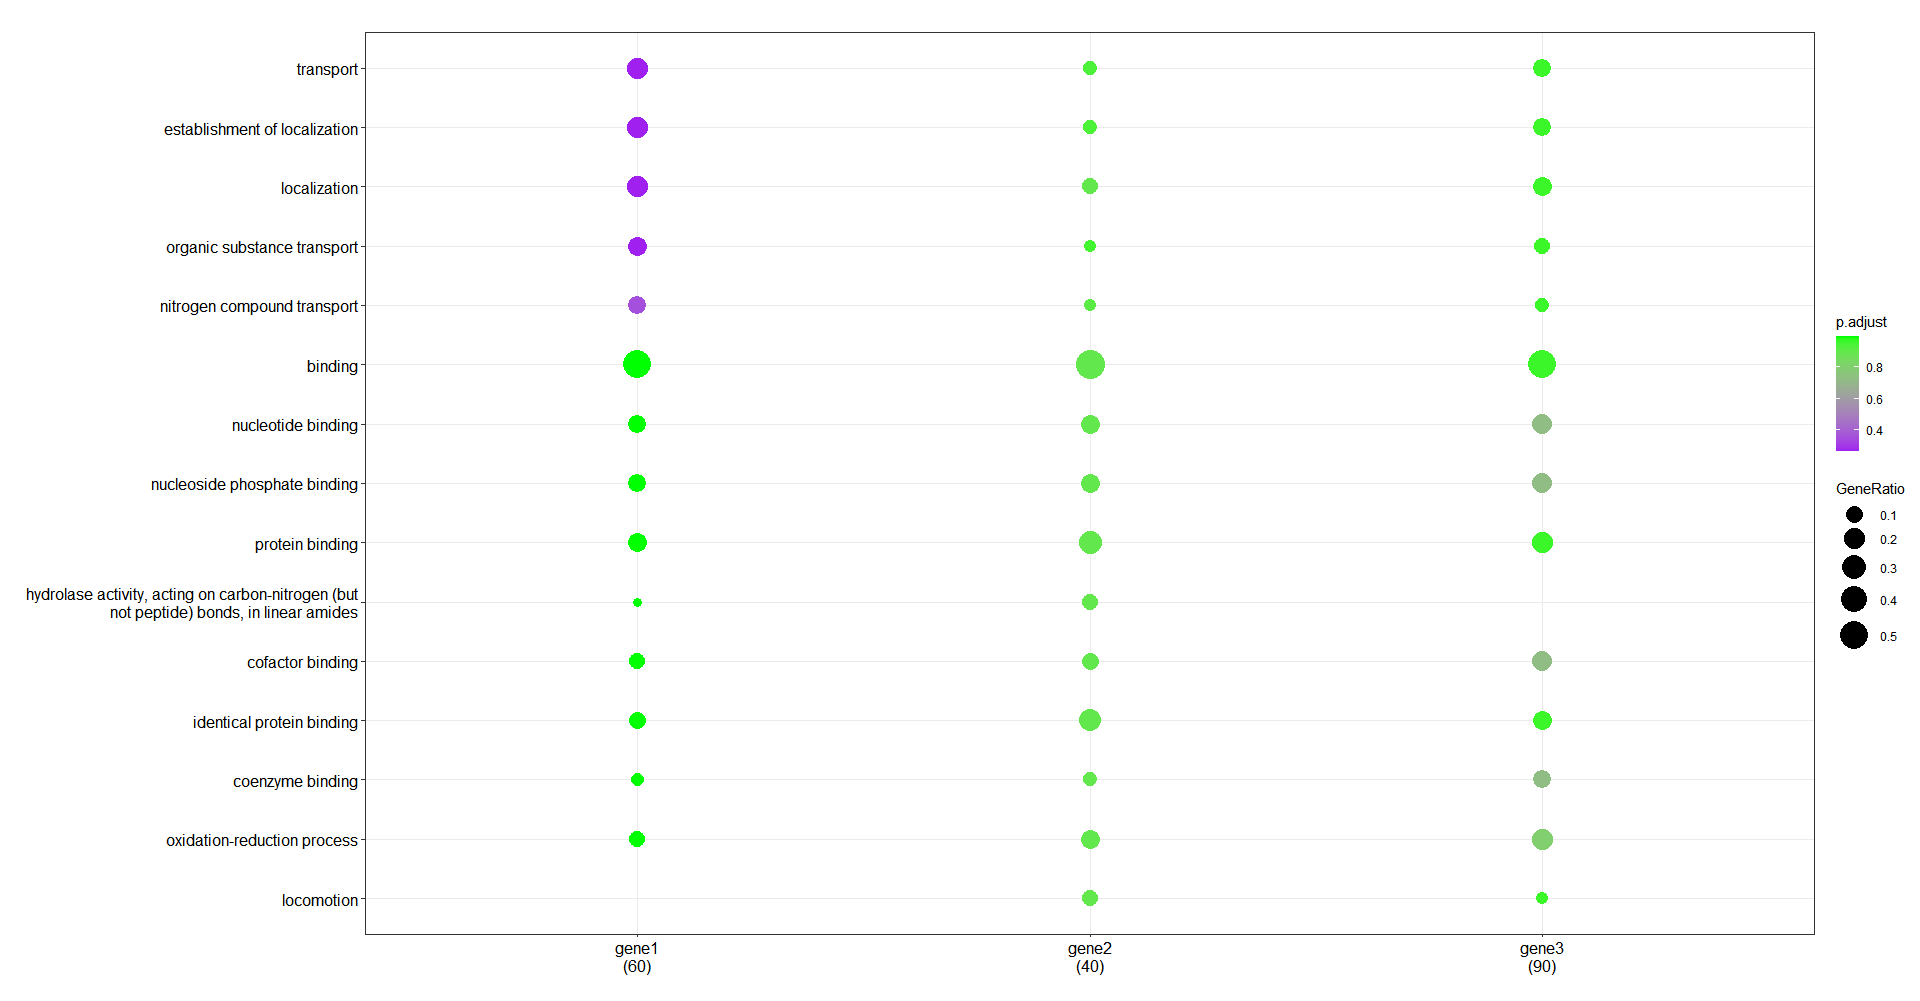
发布者:全栈程序员-站长,转载请注明出处:https://javaforall.net/202424.html原文链接:https://javaforall.net

![简易http接口实现[通俗易懂]](https://javaforall.net/wp-content/uploads/2020/11/2020110817443450-480x300.jpg)
