
原文地址: https://blog.csdn.net/VNanyesheshou/article/details/
1 Hid简介
HID设备(Hunman Interface Device Profile),即人机交互设备,常见的有鼠标,键盘,游戏手柄,等等。一般有线方式都是通过USB连线连接到机器设备,作为用户输入设备。在蓝牙技术中,HID设备的接入就是无线的了。
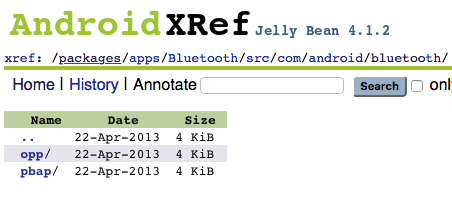
网上查资料说hid从android4.0开始支持(可能是usb hid),不过蓝牙hid应该从android4.2开始支持的,如下图所示: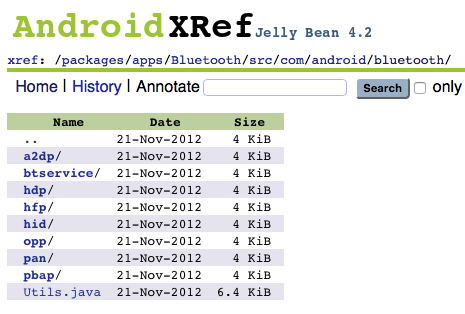

android4.1.2中的Bluetooth应用中没有hid的相关代码,而android4.2源码中Bluetooth应用中才有hid的代码。
2 主要代码
连接hid设备步骤:
- 开启蓝牙
- 获得inputDevice profile
- 扫描
- 配对
- 连接
2.1 开启蓝牙,通过广播接收者监听蓝牙相关状态。
mBluetoothAdapter = BluetoothAdapter.getDefaultAdapter(); if (mBluetoothAdapter == null) {
    Toast.makeText(this, "不支持蓝牙功能", 0).show(); // 不支持蓝牙 return; } // 如果没有打开蓝牙 if (!mBluetoothAdapter.isEnabled()) {
    mBluetoothAdapter.enable(); } // 初始化广播接收者 mBroadcastReceiver = new BlueBroadcastReceiver(); IntentFilter intentFilter = new IntentFilter(); intentFilter.addAction(BluetoothDevice.ACTION_FOUND); intentFilter.addAction(BluetoothDevice.ACTION_BOND_STATE_CHANGED); intentFilter.addAction(BluetoothAdapter.ACTION_STATE_CHANGED); intentFilter.addAction(BluetoothAdapter.ACTION_DISCOVERY_STARTED); intentFilter.addAction("android.bluetooth.input.profile.action.CONNECTION_STATE_CHANGED"); this.registerReceiver(mBroadcastReceiver, intentFilter);
2.2 获得inputDevice profile
// 4.2以上才支持HID模式
if (Build.VERSION.SDK_INT >= 17) {
    mHidUtil = HidUtil.getInstance(this); }
public static HidUtil getInstance(Context context){
if(null == instance){
instance = new HidUtil(context); } return instance; } private HidUtil(Context context) {
this.context = context; mBtAdapter = BluetoothAdapter.getDefaultAdapter(); try {
mBtAdapter.getProfileProxy(context, mListener, INPUT_DEVICE); } catch (Exception e) {
e.printStackTrace(); } } 通过BluetoothAdapter对象调用getProfileProxy()函数获取代理蓝牙输入设备代理对象。
其中参数mListener必须实现BluetoothProfile.ServiceListener()。获取代理对象成功或失败都会回调该Listener。
private BluetoothProfile.ServiceListener mListener = new BluetoothProfile.ServiceListener() {
    @Override public void onServiceConnected(int profile, BluetoothProfile proxy) {
    Log.i(TAG, "mConnectListener onServiceConnected"); //BluetoothProfile proxy这个已经是BluetoothInputDevice类型了 try {
    if (profile == INPUT_DEVICE) {
    mBluetoothProfile = proxy; } } catch (Exception e) {
    e.printStackTrace(); } } @Override public void onServiceDisconnected(int profile) {
    Log.i(TAG, "mConnectListener onServiceConnected"); } };
获取到输入设备的代理对象,之后就可以进行连接操作了。
2.3 扫描(点击连接按钮开始扫描蓝牙设备)
mBluetoothAdapter.startDiscovery(); 2.4 配对
广播接收者监听扫描到蓝牙设备,过滤出所需蓝牙设备进行配对,如果之前配对过则直接连接。
if(action.equals(BluetoothDevice.ACTION_FOUND)){
    // 通过广播接收到了BluetoothDevice final BluetoothDevice device = (BluetoothDevice) intent .getParcelableExtra(BluetoothDevice.EXTRA_DEVICE); if (device == null) return; String btname = device.getName(); String address = device.getAddress(); Log.i(TAG, "bluetooth name:"+btname+",address:"+address); if((address != null&& address.equals(HID_ADDR))||(btname != null && btname.equals(HID_NAME))){
    mConnectDevice = device; mBluetoothAdapter.cancelDiscovery(); if(!mHidUtil.isBonded(device)){
    //先配对 mHidUtil.pair(device); }else {
    //已经配对则直接连接 mHidUtil.connect(device); } } }
HidUtil类中的配对方法:
 / * 配对 * @param BluetoothDevice */ public void pair(BluetoothDevice device) {
    Log.i(TAG, "pair device:"+device); Method createBondMethod; try {
    createBondMethod = BluetoothDevice.class.getMethod("createBond"); createBondMethod.invoke(device); } catch (Exception e) {
    e.printStackTrace(); } }
2.5 连接(配对成功后)
if(action.equals(BluetoothDevice.ACTION_BOND_STATE_CHANGED)){
    BluetoothDevice device = intent .getParcelableExtra(BluetoothDevice.EXTRA_DEVICE); String name = device.getName(); String address = device.getAddress(); Log.i(TAG,"name:"+name+",address:"+address+",bondstate:"+device.getBondState()); if((address != null&& address.equals(HID_ADDR))||(name != null && name.equals(HID_NAME))){
    if(device.getBondState() == BluetoothDevice.BOND_BONDED) mHidUtil.connect(device); } }
判断是否是要连接的输入设备,如果符合条件则进行连接。
HidUtil中connect 方法
/ * 连接设备 * @param bluetoothDevice */ public void connect(final BluetoothDevice device) {
    Log.i(TAG, "connect device:"+device); try {
    //得到BluetoothInputDevice然后反射connect连接设备 Method method = mBluetoothProfile.getClass().getMethod("connect", new Class[] {
    BluetoothDevice.class }); method.invoke(mBluetoothProfile, device); } catch (Exception e) {
    e.printStackTrace(); } }
BluetoothInputDevice中的connect方法是隐藏的,所以需要通过反射机制获取该方法进行调用。
2.6 监听连接状态
通过广播接收者监听连接状态。
if(action.equals("android.bluetooth.input.profile.action.CONNECTION_STATE_CHANGED")){
    int state = intent.getIntExtra(BluetoothProfile.EXTRA_STATE,0); BluetoothDevice device = intent.getParcelableExtra(BluetoothDevice.EXTRA_DEVICE); Log.i(TAG,"state="+state+",device="+device); if(state == BluetoothProfile.STATE_CONNECTED){
   //连接成功 Toast.makeText(MainActivity.this, R.string.connnect_success, Toast.LENGTH_SHORT).show(); } else if(state == BluetoothProfile.STATE_DISCONNECTED){
   //连接失败 Toast.makeText(MainActivity.this, R.string.disconnected, Toast.LENGTH_SHORT).show(); } }
2.7 断开连接
if(mConnectDevice != null) mHidUtil.disConnect(mConnectDevice); HidUtil中disconnect方法
/ * 断开连接 * @param BluetoothDevice */ public void disConnect(BluetoothDevice device) {
    Log.i(TAG, "disConnect device:"+device); try {
    if (device != null) {
    Method method = mBluetoothProfile.getClass().getMethod("disconnect", new Class[] {
    BluetoothDevice.class }); method.invoke(mBluetoothProfile, device); } } catch (Exception e) {
    e.printStackTrace(); } }
手机端断开连接后,重新连接会提示“只能有鼠标发起重新连接请求,请使用鼠标重新连接”。
3 接收数据
adb shell
getevent -l
当连接成功后,会看到如下内容:
这表示蓝牙鼠标成为一个输入设备。
左击鼠标:
我们应用中打印
表示在屏幕中某位置处点击了一下。
右击鼠标:
表示点击了一下返回键,程序退出。
移动鼠标会发现屏幕上小光标在移动,滑动鼠标也会触发相应事件。
4 其他
现在大部分手机是支持hid的,并且也将该功能打开状态。
如果是做系统开发,就需要注意将Bluetooth中的hid开关打开。
将源码中的packages/apps/Bluetooth/res/values/config.xml的profile_supported_hid 修改为true。
<bool name="profile_supported_hid">true</bool> demo下载地址:http://www.demodashi.com/demo/13891.html
5 Demo测试
发布者:全栈程序员-站长,转载请注明出处:https://javaforall.net/212175.html原文链接:https://javaforall.net


