
引言
最近看了一下 ET 框架,本来只是研究一下网络模块,后来抽时间看一下热更框架。ET 的热更使用的不是像 tolua 这样基于 Lua 的方案,而是基于 ILRuntime 的纯 C# 热更实现方案。
ILRuntime 的实现原理
对 Unity 引擎有一定了解的开发者都应该知道: Unity 支持使用 C# 做脚本语言,是依赖 Mono 引擎运行 C# 编译后的 IL 中间语言。ILRuntime 借助 Mono.Cecil 库来读取 DLL 的 PE 信息,以及当中类型的所有信息,最终得到方法的 IL 汇编码,然后通过内置的 IL 解译执行虚拟机来执行 DLL 中的代码。
Cecil 是一个用来生成(修改和创建)和检查 ECMA CIL 格式的程序和库的库,可以完成如下操作:
- 使用简单而强大的对象模型分析 .NET 二进制文件,无需通过加载程序集即可使用 Reflection(反射)
- 修改 .NET 二进制文件,添加新的元数据结构并更改 IL 代码
Cecil 官网: http://cecil.pe
相关资源
ILRuntime 是 2016 年发布的一个开源项目,2017 年发布了第一个正式版,地址 Ourpalm/ILRuntime
$ git clone https://github.com/Ourpalm/ILRuntime.git官方提供的 Unity Demo
官方中文文档 ILRuntime Doc 其中包含:
教程
- 从零开始
- ILRuntime中使用委托
- ILRuntime中跨域继承
- ILRuntime中的反射
- CLR重定向
- CLR绑定
- LitJson集成
其他
- IL2CPP打包注意事项
- ILRuntime的性能优化
- ILRuntime的实现原理
Unity 集成步骤
参考官方文档 从零开始,基本就一下几个步骤:
- 下载最新的 release 版本 ILRuntime-1.4.zip ,然后解压缩
- 将 ILRuntime 源码工程下的
Mono.Cecil.20、Mono.Cecil.Pdb和ILRuntime复制到 Unity 工程 Assets 目录下
需删除这些目录下的
bin、obj和Properties子目录,还有.csproj文件 - Unity 开启 unsafe 模式
在 Assets 目录下创建一个命名为
smcs.rsp文本文件,内容为-unsafeUnity5.4及以前的版本,且编译设置是.Net 2.0而不是.Net 2.0 Subset的话, 需要将smcs.rsp文件名改成gmcs.rspUnity5.5以上的版本,需要将smcs.rsp文件名改成mcs.rsp
- 创建热更工程(Hotfix)
热更工程是一个独立于 Unity 工程的一个独立的 C# 类库工程,这里需用借助 VS 2017 来完成创建操作,创建步骤如下:
- 使用 VS 2017 打开当前 Unity 工程的
.sln文件 文件–新建–项目,选择Visual C#栏 中的类库(.NET Framework),然后完成剩余的设置:命名为 Hotfix 位置是 Unity 工程根目录 解决方案为 添加到解决方案 (即添加到当前 Unity 的解决方案内) 框架设置为与 Unity 工程版本一样的 .NET Framwork 4.7.1(根据自己项目情况选择)

然后点击
确定创建出 Hotfix 工程。- 在
解决方案管理器中选择Hotfix工程的引用选项,右键–添加引用,通过浏览按钮依次添加如下四个库文件:Unity 引擎自带的工具库
Unity引擎安装目录\Editor\Data\Managed\UnityEngine\UnityEngine.dll Unity引擎安装目录\Editor\Data\Managed\UnityEngine\UnityEngine.CoreModule.dll Unity引擎安装目录\Editor\Data\UnityExtensions\Unity\GUISystem\UnityEngine.UI.dllUnityEngine.CoreModule.dll 是在 Unity2017.2 之后的版本才有,低版本的 Unity 无需添加此文件
Unity 工程的业务代码库
Unity工程目录\Library\ScriptAssemblies\Assembly-CSharp.dll
到这里 Hotfix 工程就创建成功了,下面便是具体的测试代码。
- 使用 VS 2017 打开当前 Unity 工程的
测试代码
这个要测试两个方面,一是在 Hotfix 工程中调用 Unity 的接口,二是在 Unity 工程中调用 Hotfix 提供的接口。这里参考 ILRuntime中的反射 文档即可实现,具体如下:
- 创建场景
在 Unity 工程中创建一个空场景,添加一个 UI 相机、Canvas 和 一个测试按钮,结构如下:

- 从 Unity 中调用 Hotfix 提供的静态方法和非静态方法:
using System; using System.Collections.Generic; using System.Linq; using System.Text; using System.Threading.Tasks; using UnityEngine; namespace Hotfix { public class Test { // 不带参 public static String GetMsg() { Debug.Log("call static GetMsg"); return "Test Hotfix, static"; } // 带参 public static String GetMsg1(int num) { Debug.Log("call static GetMsg1, num = " + num); return "Test Hotfix, static, num = " + num; } // 非静态 public String GetMsg2(){ Debug.Log("call GetMsg2"); return "Test Hotfix, no static"; } } }Unity 工程中调用的逻辑如下:
void ILRuntimeTest(){ Debug.Log(appdomain.Invoke("Hotfix.Test", "GetMsg", null, null)); object[] param = new object[1]; param[0] = 666; Debug.Log(appdomain.Invoke("Hotfix.Test", "GetMsg1", null, param)); // 创建一个 Test 对象 var testInst = appdomain.Instantiate("Hotfix.Test"); Debug.Log(appdomain.Invoke("Hotfix.Test", "GetMsg2", testInst, null)); }这里 appdomain 是一个
ILRuntime.Runtime.Enviorment.AppDomain实例对象,需要加载 Hotfix.dll 后才能开始执行上述的测试方法。 - 从 Unity 提供给 Hotfix 调用的静态和非静态方法:
- 调用 Unity 工程中的类方法
上面的测试代码其实用到了 Unity 的
Engine.Debug.Log接口,基本是直接调用 Unity 工程中的类方法,但这样存在性能问题,后面通过 CLR 绑定来优化性能。 - 继承 Unity 工程中的类或实现接口
假如需要在 Hotfix 工程中继承 Unity 工程中的类或实现接口,则需要在 Unity 工程中增加对应类或接口的适配器。
- 使用 Unity 中的值类型,如:Vector3、Vector2 等
也是可以直接调用,但也需要使用 CLR 绑定来做性能优化。
- Hotfix 工程中使用委托
假如只是 Hotfix 工程内部使用的委托,无需做任何额外操作(因为委托是 C# 的特性,而非 Unity 的)。但假如需要将 Hotfix 工程中的委托实例传给 Unity 工程,也需要根据情况添加额外的适配器和转化器。
这里在 Unity 工程中定义一个 IUIBase 的接口:
public interface IUIBase{ void Show(); void Hide(); string GetStr(); }对应的 Unity 工程中得定义一个 IUIBaseAdapter 适配器:
using System; using ILRuntime.CLR.Method; using ILRuntime.Runtime.Enviorment; using ILRuntime.Runtime.Intepreter; public class IUIBaseAdapter : CrossBindingAdaptor { public override Type BaseCLRType{ get { return typeof (IUIBase); } } public override Type AdaptorType{ get { return typeof (Adaptor); } } public override object CreateCLRInstance(ILRuntime.Runtime.Enviorment.AppDomain appdomain, ILTypeInstance instance){ return new Adaptor(appdomain, instance); } public class Adaptor : IUIBase, CrossBindingAdaptorType { ILTypeInstance instance; ILRuntime.Runtime.Enviorment.AppDomain appdomain; IMethod mHide; IMethod mGetStr; IMethod mShow; public Adaptor(){} public Adaptor(ILRuntime.Runtime.Enviorment.AppDomain appdomain, ILTypeInstance instance) { this.appdomain = appdomain; this.instance = instance; } public ILTypeInstance ILInstance {get { return instance; } } public void Hide() { if(mHide == null){ mHide = instance.Type.GetMethod("Hide", 0); } if(mHide != null){ this.appdomain.Invoke(this.mHide, instance, null); } } public void Show() { if(mShow == null){ mShow = instance.Type.GetMethod("Show", 0); } if(mShow != null){ this.appdomain.Invoke(this.mShow, instance, null); } } public string GetStr(){ if(mGetStr == null){ mGetStr = instance.Type.GetMethod("GetStr", 0); } if(mGetStr != null){ return this.appdomain.Invoke(this.mGetStr, instance, null).ToString(); } return ""; } } }在 Hotfix 工程中让 Test 类实现此接口:
using System; using System.Collections.Generic; using System.Linq; using System.Text; using System.Threading.Tasks; using UnityEngine; namespace Hotfix { public class Test : IUIInterface { ... public void Hide() { Debug.Log("TestUI Hide"); } public void Show() { Debug.Log("TestUI Show"); Button btn = GameObject.Find("Canvas/Button").GetComponent在 Unity 工程中初始化 ILRuntime 时绑定适配器:
appdomain.RegisterCrossBindingAdaptor(new IUIInterfaceAdapter());创建 Test 对象并调用接口方法:
var testInst = appdomain.Instantiate("Hotfix.Test"); testInst.Hide(); Debug.Log(testInst.GetStr()); - 调用 Unity 工程中的类方法
委托
这里主要分析将 Hotfix 工程内的委托实例传给外部使用的情况,此时需要将委托实例转换成真正的 CLR(C#运行时)委托实例,即通过动态创建 CLR 的委托实例。由于 IL2CPP 之类的 AOT 编译技术无法在运行时生成新的类型,所以在创建委托实例的时候 ILRuntime 选择了显示注册的方式,以保证问题不被隐藏到线上才发现。
- 委托适配器:
参数组合一致的各种 delegate 与 Action/Func 可以共用同一个委托适配器:(Func 是有返回值的泛型委托)
delegate void SomeDelegate(int a, float b); Action适配器无需单独定义脚本,只需在 Unity 工程初始化 ILRuntime 的 AppDomain 时注册即可,如:
appDomain.DelegateManager.RegisterMethodDelegate带返回值类型的委托:(Action 是无返回值的泛型委托)
delegate bool SomeFunction(int a, float b); Func注册如下:
appDomain.DelegateManager.RegisterFunctionDelegate - 委托转换器:
ILRuntime 内是使用 Action 和 Func 两个系统自带的委托类型来生成委托实例的,因此如果在 Hotfix 工程中用到的非 Action 和 Func 格式定义的委托实例要传给 Unity 工程中使用,需要在注册委托的地方通过转换器转成真正需要的委托类型:
app.DelegateManager.RegisterDelegateConvertor((action) => { return new SomeFunction((a, b) => { return ((Func
以上面 Hotfix 工程中监听安装为例,onClick 监听其实是基于 UnityAction 来实现的,这就是一个委托,其定义如下:
namespace UnityEngine.Events { // // 摘要: // Zero argument delegate used by UnityEvents. public delegate void UnityAction(); }那么在 Unity 工程就需要注册此委托的转化器:
appdomain.DelegateManager.RegisterDelegateConvertor

    ((act) => { return new UnityEngine.Events.UnityAction(() => { ((Action)act)(); }); });
当然,假如忘记注册委托的转化器,运行 Unity 工程便会报错如下,根据报错来补全代码也可以:
KeyNotFoundException: Cannot find convertor for UnityEngine.Events.UnityAction Please add following code: appdomain.DelegateManager.RegisterDelegateConvertor

    ((act) => {   return new UnityEngine.Events.UnityAction(() =>   {       ((Action<>)act)();   }); });
官方的建议:
- 尽量
避免不必要的跨域委托调用- 尽量使用
Action以及Func这两个系统内置万用委托类型
跨域继承
假如想在 Hotfix 工程中继承 Unity 工程中的一个类,或者实现 Unity 工程中的一个接口,需要在 Unity 工程中实现一个 继承适配器 。官方 Demo 工程提供了三个适配器例子:InheritanceAdapter、CoroutineAdapter 和 MonoBehaviourAdapter,适配器都是继承自 CrossBindingAdaptor 的类,其中有内部类、继承和实现接口的方法。适配器类以下有几点要求:
- 适配器必须实现抽象类 CrossBindingAdaptor 中的三个接口:
BaseCLRType 、AdaptorType 和 CreateCLRInstance
public override Type BaseCLRType{ get { return typeof (继承类); } } public override Type AdaptorType{ get { return typeof (Adaptor); } } public override object CreateCLRInstance(ILRuntime.Runtime.Enviorment.AppDomain appdomain, ILTypeInstance instance){ return new Adaptor(appdomain, instance); }
- 内部类继承自你想要提供给 Hotfix 中继承的类,且需要实现
CrossBindingAdaptorType接口:提供与上面 CreateCLRInstance 实例化对象对应的构造方法和 ILInstance 接口
public class Adaptor : 继承类, CrossBindingAdaptorType { ILTypeInstance instance; ILRuntime.Runtime.Enviorment.AppDomain appdomain; public Adaptor() { } public Adaptor(ILRuntime.Runtime.Enviorment.AppDomain appdomain, ILTypeInstance instance) { this.appdomain = appdomain; this.instance = instance; } public ILTypeInstance ILInstance {get { return instance; } } }
- 剩下的就是在内部类中重写所有需要暴露给 Hotfix 工程使用的接口:
下面是实现接口方法和重写虚函数和抽象函数的大致逻辑
IMethod m继承类的虚函数名; // 虚函数是否在调用中标识 bool is继承类的虚函数名Invoking = false; IMethod m实现接口的方法名; object[] param1 = new object[继承类的虚函数名参数数量]; object[] param2 = new object[实现接口方法的参数数量]; // 重写虚函数 public override void 继承类的虚函数名(参数表){ if(m继承类的虚函数名 == null){ m继承类的虚函数名 = instance.Type.GetMethod("继承类的虚函数名", 继承类的虚函数名参数数量); } if(m继承类的虚函数名 != null&& !is继承类的虚函数名Invoking){ is继承类的虚函数名Invoking = true; // param1 传入参数表内容 param1[0] = 参数表[0]; ... this.appdomain.Invoke(m继承类的虚函数名, instance, this.param1); is继承类的虚函数名Invoking = false; }else{ base.继承类的虚函数名(参数表); } } // 实现接口 public void 实现接口的方法名(参数表){ if(m实现接口的方法名 == null){ m实现接口的方法名 = instance.Type.GetMethod("实现接口的方法名", 实现接口方法的参数数量); } if(m实现接口的方法名 != null){ // param1 传入参数表内容 param2[0] = 参数表[0]; ... this.appdomain.Invoke(m实现接口的方法名, instance, this.param2); } } // 重写抽象函数 public override void 继承类的抽象方法名(参数表){ // 基本与实现接口一样,多个 override 关键字而已 ... }需要特别注意的细节点 :
- 没有参数建议显式传递 null 为参数列表,否则会自动 new object[0] 导致 GC Alloc
- 对于虚函数而言,必须设定一个标识位来确定是否当前已经在调用中,否则如果脚本类中调用
base.继承类的方法名()就会造成无限循环,最终导致爆栈
更多细节查看官网文档 ILRuntime中跨域继承
为什么要写适配器?
ILRuntime 其实是一个独立的 C# 虚拟机,而这个虚拟机要在运行时与 Unity 的脚本进行交互,但由于 iOS 的 AOT 限制,在运行时 ILRuntime 中不知道 Unity 中的类型,所以需要在 Unity 工程中写适配器来让 ILRuntime 知道如何调用 Unity 代码,或当 Unity 的事件触发时让 ILRuntime 能够监听到。
CLR 绑定
在 Hotfix 工程中,假如需要调用 Unity 工程的方法,ILRuntime 会通过反射对目标方法进行调用,这个过程会有因为装箱和拆箱等操作产生的大量 GC Alloc 和额外开销。因此需要借助 CLR 绑定 功能,通过将需要的函数调用进行静态绑定,如此调用时就不会出现 GC Alloc 和额外开销。
绑定代码可以通过 ILRuntime.Runtime.CLRBinding.BindingCodeGenerator.GenerateBindingCode 工具来自动生成。根据官网 Unity Demo 中的 ILRuntimeDemo/ILRuntimeCLRBinding.cs 脚本,通过两种方式来生成:
- 自定义需要生成绑定代码的类型列表(即热更工程可能需要用到的类),传入 GenerateBindingCode
- 分析 Hotfix 工程生成的 dll ,自动分析其中引用到的类型(只会得到已使用的类)
在 Unity 工程中初始化 ILRuntime 的 AppDomain 对象时,调用 CLRBindings.Initialize(appdomain) 完成各个类的 CLR 绑定。假如是值类型,则需要使用 RegisterValueTypeBinder 来绑定:
appdomain.RegisterValueTypeBinder(typeof(Vector3), new Vector3Binder());CLR 绑定本质上是基于 CLR 重定向实现的
.dll 和 .pdb
.dll 文件,即 Dynamic Link Library 是动态链接库,.pdb 文件是调试符号(符文表)文件,pdb 保存了 dll 的符号表,文件比较大,程序运行时也会因为要完成映射而比较慢,最后发布 Release 版本或者不需要使用 IDE 进行调试源码的话,没必要引入 .pdb 文件
符号表:是机器码中插入的 key 与源代码文件的映射,这样只要指定源码存放的路径,IDE 就会自动找到源码。
dll 和 pdb 是配套的,一旦 dll 文件有变动,pdb 也必须做相应变化。
Unity 工程热更步骤
- 先从 Hotfix 工程中生成
Hotfix.dll和Hotfix.pdb两个文件在 VS 2017 中选择 Hotfix 工程,
右键–生成,输出如下:1>------ 已启动全部重新生成: 项目: Hotfix, 配置: Debug Any CPU ------ 1> Hotfix -> E:\U3DProjects\U3D_TestILRuntime\Hotfix\bin\Debug\Hotfix.dll ========== 全部重新生成: 成功 1 个,失败 0 个,跳过 0 个 ==========此时,在 Hotfix 工程目录中的
bin/Debug目录下生成一堆文件,其中就包含Hotfix.dll和Hotfix.pdb - 将
Hotfix.dll和Hotfix.pdb两个文件复制到 Unity 工程中的Assets/StreamingAssets目录下 - 在 Unity 工程启动时,通过代码获取热更工程的
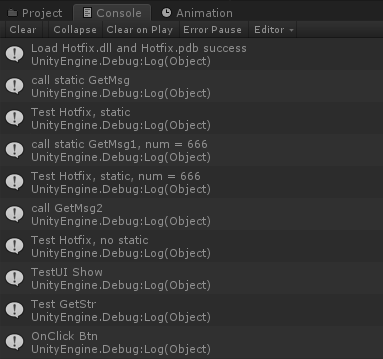
.dll和.pdb文件,传给AppDomain对象的LoadAssembly接口:using System; using System.Collections; using System.Collections.Generic; using System.IO; using System.Linq; using System.Threading.Tasks; using UnityEngine; public class GameMgr : MonoBehaviour { ILRuntime.Runtime.Enviorment.AppDomain appdomain; // Start is called before the first frame update void Start() { LoadHotfix(); } async void LoadHotfix(){ string root = Utils.GetStreamAssetsPath(); byte [] dllBytes = await Utils.LoadFileBytesAsync(root + "/Hotfix.dll"); byte [] pdbBytes = await Utils.LoadFileBytesAsync(root + "/Hotfix.pdb"); if(dllBytes != null && pdbBytes != null){ Debug.Log("Load Hotfix.dll and Hotfix.pdb success"); appdomain = new ILRuntime.Runtime.Enviorment.AppDomain(); using (System.IO.MemoryStream fs = new MemoryStream(dllBytes)) { using (System.IO.MemoryStream p = new MemoryStream(pdbBytes)) { appdomain.LoadAssembly(fs, p, new Mono.Cecil.Pdb.PdbReaderProvider()); } } ILRuntimeTest(); }else{ if(dllBytes == null){ Debug.Log("Load Hotfix.dll fail"); } if(pdbBytes == null){ Debug.Log("Load Hotfix.pdb fail"); } } } // ILRuntime 初始化,主要用于:绑定委托、CLR 绑定和绑定Adapter适配器 void ILRuntimeInitalize(){ appdomain.DelegateManager.RegisterDelegateConvertor((act) => { return new UnityEngine.Events.UnityAction(() => { ((Action)act)(); }); }); CLRBindings.Initialize(appdomain); appdomain.RegisterCrossBindingAdaptor(new IUIInterfaceAdapter()); } void ILRuntimeTest(){ Debug.Log(appdomain.Invoke("Hotfix.Test", "GetMsg", null, null)); object[] param = new object[1]; param[0] = 666; Debug.Log(appdomain.Invoke("Hotfix.Test", "GetMsg1", null, param)); // 创建一个 Test 对象 var testInst = appdomain.Instantiate ("Hotfix.Test"); Debug.Log(appdomain.Invoke("Hotfix.Test", "GetMsg2", testInst, null)); testInst.Show(); Debug.Log(testInst.GetStr()); } // Update is called once per frame void Update() { } } - 运行 Unity ,点击屏幕中的按钮,可以看到如下输出:
iOS IL2CPP 打包
IL2CPP和mono的最大区别就是不能在运行时动态生成代码和类型,所以这就要求必须在编译时就完全确定需要用到的类型。
- 类型裁剪
这里主要是 IL2CPP 打包时会对 Unity 工程进行裁剪,裁剪掉其中没有引用到的类型,已达到减小发布后 ipad 包的尺寸。Unity 支持通过在 Assets 目录中创建一个
link.xml配置文件,来告诉 Unity 那些类型不能被裁剪掉。(工程包体本身较小的可以在 PlayerSettings 中把裁剪直接关掉)例如: - 泛型实例和泛型方法
参考 iOS IL2CPP打包注意事项
命令行编译 Hotfix.csproj
每次修改 Hotfix 内容后都要在 VS 2017 中重新生成 Hotfix ,但我习惯使用 VS Code 作为编辑器,想着能不能通过命令行的方式完成 Hotfix 工程的编译工程。大致有两种做法:
devenv是 VS 的可执行程序,一般在"C:\Program Files (x86)\Microsoft Visual Studio 10.0\Common7\IDE"目录下,其中 devenv.com 是命令行程序,devenv.exe 是 GUI 的程序$ devenv Hotfix/Hotfix.vcxproj /Build "Release|Win32"MSBuild不依赖 VS,是 .NET Framework 安装时自带的工具,可以在路径"C:\Windows\Microsoft.NET\Framework"获得,VS 的 devenv 工具做种实现也是调用 MSBuild 来完成的。直接从v4.0.30319目录下即可获得 4.5、4.6、4.7 可用的 MSBuild 工具(因为 4.x 其实都是 4.0 的 in place 升级)完整路径为“C:/Windows/Microsoft.NET/Framework/v4.0.30319/MSBuild.exe”,将其配置到系统 Path 中,编译命令如下:$ MSBuild Hotfix/Hotfix.csproj /t:Rebuild /p:Configuration=Release
可以直接配置成 VS Code 中的任务:
{ "version": "2.0.0", "inputs": [ { "id": "build", "type": "pickString", "description": "选择构建类型", "options": [ "Debug", "Release" ] } ], "tasks": [ { "label": "build hotfix", "type": "shell", "command": "C:/Windows/Microsoft.NET/Framework/v4.0.30319/MSBuild.exe", "args": [ "${workspaceFolder}/Hotfix/Hotfix.csproj", "/t:Rebuild", "/p:Configuration=${input:build}" ], "group": "build", "presentation": { "reveal": "silent" }, "problemMatcher": "$msCompile" } ] }然后通过 Ctlr + Shift + B 执行任务,可以选择构建 Debug 或 Release。
在 Unity 通过 Editor 工具来执行命令行:
private const string msbuildExe = "C:/Windows/Microsoft.NET/Framework/v4.0.30319/MSBuild.exe"; [MenuItem("Tools/ILRuntime/Build Hotfix(Debug)")] static void BuildHotfixDebug(){ BuildHotfix("Debug"); } [MenuItem("Tools/ILRuntime/Build Hotfix(Release)")] static void BuildHotfixRelease(){ BuildHotfix("Release"); } static void BuildHotfix(string _c){ if(!File.Exists(msbuildExe)){ UnityEngine.Debug.LogError("找不到 MSBuild 工具"); return; } System.IO.DirectoryInfo parent = System.IO.Directory.GetParent(Application.dataPath); string projectPath = parent.ToString(); ProcessCommand(msbuildExe, projectPath + "/Hotfix/Hotfix.csproj /t:Rebuild /p:Configuration=" + _c); UnityEngine.Debug.LogFormat("Hotfix {0} 编译完成", _c); } public static void ProcessCommand(string command, string argument) { ProcessStartInfo start = new ProcessStartInfo(command); start.Arguments = argument; start.CreateNoWindow = true; start.ErrorDialog = true; start.UseShellExecute = true; if (start.UseShellExecute) { start.RedirectStandardOutput = false; start.RedirectStandardError = false; start.RedirectStandardInput = false; } else { start.RedirectStandardOutput = true; start.RedirectStandardError = true; start.RedirectStandardInput = true; start.StandardOutputEncoding = System.Text.UTF8Encoding.UTF8; start.StandardErrorEncoding = System.Text.UTF8Encoding.UTF8; } Process p = Process.Start(start); if (!start.UseShellExecute) { UnityEngine.Debug.LogFormat("--- output:{0}", p.StandardOutput.ToString()); printOutPut(p.StandardOutput); printOutPut(p.StandardError); } p.WaitForExit(); p.Close(); }
ILRuntime 和 Lua 热更方案的优劣
市场上主流的还是 Lua 系,先 tolua 和 xlua 框架在游戏行业基本是了大部分游戏项目的热更选择;C# 系 的成熟方案还是较少。关于两种热更方案的优劣,参考 《必读!ILRuntime来实现热更新的优与劣!》和 《XLua 与 ILRuntime 性能测试》,主要提到了几点:
- 不管是 Lua 实现还是 ILRuntime 实现,热更部分的代码都不继承 MonoBehaviour
- .net4.6 的 async\wait 所支持的现在版本应该也还不够稳定,纯计算的性能弱于 Lua
- ILRuntime 性能较差,ILRuntime 是自己实现一套解释器,且是用 C# 编写的,原生性能较差。而 Lua 有 Jit ,在支持 Jit 的设备上有接近 c 的性能。
- ILRuntime 在系统值计算上,由于需要通过 CLR 绑定来在 C# 层面计算,因此性能较差。
其他
测试工程:linshuhe/U3D_TestILRuntime
参考
- ILRuntime官方Demo笔记
- 从零开始
- ILRuntime Unity热更新
- 如何通过命令行 msbuild 编译项目
- 使用devenv/MSBuild在命令行编译单个project
- 【unity小技巧之二】使用unity3d调用命令行工具
- .lib .dll .pdb 的简单介绍,以及调试dll源码
发布者:全栈程序员-站长,转载请注明出处:https://javaforall.net/214169.html原文链接:https://javaforall.net


