
个人博客纯净版:https://www.fangzhipeng.com/springcloud/2017/08/12/springcloud-sleuth.html
为什么需要Spring Cloud Sleuth
微服务架构是一个分布式架构,它按业务划分服务单元,一个分布式系统往往有很多个服务单元。由于服务单元数量众多,业务的复杂性,如果出现了错误和异常,很难去定位。主要体现在,一个请求可能需要调用很多个服务,而内部服务的调用复杂性,决定了问题难以定位。所以微服务架构中,必须实现分布式链路追踪,去跟进一个请求到底有哪些服务参与,参与的顺序又是怎样的,从而达到每个请求的步骤清晰可见,出了问题,很快定位。
举个例子,在微服务系统中,一个来自用户的请求,请求先达到前端A(如前端界面),然后通过远程调用,达到系统的中间件B、C(如负载均衡、网关等),最后达到后端服务D、E,后端经过一系列的业务逻辑计算最后将数据返回给用户。对于这样一个请求,经历了这么多个服务,怎么样将它的请求过程的数据记录下来呢?这就需要用到服务链路追踪。
本文主要讲述如何在Spring Cloud Sleuth中集成Zipkin。在Spring Cloud Sleuth中集成Zipkin非常的简单,只需要引入相应的依赖和做相关的配置即可。
基本术语
Spring Cloud Sleuth采用的是Google的开源项目Dapper的专业术语。
- Span:基本工作单元,发送一个远程调度任务 就会产生一个Span,Span是一个64位ID唯一标识的,Trace是用另一个64位ID唯一标识的,Span还有其他数据信息,比如摘要、时间戳事件、Span的ID、以及进度ID。
- Trace:一系列Span组成的一个树状结构。请求一个微服务系统的API接口,这个API接口,需要调用多个微服务,调用每个微服务都会产生一个新的Span,所有由这个请求产生的Span组成了这个Trace。
- Annotation:用来及时记录一个事件的,一些核心注解用来定义一个请求的开始和结束 。这些注解包括以下:
- cs – Client Sent -客户端发送一个请求,这个注解描述了这个Span的开始
-
sr - Server Received -服务端获得请求并准备开始处理它,如果将其sr减去cs时间戳便可得到网络传输的时间。
- ss – Server Sent (服务端发送响应)–该注解表明请求处理的完成(当请求返回客户端),如果ss的时间戳减去sr时间戳,就可以得到服务器请求的时间。
- cr – Client Received (客户端接收响应)-此时Span的结束,如果cr的时间戳减去cs时间戳便可以得到整个请求所消耗的时间。
案例实战
本文案例一共四个工程采用多Module形式。需要新建一个主Maven工程,主要指定了Spring Boot的版本为1.5.3,Spring Cloud版本为Dalston.RELEASE。包含了eureka-server工程,作为服务注册中心,eureka-server的创建过程这里不重复;zipkin-server作为链路追踪服务中心,负责存储链路数据;gateway-service作为服务网关工程,负责请求的转发,同时它也作为链路追踪客户端,负责产生数据,并上传给zipkin-service;user-service为一个应用服务,对外暴露API接口,同时它也作为链路追踪客户端,负责产生数据。
构建zipkin-server工程
新建一个Module工程,取名为zipkin-server,其pom文件继承了主Maven工程的pom文件;作为Eureka Client,引入Eureka的起步依赖spring-cloud-starter-eureka,引入zipkin-server依赖,以及zipkin-autoconfigure-ui依赖,后两个依赖提供了Zipkin的功能和Zipkin界面展示的功能。代码如下:
     com.forezp


     sleuth


     0.0.1-SNAPSHOT


      org.springframework.cloud


      spring-cloud-starter-eureka


      io.zipkin.java


      zipkin-server


      io.zipkin.java


      zipkin-autoconfigure-ui
在程序的启动类ZipkinServiceApplication加上@EnableZipkinServer开启ZipkinServer的功能,加上@EnableEurekaClient注解,启动Eureka Client。代码如下:
@SpringBootApplication @EnableEurekaClient @EnableZipkinServer public class ZipkinServerApplication { public static void main(String[] args) { SpringApplication.run(ZipkinServerApplication.class, args); } } 在配置文件application.yml文件,指定程序名为zipkin-server,端口为9411,服务注册地址为http://localhost:8761/eureka/。
eureka: client: serviceUrl: defaultZone: http://localhost:8761/eureka/ server: port: 9411 spring: application: name: zipkin-server 构建user-service
在主Maven工程下建一个Module工程,取名为user-service,作为应用服务,对外暴露API接口。pom文件继承了主Maven工程的pom文件,并引入了Eureka的起步依赖spring-cloud-starter-eureka,Web起步依赖spring-boot-starter-web,Zipkin的起步依赖spring-cloud-starter-zipkin,代码如下:
      org.springframework.cloud


      spring-cloud-starter-eureka


      org.springframework.boot


      spring-boot-starter-web


      org.springframework.cloud


      spring-cloud-starter-zipkin


      RELEASE
在配置文件applicatiom.yml,指定了程序名为user-service,端口为8762,服务注册地址为http://localhost:8761/eureka/,Zipkin Server地址为http://localhost:9411。spring.sleuth.sampler.percentage为1.0,即100%的概率将链路的数据上传给Zipkin Server,在默认的情况下,该值为0.1,代码如下:
eureka: client: serviceUrl: defaultZone: http://localhost:8761/eureka/ server: port: 8762 spring: application: name: user-service zipkin: base-url: http://localhost:9411 sleuth: sampler: percentage: 1.0 在UserController类建一个“/user/hi”的API接口,对外提供服务,代码如下:
@RestController @RequestMapping("/user") public class UserController { @GetMapping("/hi") public String hi(){ return "I'm forezp"; } } 最后作为Eureka Client,需要在程序的启动类UserServiceApplication加上@EnableEurekaClient注解。
构建gateway-service
新建一个名为gateway-service工程,这个工程作为服务网关,将请求转发到user-service,作为Zipkin客户端,需要将链路数据上传给Zipkin Server,同时它也作为Eureka Client。它在pom文件除了需要继承主Maven工程的 pom,还需引入的依赖如下:
      org.springframework.cloud


      spring-cloud-starter-eureka


      org.springframework.cloud


      spring-cloud-starter-zuul


      org.springframework.boot


      spring-boot-starter-web


      org.springframework.cloud


      spring-cloud-starter-zipkin


      RELEASE
在application.yml文件,配置程序名为gateway-service,端口为5000,服务注册地址为http://localhost:8761/eureka/,Zipkin Server地址为http://localhost:9411,以“/user-api/”开头的Uri请求,转发到服务名为 user-service的服务。配置代码如下:
eureka: client: serviceUrl: defaultZone: http://localhost:8761/eureka/ server: port: 5000 spring: application: name: gateway-service sleuth: sampler: percentage: 1.0 zipkin: base-url: http://localhost:9411 zuul: routes: api-a: path: /user-api/ serviceId: user-service 在程序的启动类GatewayServiceApplication,加上@EnableEurekaClient注解开启Eureka Client,加上@EnableZuulProxy注解,开启Zuul代理功能。代码如下:
@SpringBootApplication @EnableZuulProxy @EnableEurekaClient public class GatewayServiceApplication { public static void main(String[] args) { SpringApplication.run(GatewayServiceApplication.class, args); } } 项目演示
完整的项目搭建完毕,依次启动eureka-server、zipkin-server、user-service、gateway-service。在浏览器上访问http://localhost:5000/user-api/user/hi,浏览器显示:
I’m forezp
访问http://localhost:9411,即访问Zipkin的展示界面,界面显示如图1所示:
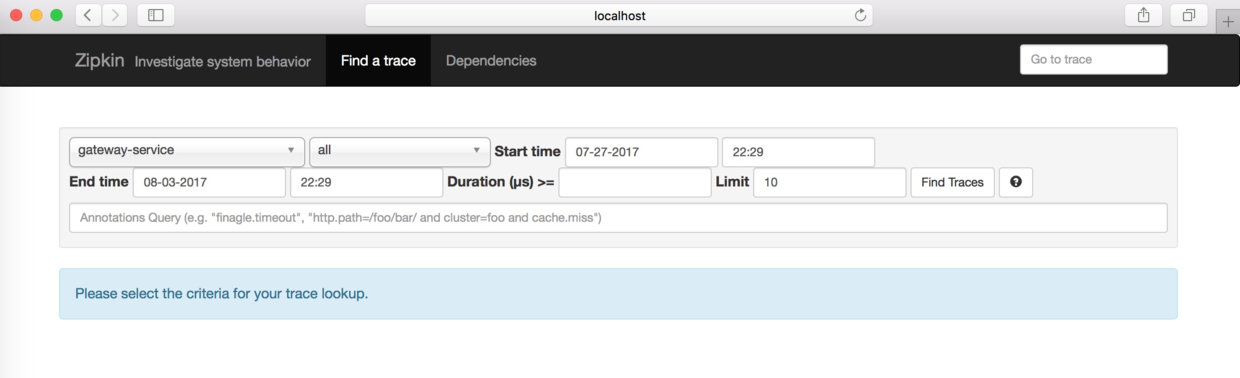

这个界面主要用来查找服务的调用情况,可以根据服务名、开始时间、结束时间、请求消耗的时间等条件来查找。点击“Find Trackes”按钮,界面如图所示。从图可知服务的调用情况,比如服务调用时间、服务的消耗时间,服务调用的链路情况。

点击Dependences按钮,可以查看服务的依赖关系,在本案例中,gateway-service将请求转发到了user-service,它们的依赖关系如图:

怎么在链路数据中添加自定义数据
现在需要实现这样一个功能,需要在链路数据中加上操作人。这需要在gateway-service上实现。建一个ZuulFilter过滤器,它的类型为“post”,order为900,开启拦截。在拦截逻辑方法里,通过Tracer的addTag方法加上自定义的数据,比如本案例中加入了链路的操作人。另外也可以在这个过滤器中获取当前链路的traceId信息,traceId作为链路数据的唯一标识,可以存储在log日志中,方便后续查找。
@Component public class LoggerFilter extends ZuulFilter { @Autowired Tracer tracer; @Override public String filterType() { return FilterConstants.POST_TYPE; } @Override public int filterOrder() { return 900; } @Override public boolean shouldFilter() { return true; } @Override public Object run() { tracer.addTag("operator","forezp"); System.out.print(tracer.getCurrentSpan().traceIdString()); return null; } } 使用spring-cloud-starter-stream-rabbit进行链路通讯
在上述的案例中,最终gateway-service收集的数据,是通过Http上传给zip-server的,在Spring Cloud Sleuth中支持消息组件来通讯的,在这一小节使用RabbitMQ来通讯。首先来改造zipkin-server,在pom文件将zipkin-server的依赖去掉,加上spring-cloud-sleuth-zipkin-stream和spring-cloud-starter-stream-rabbit,代码如下:
     org.springframework.cloud


     spring-cloud-sleuth-zipkin-stream


     org.springframework.cloud


     spring-cloud-starter-stream-rabbit
在application.yml配置上RabbitMQ的配置,包括host、端口、用户名、密码,如下:
spring: rabbitmq: host: localhost port: 5672 username: guest password: guest 在程序的启动类ZipkinServerApplication上@EnableZipkinStreamServer注解,开启ZipkinStreamServer。代码如下:
@SpringBootApplication @EnableEurekaClient @EnableZipkinStreamServer public class ZipkinServerApplication { public static void main(String[] args) { SpringApplication.run(ZipkinServerApplication.class, args); } } 现在来改造下Zipkin Client(包括gateway-service、user-service),在pom文件中将spring-cloud-starter-zipkin以来改为spring-cloud-sleuth-zipkin-stream和spring-cloud-starter-stream-rabbit,代码如下:
     org.springframework.cloud


     spring-cloud-sleuth-zipkin-stream


     org.springframework.cloud


     spring-cloud-starter-stream-rabbit
同时在applicayion.yml文件加上RabbitMQ的配置,同zipkin-server工程。
这样,就将链路的上传数据从Http改了为用消息代组件RabbitMQ。
将链路数据存储在Mysql数据库
在上述的例子中,Zipkin Server是将数据存储在内存中,一旦程序重启,之前的链路数据全部丢失,那么怎么将链路数据存储起来呢?Zipkin支持Mysql、Elasticsearch、Cassandra存储。这一小节讲述用Mysql存储,下一节讲述用Elasticsearch存储。
首先,在zipkin-server工程加上Mysql的连接依赖mysql-connector-java,JDBC的起步依赖spring-boot-starter-jdbc,代码如下:
     mysql


     mysql-connector-java


     org.springframework.boot


     spring-boot-starter-jdbc
在配置文件application.yml加上数据源的配置,包括数据库的Url、用户名、密码、连接驱动,另外需要配置zipkin.storage.type为mysql,代码如下:
spring: datasource: url: jdbc:mysql://localhost:3306/spring-cloud-zipkin?useUnicode=true&characterEncoding=utf8&useSSL=false username: root password: driver-class-name: com.mysql.jdbc.Driver zipkin: storage: type: mysql 另外需要在Mysql数据库中初始化数据库脚本,数据库脚本地址:https://github.com/openzipkin/zipkin/blob/master/zipkin-storage/mysql/src/main/resources/mysql.sql
CREATE TABLE IF NOT EXISTS zipkin_spans ( `trace_id_high` BIGINT NOT NULL DEFAULT 0 COMMENT 'If non zero, this means the trace uses 128 bit traceIds instead of 64 bit', `trace_id` BIGINT NOT NULL, `id` BIGINT NOT NULL, `name` VARCHAR(255) NOT NULL, `parent_id` BIGINT, `debug` BIT(1), `start_ts` BIGINT COMMENT 'Span.timestamp(): epoch micros used for endTs query and to implement TTL', `duration` BIGINT COMMENT 'Span.duration(): micros used for minDuration and maxDuration query' ) ENGINE=InnoDB ROW_FORMAT=COMPRESSED CHARACTER SET=utf8 COLLATE utf8_general_ci; ALTER TABLE zipkin_spans ADD UNIQUE KEY(`trace_id_high`, `trace_id`, `id`) COMMENT 'ignore insert on duplicate'; ALTER TABLE zipkin_spans ADD INDEX(`trace_id_high`, `trace_id`, `id`) COMMENT 'for joining with zipkin_annotations'; ALTER TABLE zipkin_spans ADD INDEX(`trace_id_high`, `trace_id`) COMMENT 'for getTracesByIds'; ALTER TABLE zipkin_spans ADD INDEX(`name`) COMMENT 'for getTraces and getSpanNames'; ALTER TABLE zipkin_spans ADD INDEX(`start_ts`) COMMENT 'for getTraces ordering and range'; CREATE TABLE IF NOT EXISTS zipkin_annotations ( `trace_id_high` BIGINT NOT NULL DEFAULT 0 COMMENT 'If non zero, this means the trace uses 128 bit traceIds instead of 64 bit', `trace_id` BIGINT NOT NULL COMMENT 'coincides with zipkin_spans.trace_id', `span_id` BIGINT NOT NULL COMMENT 'coincides with zipkin_spans.id', `a_key` VARCHAR(255) NOT NULL COMMENT 'BinaryAnnotation.key or Annotation.value if type == -1', `a_value` BLOB COMMENT 'BinaryAnnotation.value(), which must be smaller than 64KB', `a_type` INT NOT NULL COMMENT 'BinaryAnnotation.type() or -1 if Annotation', `a_timestamp` BIGINT COMMENT 'Used to implement TTL; Annotation.timestamp or zipkin_spans.timestamp', `endpoint_ipv4` INT COMMENT 'Null when Binary/Annotation.endpoint is null', `endpoint_ipv6` BINARY(16) COMMENT 'Null when Binary/Annotation.endpoint is null, or no IPv6 address', `endpoint_port` SMALLINT COMMENT 'Null when Binary/Annotation.endpoint is null', `endpoint_service_name` VARCHAR(255) COMMENT 'Null when Binary/Annotation.endpoint is null' ) ENGINE=InnoDB ROW_FORMAT=COMPRESSED CHARACTER SET=utf8 COLLATE utf8_general_ci; ALTER TABLE zipkin_annotations ADD UNIQUE KEY(`trace_id_high`, `trace_id`, `span_id`, `a_key`, `a_timestamp`) COMMENT 'Ignore insert on duplicate'; ALTER TABLE zipkin_annotations ADD INDEX(`trace_id_high`, `trace_id`, `span_id`) COMMENT 'for joining with zipkin_spans'; ALTER TABLE zipkin_annotations ADD INDEX(`trace_id_high`, `trace_id`) COMMENT 'for getTraces/ByIds'; ALTER TABLE zipkin_annotations ADD INDEX(`endpoint_service_name`) COMMENT 'for getTraces and getServiceNames'; ALTER TABLE zipkin_annotations ADD INDEX(`a_type`) COMMENT 'for getTraces'; ALTER TABLE zipkin_annotations ADD INDEX(`a_key`) COMMENT 'for getTraces'; ALTER TABLE zipkin_annotations ADD INDEX(`trace_id`, `span_id`, `a_key`) COMMENT 'for dependencies job'; CREATE TABLE IF NOT EXISTS zipkin_dependencies ( `day` DATE NOT NULL, `parent` VARCHAR(255) NOT NULL, `child` VARCHAR(255) NOT NULL, `call_count` BIGINT, `error_count` BIGINT ) ENGINE=InnoDB ROW_FORMAT=COMPRESSED CHARACTER SET=utf8 COLLATE utf8_general_ci; ALTER TABLE zipkin_dependencies ADD UNIQUE KEY(`day`, `parent`, `child`); 将链路数据存储在ElasticSearch
使用Mysql存储链路数据,在并发高的情况下,显然不合理,这时可以选择使用ElasticSearch存储。读者需要自行安装ElasticSearch、Kibana(下一小节使用),下载地址为https://www.elastic.co/products/elasticsearch。安装完成后并启动它们,其中ElasticSearch的默认端口为9200,Kibana的端口为5601。
安装的过程可以参考我的这篇文章:http://blog.csdn.net/forezp/article/details/
本小节的案例在上上小节的案例的基础上进行改造。首先在pom文件,加上zipkin的依赖和zipkin-autoconfigure-storage-elasticsearch-http的依赖,代码如下:
     io.zipkin.java


     zipkin


     1.28.0


     io.zipkin.java


     zipkin-autoconfigure-storage-elasticsearch-http


     1.28.0
在application.yml文件加上Zipkin的配置,配置了zipkin的存储类型为elasticsearch,使用的StorageComponent为elasticsearch。然后需要配置elasticsearch,包括hosts,可以配置多个,用“,”隔开;index为zipkin等,具体配置如下:
zipkin: storage: type: elasticsearch StorageComponent: elasticsearch elasticsearch: cluster: elasticsearch max-requests: 30 index: zipkin index-shards: 3 index-replicas: 1 hosts: localhost:9200 在kibana上展示
上一小节讲述了如何将链路数据存储在ElasticSearch,ElasticSearch可以和Kibana结合,将链路数据展示在 Kibana上。安装完Kibana,并启动,它默认会向本地的9200端口的ElasticSearch读取数据,它默认的端口为5601。访问http://localhost:5601,显示的界面如下:

在上述的界面点击”Management”按钮,然后点击“Add New”,添加一个index,在上节我们在ElasticSearch中写入链路数据的index配置为“zipkin”,那么在界面填写为“zipkin-*”,点击“Create”按钮。

创建完index之后,点击Discover,就可以在界面上展示链路数据了。

采用Http的方式传输链路数据怎么存在mysql中(补充)
在我的项目中,采用rabbitmq传输,并存储在mysql中,遇到了程序启动慢的问题,遂决定改成http传输链路数据,但采用http 传输链路是我之前没有讲解过的,于是做下补充。
源码工程在:https://github.com/forezp/SpringCloudLearning/tree/master/chapter-sleuth-mysql
首先在zipkin-server 的pom文件中,加上以下的依赖:
     org.springframework.cloud


     spring-cloud-starter-eureka


     io.zipkin.java


     zipkin-server


     1.19.0


     io.zipkin.java


     zipkin-storage-mysql


     1.19.0


     io.zipkin.java


     zipkin-autoconfigure-ui


     mysql


     mysql-connector-java


     org.springframework.boot


     spring-boot-starter-jdbc
工程的配置文件bootstrap.yml:
eureka: client: serviceUrl: defaultZone: http://localhost:8761/eureka/ server: port: 9411 spring: application: name: zipkin-server sleuth: sampler: percentage: 1.0 enabled: false datasource: driver-class-name: com.mysql.jdbc.Driver url: jdbc:mysql://localhost:3306/spring-cloud-zipkin?useUnicode=true&characterEncoding=utf8&useSSL=false username: root password: zipkin: storage: type: mysql 在程序的启动类ZipkinServerApplication中注入MySQLStorage的bean,代码如下:
@SpringBootApplication @EnableEurekaClient @EnableZipkinServer public class ZipkinServerApplication { public static void main(String[] args) { SpringApplication.run(ZipkinServerApplication.class, args); } @Bean public MySQLStorage mySQLStorage(DataSource datasource) { return MySQLStorage.builder().datasource(datasource).executor(Runnable::run).build(); } } 只需要这几步才有http传输的链路数据就可以存在mysql数据库中。
更多阅读
史上最简单的 SpringCloud 教程汇总
SpringBoot教程汇总
Java面试题系列汇总
源码下载
最原始的工程:
https://github.com/forezp/SpringCloudLearning/tree/master/chapter-sleuth
采用RabbitMq通讯的工程:
https://github.com/forezp/SpringCloudLearning/tree/master/chapter-sleuth-stream
采用Mysql存储的工程:
https://github.com/forezp/SpringCloudLearning/tree/master/chapter-sleuth-stream-mysql
采用ES存储的工程:
https://github.com/forezp/SpringCloudLearning/tree/master/chapter-sleuth-stream-elasticsearch
参考资料
http://cloud.spring.io/spring-cloud-sleuth/spring-cloud-sleuth.html
https://github.com/openzipkin/zipkin
关注我的公众号
精彩内容不能错过!
扫码关注公众号有惊喜

(转载本站文章请注明作者和出处 方志朋的博客)
发布者:全栈程序员-站长,转载请注明出处:https://javaforall.net/215084.html原文链接:https://javaforall.net


