
最近公司有个导航项目需要做个流程图比较复杂的那种,作为一个前端小菜也是很蒙的,要求就两条一:动态加载流程图;二:动态连线;这两点要求也是难住了一阵呢,最后选择了jointJS,选着原因官网API很详细,代码量比较少封装起来使用也很便捷,进阶文档基础略过,没接触过得可以去在官网先学习一下,废话不多少直接上硬菜。
我这块写了两个一个是节点型流程图和关系行流程图。(源码在下一篇文章可以下载查看示例)
节点型流程图
一 准备文件
1.jquery
2.Lodash.js
3.Backbone.js
4.joint.js
5.joint.css
这些官网都可以下载。
前四个顺序一定不能乱!!!(也是坑了一次)
二 进阶
1.创建数据模块要出现的画板
因为是动态加载的数据,但是导航图需要的是坐标,数据加载出来的位置是不固定的所以需要建立一个隐藏的区域把joint画板覆盖上边。
2.创建joint画板
html代码:
Js代码:
var graph = new joint.dia.Graph; var paper = new joint.dia.Paper({ el: $('#paper'), width: 20000, height: 20000, gridSize: 1, model: graph });定义Joint的画布和画板,然后我封装了两个函数用来定义线和模块,方便使用减少代码量,在写代码方面也很很懒的,哈哈继续继续。
//定义模块形状 var stat = function(x, y, shape, background, text) { var cell; if(shape === "rect") { cell = new joint.shapes.basic.Rect({ position: { x: x, y: y }, //坐标 size: { width: 140, height: 40 }, //宽高 attrs: { rect: { fill: { type: 'linearGradient', stops: [{ offset: '0%', color: background }, //渐变开始 { offset: '100%', color: background } ], //渐变结束 attrs: { x1: '0%', y1: '0%', x2: '0%', y2: '100%' } }, stroke: background, //边框颜色 'stroke-width': 1 //边框大小 }, text: { text: text, 'ref-x': .5, 'ref-y': .5, fill: '#000' }, //显示文字 } }); } else if(shape === "ellipse") { cell = new joint.shapes.basic.Ellipse({ position: { x: x, y: y }, //坐标 size: { width: 140, height: 40 }, //宽高 attrs: { ellipse: { fill: { type: 'linearGradient', stops: [{ offset: '0%', color: background }, //渐变开始 { offset: '100%', color: '#FFFFFF' } //渐变结束 ], attrs: { x1: '0%', y1: '0%', x2: '0%', y2: '100%' } }, stroke: background, //边框颜色 'stroke-width': 1 //边框大小 }, text: { text: text, 'ref-x': .5, 'ref-y': .5, fill: '#000' }, //显示文字 } }); } graph.addCell(cell); return cell; };rect为方形,circle为圆形,还有stroke:边框颜色,具体其他样式官网很详细。
//定义连线 function link(source, target, label) { var cell = new joint.dia.Link({ source: { id: source.id }, target: { id: target.id }, labels: [{ position: 0.5, attrs: { text: { text: label || '', 'font-weight': 'bold' } } }], attrs: { '.connection': { stroke: '#', //连线颜色 'stroke-width': 4 //连线粗细 }, '.marker-target': { fill: '#000', //箭头颜色 d: 'M 10 0 L 0 5 L 10 10 z' //箭头样式 } } }); graph.addCell(cell); return cell; }导航流程图需要的根据节点进行连接,数据结构如下
var data = [ [{ title: '订单', tolink: "", state: "1", id: "1", name: '订单' }], [{ title: '预售', tolink: "1", state: "1", id: "2", name: '预售' }, { title: '预售2', tolink: "1", state: "0", id: "3", name: '预售2' }], [{ title: '采购清单', tolink: "2", state: "-1", id: "4", name: '采购清单' }, { title: '待加工', tolink: "2", state: "-1", id: "5", name: '待加工' }] ]state代表状态,这里可以随意定义,比较懒就直接-1,0,1定义了,id是必须需要的因为要根据id找坐标,tolink是当前上一个连接节点的id。这里结构一定要根据节点划分,每一级的节点要在一个数组里也是方便下一步遍历操作,当然大家也可以用其他方法都是可以的这方面刚接触前端还在摸索中。
三 动态连接
var arraylist = []; $.each(data, function (index, item1) { $(".ProcessDiv").append("
") $.each(item1, function (index2, item2) { $(".process").eq(index).append("" + item1[index2].title + "
") debugger var id1 = item1[index2].id var arrValue1 = arraylist[id1]; var y = $("#" + id1).offset().top; var x = $("#" + id1).offset().left; var name = item1[index2].name var n = item1[index2].state if (arrValue1 == undefined) { switch (n) { case "1": arraylist[id1] = stat(x, y, "rect", "green", name); break; case "0": arraylist[id1] = stat(x, y, "rect", "yellow", name); break; default: arraylist[id1] = stat(x, y, "rect", "red", name); } } if (item1[index2].tolink != "") { var id2 = item1[index2].tolink var arrValue2 = arraylist[id2]; var y2 = $("#" + id2).offset().top; var x2 = $("#" + id2).offset().left; var state = item1[index2].state if (arrValue2 == undefined) { arraylist[id2] = stat(x2, y2, "rect", "#000"); } link(arraylist[id2], arraylist[id1]); } }); });这里需要用到字典数组,放置重复生成模块这坑也是摔的妥妥的,定义一个数组arraylist,然后进行第一次遍历data,根据数组个数也就是节点创建节点区域process,然后进行二次遍历,拿到遍历到的节点添加到对应的节点区域,遍历时候根据id存入字典数组,再次遍历是如果存在就直接使用,没有在创建,这一步是防止一个父节点连接多个子节点时候重复创建,创建var根据offset().top;和offset().left,存入y,x坐标,,如果tolink==””就保存父节点,根据state决定当前接节点状态及颜色,这下坐标有了,id有了就可以连接了。
link(arraylist[id2], arraylist[id1]);完整代码:
效果图

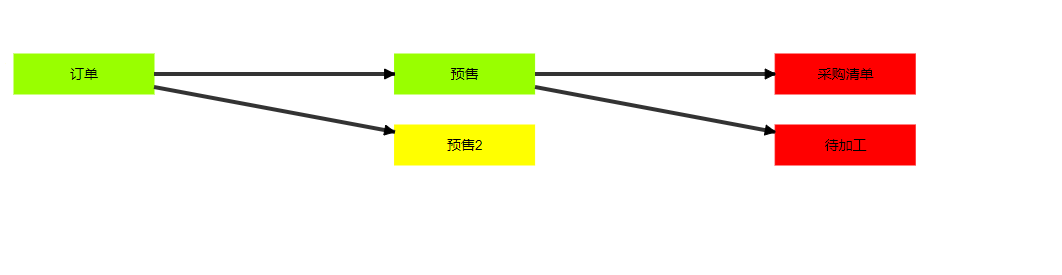
基本节点流程图就这样了只需要后台传入数据就可以了
关系型流程图
关系型流程图就有点复杂,主要复杂在数据结构这方面,结构如下图

字典数组和遍历和节点流程图一样,但是关系这块要在一个数组里面包含所有关联的信息,在创建隐藏模版这块推荐使用模版引擎(template.js)搭配joint堪称完美!!

效果图如下:


写得有点仓促样式可能不太 咳咳,基本的方法效果还是实现了,先这样吧有不足的地方欢迎大家一起学习讨论!
发布者:全栈程序员-站长,转载请注明出处:https://javaforall.net/215364.html原文链接:https://javaforall.net


