
Flume中sources、channels、sinks的常用配置(多个案例)
文章目录
- Flume中sources、channels、sinks的常用配置(多个案例)
-
-
- Flume基础及架构
- 案例1:netcat -> memory -> logger
- 案例2:exec -> file -> logger
- 案例3:spooldir -> memory -> hdfs读取目录文件到HDFS
- 案例4:选择器selector,两种类型 replicating(副本)、multiplexing(多路复用,路由)
- 案例5:拦截器interceptor
- 案例6:处理器processor、sink组(单数据源,多出口)
- 案例7:扇入,多数据源,单sink(多数据源汇总)
- 案例8:taildir -> kafka (数据从source到channel,省略sink,source中配置了选择器和自定义拦截器)
-
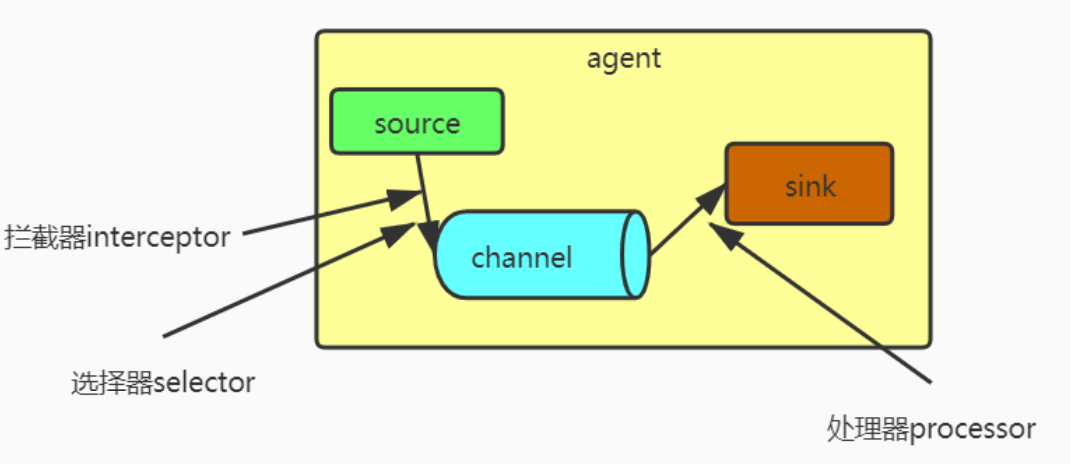
Flume基础及架构
Flume中的组件:
- 一个独立的flume进程称之为agent,每一个agent包含3个组件:source、channel、sink
- source:用于采集数据,与数据源进行对接,source是产生数据流的源头,同时会将收集的数据传输给channel
- channel:连接source和sink,类似于是一个队列,数据先进先出,还可以进行数据的缓冲
- sink:从channel拉取数据,然后将数据写入目标端
- event:是flume数据传输的基本单元,event由可选的header和载有数据的字节数组body构成:如:{ header:{}, body:日志数据(byte数组) }

常用source包括:netcat、exec、http、avro、spooldir、kafka、自定义…
常用channel包括:memory channel、file channel…
常用sink包括:hdfs、logger、kafka、hive、avro、自定义…
案例1:netcat -> memory -> logger
用netcat发送数据到指定端口,flume监听44444端口,并将数据实时显示到控制台
#describe sources、channels、sinks a1.sources = r1 a1.channels = c1 a1.sinks = k1 #defined sources a1.sources.r1.type = netcat #连接的ip地址或主机名 a1.sources.r1.bind = hadoop01 a1.sources.r1.port = 44444 #defined channels a1.channels.c1.type = memory a1.channels.c1.capacity = 1000 a1.channels.c1.transactionCapacity = 100 #defined sinks a1.sinks.k1.type = logger #bind a1.sources.r1.channels = c1 a1.sinks.k1.channel = c1 bin/flume-ng agent –conf conf/ –conf-file demo/netcat-memory-logger.conf –name a1 -Dflume.root.logger=INFO,console
用netcat向44444发送数据:nc hadoop01 44444
案例2:exec -> file -> logger
用命令读取本地文件的最后行并使用file channel,最后将得到的数据输出到控制台
#describe sources、channels、sinks a1.sources = r1 a1.channels = c1 a1.sinks = k1 #defined sources a1.sources.r1.type = exec a1.sources.r1.command = tail -F /opt/datas/flume/demo2.txt #defined sinks a1.sinks.k1.type = logger #defined channels a1.channels.c1.type = file #配置检查点目录 a1.channels.c1.checkpointDir = /opt/datas/flume/checkpoint/behavior2 #配置数据目录 a1.channels.c1.dataDirs = /opt/datas/flume/data/behavior3/ #bind a1.sources.r1.channels = c1 a1.sinks.k1.channel = c1 bin/flume-ng agent –conf conf –conf-file demo01/exec-file-hdfs.conf –name a1 -Dflume.root.logger=INFO,console
向demo2.txt中追加数据: echo “hello” >> demo2.txt
案例3:spooldir -> memory -> hdfs读取目录文件到HDFS
监控一个目录,并将其传输到hdfs中存储(只能监控所配置目录下的文件,不能监控配置目录下的目录)
#describe sources,channels,sinks a1.sources = r1 a1.sinks = k1 a1.channels = c1 #defined sources a1.sources.r1.type = spooldir a1.sources.r1.spoolDir = /opt/datas/flume/spooldir #为已读文件标记后缀 a1.sources.r1.fileSuffix = .COMPLETE a1.sources.r1.fileHeader = true #忽略所有以.tmp结尾的文件,不上传 a1.sources.r1.ignorePattern = (^.*\.tmp$) #defined sinks a1.sinks.k1.type = hdfs a1.sinks.k1.hdfs.path = hdfs://hadoop01:9000/flume/spooldir/%Y%m%d/%H #上传文件的前缀 a1.sinks.k1.hdfs.filePrefix = spooldir- a1.sinks.k1.hdfs.fileSuffix = .log #是否按照时间滚动文件夹 a1.sinks.k1.hdfs.round = true #多少时间单位创建一个新的文件夹 a1.sinks.k1.hdfs.roundValue = 1 #重新定义时间单位 a1.sinks.k1.hdfs.roundUnit = hour #是否使用本地时间戳 a1.sinks.k1.hdfs.useLocalTimeStamp = true #积攒多少个Event才flush到HDFS一次 a1.sinks.k1.hdfs.batchSize = 100 #设置文件类型,可支持压缩 a1.sinks.k1.hdfs.fileType = DataStream #多久生成一个新的文件 a1.sinks.k1.hdfs.rollInterval = 60 #设置每个文件的滚动大小大概是128M a1.sinks.k1.hdfs.rollSize = #设置文件的滚动与Event数量无关 a1.sinks.k1.hdfs.rollCount = 0 #defined channels a1.channels.c1.type = memory a1.channels.c1.transactioncapicity = 100 a1.channels.c1.capacity = 1000 # Bind the source and sink to the channel a1.sources.r1.channels = c1 a1.sinks.k1.channel = c1 bin/flume-ng agent –conf conf –conf-file demo01/spooldir-memory-hdfs.conf –name a1 -Dflume.root.logger=INFO,console
创建一个文件,里面填写些内容,再 mv 到所监控的目录下:vim 1.data mv ./spooldir
案例4:选择器selector,两种类型 replicating(副本)、multiplexing(多路复用,路由)
replication:相当于复制了一份给另一个channel,传输到之后的连个channel的数据一样

#定义agent1 a1.sources = r1 a1.sinks = k1 k2 a1.channels = c1 c2 a1.sources.r1.selector.type = replicating #defined sources a1.sources.r1.type = netcat a1.sources.r1.bind = hadoop01 a1.sources.r1.port = 44444 #defined sinks a1.sinks.k1.type = avro a1.sinks.k1.hostname = hadoop01 a1.sinks.k1.port = 4141 a1.sinks.k2.type = avro a1.sinks.k2.hostname = hadoop01 a1.sinks.k2.port = 4142 #defined channels a1.channels.c1.type = memory a1.channels.c1.capacity = 1000 a1.channels.c1.transactionCapacity = 100 a1.channels.c2.type = memory a1.channels.c2.capacity = 1000 a1.channels.c2.transactionCapacity = 100 #bind a1.sources.r1.channels = c1 c2 a1.sinks.k1.channel = c1 a1.sinks.k2.channel = c2 #定义agent2 a2.sources = r1 a2.sinks = k1 a2.channels = c1 a2.sources.r1.type = avro a2.sources.r1.bind = hadoop01 a2.sources.r1.port = 4141 a2.sinks.k1.type = logger a2.channels.c1.type = memory a2.channels.c1.capacity = 1000 a2.channels.c1.transactionCapacity = 100 a2.sources.r1.channels = c1 a2.sinks.k1.channel = c1 #定义agent3 a3.sources = r1 a3.sinks = k1 a3.channels = c1 a3.sources.r1.type = avro a3.sources.r1.bind = hadoop01 a3.sources.r1.port = 4142 a3.sinks.k1.type = logger a3.channels.c1.type = memory a3.channels.c1.capacity = 1000 a3.channels.c1.transactionCapacity = 100 a3.sources.r1.channels = c1 a3.sinks.k1.channel = c1 先启动agent2和agent3,之后启动agent1,再使用nc hadoop01 44444向hadoop01的44444端口发送数据,可以发现后面两个agent都会收到数据。
multiplexing:复用、路由,可以根据头部信息进行路由,决定数据该去哪个channel
#定义agent1 a1.sources = r1 a1.sinks = k1 k2 a1.channels = c1 c2 # multiplexing 根据mapping映射的数据决定发往哪个channel a1.sources.r1.selector.type = multiplexing a1.sources.r1.selector.header = country a1.sources.r1.selector.mapping.CN = c1 a1.sources.r1.selector.mapping.USA = c2 #两个映射都不是的话默认发往c1 a1.sources.r1.selector.default = c1 # Describe/configure the source a1.sources.r1.type = org.apache.flume.source.http.HTTPSource a1.sources.r1.host = hadoop01 a1.sources.r1.port = 52020 # Describe the sink a1.sinks.k1.type = avro a1.sinks.k1.hostname = hadoop01 a1.sinks.k1.port = 4141 a1.sinks.k2.type = avro a1.sinks.k2.hostname = hadoop01 a1.sinks.k2.port = 4142 # Describe the channel a1.channels.c1.type = memory a1.channels.c1.capacity = 1000 a1.channels.c1.transactionCapacity = 100 a1.channels.c2.type = memory a1.channels.c2.capacity = 1000 a1.channels.c2.transactionCapacity = 100 # Bind the source and sink to the channel a1.sources.r1.channels = c1 c2 a1.sinks.k1.channel = c1 a1.sinks.k2.channel = c2 #配置agent2 使用avro为source,打印到控制台 a2.sources = r1 a2.sinks = k1 a2.channels = c1 a2.sources.r1.type = avro a2.sources.r1.bind = hadoop01 a2.sources.r1.port = 4141 a2.sinks.k1.type = logger a2.channels.c1.type = memory a2.channels.c1.capacity = 1000 a2.channels.c1.transactionCapacity = 100 a2.sources.r1.channels = c1 a2.sinks.k1.channel = c1 #定义agent3 使用avro为source,打印到控制台 a3.sources = r1 a3.sinks = k1 a3.channels = c1 a3.sources.r1.type = avro a3.sources.r1.bind = hadoop01 a3.sources.r1.port = 4142 a3.sinks.k1.type = logger a3.channels.c1.type = memory a3.channels.c1.capacity = 1000 a3.channels.c1.transactionCapacity = 100 a3.sources.r1.channels = c1 a3.sinks.k1.channel = c1 先启动agent2和agent3,然后启动agent1,使用curl向hadoop01的52020端口发送http请求
curl -X POST -d ‘[{“headers”:{“country”:“CN”},“body”:“1234”}]’ http://hadoop01:52020
curl -X POST -d ‘[{“headers”:{“country”:“USA”},“body”:“1234”}]’ http://hadoop01:52020
curl -X POST -d ‘[{“headers”:{“country”:“HHH”},“body”:“1234”}]’ http://hadoop01:52020
curl -X POST -d ‘[{“headers”:{“hhhh”:“HHH”},“body”:“1234”}]’ http://hadoop01:52020
案例5:拦截器interceptor
可以使用自带的拦截器,也可以自定义拦截器,一般flume中不做复杂ETL
#使用host拦截器和timestamp拦截器,给采集到hdfs的文件以主机名和时间戳命名 #defined sources、sinks、channels a1.sources = r1 a1.sinks = k1 a1.channels = c1 #defined source a1.sources.r1.type = netcat a1.sources.r1.port = 44444 a1.sources.r1.bind = hadoop01 a1.sources.r1.interceptors = i1 i2 a1.sources.r1.interceptors.i1.preserveExisting= false a1.sources.r1.interceptors.i1.type =timestamp a1.sources.r1.interceptors.i2.type = host a1.sources.r1.interceptors.i2.hostHeader =hostname a1.sources.r1.interceptors.i2.useIP = false #defined sinks a1.sinks.k1.type = hdfs a1.sinks.k1.channel = c1 a1.sinks.k1.hdfs.path =hdfs://hadoop01:9000/flume/interceptor/%Y-%m-%d/%H%M #将主机名作为文件名字的前缀 a1.sinks.k1.hdfs.filePrefix = %{
   hostname}. a1.sinks.k1.hdfs.fileType=DataStream #defined channel a1.channels.c1.type = memory a1.channels.c1.capacity = 1000 a1.channels.c1.transactionCapacity = 100 #bind a1.sources.r1.channels = c1 a1.sinks.k1.channel = c1 #使用nc hadoop01 44444向hadoop01的44444端口发送数据,观察hdfs相应目录下的文件名。
#regex_filter拦截器,根据正则表达式来过滤,此为agent2,启动时--name a2 a2.sources = r1 a2.sinks = k1 a2.channels = c1 #defined sources a2.sources.r1.type = netcat a2.sources.r1.bind = hadoop01 a2.sources.r1.port = 44444 #defind interceptor a2.sources.r1.interceptors = i1 a2.sources.r1.interceptors.i1.type = regex_filter #匹配纯数字的数据 a2.sources.r1.interceptors.i1.regex = ^[0-9]*$ #满足正则表达式的是否排除 false不排除,true排除 a2.sources.r1.interceptors.i1.excludeEvents = false a2.sinks.k1.type = logger a2.channels.c1.type = memory a2.channels.c1.capacity = 1000 a2.channels.c1.transactionCapacity = 100 a2.sources.r1.channels = c1 a2.sinks.k1.channel = c1 #使用nc hadoop01 44444向hadoop01的44444端口发送不同的数据,观察满足正则表达式的数据是否接收到 #regex_extractor 将满足正则表达式的数据映射到event的body内,--name a3 a3.sources = r1 a3.sinks = k1 a3.channels = c1 #sources a3.sources.r1.type = netcat a3.sources.r1.bind = hadoop01 a3.sources.r1.port = 44444 #interceptors a3.sources.r1.interceptors = i1 a3.sources.r1.interceptors.i1.type = regex_extractor a3.sources.r1.interceptors.i1.regex = (\\d):(\\d):(\\d) a3.sources.r1.interceptors.i1.serializers = s1 s2 s3 a3.sources.r1.interceptors.i1.serializers.s1.name = one a3.sources.r1.interceptors.i1.serializers.s2.name = two a3.sources.r1.interceptors.i1.serializers.s3.name = three #sinks a3.sinks.k1.type = logger #channel a3.channels.c1.type = memory a3.channels.c1.capacity = 1000 a3.channels.c1.transactionCapacity = 100 #bind a3.sources.r1.channels = c1 a3.sinks.k1.channel = c1 #使用nc hadoop01 44444向hadoop01的44444端口发送不同的数据,观察满足正则表达式的数据是否按顺序映射到body内 案例6:处理器processor、sink组(单数据源,多出口)
#定义agent1 a1.sources = r1 a1.sinks = k1 k2 a1.channels = c1 #defined sources a1.sources.r1.type = exec a1.sources.r1.command = tail -F /opt/data/flume/h.txt #defined sinkgroups a1.sinkgroups = g1 a1.sinkgroups.g1.sinks = k1 k2 #定义processor类型为负载均衡,轮询的方式 a1.sinkgroups.g1.processor.type = load_balance a1.sinkgroups.g1.processor.backoff = true a1.sinkgroups.g1.processor.selector = round_robin a1.sinkgroups.g1.processor.selector.maxTimeOut = 10000 #定义processor类型为故障转移,priority值越大优先级越高,优先级高的挂了之后优先级低的上位 #a1.sinkgroups.g1.processor.type = failover #a1.sinkgroups.g1.processor.priority.k1 = 1 #a1.sinkgroups.g1.processor.priority.k2 = 10 #a1.sinkgroups.g1.processor.maxpenality = 10000 #defined sinks a1.sinks.k1.type = avro a1.sinks.k1.hostname = hadoop01 a1.sinks.k1.port = 4141 a1.sinks.k2.type = avro a1.sinks.k2.hostname = hadoop01 a1.sinks.k2.port = 4142 #defined channels a1.channels.c1.type = memory a1.channels.c1.capacity = 1000 a1.channels.c1.transactionCapacity = 100 #bind a1.sources.r1.channels = c1 a1.sinks.k1.channel = c1 a1.sinks.k2.channel = c1 #定义agent2 a2.sources = r1 a2.sinks = k1 a2.channels = c1 a2.sources.r1.type = avro a2.sources.r1.bind = hadoop01 a2.sources.r1.port = 4141 a2.sinks.k1.type = logger a2.channels.c1.type = memory a2.channels.c1.capacity = 1000 a2.channels.c1.transactionCapacity = 100 a2.sources.r1.channels = c1 a2.sinks.k1.channel = c1 #定义agent3 a3.sources = r1 a3.sinks = k1 a3.channels = c1 a3.sources.r1.type = avro a3.sources.r1.bind = hadoop01 a3.sources.r1.port = 4142 a3.sinks.k1.type = logger a3.channels.c1.type = memory a3.channels.c1.capacity = 1000 a3.channels.c1.transactionCapacity = 100 a3.sources.r1.channels = c1 a3.sinks.k1.channel = c1 向exec中指定的文件里追加数据,观察哪个agent2和agent3哪个收到了数据;之后可以将注释去掉,换一种processor测试。
发送数据测试:for i in `seq 1 10`; do echo “000_”$i >> h.txt ; sleep 1 ;done
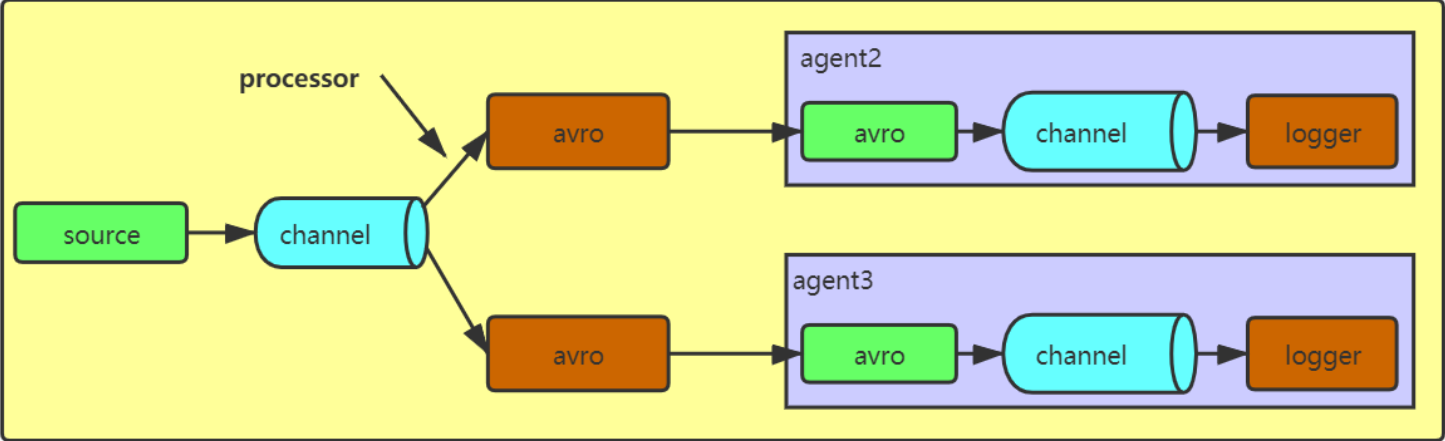
案例7:扇入,多数据源,单sink(多数据源汇总)
#agent1的配置 sources为netcat,sinks为avro a1.sources = r1 a1.sinks = k1 a1.channels = c1 a1.sources.r1.type = netcat a1.sources.r1.bind = hadoop01 a1.sources.r1.port = 44444 a1.sinks.k1.type = avro a1.sinks.k1.hostname = hadoop01 a1.sinks.k1.port = 4141 a1.channels.c1.type = memory a1.channels.c1.capacity = 1000 a1.channels.c1.transactionCapacity = 100 a1.sources.r1.channels = c1 a1.sinks.k1.channel = c1 #agent2的配置 sources为exec,sinks为avro a2.sources = r1 a2.sinks = k1 a2.channels = c1 a2.sources.r1.type = exec a2.sources.r1.command = tail -F /opt/data/flume/h.txt a2.sinks.k1.type = avro a2.sinks.k1.hostname = hadoop01 a2.sinks.k1.port = 4141 a2.channels.c1.type = memory a2.channels.c1.capacity = 1000 a2.channels.c1.transactionCapacity = 100 a2.sources.r1.channels = c1 a2.sinks.k1.channel = c1 #agent3的配置 avro为sources,logger为sinks,可以看到agent1和agent2的数据都汇总到了agent3 a3.sources = r1 a3.sinks = k1 a3.channels = c1 a3.sources.r1.type = avro a3.sources.r1.bind = hadoop01 a3.sources.r1.port = 4141 a3.sinks.k1.type = logger a3.channels.c1.type = memory a3.channels.c1.capacity = 1000 a3.channels.c1.transactionCapacity = 100 a3.sources.r1.channels = c1 a3.sinks.k1.channel = c1 向netcat和exec指定的文件和端口发送数据,agent3的控制台可以看到agent1和agent2的数据被汇总过来
案例8:taildir -> kafka (数据从source到channel,省略sink,source中配置了选择器和自定义拦截器)
监控一个目录,对满足条件的文件进行采集,之后会通过ETL拦截器和分类型拦截器(看这条数据是启动日志还是事件日志)进行拦截,ETL拦截器会把长度不满足条件(不合法)的数据清洗掉,然后分类型拦截器会判断该条日志是启动日志还是事件日志,并标记到event的header里,方便后面multiplexing时进行channel的选择。
日志样例:上面那条是事件日志,下面那条是启动日志,启动日志里有start关键字
#defined sources,channels a1.sources = r1 a1.channels = c1 c2 # configure source a1.sources.r1.type = TAILDIR #记录读取日志的位置 a1.sources.r1.positionFile = /opt/modules/flume-1.7.0/position a1.sources.r1.filegroups = f1 #读取日志的位置 a1.sources.r1.filegroups.f1 = /tmp/logs/app.+ a1.sources.r1.fileHeader = true a1.sources.r1.channels = c1 c2 #interceptor a1.sources.r1.interceptors = i1 i2 #配置自定义拦截器,全类名后加$Builder a1.sources.r1.interceptors.i1.type = com.bigdata.flume.interceptor.LogETLInterceptor$Builder #ETL拦截器 a1.sources.r1.interceptors.i2.type = com.bigdata.flume.interceptor.LogTypeInterceptor$Builder #日志类型拦截器 #selector 跟据日志类型是启动日志startLog还是事件日志eventLog来传到不同的KafkaChannel a1.sources.r1.selector.type = multiplexing a1.sources.r1.selector.header = topic a1.sources.r1.selector.mapping.topic_start = c1 a1.sources.r1.selector.mapping.topic_event = c2 # configure channel a1.channels.c1.type = org.apache.flume.channel.kafka.KafkaChannel a1.channels.c1.kafka.bootstrap.servers = hadoop01:9092 a1.channels.c1.kafka.topic = topic_start a1.channels.c1.parseAsFlumeEvent = false a1.channels.c1.kafka.consumer.group.id = flume-consumer a1.channels.c2.type = org.apache.flume.channel.kafka.KafkaChannel a1.channels.c2.kafka.bootstrap.servers = hadoop01:9092 a1.channels.c2.kafka.topic = topic_event a1.channels.c2.parseAsFlumeEvent = false a1.channels.c2.kafka.consumer.group.id = flume-consumer 自定义拦截器的代码写完后,需打成jar包添加到flume的lib目录下
自定义代码,实现Interceptor接口,编写单事件和多事件处理逻辑,编写静态内部类实现Interceptor.Builder并build自定义类的对象
//ETLinterceptor import org.apache.flume.Context; import org.apache.flume.Event; import org.apache.flume.interceptor.Interceptor; import java.nio.charset.Charset; import java.util.ArrayList; import java.util.List; public class LogETLInterceptor implements Interceptor {
    @Override public void initialize() {
    } @Override public Event intercept(Event event) {
    byte[] body = event.getBody(); String log = new String(body, Charset.forName("UTF-8")); //判断字符串中是否包含"start"来确定是否为启动日志,通过相应方法判断是否合法 if(log.contains("start")){
    if( LogUtils.validateStart(log)){
    return event; } }else{
    if(LogUtils.validateEvent(log)){
    return event; } } return null; } @Override public List<Event> intercept(List<Event> list) {
    ArrayList<Event> events = new ArrayList<>(); for (Event event : list) {
    Event intercept = intercept(event); if(intercept != null){
    events.add(intercept); } } return events; } @Override public void close() {
    } public static class Builder implements Interceptor.Builder{
    @Override public Interceptor build() {
    return new LogETLInterceptor(); } @Override public void configure(Context context) {
    } } }
//自定义ETL拦截器的工具类,里面有所用到的方法 import org.apache.commons.lang.math.NumberUtils; public class LogUtils {
//启动日志如果为null或不是{}格式,就过滤掉 public static boolean validateStart(String log){
if(log == null){
return false; } if( !log.trim().startsWith("{") || !log.trim().endsWith("}")){
return false; } return true; } //事件日志判断以"|"切割是否长度为2并且|前面的时间戳长度是否为13并且格式{} public static boolean validateEvent(String log){
String[] logContents = log.split("\\|"); if(logContents.length != 2){
return false; } if( logContents[0].length() != 13 || !NumberUtils.isDigits(logContents[0])){
return false; } if( !logContents[1].trim().startsWith("{") || !logContents[1].trim().endsWith("}")){
return false; } return true; } } //类型拦截器,判断日志是什么类型,并将类型信息添加到header中 import org.apache.flume.Context; import org.apache.flume.Event; import org.apache.flume.interceptor.Interceptor; import java.nio.charset.Charset; import java.util.ArrayList; import java.util.List; import java.util.Map; public class LogTypeInterceptor implements Interceptor {
@Override public void initialize() {
} //将事件类型添加到header中 @Override public Event intercept(Event event) {
byte[] body = event.getBody(); String log = new String(body, Charset.forName("UTF-8")); Map<String, String> headers = event.getHeaders(); if(log.contains("start")){
headers.put("topic","topic_start"); }else{
headers.put("topic","topic_event"); } return event; } @Override public List<Event> intercept(List<Event> list) {
ArrayList<Event> events = new ArrayList<Event>(); for (Event event : list) {
Event intercept = intercept(event); events.add(intercept); } return events; } @Override public void close() {
} public static class Builder implements Interceptor.Builder{
@Override public Interceptor build() {
return new LogTypeInterceptor(); } @Override public void configure(Context context) {
} } } 打jar包上传到linux中flume的lib目录下,启动kafka,启动flume,给监控目录中生成日志进行测试。
发布者:全栈程序员-站长,转载请注明出处:https://javaforall.net/224797.html原文链接:https://javaforall.net


