
AlertDialog的六种创建方式
AlertDialog的六种创建方式
创建AlertDialog的步骤:
1、创建AlertDialog.Builder对象
2、调用Builder对象的setTitle方法设置标题,setIcon方法设置图标
3、调用Builder相关方法如setMessage方法、setItems方法、setSingleChoiceItems方法、setMultiChoiceItems方法、setAdapter方法、setView方法设置不同类型的对话框内容。
4、调用setPositiveButton、setNegativeButton、setNeutralButton设置多个按钮
5、调用Builder对象的create()方法创建AlertDialog对象
6、调用AlertDialog对象的show()方法将对话框显示出来
一、setMessage:设置对话框内容为简单文本内容


    // 创建构建器 AlertDialog.Builder builder = new AlertDialog.Builder(this); // 设置参数 builder.setTitle("请做出选择").setIcon(R.drawable.ic_launcher) .setMessage("我美不美") .setPositiveButton("美", new OnClickListener() {
    // 积极  @Override public void onClick(DialogInterface dialog, int which) { // TODO Auto-generated method stub Toast.makeText(MainActivity.this, "恭喜你答对了", 0) .show(); } }).setNegativeButton("不美", new OnClickListener() {
    // 消极  @Override public void onClick(DialogInterface dialog, int which) { // TODO Auto-generated method stub Toast.makeText(MainActivity.this, "一点也不老实", 0) .show(); } }).setNeutralButton("不知道", new OnClickListener() {
    // 中间级  @Override public void onClick(DialogInterface dialog, int which) { // TODO Auto-generated method stub Toast.makeText(MainActivity.this, "快睁开眼瞅瞅", 0) .show(); } }); builder.create().show();
运行截图:

二、setItem:设置文本框内容为简单列表项
// 创建数据 final String[] items = new String[] { "北京", "上海", "广州", "深圳" }; // 创建对话框构建器 AlertDialog.Builder builder = new AlertDialog.Builder(this); // 设置参数 builder.setIcon(R.drawable.ic_launcher).setTitle("提示") .setItems(items, new OnClickListener() { @Override public void onClick(DialogInterface dialog, int which) { Toast.makeText(MainActivity.this, items[which], Toast.LENGTH_SHORT).show(); } }); builder.create().show();
运行截图:

三、setSingleChoiceItems()设置对话框内容为单选列表项
// 创建数据 final String[] items = new String[] { "北京", "上海", "广州", "深圳" }; // 创建对话框构建器 AlertDialog.Builder builder = new AlertDialog.Builder(this); // 设置参数 builder.setIcon(R.drawable.ic_launcher).setTitle("提示") .setSingleChoiceItems(items, 0, new OnClickListener() { @Override public void onClick(DialogInterface dialog, int which) { // TODO Auto-generated method stub Toast.makeText(MainActivity.this, items[which], Toast.LENGTH_SHORT).show(); } }); builder.create().show();
运行截图:

四、setMultiChoiceItems()设置对话框内容为多选项列表
// 创建数据 final String[] items = new String[] { "北京", "上海", "广州", "深圳" }; // 创建对话框构建器 AlertDialog.Builder builder = new AlertDialog.Builder(this); builder.setIcon(R.drawable.ic_launcher) .setTitle("提示") .setMultiChoiceItems(items, new boolean[] { true, true, false, false, false }, new OnMultiChoiceClickListener() { @Override public void onClick(DialogInterface dialog, int which, boolean isChecked) { // TODO Auto-generated method stub if (isChecked) { Toast.makeText(MainActivity.this, items[which], 0).show(); } } }); builder.create().show();
运行截图:

五、setAdapter()设置对话框内容为自定义列表项(这里是一个布局)
// 创建数据 final String[] items = new String[] { "北京", "上海", "广州", "深圳" }; // 创建对话框构建器 AlertDialog.Builder builder = new AlertDialog.Builder(this); builder.setTitle("提示") .setIcon(R.drawable.ic_launcher) .setAdapter( new ArrayAdapter<String>(MainActivity.this, R.layout.item, R.id.tv, items), new OnClickListener() { @Override public void onClick(DialogInterface dialog, int which) { // TODO Auto-generated method stub Toast.makeText(MainActivity.this, items[which], 0).show(); } }); builder.create().show();
运行截图:

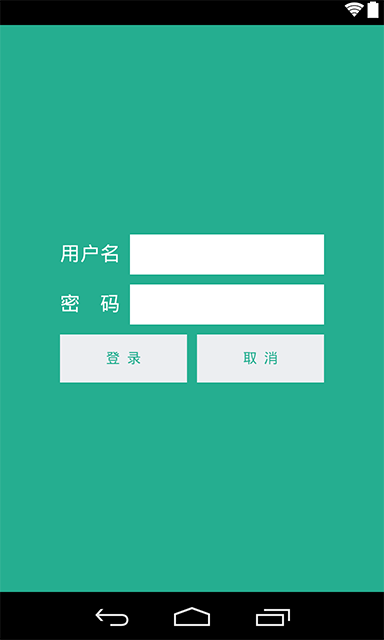
六、setView()设置对话框为自定义View
// 创建对话框构建器 AlertDialog.Builder builder = new AlertDialog.Builder(this); // 获取布局 View view2 = View.inflate(MainActivity.this, R.layout.login, null); // 获取布局中的控件 final EditText username = (EditText) view2.findViewById(R.id.username); final EditText password = (EditText) view2.findViewById(R.id.password); final Button button = (Button) view2.findViewById(R.id.btn_login); // 设置参数 builder.setTitle("Login").setIcon(R.drawable.ic_launcher) .setView(view2); // 创建对话框 final AlertDialog alertDialog = builder.create(); button.setOnClickListener(new View.OnClickListener() { @Override public void onClick(View v) { // TODO Auto-generated method stub String uname = username.getText().toString().trim(); String psd = password.getText().toString().trim(); if (uname.equals("shenhua") && psd.equals("")) { Toast.makeText(MainActivity.this, "登录成功", 0).show(); } Toast.makeText(MainActivity.this, "登录失败", 0).show(); alertDialog.dismiss();// 对话框消失 } }); alertDialog.show();
运行截图:

Android常用实例—Alert Dialog的使用
AlertDialog的使用很普遍,在应用中当你想要用户做出“是”或“否”或者其它各式各样的选择时,为了保持在同样的Activity和不改变用户屏幕,就可以使用AlertDialog.
代码地址
https://github.com/JueYingCoder/AndroidUsefulExample_AlertDialog
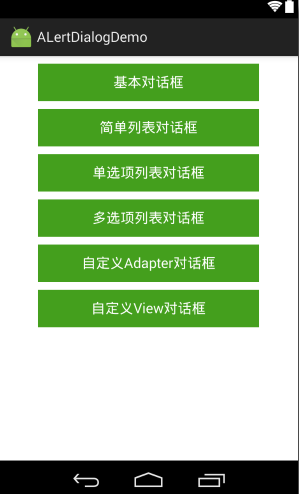
这篇文章主要讲解如何实现各种AlertDialog,文章比较长,如果能认真读完,AlertDialog的各种用法应该就能掌握了,下面是我们今天要实现的最终效果:
可以将对话框主要分为三个部分:上面区域是标题栏和图标,中间区域是内容区,下方是button区;其他形式各异的对话框也都是基于此的变体而已! 那么要创建一个对话框,我们需要做些什么:
1,首先需要创建一个AlertDialog.Builder对象,基本语法:
AlertDialog.Builder alertDialogBuilder=new AlertDialog.Builder(this);- 1
2,创建alertDialogBuilder对象后,通过调用它的create()方法就可以构造出一个对话框
AlertDialog alertDialog = alertDialogBuilder.create(); alertDialog.show();//将dialog显示出来- 1
- 2
3,但是我们还有一个疑问,如何设置Dialog的其他属性呢,也就是说怎么控制标题,图表区域,内容区域和button区域,我们自然而然的想到的是一系列set方法;事实上真是如此,通过调用alertDialogBuilder对象的setXX方法来实现:
alertDialogBuilder.setTitle();//设置标题 alertDialogBuilder.setIcon();//设置图表 /*设置下方按钮*/ alertDialogBuilder.setPositiveButton(); alertDialogBuilder.setNegativeButton(); alertDialogBuilder.setNeutralButton(); /*对话框内容区域的设置提供了多种方法*/ setMessage();//设置显示文本 setItems();//设置对话框内容为简单列表项 setSingleChoiceItems();//设置对话框内容为单选列表项 setMultiChoiceItems();//设置对话框内容为多选列表项 setAdapter();//设置对话框内容为自定义列表项 setView();//设置对话框内容为自定义View //设置对话框是否可取消 setCancelable(booleab cancelable); setCancelListener(onCancelListener);- 1
- 2
- 3
- 4
- 5
- 6
- 7
- 8
- 9
- 10
- 11
- 12
- 13
- 14
- 15
- 16
- 17
- 18
- 19
综上:对于AlertDialog的使用其实主要还是针对如何设置内容区域;
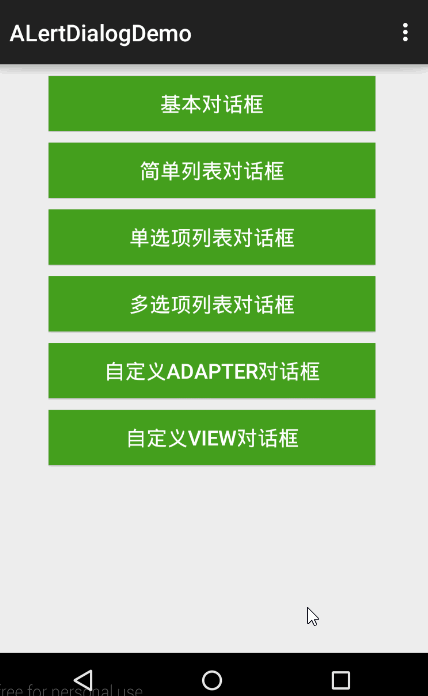
下面我们通过使用不同的内容区域的设置方法,实现几个常用的对话框; 基本思路是在MainActivity中添加几个Button,点击后分别弹出对应的AlertDialog 步骤:
– 1 .创建Android Project->”AlertDialogDemo”
– 2 .编写activity_main.xml布局文件
– 3.编写所需strings.xml
– 4.编写MainActivity中各方法
<LinearLayout xmlns:android="http://schemas.android.com/apk/res/android" xmlns:tools="http://schemas.android.com/tools" android:orientation="vertical" android:layout_width="match_parent" android:layout_height="match_parent" > <Button android:id="@+id/btn_simple_dialog" android:text="@string/simple_dialog" android:textColor="#ffffff" android:textSize="18sp" android:background="#449F1D" android:layout_marginTop="10dp" android:layout_marginLeft="50dp" android:layout_marginRight="50dp" android:layout_width="match_parent" android:layout_height="wrap_content" /> <Button android:id="@+id/btn_simple_list_dialog" android:text="@string/simple_list_dialog" android:textColor="#ffffff" android:textSize="18sp" android:background="#449F1D" android:layout_marginTop="10dp" android:layout_marginLeft="50dp" android:layout_marginRight="50dp" android:layout_width="match_parent" android:layout_height="wrap_content" /> <Button android:id="@+id/btn_single_choice_dialog" android:text="@string/single_choice_dialog" android:textColor="#ffffff" android:textSize="18sp" android:background="#449F1D" android:layout_marginTop="10dp" android:layout_marginLeft="50dp" android:layout_marginRight="50dp" android:layout_width="match_parent" android:layout_height="wrap_content" /> <Button android:id="@+id/btn_multi_choice_dialog" android:text="@string/multi_choice_dialog" android:textColor="#ffffff" android:textSize="18sp" android:background="#449F1D" android:layout_marginTop="10dp" android:layout_marginLeft="50dp" android:layout_marginRight="50dp" android:layout_width="match_parent" android:layout_height="wrap_content" /> <Button android:id="@+id/btn_custom_adapter_dialog" android:text="@string/custom_adapter_dialog" android:textColor="#ffffff" android:textSize="18sp" android:background="#449F1D" android:layout_marginTop="10dp" android:layout_marginLeft="50dp" android:layout_marginRight="50dp" android:layout_width="match_parent" android:layout_height="wrap_content" /> <Button android:id="@+id/btn_custom_view_dialog" android:text="@string/custom_view_dialog" android:textColor="#ffffff" android:textSize="18sp" android:background="#449F1D" android:layout_marginTop="10dp" android:layout_marginLeft="50dp" android:layout_marginRight="50dp" android:layout_width="match_parent" android:layout_height="wrap_content" /> </LinearLayout>- 1
- 2
- 3
- 4
- 5
- 6
- 7
- 8
- 9
- 10
- 11
- 12
- 13
- 14
- 15
- 16
- 17
- 18
- 19
- 20
- 21
- 22
- 23
- 24
- 25
- 26
- 27
- 28
- 29
- 30
- 31
- 32
- 33
- 34
- 35
- 36
- 37
- 38
- 39
- 40
- 41
- 42
- 43
- 44
- 45
- 46
- 47
- 48
- 49
- 50
- 51
- 52
- 53
- 54
- 55
- 56
- 57
- 58
- 59
- 60
- 61
- 62
- 63
- 64
- 65
- 66
- 67
- 68
- 69
- 70
- 71
- 72
- 73
布局效果:
strings.xml
<resources> <string name="app_name">ALertDialogDemo</string> <!-- 主界面布局所需要的字符串资源--> <string name="action_settings">Settings</string> <string name="simple_dialog">基本对话框</string> <string name="simple_list_dialog">简单列表对话框</string> <string name="single_choice_dialog">单选项列表对话框</string> <string name="multi_choice_dialog">多选项列表对话框</string> <string name="custom_adapter_dialog">自定义Adapter对话框</string> <string name="custom_view_dialog">自定义View对话框</string> <!-- 对话框所需要的字符串资源--> <string name="dialog_message">这里是内容区域</string> <string name="postive_button">确定</string> <string name="negative_button">取消</string> <!-- 对话框提示信息字符串资源--> <string name="toast_postive">你点击了确定按钮</string> <string name="toast_negative">你点击了取消按钮</string> <string name="text">自定义Adapter的内容</string> </resources>- 1
- 2
- 3
- 4
- 5
- 6
- 7
- 8
- 9
- 10
- 11
- 12
- 13
- 14
- 15
- 16
- 17
- 18
- 19
- 20
- 21
- 22
- 23
MainActivity.java
public class MainActivity extends ActionBarActivity implements View.OnClickListener{
//对应各个button private Button simpleDiaog; private Button simpleListDiaog; private Button singleChoiceDiaog; private Button multiChoiceDiaog; private Button customAdateprDiaog; private Button customViewDiaog; //声明一个AlertDialog构造器 private AlertDialog.Builder builder; @Override protected void onCreate(Bundle savedInstanceState) { super.onCreate(savedInstanceState); setContentView(R.layout.activity_main); //实例化控件 simpleDiaog= (Button) findViewById(R.id.btn_simple_dialog); simpleListDiaog= (Button) findViewById(R.id.btn_simple_list_dialog); singleChoiceDiaog= (Button) findViewById(R.id.btn_single_choice_dialog); multiChoiceDiaog= (Button) findViewById(R.id.btn_multi_choice_dialog); customAdateprDiaog= (Button) findViewById(R.id.btn_custom_adapter_dialog); customViewDiaog= (Button) findViewById(R.id.btn_custom_view_dialog); //监听点击事件 simpleDiaog.setOnClickListener(this); simpleListDiaog.setOnClickListener(this); singleChoiceDiaog.setOnClickListener(this); multiChoiceDiaog.setOnClickListener(this); customAdateprDiaog.setOnClickListener(this); customViewDiaog.setOnClickListener(this); } / * * 每个button点击后弹出对应对话框,为了方便,各写一个showXXDialog()方法 */ @Override public void onClick(View view) { switch (view.getId()){ case R.id.btn_simple_dialog: showSimpleDialog(view); break; case R.id.btn_simple_list_dialog: showSimpleListDialog(view); break; case R.id.btn_single_choice_dialog: showSingleChoiceDialog(view); break; case R.id.btn_multi_choice_dialog: showMultiChoiceDialog(view); break; case R.id.btn_custom_adapter_dialog: showCustomAdapterDialog(view); break; case R.id.btn_custom_view_dialog: showCustomViewDialog(view); break; } } @Override public boolean onCreateOptionsMenu(Menu menu) { getMenuInflater().inflate(R.menu.menu_main, menu); return true; } }- 1
- 2
- 3
- 4
- 5
- 6
- 7
- 8
- 9
- 10
- 11
- 12
- 13
- 14
- 15
- 16
- 17
- 18
- 19
- 20
- 21
- 22
- 23
- 24
- 25
- 26
- 27
- 28
- 29
- 30
- 31
- 32
- 33
- 34
- 35
- 36
- 37
- 38
- 39
- 40
- 41
- 42
- 43
- 44
- 45
- 46
- 47
- 48
- 49
- 50
- 51
- 52
- 53
- 54
- 55
- 56
- 57
- 58
- 59
- 60
- 61
- 62
- 63
- 64
- 65
- 66
- 67
- 68
- 69
- 70
上述代码都比较简单,现在我们真正关心的就是如何去具体实现showXXDialog;
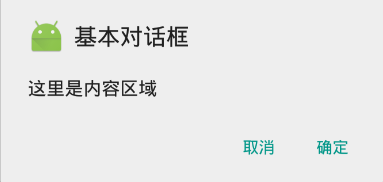
1.showSimpleDialog(): 根据我们前面所写的基本语法,我们可以很快写出下面这些代码,唯一需要注意的就是监听两个button,由于这是最基本也是最核心的AlertDialog,所以只要掌握了这个其他的alertDialog也就相对简单了;
//显示基本Dialog private void showSimpleDialog(View view) { builder=new AlertDialog.Builder(this); builder.setIcon(R.mipmap.ic_launcher); builder.setTitle(R.string.simple_dialog); builder.setMessage(R.string.dialog_message); //监听下方button点击事件 builder.setPositiveButton(R.string.postive_button, new DialogInterface.OnClickListener() { @Override public void onClick(DialogInterface dialogInterface, int i) { Toast.makeText(getApplicationContext(),R.string.toast_postive,Toast.LENGTH_SHORT).show(); } }); builder.setNegativeButton(R.string.negative_button, new DialogInterface.OnClickListener() { @Override public void onClick(DialogInterface dialogInterface, int i) { Toast.makeText(getApplicationContext(), R.string.toast_negative, Toast.LENGTH_SHORT).show(); } }); //设置对话框是可取消的 builder.setCancelable(true); AlertDialog dialog=builder.create(); dialog.show(); }- 1
- 2
- 3
- 4
- 5
- 6
- 7
- 8
- 9
- 10
- 11
- 12
- 13
- 14
- 15
- 16
- 17
- 18
- 19
- 20
- 21
- 22
- 23
- 24
- 25
- 26
实现效果:
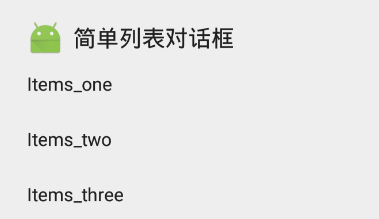
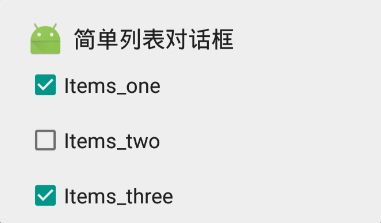
2,showSimpleListDialog():前面的代码很相似,唯一需要改变的就是将内容区域改为列表项:
private void showSimpleListDialog(View view) { builder=new AlertDialog.Builder(this); builder.setIcon(R.mipmap.ic_launcher); builder.setTitle(R.string.simple_list_dialog); / * 设置内容区域为简单列表项 */ final String[] Items={
"Items_one","Items_two","Items_three"}; builder.setItems(Items, new DialogInterface.OnClickListener() { @Override public void onClick(DialogInterface dialogInterface, int i) { Toast.makeText(getApplicationContext(), "You clicked "+Items[i], Toast.LENGTH_SHORT).show(); } }); builder.setCancelable(true); AlertDialog dialog=builder.create(); dialog.show(); } - 1
- 2
- 3
- 4
- 5
- 6
- 7
- 8
- 9
- 10
- 11
- 12
- 13
- 14
- 15
- 16
- 17
- 18
- 19
- 20
实现效果:
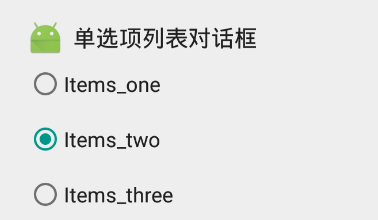
3,showSingleChoiceDialog():注意setSingleChoiceItems()内部各参数的意义
 private void showSingleChoiceDialog(View view) { builder=new AlertDialog.Builder(this); builder.setIcon(R.mipmap.ic_launcher); builder.setTitle(R.string.single_choice_dialog); / * 设置内容区域为单选列表项 */ final String[] items={
"Items_one","Items_two","Items_three"}; builder.setSingleChoiceItems(items, 1, new DialogInterface.OnClickListener() { @Override public void onClick(DialogInterface dialogInterface, int i) { Toast.makeText(getApplicationContext(), "You clicked "+items[i], Toast.LENGTH_SHORT).show(); } }); builder.setCancelable(true); AlertDialog dialog=builder.create(); dialog.show(); }- 1
- 2
- 3
- 4
- 5
- 6
- 7
- 8
- 9
- 10
- 11
- 12
- 13
- 14
- 15
- 16
- 17
- 18
- 19
- 20
实现效果:
4,showMultiCHoiceDialog():
private void showMultiChoiceDialog(View view) { builder=new AlertDialog.Builder(this); builder.setIcon(R.mipmap.ic_launcher); builder.setTitle(R.string.simple_list_dialog); / * 设置内容区域为多选列表项 */ final String[] items={
      "Items_one","Items_two","Items_three"}; builder.setMultiChoiceItems(items, new boolean[]{
true, false, true}, new DialogInterface.OnMultiChoiceClickListener() { @Override public void onClick(DialogInterface dialogInterface, int i, boolean b) { Toast.makeText(getApplicationContext(),"You clicked "+items[i]+" "+b,Toast.LENGTH_SHORT).show(); } }); builder.setCancelable(true); AlertDialog dialog=builder.create(); dialog.show(); }- 1
- 2
- 3
- 4
- 5
- 6
- 7
- 8
- 9
- 10
- 11
- 12
- 13
- 14
- 15
- 16
- 17
- 18
- 19
- 20
- 21
- 22
实现效果:
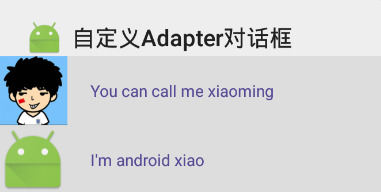
5,showCustomAdapterDialog():
<?xml version="1.0" encoding="utf-8"?> <LinearLayout xmlns:android="http://schemas.android.com/apk/res/android" android:orientation="horizontal" android:background="#dddddd" android:layout_marginLeft="15dp" android:layout_marginTop="15dp" android:layout_marginBottom="10dp" android:layout_marginRight="15dp" android:layout_width="match_parent" android:layout_height="wrap_content"> <ImageView android:id="@+id/id_image" android:layout_width="60dp" android:layout_height="60dp" /> <TextView android:textColor="#" android:id="@+id/id_text" android:layout_marginLeft="20dp" android:layout_gravity="center" android:layout_width="wrap_content" android:layout_height="wrap_content" /> </LinearLayout>- 1
- 2
- 3
- 4
- 5
- 6
- 7
- 8
- 9
- 10
- 11
- 12
- 13
- 14
- 15
- 16
- 17
- 18
- 19
- 20
- 21
- 22
布局效果:
然后我们在需要在MainActivity.java中实现我们自定义的Adapter类:
private class CustomAdapter extends BaseAdapter {
private List<ItemBean> items; private LayoutInflater inflater; private ImageView image; private TextView text; public CustomAdapter(List<ItemBean> items, Context context) { this.items = items; this.inflater = LayoutInflater.from(context); } @Override public int getCount() { return items.size(); } @Override public Object getItem(int i) { return items.get(i); } @Override public long getItemId(int i) { return i; } @Override public View getView(int i, View view, ViewGroup viewGroup) { if(view==null){ view=inflater.inflate(R.layout.custom_adapter,null); image= (ImageView) view.findViewById(R.id.id_image); text= (TextView) view.findViewById(R.id.id_text); } image.setImageResource(items.get(i).getImageId()); text.setText(items.get(i).getMessage()); return view; } }- 1
- 2
- 3
- 4
- 5
- 6
- 7
- 8
- 9
- 10
- 11
- 12
- 13
- 14
- 15
- 16
- 17
- 18
- 19
- 20
- 21
- 22
- 23
- 24
- 25
- 26
- 27
- 28
- 29
- 30
- 31
- 32
- 33
- 34
- 35
- 36
- 37
- 38
- 39
- 40
- 41
我们在这里使用了List items;是因为Adapter中需要一张图片和String来填充我们刚定义好的layout;所以我们还需要在MainActivity中建立一个数据类:ItemBean:
private class ItemBean{
private int imageId; private String message; public ItemBean(int imageId, String message) { this.imageId = imageId; this.message = message; } public String getMessage() { return message; } public int getImageId() { return imageId; } public void setImageId(int imageId) { this.imageId = imageId; } public void setMessage(String message) { this.message = message; } } private void showCustomAdapterDialog(View view){ builder=new AlertDialog.Builder(this); builder.setIcon(R.mipmap.ic_launcher); builder.setTitle(R.string.custom_adapter_dialog); / * 设置内容区域为自定义adapter */ List<ItemBean> items=new ArrayList<>(); items.add(new ItemBean(R.mipmap.icon,"You can call me xiaoming")); items.add(new ItemBean(R.mipmap.ic_launcher, "I'm android xiao")); CustomAdapter adapter=new CustomAdapter(items,getApplicationContext()); builder.setAdapter(adapter, new DialogInterface.OnClickListener() { @Override public void onClick(DialogInterface dialogInterface, int i) { Toast.makeText(getApplicationContext(),"You clicked"+i,Toast.LENGTH_SHORT).show(); } }); builder.setCancelable(true); AlertDialog dialog=builder.create(); dialog.show(); }- 1
- 2
- 3
- 4
- 5
- 6
- 7
- 8
- 9
- 10
- 11
- 12
- 13
- 14
- 15
- 16
- 17
- 18
- 19
- 20
- 21
- 22
- 23
- 24
- 25
- 26
- 27
- 28
- 29
- 30
- 31
- 32
- 33
- 34
- 35
- 36
- 37
- 38
- 39
- 40
- 41
- 42
- 43
- 44
- 45
- 46
- 47
- 48
- 49
- 50
- 51
- 52
实现效果:
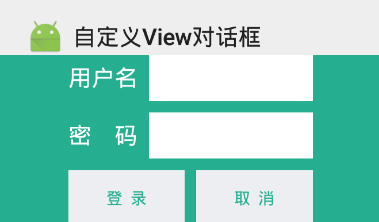
6,showCustomViewDialog()
为了实现自定义View的内容区域,我们首先需要建立一个布局文件: layout->custom_view.xml
<?xml version="1.0" encoding="utf-8"?> <LinearLayout xmlns:android="http://schemas.android.com/apk/res/android" android:layout_width="match_parent" android:layout_height="match_parent" android:orientation="vertical" android:gravity="center" android:background="#25AE90"> <LinearLayout android:orientation="horizontal" android:layout_width="match_parent" android:layout_height="wrap_content" android:layout_marginRight="60dp" android:layout_marginLeft="60dp"> <TextView android:text="用户名" android:layout_marginRight="10dp" android:textSize="20sp" android:textColor="#ffffff" android:layout_width="wrap_content" android:layout_height="wrap_content" /> <EditText android:layout_width="0dp" android:layout_weight="1" android:layout_height="40dp" android:background="#ffffff"/> </LinearLayout> <LinearLayout android:orientation="horizontal" android:layout_width="match_parent" android:layout_height="wrap_content" android:layout_marginTop="10dp" android:layout_marginRight="60dp" android:layout_marginLeft="60dp"> <TextView android:text="密 码" android:layout_marginRight="10dp" android:textSize="20sp" android:textColor="#ffffff" android:layout_width="wrap_content" android:layout_height="wrap_content" /> <EditText android:layout_width="0dp" android:layout_weight="1" android:layout_height="40dp" android:background="#ffffff"/> </LinearLayout> <LinearLayout android:orientation="horizontal" android:layout_width="match_parent" android:layout_height="wrap_content" android:layout_marginTop="10dp" android:layout_marginRight="60dp" android:layout_marginLeft="60dp"> <Button android:text="登 录" android:textColor="#25AE90" android:background="#ECEEF1" android:layout_width="0dp" android:layout_marginRight="10dp" android:layout_weight="1" android:layout_height="wrap_content" /> <Button android:text="取 消" android:textColor="#25AE90" android:background="#ECEEF1" android:layout_width="0dp" android:layout_weight="1" android:layout_height="wrap_content" /> </LinearLayout> </LinearLayout>- 1
- 2
- 3
- 4
- 5
- 6
- 7
- 8
- 9
- 10
- 11
- 12
- 13
- 14
- 15
- 16
- 17
- 18
- 19
- 20
- 21
- 22
- 23
- 24
- 25
- 26
- 27
- 28
- 29
- 30
- 31
- 32
- 33
- 34
- 35
- 36
- 37
- 38
- 39
- 40
- 41
- 42
- 43
- 44
- 45
- 46
- 47
- 48
- 49
- 50
- 51
- 52
- 53
- 54
- 55
- 56
- 57
- 58
- 59
- 60
- 61
- 62
- 63
- 64
- 65
- 66
- 67
- 68
- 69
- 70
布局效果:
实现showCustomViewDialog()
private void showCustomViewDialog(View view){ builder=new AlertDialog.Builder(this); builder.setIcon(R.mipmap.ic_launcher); builder.setTitle(R.string.custom_view_dialog); / * 设置内容区域为自定义View */ LinearLayout loginDialog= (LinearLayout) getLayoutInflater().inflate(R.layout.custom_view,null); builder.setView(loginDialog); builder.setCancelable(true); AlertDialog dialog=builder.create(); dialog.show(); }- 1
- 2
- 3
- 4
- 5
- 6
- 7
- 8
- 9
- 10
- 11
- 12
- 13
- 14
- 15
实现效果:
总结:
- AlertDialog基本用法 :需要掌握AlertDialog的创建过程,理解Builder模式;
- 内容区域 :AlertDialog的难点就在于设计合适的内容区域;
- 自定义布局 :很多时候我们都需要按照自己的意愿去定制AlertDialog内容区域的显示形式,这就需要我们掌握自定义Adapter和自定义View的用法,而这两部分也是一个难点,要讲的话又是另一个专题了;
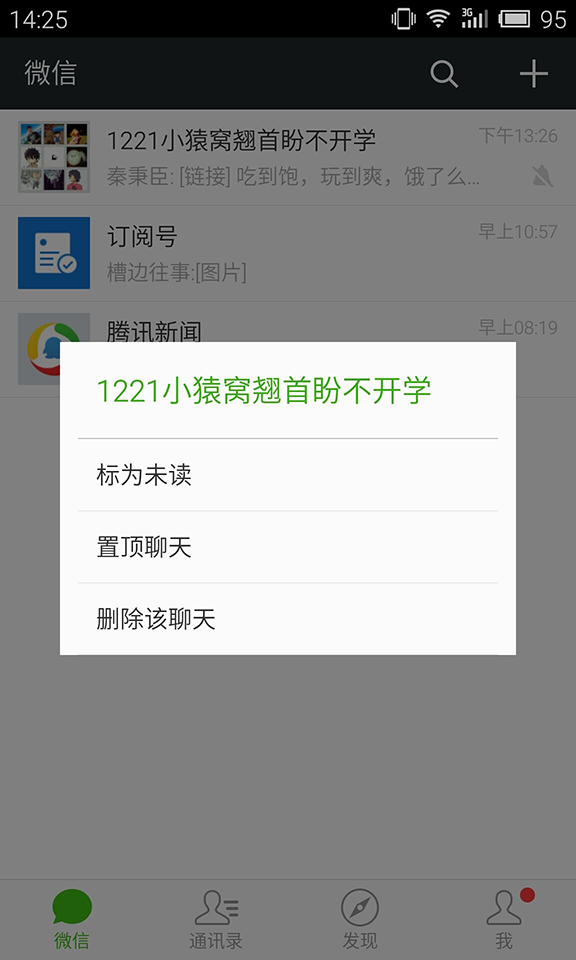
作为文章的结束;为了检验我们是否已经掌握了AlertDialog的各种用法,我们可以试着实现以下微信中的AlertDialog;如果你已经掌握了自定义adapter和自定义ListView的话可以试着实现删除和置顶ListItem的功能。
Tips:编写自定义ListView,监听长按ListItem时弹出AlertDialog,并且实现点击删除能保证ListView中的Item删除掉,并且能够实现置顶功能
发布者:全栈程序员-站长,转载请注明出处:https://javaforall.net/233963.html原文链接:https://javaforall.net

![附件在线预览控件实现的市场调研[通俗易懂]](https://javaforall.net/wp-content/uploads/2020/11/2020110817443450-480x300.jpg)
