
1、准备2台在同一个局域网内的机器,一台作为master主控机,一台作为slave 执行机
master机器ip:172.16.20.134
slave机器ip:172.16.20.146
2、在2台机器上安装同样版本的jmeter 和 java
3、关闭slave机器的防火墙,从master 机器能ping通到slave机器上
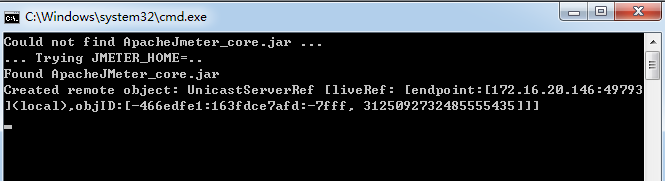
4、slave 机器进入jmeter\bin 目录,点击 jmeter-server.bat,启动jmeter remote 服务

5、编辑好jmeter 脚本,脚本功能,1)打开百度页面,2)一个beanshell脚本,打印本机ip。bean脚本:

import java.net.InetAddress;
InetAddress addr = InetAddress.getLocalHost();
String ip=addr.getHostAddress().toString(); //获取本机ip
String hostName=addr.getHostName().toString(); //获取本机计算机名称
System.out.println(ip);
整个jmeter脚本如下:
<?xml version="1.0" encoding="UTF-8"?>
<jmeterTestPlan version="1.2" properties="3.2" jmeter="3.3 r1808647">
  <hashTree>
    <TestPlan guiclass="TestPlanGui" testclass="TestPlan" testname="测试计划" enabled="true">
      <stringProp name="TestPlan.comments"></stringProp>
      <boolProp name="TestPlan.functional_mode">false</boolProp>
      <boolProp name="TestPlan.serialize_threadgroups">false</boolProp>
      <elementProp name="TestPlan.user_defined_variables" elementType="Arguments" guiclass="ArgumentsPanel" testclass="Arguments" testname="用户定义的变量" enabled="true">
        <collectionProp name="Arguments.arguments"/>
      </elementProp>
      <stringProp name="TestPlan.user_define_classpath"></stringProp>
    </TestPlan>
    <hashTree>
      <ThreadGroup guiclass="ThreadGroupGui" testclass="ThreadGroup" testname="线程组" enabled="true">
        <stringProp name="ThreadGroup.on_sample_error">continue</stringProp>
        <elementProp name="ThreadGroup.main_controller" elementType="LoopController" guiclass="LoopControlPanel" testclass="LoopController" testname="循环控制器" enabled="true">
          <boolProp name="LoopController.continue_forever">false</boolProp>
          <stringProp name="LoopController.loops">2</stringProp>
        </elementProp>
        <stringProp name="ThreadGroup.num_threads">10</stringProp>
        <stringProp name="ThreadGroup.ramp_time">1</stringProp>
        <longProp name="ThreadGroup.start_time">1528965503000</longProp>
        <longProp name="ThreadGroup.end_time">1528965503000</longProp>
        <boolProp name="ThreadGroup.scheduler">false</boolProp>
        <stringProp name="ThreadGroup.duration"></stringProp>
        <stringProp name="ThreadGroup.delay"></stringProp>
      </ThreadGroup>
      <hashTree>
        <HTTPSamplerProxy guiclass="HttpTestSampleGui" testclass="HTTPSamplerProxy" testname="HTTP请求" enabled="true">
          <elementProp name="HTTPsampler.Arguments" elementType="Arguments" guiclass="HTTPArgumentsPanel" testclass="Arguments" testname="用户定义的变量" enabled="true">
            <collectionProp name="Arguments.arguments"/>
          </elementProp>
          <stringProp name="HTTPSampler.domain">www.baidu.com</stringProp>
          <stringProp name="HTTPSampler.port">443</stringProp>
          <stringProp name="HTTPSampler.protocol">https</stringProp>
          <stringProp name="HTTPSampler.contentEncoding"></stringProp>
          <stringProp name="HTTPSampler.path"></stringProp>
          <stringProp name="HTTPSampler.method">GET</stringProp>
          <boolProp name="HTTPSampler.follow_redirects">true</boolProp>
          <boolProp name="HTTPSampler.auto_redirects">false</boolProp>
          <boolProp name="HTTPSampler.use_keepalive">true</boolProp>
          <boolProp name="HTTPSampler.DO_MULTIPART_POST">false</boolProp>
          <stringProp name="HTTPSampler.embedded_url_re"></stringProp>
          <stringProp name="HTTPSampler.connect_timeout"></stringProp>
          <stringProp name="HTTPSampler.response_timeout"></stringProp>
        </HTTPSamplerProxy>
        <hashTree/>
        <BeanShellSampler guiclass="BeanShellSamplerGui" testclass="BeanShellSampler" testname="BeanShell Sampler" enabled="true">
          <stringProp name="BeanShellSampler.query">import java.net.InetAddress;
InetAddress addr = InetAddress.getLocalHost();
String ip=addr.getHostAddress().toString(); //获取本机ip
String hostName=addr.getHostName().toString(); //获取本机计算机名称
System.out.println(ip);</stringProp>
          <stringProp name="BeanShellSampler.filename"></stringProp>
          <stringProp name="BeanShellSampler.parameters"></stringProp>
          <boolProp name="BeanShellSampler.resetInterpreter">false</boolProp>
        </BeanShellSampler>
        <hashTree/>
        <ResultCollector guiclass="ViewResultsFullVisualizer" testclass="ResultCollector" testname="察看结果树" enabled="true">
          <boolProp name="ResultCollector.error_logging">false</boolProp>
          <objProp>
            <name>saveConfig</name>
            <value class="SampleSaveConfiguration">
              <time>true</time>
              <latency>true</latency>
              <timestamp>true</timestamp>
              <success>true</success>
              <label>true</label>
              <code>true</code>
              <message>true</message>
              <threadName>true</threadName>
              <dataType>true</dataType>
              <encoding>false</encoding>
              <assertions>true</assertions>
              <subresults>true</subresults>
              <responseData>false</responseData>
              <samplerData>false</samplerData>
              <xml>false</xml>
              <fieldNames>true</fieldNames>
              <responseHeaders>false</responseHeaders>
              <requestHeaders>false</requestHeaders>
              <responseDataOnError>false</responseDataOnError>
              <saveAssertionResultsFailureMessage>true</saveAssertionResultsFailureMessage>
              <assertionsResultsToSave>0</assertionsResultsToSave>
              <bytes>true</bytes>
              <sentBytes>true</sentBytes>
              <threadCounts>true</threadCounts>
              <idleTime>true</idleTime>
              <connectTime>true</connectTime>
            </value>
          </objProp>
          <stringProp name="filename"></stringProp>
        </ResultCollector>
        <hashTree/>
        <ResultCollector guiclass="StatGraphVisualizer" testclass="ResultCollector" testname="Aggregate Graph" enabled="true">
          <boolProp name="ResultCollector.error_logging">false</boolProp>
          <objProp>
            <name>saveConfig</name>
            <value class="SampleSaveConfiguration">
              <time>true</time>
              <latency>true</latency>
              <timestamp>true</timestamp>
              <success>true</success>
              <label>true</label>
              <code>true</code>
              <message>true</message>
              <threadName>true</threadName>
              <dataType>true</dataType>
              <encoding>false</encoding>
              <assertions>true</assertions>
              <subresults>true</subresults>
              <responseData>false</responseData>
              <samplerData>false</samplerData>
              <xml>false</xml>
              <fieldNames>true</fieldNames>
              <responseHeaders>false</responseHeaders>
              <requestHeaders>false</requestHeaders>
              <responseDataOnError>false</responseDataOnError>
              <saveAssertionResultsFailureMessage>true</saveAssertionResultsFailureMessage>
              <assertionsResultsToSave>0</assertionsResultsToSave>
              <bytes>true</bytes>
              <sentBytes>true</sentBytes>
              <threadCounts>true</threadCounts>
              <idleTime>true</idleTime>
              <connectTime>true</connectTime>
            </value>
          </objProp>
          <stringProp name="filename"></stringProp>
        </ResultCollector>
        <hashTree/>
      </hashTree>
    </hashTree>
    <WorkBench guiclass="WorkBenchGui" testclass="WorkBench" testname="工作台" enabled="true">
      <boolProp name="WorkBench.save">true</boolProp>
    </WorkBench>
    <hashTree/>
  </hashTree>
</jmeterTestPlan>
6、master 主控机打开jmeter\bin\jmeter.properties 文件, 设置 remote_hosts=172.16.20.146:1099
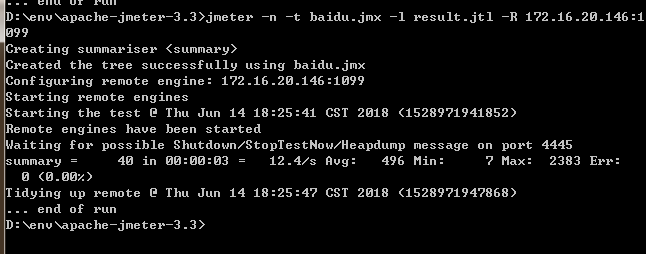
7、执行命令:jmeter -n -t baidu.jmx -l result.jtl -R 172.16.20.146:1099
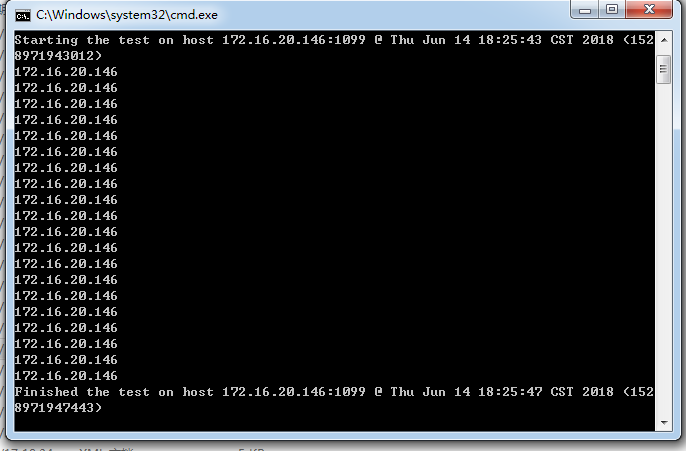
slave 机器执行结果,在salve 机器的console上打印了本机ip,调用成功
版权声明:本文内容由互联网用户自发贡献,该文观点仅代表作者本人。本站仅提供信息存储空间服务,不拥有所有权,不承担相关法律责任。如发现本站有涉嫌侵权/违法违规的内容, 请联系我们举报,一经查实,本站将立刻删除。
发布者:全栈程序员-站长,转载请注明出处:https://javaforall.net/101606.html原文链接:https://javaforall.net


