
大家好,又见面了,我是你们的朋友全栈君。
1.首先需要在pom.xml文件中添加依赖。
需要添加的依赖如下:
         <dependency>
            <groupId>org.mybatis.spring.boot</groupId>
            <artifactId>mybatis-spring-boot-starter</artifactId>
            <version>1.3.2</version>
        </dependency>

        <dependency>
            <groupId>mysql</groupId>
            <artifactId>mysql-connector-java</artifactId>
            <scope>runtime</scope>
        </dependency>
2.配置application.properties文件
代码如下:
 #配置数据源
spring.datasource.driver-class-name=com.mysql.jdbc.Driver
spring.datasource.url=jdbc:mysql://192.168.1.121:3306/world?useUnicode=true&characterEncoding=utf8&useSSL=false
spring.datasource.username=root
spring.datasource.password=root

#Mybatis配置
#设置mapper文件的位置
mybatis.mapperLocations=classpath:mapper/*.xml
到此为止mybatis的整合就完成了,下面我们来写一下代码测试一下。
3.创建实体类
 package com.youyou.address.entity;


import lombok.Data;

/**
 * 数据库实体,联系人
 */
@Data
public class ContacterEO {
    /**
     * 主键

     */
    private String id;
    /**
     * 姓名
     */
    private String name;

    /**
     * 性别(0,女;1,男)
     */
    private String sex;

    /**
     * 年龄
     */
    private Integer age ;

    /**
     * 电话
     */
    private  String phone;

    /**
     * 地址
     */
    private String location;

    /**
     * 删除(0,未删除;1,删除)
     */
    private String dflag ;
}
注意:如果不能识别@Data注解,则需要手动添加getter和setter方法。
4.创建dao接口
 package com.youyou.address.dao;


import com.youyou.address.entity.ContacterEO;

import java.util.List;

public interface ContacterDao {

    void insertOne(ContacterEO contacterEO);

    /**
     * 查询所有
     * @return
     */
    List<ContacterEO> findAll();

}
5.编写对应mapper文件
 <?xml version="1.0" encoding="UTF-8" ?>
<!DOCTYPE mapper PUBLIC "-//mybatis.org//DTD Mapper 3.0//EN" "http://mybatis.org/dtd/mybatis-3-mapper.dtd" >
<mapper namespace="com.youyou.address.dao.ContacterDao" >

    <select id="insertOne"  parameterType="com.youyou.address.entity.ContacterEO" >
        INSERT INTO ts_contacter VALUES(#{id} , #{name} , #{sex} , #{age} , #{phone} , #{location} , #{dflag})
    </select>

    <select id="findAll" resultType="com.youyou.address.entity.ContacterEO">
        select * from ts_contacter
    </select>

</mapper>
6.编写service类
 package com.youyou.address.service;

import com.youyou.address.dao.ContacterDao;
import com.youyou.address.entity.ContacterEO;
import org.springframework.beans.factory.annotation.Autowired;
import org.springframework.stereotype.Service;
import org.springframework.transaction.annotation.Transactional;

import java.util.List;

@Service
@Transactional
public class ContacterService {

    @Autowired
    private ContacterDao dao;

    public void insertOne(ContacterEO contacterEO){
         dao.insertOne(contacterEO);
    }

    public List<ContacterEO> findAll(){
        return dao.findAll();
    }

}
7.编写controller类
 package com.youyou.address.controller;


import com.youyou.address.entity.ContacterEO;
import com.youyou.address.service.ContacterService;
import io.swagger.annotations.Api;
import io.swagger.annotations.ApiOperation;
import org.springframework.beans.factory.annotation.Autowired;
import org.springframework.web.bind.annotation.GetMapping;
import org.springframework.web.bind.annotation.RequestMapping;
import org.springframework.web.bind.annotation.RestController;

import java.util.List;

@Api(description = "联系人接口")
@RestController
@RequestMapping(value = "/contacter")
public class ContacterController {

    @Autowired
    private ContacterService service;

    @ApiOperation(value = "新增")
    @GetMapping("/add")
    public ContacterEO  add(ContacterEO contacterEO){
        System.out.println("添加一个联系人");

        service.insertOne(contacterEO);

        return contacterEO;
    }

    @ApiOperation(value = "查询所有")
    @GetMapping("/findAll")
    public List<ContacterEO> findAll(){
        return service.findAll();
    }

}
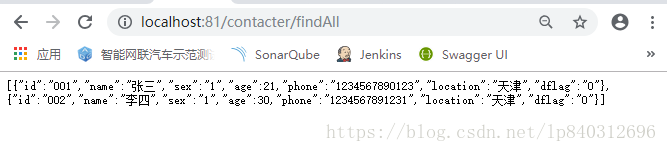
运行结果
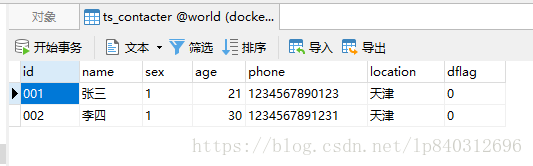
数据库中数据

运行结果
版权声明:本文内容由互联网用户自发贡献,该文观点仅代表作者本人。本站仅提供信息存储空间服务,不拥有所有权,不承担相关法律责任。如发现本站有涉嫌侵权/违法违规的内容, 请联系我们举报,一经查实,本站将立刻删除。
发布者:全栈程序员-站长,转载请注明出处:https://javaforall.net/106467.html原文链接:https://javaforall.net


