
https://socialiteproviders.github.io/providers/qq.html
1. Installation
// This assumes that you have composer installed globally
composer require socialiteproviders/qq
# 2. Service Provider
-
Remove
Laravel\Socialite\SocialiteServiceProviderfrom yourproviders[]array inconfig\app.phpif you have added it already. -
Add
\SocialiteProviders\Manager\ServiceProvider::classto yourproviders[]array inconfig\app.php.
For example:
'providers' => [
    // a whole bunch of providers
    // remove 'Laravel\Socialite\SocialiteServiceProvider',
    \SocialiteProviders\Manager\ServiceProvider::class, // add
];
- Note: If you would like to use the Socialite Facade, you need to install it.
# 3. Event Listener
-
Add
SocialiteProviders\Manager\SocialiteWasCalledevent to yourlisten[]array inapp/Providers/EventServiceProvider. -
Add your listeners (i.e. the ones from the providers) to the
SocialiteProviders\Manager\SocialiteWasCalled[]that you just created. -
The listener that you add for this provider is
'SocialiteProviders\\QQ\\QqExtendSocialite@handle',. -
Note: You do not need to add anything for the built-in socialite providers unless you override them with your own providers.
For example:
/**
 * The event handler mappings for the application.
 *
 * @var array
 */
protected $listen = [
    \SocialiteProviders\Manager\SocialiteWasCalled::class => [
        // add your listeners (aka providers) here
        'SocialiteProviders\\QQ\\QqExtendSocialite@handle',
    ],
];
# Reference
# 4. Configuration setup
You will need to add an entry to the services configuration file so that after config files are cached for usage in production environment (Laravel command artisan config:cache) all config is still available.
# Add to config/services.php.
'qq' => [
    'client_id' => env('QQ_KEY'),
    'client_secret' => env('QQ_SECRET'),
    'redirect' => env('QQ_REDIRECT_URI')
],
# 5. Usage
-
You should now be able to use it like you would regularly use Socialite (assuming you have the facade installed):
return Socialite::with('QQ')->redirect();
# Lumen Support
You can use Socialite providers with Lumen. Just make sure that you have facade support turned on and that you follow the setup directions properly.
Note: If you are using this with Lumen, all providers will automatically be stateless since Lumen does not keep track of state.
Also, configs cannot be parsed from the services[] in Lumen. You can only set the values in the .env file as shown exactly in this document. If needed, you can also override a config (shown below).
# Stateless
- You can set whether or not you want to use the provider as stateless. Remember that the OAuth provider (Twitter, Tumblr, etc) must support whatever option you choose.
Note: If you are using this with Lumen, all providers will automatically be stateless since Lumen does not keep track of state.
// to turn off stateless
return Socialite::with('QQ')->stateless(false)->redirect();

// to use stateless
return Socialite::with('QQ')->stateless()->redirect();
# Overriding a config
If you need to override the provider’s environment or config variables dynamically anywhere in your application, you may use the following:
$clientId = "secret";
$clientSecret = "secret";
$redirectUrl = "http://yourdomain.com/api/redirect";
$additionalProviderConfig = ['site' => 'meta.stackoverflow.com'];
$config = new \SocialiteProviders\Manager\Config($clientId, $clientSecret, $redirectUrl, $additionalProviderConfig);
return Socialite::with('QQ')->setConfig($config)->redirect();
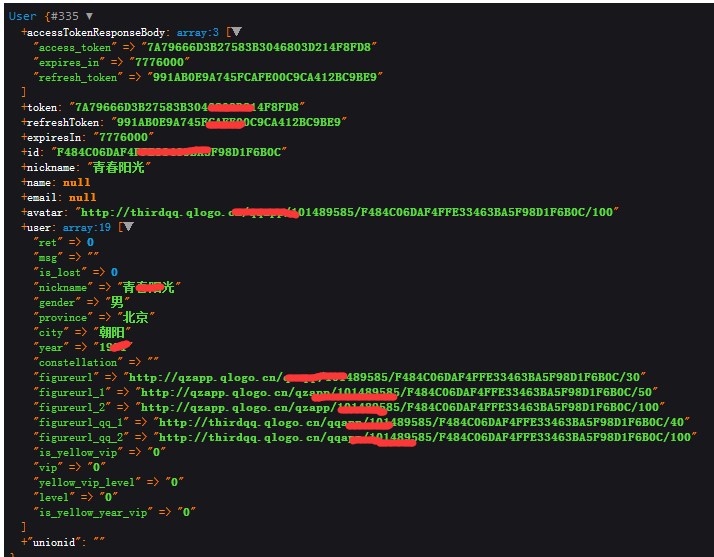
# Retrieving the Access Token Response Body
Laravel Socialite by default only allows access to the access_token. Which can be accessed via the \Laravel\Socialite\User->token public property. Sometimes you need access to the whole response body which may contain items such as a refresh_token.
You can get the access token response body, after you called the user() method in Socialite, by accessing the property $user->accessTokenResponseBody;
$user = Socialite::driver('QQ')->user();
$accessTokenResponseBody = $user->accessTokenResponseBody;
# Reference

参考地址:https://laravel-china.org/docs/laravel/5.6/socialite/1418
https://socialiteproviders.github.io/providers/qq.html
发布者:全栈程序员-站长,转载请注明出处:https://javaforall.net/113037.html原文链接:https://javaforall.net


