
大家好,又见面了,我是你们的朋友全栈君。
原博主博客地址:https://blog.csdn.net/qq21497936
本文章博客地址:https://blog.csdn.net/qq21497936/article/details/84957708
《JRtplib开发笔记(一):JRtplib简介、JThread库编译》: https://blog.csdn.net/qq21497936/article/details/84785284
《JRtplib开发笔记(二):JRtplib库编译、示例演示》: https://blog.csdn.net/qq21497936/article/details/84785593
《JRtplib开发笔记(三):JRtplib库编程使用说明》: https://blog.csdn.net/qq21497936/article/details/84957120
《JRtplib开发笔记(四):JRtplib的VS开发环境搭建以及Demo》: https://blog.csdn.net/qq21497936/article/details/84957708
JRtplib开发笔记(四):JRtplib的VS开发环境搭建以及Demo
前话
前面介绍了JRtplib的使用,接下来介绍如何加入到工程项目中,并使用该工程项目写一个简单的使用Demo。
搭建JRtplib开发环境(VS2017,VC++)
因为没有带Fec,所以传输数据还是会有丢包的情况,这点需要提醒读者,但是如果是局域网有线网络,基本可以忽略丢包的问题,但是如果是使用无线网AP那么首先AP要支持组播,其次组播丢包那是很严重的,如果传图基本是很难收完整的。
下面介绍写了一个简单的rtp接受端和客户端,接受端只发送,客户端只接收。在使用jrtplib之前需要将其添加进工程,当前我们以VS作为IDE,写一个VC程序(使用C语言调用C++),其他IDE参考VS即可,调用外部库不外乎就是三点:
- 引用时需要的头文件
- 编译时需要的dll/lib/.a(此处需要dll与运行时需要的dll一样)
- 运行时需要的dll(此处与编译时需要的dll一样)
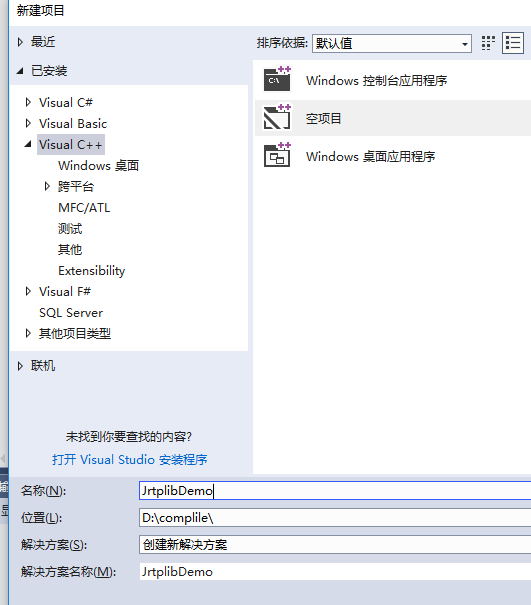
步骤一:新建JrtplibDemo工程
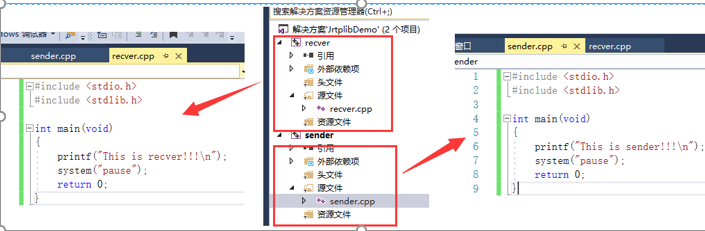
使用VS2017新建VC++空工程,移除创建的项目,然后再添加sender和recver两个项目:

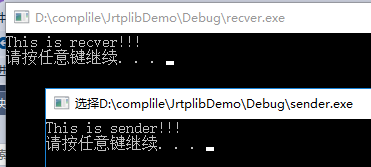
为了调试方便,我们启用多个项目调试,即运行时可设置运行调试哪些项目,如下图:

运行时,如下图:
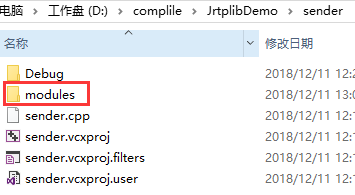
步骤二:项目引用Jrtplib头文件和库文件
将之前的modules模块文件夹引入到工程中,
引入头文件:
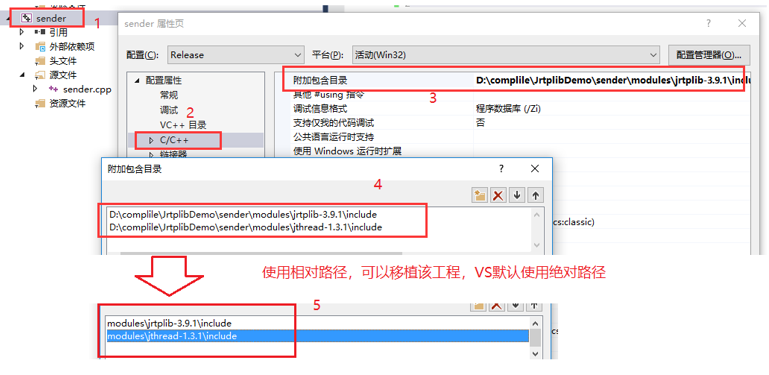
引入库文件
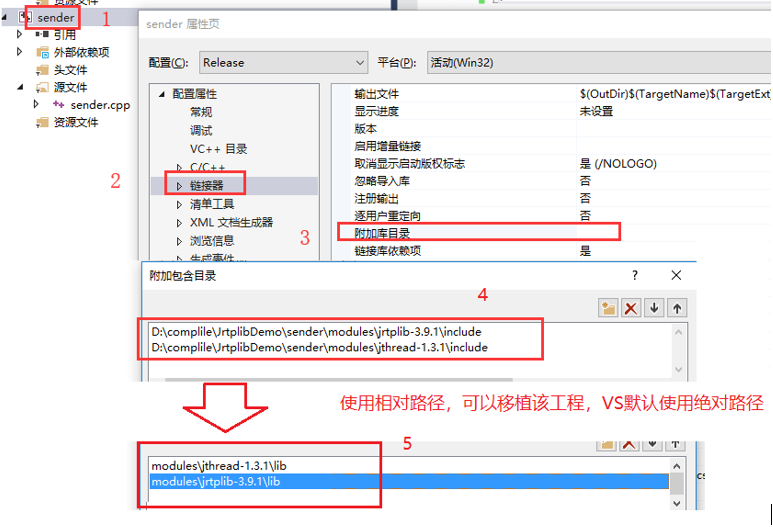
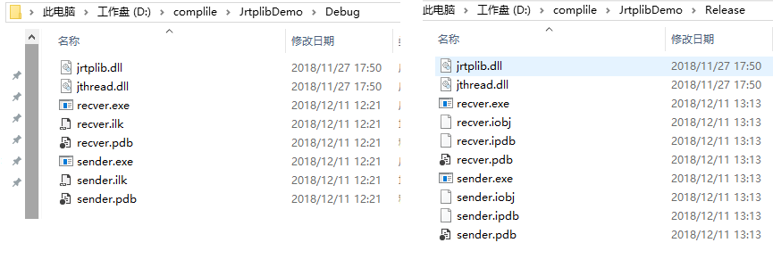
复制库文件(运行时也需要使用库,所以需要将库dll文件复制到exe输出目录下)
Demo演示
可以设置时间戳,包间间隔,负载类型等等,此Demo未附带
发送端源码
#include <stdio.h>
#include <stdlib.h>

// rtp库依赖socket,必须再rtp库引入之前添加,否则会出各种错误
#include <WinSock2.h>
#pragma comment(lib, "ws2_32.lib")

// rtp库引入
#include "rtpsession.h"
#include "rtpudpv4transmitter.h"
#include "rtpipv4address.h"
#include "rtpsessionparams.h"
#include "rtperrors.h"
#pragma comment(lib, "jrtplib.lib")

using namespace jrtplib;

int main(void)
{
  RTPSession  rtpSession;
  R TPSessionParams rtpSessionParams;
  RTPUDPv4TransmissionParams rtpUdpv4Transmissionparams;

  char buf[1024] = { 0x00 };
  char ip[16] = { 0x00 };
  int port = 0;
  int ret = 0;

  // 容易忽略,因为自写代码中没有调用socket,rtp有调用但是没有初始化
  WSADATA dat;
  WSAStartup(MAKEWORD(2, 2), &dat);

  printf("This is sender!!!\n");

  printf("Input destination ip:");
  scanf("%s", ip);
  printf("Input destination port:");
  scanf("%d", &port);
  printf("Destination %s:%d\n", ip, port);

  rtpSessionParams.SetOwnTimestampUnit(1.0 / 1);
  rtpSessionParams.SetUsePollThread(true);
  rtpSessionParams.SetAcceptOwnPackets(false);
  ret = rtpSession.Create(rtpSessionParams, &rtpUdpv4Transmissionparams);
  if (ret < 0)
  {
    printf("Failed to RtpSession::Create, ret=%d\n", ret);
  }

  RTPIPv4Address addr(ntohl(inet_addr(ip)), port);
  rtpSession.AddDestination(addr);

  while (true)
  {
    printf("Input message:");
    scanf("%s", buf);
    if (strcmp(buf, "exit") == 0)
    {
      break;
    }
    ret = rtpSession.SendPacket((void *)buf, strlen(buf), 0, false, 1);
    if (ret < 0)
    {
      printf("Failed to RtpSession::SendPacket, ret=%d\n", ret);
      continue;
    }
    else {
      printf("Succeed to RtpSession::SendPacket!!!\n");
    }
    RTPTime::Wait(RTPTime(0, 100));
  }
  return 0;
}
接收端源码
#include <stdio.h>
#include <stdlib.h>

// rtp库依赖socket,必须再rtp库引入之前添加,否则会出各种错误
#include <WinSock2.h>
#pragma comment(lib, "ws2_32.lib")

// rtp库引入
#include "rtpsession.h"
#include "rtpudpv4transmitter.h"
#include "rtpipv4address.h"
#include "rtpsessionparams.h"
#include "rtperrors.h"
#include "rtppacket.h"
#pragma comment(lib, "jrtplib.lib")

using namespace jrtplib;

int main(void)
{
  RTPSession  rtpSession;
  RTPSessionParams rtpSessionParams;
  RTPUDPv4TransmissionParams rtpUdpv4Transmissionparams;

  char ip[16] = "127.0.0.1";
  int port = 0;
  int ret = 0;
  char buf[1024] = { 0x00 };

  // 容易忽略,因为自写代码中没有调用socket,rtp有调用但是没有初始化
  WSADATA dat;
  WSAStartup(MAKEWORD(2, 2), &dat);

  printf("This is recver!!!\n");

  printf("Input local port:");
  scanf("%d", &port);
  printf("recv %s:%d\n", ip, port);

  rtpSessionParams.SetOwnTimestampUnit(1.0 / 1);
  rtpSessionParams.SetUsePollThread(true);
  rtpSessionParams.SetAcceptOwnPackets(true);
  rtpUdpv4Transmissionparams.SetPortbase(port);
  ret = rtpSession.Create(rtpSessionParams, &rtpUdpv4Transmissionparams);
  if (ret < 0)
  {
    printf("Failed to RtpSession::Create, ret=%d\n", ret);
  }

  RTPIPv4Address addr(ntohl(inet_addr(ip)), port);
#if 0
  // 组播
  rtpSession.JoinMulticastGroup(addr);
#else
  // 本机接收,127.0.0.1
  rtpSession.AddDestination(addr);
#endif

  while (true)
  {
    rtpSession.BeginDataAccess();
    if (rtpSession.GotoFirstSourceWithData())
    {
      do {
        RTPPacket *packet;
        while ((packet = rtpSession.GetNextPacket()) != NULL)
        {
          unsigned int recvSize = packet->GetPayloadLength();
          unsigned char * recvData = (unsigned char *)packet->GetPayloadData();
          memcpy(buf, recvData, recvSize);
          buf[recvSize] = '\0';
          printf("recv %d, message: %s\n", recvSize, buf);
          rtpSession.DeletePacket(packet);
        }
      } while (rtpSession.GotoNextSourceWithData());
    }
    rtpSession.EndDataAccess();
    RTPTime::Wait(RTPTime(0, 100));
  }
  return 0;
}
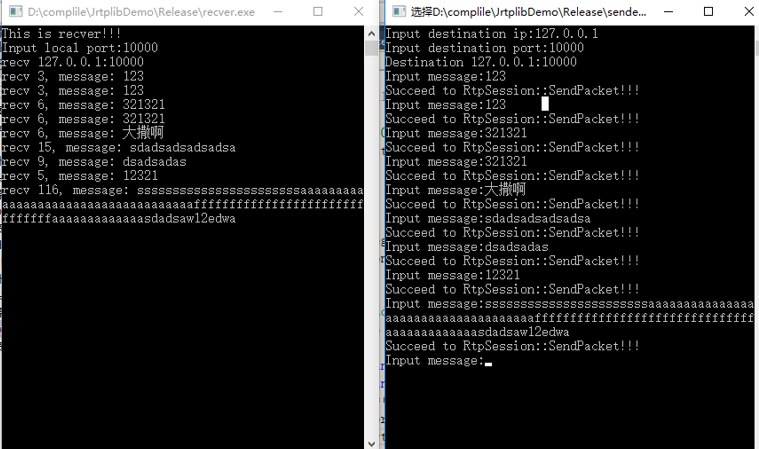
运行Demo效果
Demo下载地址
https://download.csdn.net/download/qq21497936/10843335
《JRtplib开发笔记(一):JRtplib简介、JThread库编译》: https://blog.csdn.net/qq21497936/article/details/84785284
《JRtplib开发笔记(二):JRtplib库编译、示例演示》: https://blog.csdn.net/qq21497936/article/details/84785593
《JRtplib开发笔记(三):JRtplib库编程使用说明》: https://blog.csdn.net/qq21497936/article/details/84957120
《JRtplib开发笔记(四):JRtplib的VS开发环境搭建以及Demo》: https://blog.csdn.net/qq21497936/article/details/84957708
原博主博客地址:https://blog.csdn.net/qq21497936
本文章博客地址:https://blog.csdn.net/qq21497936/article/details/84957708
发布者:全栈程序员-站长,转载请注明出处:https://javaforall.net/126860.html原文链接:https://javaforall.net


