
大家好,又见面了,我是你们的朋友全栈君。
1,简介
最开始我要做右键菜单时,理所当然的想到的是右键单击的信号,这样是可以的。
后来发现原来Qt给QWidget提供了单独的菜单信号:
void customContextMenuRequested(const QPoint &pos);
不过需要先设置菜单策略,使用接口:
setContextMenuPolicy(Qt::CustomContextMenu);
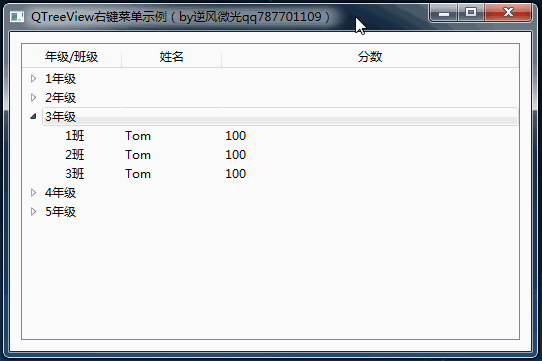
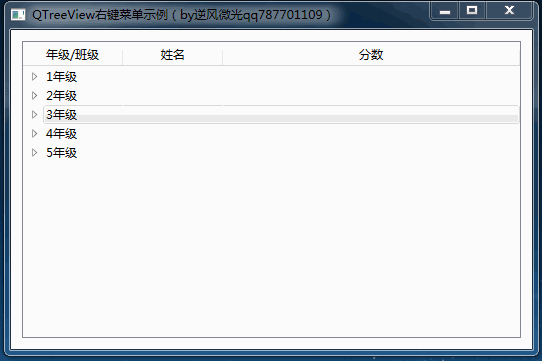
2,菜单效果
下面介绍一个示例,实现如图的菜单效果:
请忽略样式的不搭 ,只是演示设样式的方法。

3,代码
下面代码演示了给QTreeView添加2个菜单,分别实现展开和折叠功能:
MainWindow.h:
#ifndef MAINWINDOW_H
#define MAINWINDOW_H

#include <QMainWindow>
#include <QStandardItemModel>

namespace Ui {
class MainWindow;
}

class MainWindow : public QMainWindow
{
    Q_OBJECT

public:
    explicit MainWindow(QWidget *parent = 0);
    ~MainWindow();

    void InitTree();

private slots:
    void slotTreeMenu(const QPoint &pos);
    void slotTreeMenuExpand(bool checked = false);
    void slotTreeMenuCollapse(bool checked = false);

private:
    Ui::MainWindow *ui;
    QStandardItemModel* mModel;
};

#endif // MAINWINDOW_H
MainWindow.cpp:
#include "mainwindow.h"
#include "ui_mainwindow.h"

#include <QMenu>

MainWindow::MainWindow(QWidget *parent) :
    QMainWindow(parent),
    ui(new Ui::MainWindow)
{
    ui->setupUi(this);
    InitTree();
}

MainWindow::~MainWindow()
{
    delete ui;
}

void MainWindow::InitTree()
{
    //1,QTreeView常用设置项
    QTreeView* t = ui->treeView;
    t->setEditTriggers(QTreeView::NoEditTriggers);			//单元格不能编辑
    t->setSelectionBehavior(QTreeView::SelectRows);			//一次选中整行
    t->setSelectionMode(QTreeView::SingleSelection);        //单选,配合上面的整行就是一次选单行
    t->setAlternatingRowColors(true);                       //每间隔一行颜色不一样,当有qss时该属性无效
    t->setFocusPolicy(Qt::NoFocus);                         //去掉鼠标移到单元格上时的虚线框

    //2,列头相关设置
    t->header()->setHighlightSections(true);                //列头点击时字体变粗,去掉该效果
    t->header()->setDefaultAlignment(Qt::AlignCenter);      //列头文字默认居中对齐
    t->header()->setDefaultSectionSize(100);                //默认列宽100
    t->header()->setStretchLastSection(true);               //最后一列自适应宽度
    t->header()->setSortIndicator(0,Qt::AscendingOrder);    //按第1列升序排序

    //3,构造Model
    //设置列头
    QStringList headers;
    headers << QStringLiteral("年级/班级")
            << QStringLiteral("姓名")
            << QStringLiteral("分数");
    mModel = new QStandardItemModel(ui->treeView);
    mModel->setHorizontalHeaderLabels(headers);
    //设置数据
    for(int i=0;i<5;i++)
    {
        //一级节点:年级,只设第1列的数据,第2、3列将显示为空白
        QStandardItem* itemGrade = new QStandardItem(QStringLiteral("%1年级").arg(i+1));
        mModel->appendRow(itemGrade);       //一级节点挂在model上

        for(int j=0;j<3;j++)
        {
            //二级节点:班级、姓名、分数
            QList<QStandardItem*> items;
            QStandardItem* itemClass = new QStandardItem(QStringLiteral("%1班").arg(j+1));
            QStandardItem* itemName = new QStandardItem("Tom");
            QStandardItem* itemScore = new QStandardItem("100");
            items << itemClass << itemName << itemScore;
            itemGrade->appendRow(items);    //二级节点挂在一级的第1列节点上
        }
    }
    //4,应用model
    t->setModel(mModel);

    //5, 信号槽,右键菜单
    t->setContextMenuPolicy(Qt::CustomContextMenu);
    connect(t, &QTreeView::customContextMenuRequested, this, &MainWindow::slotTreeMenu);
}

void MainWindow::slotTreeMenu(const QPoint &pos)
{
    QString qss = "QMenu{color:#E8E8E8;background:#4D4D4D;margin:2px;}\
                QMenu::item{padding:3px 20px 3px 20px;}\
                QMenu::indicator{width:13px;height:13px;}\
                QMenu::item:selected{color:#E8E8E8;border:0px solid #575757;background:#1E90FF;}\
                QMenu::separator{height:1px;background:#757575;}";

    QMenu menu;
    menu.setStyleSheet(qss);    //可以给菜单设置样式

    QModelIndex curIndex = ui->treeView->indexAt(pos);      //当前点击的元素的index
    QModelIndex index = curIndex.sibling(curIndex.row(),0); //该行的第1列元素的index
    if (index.isValid())
    {
        //可获取元素的文本、data,进行其他判断处理
        //QStandardItem* item = mModel->itemFromIndex(index);
        //QString text = item->text();
        //QVariant data = item->data(Qt::UserRole + 1);
        //...

        //添加一行菜单,进行展开
        menu.addAction(QStringLiteral("展开"), this, SLOT(slotTreeMenuExpand(bool)));
        menu.addSeparator();    //添加一个分隔线
        menu.addAction(QStringLiteral("折叠"), this, SLOT(slotTreeMenuCollapse(bool)));
    }
    menu.exec(QCursor::pos());  //显示菜单
}

void MainWindow::slotTreeMenuExpand(bool checked)
{
    QModelIndex curIndex = ui->treeView->currentIndex();
    QModelIndex index = curIndex.sibling(curIndex.row(),0); //同一行第一列元素的index
    if(index.isValid())
    {
        ui->treeView->expand(index);
    }
}

void MainWindow::slotTreeMenuCollapse(bool checked)
{
    QModelIndex curIndex = ui->treeView->currentIndex();
    QModelIndex index = curIndex.sibling(curIndex.row(),0); //同一行第一列元素的index
    if(index.isValid())
    {
        ui->treeView->collapse(index);
    }
} &QTreeView::customContextMenuRequested, this, &MainWindow::slotTreeMenu);
}

void MainWindow::slotTreeMenu(const QPoint &pos)
{
    QString qss = "QMenu{color:#E8E8E8;background:#4D4D4D;margin:2px;}\
                QMenu::item{padding:3px 20px 3px 20px;}\
                QMenu::indicator{width:13px;height:13px;}\
                QMenu::item:selected{color:#E8E8E8;border:0px solid #575757;background:#1E90FF;}\
                QMenu::separator{height:1px;background:#757575;}";

    QMenu menu;
    menu.setStyleSheet(qss);    //可以给菜单设置样式

    QModelIndex curIndex = ui->treeView->indexAt(pos);      //当前点击的元素的index
    QModelIndex index = curIndex.sibling(curIndex.row(),0); //该行的第1列元素的index
    if (index.isValid())
    {
        //可获取元素的文本、data,进行其他判断处理
        //QStandardItem* item = mModel->itemFromIndex(index);
        //QString text = item->text();
        //QVariant data = item->data(Qt::UserRole + 1);
        //...

        //添加一行菜单,进行展开
        menu.addAction(QStringLiteral("展开"), this, SLOT(slotTreeMenuExpand(bool)));
        menu.addSeparator();    //添加一个分隔线
        menu.addAction(QStringLiteral("折叠"), this, SLOT(slotTreeMenuCollapse(bool)));
    }
    menu.exec(QCursor::pos());  //显示菜单
}

void MainWindow::slotTreeMenuExpand(bool checked)
{
    QModelIndex curIndex = ui->treeView->currentIndex();
    QModelIndex index = curIndex.sibling(curIndex.row(),0); //同一行第一列元素的index
    if(index.isValid())
    {
        ui->treeView->expand(index);
    }
}

void MainWindow::slotTreeMenuCollapse(bool checked)
{
    QModelIndex curIndex = ui->treeView->currentIndex();
    QModelIndex index = curIndex.sibling(curIndex.row(),0); //同一行第一列元素的index
    if(index.isValid())
    {
        ui->treeView->collapse(index);
    }
}
4,菜单图标
菜单左侧可以带图标:
只需添加图片到资源文件,然后在addAction时第一个参数填入图片路径:
menu.addAction(QIcon(":/image/add.png"),QStringLiteral("添加"), this, SLOT(slotTreeMenuAdd(bool)));
menu.addAction(QIcon(":/image/delete.png"),QStringLiteral("删除"), this, SLOT(slotTreeMenuDelete(bool)));
5,多级菜单
有时候一级菜单满足不了需求,可以设置子菜单,实现多级菜单。
效果如图:

添加子菜单的代码如下:
void MainWindow::slotTreeMenu(const QPoint &pos)
{
    QModelIndex curIndex = ui->treeView->indexAt(pos);      //当前点击的元素的index
    QModelIndex index = curIndex.sibling(curIndex.row(),0); //该行的第1列元素的index
    if (index.isValid())
    {
        if(index.parent() != ui->treeView->rootIndex())     //不是一级节点,因为只对二级节点往其他年级移动
        {
            QMenu menu;
            QAction* actionParent = menu.addAction(QStringLiteral("移动到年级"));    //父菜单

            QMenu* subMenu = new QMenu(&menu);  //子菜单
            subMenu->addAction(QStringLiteral("1年级"), this, SLOT(slotTreeMenuMove(bool)));
            subMenu->addAction(QStringLiteral("2年级"), this, SLOT(slotTreeMenuMove(bool)));
            subMenu->addAction(QStringLiteral("3年级"), this, SLOT(slotTreeMenuMove(bool)));
            actionParent->setMenu(subMenu);

            menu.exec(QCursor::pos());
        }
    }
}

void MainWindow::slotTreeMenuMove(bool checked)
{
    //通过action的文本可以判断选择的哪个子菜单,如果文本不够用也可以用data接口
    QAction* action = qobject_cast<QAction*>(sender());
    QString grade = action->text();
    //执行移动
    //...
}
6,源码下载
链接:https://pan.baidu.com/s/1-0DjEwmYCRmQhb5vf6E17A
提取码:rhhd
本博客所有源码,包括本专栏所有配套代码,都可在群文件下载:
群号码:1149411109
群名称:Qt实战派学习群

版权声明:本文内容由互联网用户自发贡献,该文观点仅代表作者本人。本站仅提供信息存储空间服务,不拥有所有权,不承担相关法律责任。如发现本站有涉嫌侵权/违法违规的内容, 请联系我们举报,一经查实,本站将立刻删除。
发布者:全栈程序员-站长,转载请注明出处:https://javaforall.net/141921.html原文链接:https://javaforall.net


