
大家好,又见面了,我是你们的朋友全栈君。如果您正在找激活码,请点击查看最新教程,关注关注公众号 “全栈程序员社区” 获取激活教程,可能之前旧版本教程已经失效.最新Idea2022.1教程亲测有效,一键激活。
Jetbrains全系列IDE稳定放心使用
LAMP 架构搭建
1. LAMP架构简介
所谓lamp,其实就是由Linux+Apache+Mysql/MariaDB+Php/Perl/Python的一组动态网站或者服务器的开源软件,除Linux外其它各部件本身都是各自独立的程序,但是因为经常被放在一起使用,拥有了越来越高的兼容度,共同组成了一个强大的Web应用程序平台。
LAMP指的是Linux(操作系统)、Apache(HTTP服务器)、MySQL(也指MariaDB,数据库软件)和PHP(有时也是指Perl或Python)的第一个字母,一般用来建立web应用平台。
2. 架构说明
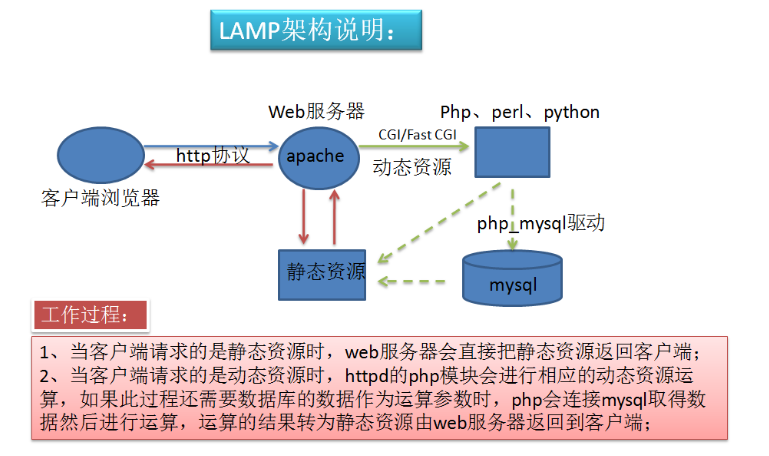

apache主要实现如下功能:

第一:处理http的请求、构建响应报文等自身服务;

第二:配置让Apache支持PHP程序的响应(通过PHP模块或FPM);

第三:配置Apache具体处理php程序的方法,如通过反向代理将php程序交给fcgi处理。

mariadb主要实现如下功能:

第一:提供PHP程序对数据的存储;

第二:提供PHP程序对数据的读取(通常情况下从性能的角度考虑,尽量实现数据库的读写分离)。

php主要实现如下功能:

第一:提供apache的访问接口,即CGI或Fast CGI(FPM);

第二:提供PHP程序的解释器;

第三:提供mairadb数据库的连接函数的基本环境。

由此可知,要实现LAMP在配置每一个服务时,安装功能需求进行配置,即可实现LAMP的架构,当然apache、mariadb和php服务都可配置为独立服务,安装在不同服务器之上。
3. 安装httpd
// 安装开发工具包
[root@localhost ~]# yum groups mark install 'Development Tools'

//创建用户
[root@localhost ~]# useradd -r -M -s /sbin/nologin apache

//安装依赖包
yum -y install openssl-devel pcre-devel expat-devel libtool gcc gcc-c++ make

//拉取软件包
[root@localhost ~]# wget https://mirrors.tuna.tsinghua.edu.cn/apache/apr/apr-util-1.6.1.tar.gz
[root@localhost ~]# wget https://mirrors.tuna.tsinghua.edu.cn/apache/apr/apr-1.7.0.tar.gz
[root@localhost ~]# wget https://mirrors.tuna.tsinghua.edu.cn/apache/httpd/httpd-2.4.49.tar.gz
[root@localhost src]# ls
apr-1.7.0.tar.gz       debug                kernels
apr-util-1.6.1.tar.gz  httpd-2.4.49.tar.gz

//解压软件包
[root@localhost src]# tar xf apr-util-1.6.1.tar.gz
[root@localhost src]# tar xf apr-1.7.0.tar.gz
[root@localhost src]# tar xf httpd-2.4.49.tar.gz

//进入apr-1.7.0的configure删除这一行
$RM "$cfgfile"

//编译apr
[root@localhost apr-1.7.0]# ./configure --prefix=/usr/local/apr && make && make install

//编译apr-util
[root@localhost apr-util-1.6.1]# ./configure --prefix=/usr/local/apr-util --with-apr=/usr/local/apr/ && make && make install

//编译安装httpd
[root@localhost httpd-2.4.49]# ./configure --prefix=/usr/local/apache \
> --enable-so \
> --enable-ssl \
> --enable-cgi \
> --enable-rewrite \
> --with-zlib \
> --with-pcre \
> --with-apr=/usr/local/apr \
> --with-apr-util=/usr/local/apr-util/ \
> --enable-modules=most \
> --enable-mpms-shared=all \
> --with-mpm=prefork

[root@localhost httpd-2.4.49]# make && make install

//设置环境变量
[root@localhost ~]# echo 'export PATH=/usr/local/apache/bin:$PATH' > /etc/profile.d/httpd.sh
[root@localhost ~]# source /etc/profile.d/httpd.sh

//头文件软连接
[root@localhost ~]# ln -s /usr/local/apache/include/ /usr/include/apache

//帮助文档
[root@localhost ~]# vim /etc/man_db.conf
MANDATORY_MANPATH                       /usr/local/apache/m
an

//取消注释
[root@localhost ~]# vim /usr/local/apache/conf/httpd.conf
ServerName www.example.com:80

//编写服务控制脚本
[root@localhost ~]# cat /usr/lib/systemd/system/httpd.service
[Unit]
Description=HTTPD server daemon
After=network.target sshd-keygen.target

[Service]
Type=forking
ExecStart=/usr/local/apache/bin/apachectl start
ExecReload=/bin/kill -HUP $MAINPID
ExecStop=/usr/local/apache/bin/apachectl stop
[Install]
WantedBy=multi-user.target

//设置开机自启
[root@localhost ~]# systemctl enable --now httpd
[root@localhost ~]# systemctl status httpd
● httpd.service - HTTPD server daemon
   Loaded: loaded (/usr/lib/systemd/system/httpd.service; >
   Active: active (running) since Thu 2021-09-23 15:59:20 >
  Process: 175327 ExecStop=/usr/local/apache/bin/apachectl>
  Process: 177184 ExecStart=/usr/local/apache/bin/apachect>
 Main PID: 177187 (httpd)
4. 安装mysq
// 安装依赖包
[root@localhost src]# yum -y install ncurses-devel openssl-devel openssl cmake mariadb-devel ncurses-compat-libs

//创建用户
[root@localhost src]# useradd -r -M -s /sbin/nologin mysql

//下载二进制包
[root@localhost src]# wget https://downloads.mysql.com/archives/get/file/mysql-5.7.22-linux-glibc2.12-x86_64.tar.gz

//解压软件包
[root@localhost src]# tar xf mysql-5.7.31-linux-glibc2.12-x86_64.tar.gz -C /usr/local/

//更改软件名 更改属主属组
[root@localhost ]# mv mysql-5.7.31-linux-glibc2.12-x86_64/ mysql
[root@localhost local]# ls
apache  apr-util  etc    include  lib64    mysql  share
apr     bin       games  lib      libexec  sbin   src
[root@localhost local]# chown -R mysql.mysql mysql

//环境变量
[root@localhost local]# echo 'export PATH=/usr/local/mysql/bin:$PATH' > /etc/profile.d/mysql.sh
[root@localhost local]# source /etc/profile.d/mysql.sh

//头文件软连接
[root@localhost local]# ln -s /usr/local/mysql/include /usr/include/mysql

//帮助文档
[root@localhost local]# vim /etc/man_db.conf
MANDATORY_MANPATH                       /usr/local/mysql/man

//库文件
[root@localhost local]# vim /etc/ld.so.conf.d/mysql.conf
[root@localhost local]# cat /etc/ld.so.conf.d/mysql.conf
/usr/local/mysql/lib
[root@localhost local]# ldconfig

//创建数据存放目录
[root@localhost local]# mkdir /opt/data
[root@localhost local]# chown -R mysql.mysql mysql

//初始化
[root@localhost local]# mysqld --initialize-insecure --user mysql --datadir /opt/data
2021-09-23T08:15:13.057224Z 0 [Warning] TIMESTAMP with implicit DEFAULT value is deprecated. Please use --explicit_defaults_for_timestamp server option (see documentation for more details).
2021-09-23T08:15:13.230890Z 0 [Warning] InnoDB: New log files created, LSN=45790
2021-09-23T08:15:13.262164Z 0 [Warning] InnoDB: Creating foreign key constraint system tables.
2021-09-23T08:15:13.317069Z 0 [Warning] No existing UUID has been found, so we assume that this is the first time that this server has been started. Generating a new UUID: 60745fa2-1c46-11ec-af59-000c2988823d.
2021-09-23T08:15:13.317667Z 0 [Warning] Gtid table is not ready to be used. Table 'mysql.gtid_executed' cannot be opened.
2021-09-23T08:15:14.097910Z 0 [Warning] CA certificate ca.pem is self signed.
2021-09-23T08:15:14.237198Z 1 [Warning] root@localhost is created with an empty password ! Please consider switching off the --initialize-insecure option.

//编写配置文件
[root@localhost ~]# cat > /etc/my.cnf <<EOF
> [mysqld]
> basedir = /usr/local/mysql
> datadir = /opt/data
> socket = /tmp/mysql.sock
> port = 3306
> pid-file = /opt/data/mysql.pid
> user = mysql
> skip-name-resolve
> EOF

//服务控制脚本
[root@localhost ~]# cat /usr/lib/systemd/system/mysqld.service
[Unit]
Description=Mysql server daemon
After=network.target sshd-keygen.target

[Service]
Type=forking
ExecStart=/usr/local/mysql/support-files/mysql.server start
ExecReload=/bin/kill -HUP $MAINPID
ExecStop=/usr/local/mysql/support-files/mysql.server stop
[Install]
WantedBy=multi-user.target
basedir=/usr/local/mysql
datadir=/opt/data

[root@localhost ~]# vim /usr/local/mysql/support-files/mysql.server
basedir=/usr/local/mysql
datadir=/opt/data

//设置开机自启
[root@localhost ~]# systemctl daemon-reload
[root@localhost ~]# systemctl start mysqld
[root@localhost ~]# systemctl enable --now mysqld
Created symlink /etc/systemd/system/multi-user.target.wants/mysqld.service → /usr/lib/systemd/system/mysqld.service.
[root@localhost ~]# ss -antl
State  Recv-Q Send-Q Local Address:Port  Peer Address:Port
LISTEN 0      128          0.0.0.0:22         0.0.0.0:*
LISTEN 0      80                 *:3306             *:*
LISTEN 0      128                *:80               *:*
LISTEN 0      128             [::]:22            [::]:*

//设置密码
mysql> set password = password("123456");
Query OK, 0 rows affected, 1 warning (0.00 sec)
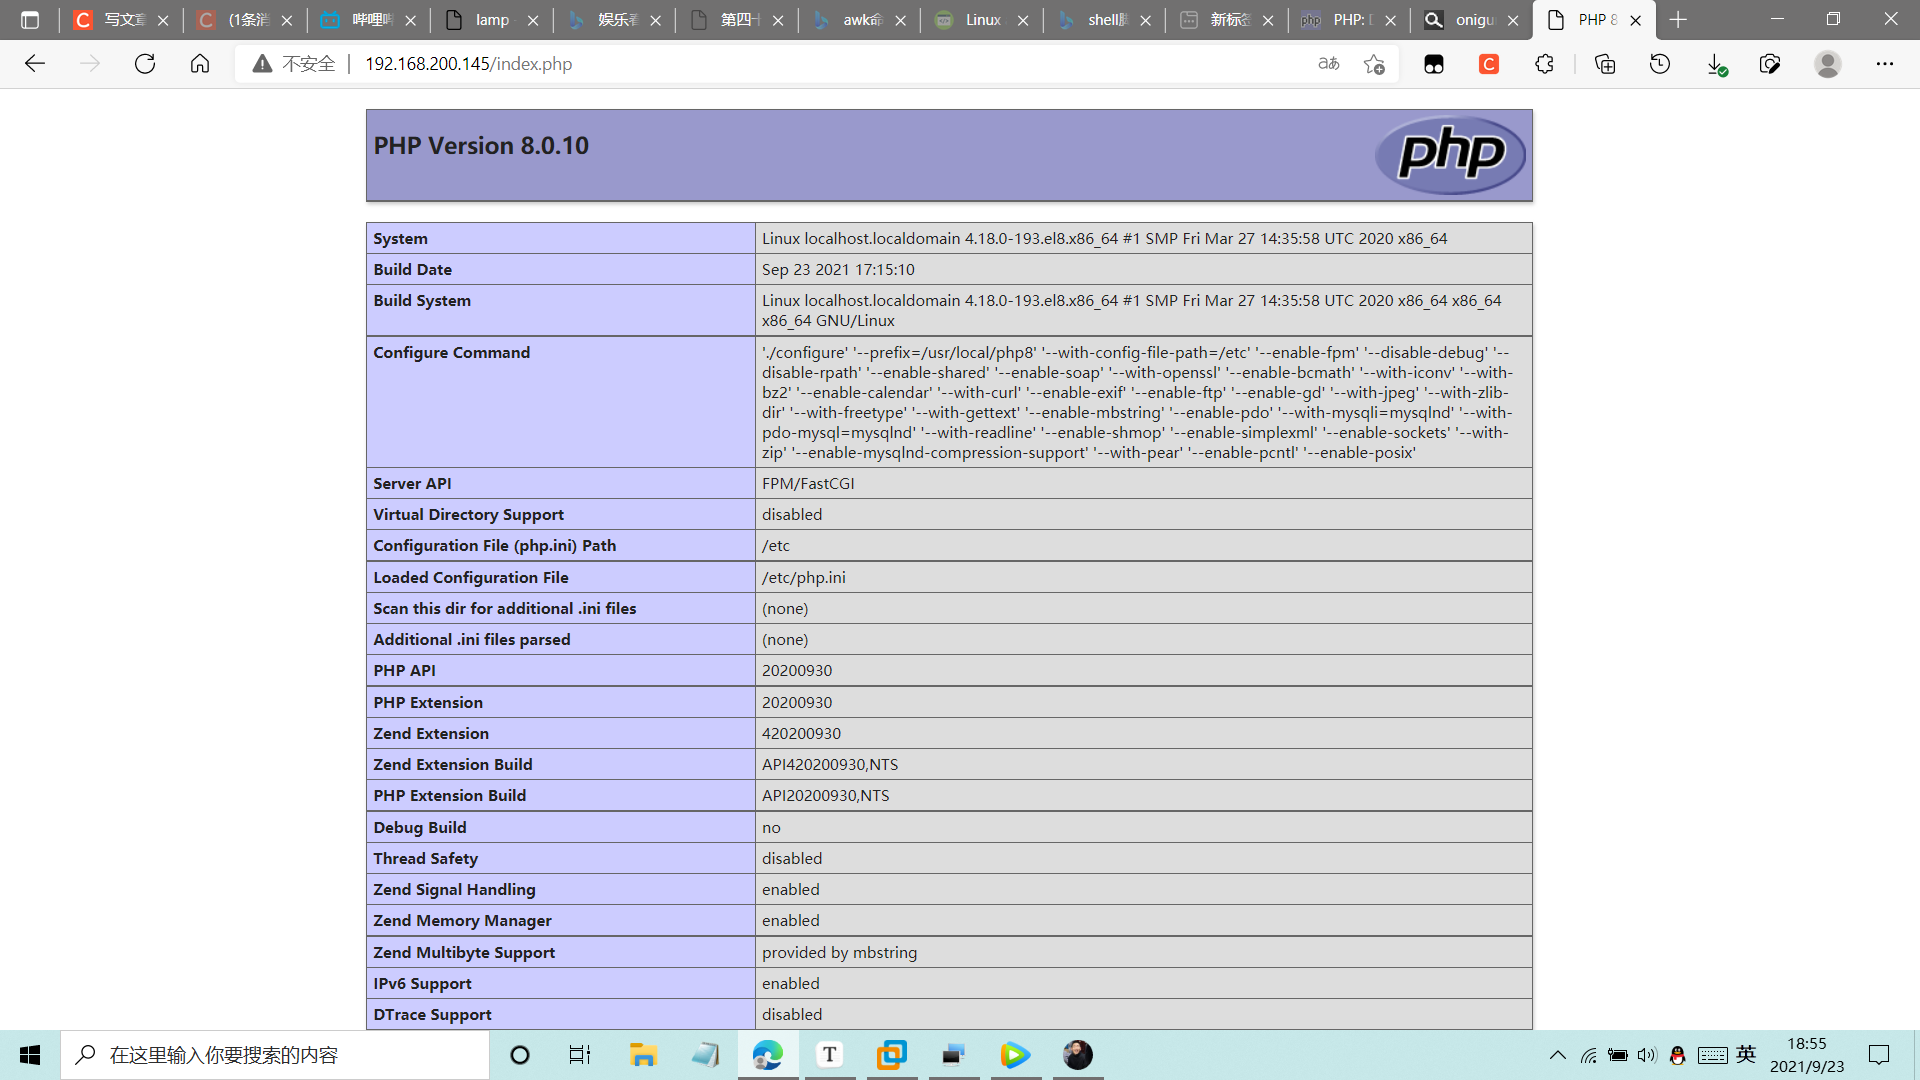
5. 安装php
//下载软件包
https://www.php.net/downloads.php#v8.0.10

//解压
[root@localhost src]# tar xf php-8.0.10.tar.xz
[root@localhost src]# ls

//安装依赖包
[root@localhost php-8.0.10]# yum -y install epel-release
[root@localhost ~]# yum -y install http://mirror.centos.org/centos/8-stream/PowerTools/x86_64/os/Packages/oniguruma-devel-6.8.2-2.el8.x86_64.rpm
[root@localhost php-8.0.10]# yum -y install libxml2 libxml2-devel openssl openssl-devel bzip2 bzip2-devel libcurl libcurl-devel libicu-devel libjpeg libjpeg-devel libpng libpng-devel openldap-devel pcre-devel freetype freetype-devel gmp gmp-devel libmcrypt libmcrypt-devel readline readline-devel libxslt libxslt-devel mhash mhash-devel php-mysqlnd libsqlite3x-devel oniguruma libzip-devel

//编译安装
[root@localhost php-8.0.10]# ./configure --prefix=/usr/local/php8 \
--with-config-file-path=/etc \
--enable-fpm \
--disable-debug \
--disable-rpath \
--enable-shared \
--enable-soap \
--with-openssl \
--enable-bcmath \
--with-iconv \
--with-bz2 \
--enable-calendar \
--with-curl \
--enable-exif  \
--enable-ftp \
--enable-gd \
--with-jpeg \
--with-zlib-dir \
--with-freetype \
--with-gettext \
--enable-mbstring \
--enable-pdo \
--with-mysqli=mysqlnd \
--with-pdo-mysql=mysqlnd \
--with-readline \
--enable-shmop \
--enable-simplexml \
--enable-sockets \
--with-zip \
--enable-mysqlnd-compression-support \
--with-pear \
--enable-pcntl \
--enable-posix

[root@localhost php-8.0.10]# make && make install

//环境变量
[root@localhost ~]# echo 'export PATH=/usr/local/php8/bin:$PATH' > /etc/profile.d/php.sh
[root@localhost ~]# source /etc/profile.d/php.sh

//配置php-fpm
[root@localhost php-8.0.10]# cp php.ini-production /etc/php.ini
cp:是否覆盖'/etc/php.ini'? y
[root@localhost fpm]# cp init.d.php-fpm /etc/init.d/php-fpm
[root@localhost fpm]# chmod +x /etc/init.d/php-fpm
[root@localhost php-8.0.10]# cd /usr/local/php8/
[root@localhost php8]# ls
bin  etc  include  lib  php  sbin  var
[root@localhost php8]# cd etc/
[root@localhost etc]# cp php-fpm.conf.default php-fpm.conf
[root@localhost etc]# ls
pear.conf  php-fpm.conf  php-fpm.conf.default  php-fpm.d
[root@localhost etc]# cd php-fpm.d/
[root@localhost php-fpm.d]# cp www.conf.default www.conf
[root@localhost php-fpm.d]# ls
www.conf  www.conf.default


//取消httpd.conf的注释
[root@localhost fpm]# vim /usr/local/apache/conf/httpd.conf
LoadModule proxy_module modules/mod_proxy.so
LoadModule proxy_fcgi_module modules/mod_proxy_fcgi.so

//编写测试文件
[root@localhost apache]# cat htdocs/test/index.php
<?php
phpinfo();
?>
[root@localhost ~]# chown -R apache.apache /usr/local/apache/htdocs/

//配置虚拟主机
[root@localhost ~]# vim /usr/local/apache/conf/httpd.conf
//在配置文件的最后加入以下内容
<VirtualHost *:80>
    DocumentRoot "/usr/local/apache/htdocs/test"
    ServerName www.xym.com
    ProxyRequests Off
    ProxyPassMatch ^/(.*\.php)$ fcgi://127.0.0.1:9000/usr/local/apache/htdocs/test/$1
    <Directory "/usr/local/apache/htdocs/test">
        Options none
        AllowOverride none
        Require all granted
    </Directory>
</VirtualHost>

[root@localhost ~]# vim /usr/local/apache/conf/httpd.conf
//搜索AddType,添加以下内容
    # If the AddEncoding directives above are commented-out, then you
    # probably should define those extensions to indicate media types:
    #
    AddType application/x-compress .Z
    AddType application/x-gzip .gz .tgz
    AddType application/x-httpd-php .php        #添加此行
    AddType application/x-httpd-php-source .phps        #添加此行

[root@localhost ~]# sed -i '/ DirectoryIndex/s/index.html/index.php index.html/g' /usr/local/apache/conf/httpd.conf

//启动php httpd
[root@localhost php-fpm.d]# service php-fpm start
[root@localhost apache]# systemctl restart httpd
[root@localhost php-fpm.d]# ss -antl
State  Recv-Q Send-Q Local Address:Port  Peer Address:Port
LISTEN 0      128        127.0.0.1:9000       0.0.0.0:*
LISTEN 0      128          0.0.0.0:22         0.0.0.0:*
LISTEN 0      80                 *:3306             *:*
LISTEN 0      128                *:80               *:*
LISTEN 0      128             [::]:22            [::]:*
版权声明:本文内容由互联网用户自发贡献,该文观点仅代表作者本人。本站仅提供信息存储空间服务,不拥有所有权,不承担相关法律责任。如发现本站有涉嫌侵权/违法违规的内容, 请联系我们举报,一经查实,本站将立刻删除。
发布者:全栈程序员-站长,转载请注明出处:https://javaforall.net/181022.html原文链接:https://javaforall.net


