
大家好,又见面了,我是你们的朋友全栈君。如果您正在找激活码,请点击查看最新教程,关注关注公众号 “全栈程序员社区” 获取激活教程,可能之前旧版本教程已经失效.最新Idea2022.1教程亲测有效,一键激活。
Jetbrains全系列IDE稳定放心使用
首先引入POM依赖
		<!--nosql数据库-->
		<dependency>
			<groupId>org.springframework.boot</groupId>
			<artifactId>spring-boot-starter-data-redis</artifactId>
		</dependency>

		<!--spring2.0集成redis所需common-pool2-->
		<dependency>
			<groupId>org.apache.commons</groupId>
			<artifactId>commons-pool2</artifactId>
			<version>2.4.2</version>
		</dependency>

		<!--fastjson-->
		<dependency>
			<groupId>com.alibaba</groupId>
			<artifactId>fastjson</artifactId>
			<version>1.2.8</version>
		</dependency>
加入配置
这里我用的是YML的格式
spring:
    redis:
      #数据库索引
      database: 0
      host: 127.0.0.1
      port: 6379
      password:
      jedis:
        pool:
          #最大连接数
          max-active: 8
          #最大阻塞等待时间(负数表示没限制)
          max-wait: -1
          #最大空闲
          max-idle: 8
          #最小空闲
          min-idle: 0
      #连接超时时间
      timeout: 10000
正常情况下这样就可以直接使用了
@SpringBootTest
@RunWith(SpringRunner.class)
@Component
public class TestRedis {

    @Autowired
    private RedisTemplate redisTemplate;

    @Test
    public void set(){
        redisTemplate.opsForValue().set("test:set","testValue1");
    }
}
完了?
没错,完了!
可能你就好奇了,不对呀,刚刚还引入了fastjson啊,这就是文章的重点了,然我们跑一下刚刚的程序,看一下我们存的键值对


虽然存取是没什么问题,但是这看着让人很蓝受,让我们翻阅Redis的源码发现RedisTemplate中有这么一段
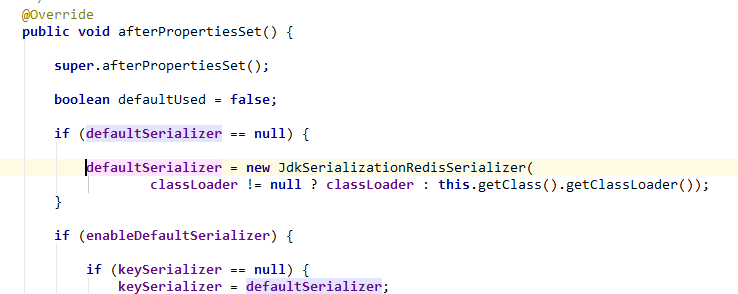
这是由于默认序列化方式导致的,竟然发现了问题,现在就解决它
首先自定义一个通用序列化方式的类
public class FastJsonRedisSerializer<T> implements RedisSerializer<T> {

    public static final Charset DEFAULT_CHARSET = Charset.forName("UTF-8");

    private Class<T> clazz;

    public FastJsonRedisSerializer(Class<T> clazz) {
        super();
        this.clazz = clazz;
    }

    @Override
    public byte[] serialize(T t) throws SerializationException {
        if (null == t) {
            return new byte[0];
        }
        return JSON.toJSONString(t, SerializerFeature.WriteClassName).getBytes(DEFAULT_CHARSET);
    }

    @Override
    public T deserialize(byte[] bytes) throws SerializationException {
        if (null == bytes || bytes.length <= 0) {
            return null;
        }
        String str = new String(bytes, DEFAULT_CHARSET);
        return (T) JSON.parseObject(str, clazz);
    }

}
然后我们找源码
org.springframework.boot.autoconfigure.data.redis.RedisAutoConfiguration
毫无疑问,它就是Redis的核心配置了,新建一个类RedisConfig把RedisAutoConfiguration中的内容全部复制过来,稍加修改
@Configuration
@ConditionalOnClass(RedisOperations.class)
@EnableConfigurationProperties(RedisProperties.class)
public class RedisConfig {

    @Bean
    @ConditionalOnMissingBean(name = "redisTemplate")
    public RedisTemplate<Object, Object> redisTemplate(
            RedisConnectionFactory redisConnectionFactory) {
        RedisTemplate<Object, Object> template = new RedisTemplate<>();

        //使用fastjson序列化
        FastJsonRedisSerializer fastJsonRedisSerializer = new FastJsonRedisSerializer(Object.class);
        // value值的序列化采用fastJsonRedisSerializer
        template.setValueSerializer(fastJsonRedisSerializer);
        template.setHashValueSerializer(fastJsonRedisSerializer);
        // key的序列化采用StringRedisSerializer
        template.setKeySerializer(new StringRedisSerializer());
        template.setHashKeySerializer(new StringRedisSerializer());

        template.setConnectionFactory(redisConnectionFactory);
        return template;
    }

    @Bean
    @ConditionalOnMissingBean(StringRedisTemplate.class)
    public StringRedisTemplate stringRedisTemplate(
            RedisConnectionFactory redisConnectionFactory) {
        StringRedisTemplate template = new StringRedisTemplate();
        template.setConnectionFactory(redisConnectionFactory);
        return template;
    }

}
如上代码所见,我们修改了key和value的序列化规则,key就用Redis本身提供的序列化方式,value就用我们刚刚定义的fastjson序列化方式。
至此完毕
版权声明:本文内容由互联网用户自发贡献,该文观点仅代表作者本人。本站仅提供信息存储空间服务,不拥有所有权,不承担相关法律责任。如发现本站有涉嫌侵权/违法违规的内容, 请联系我们举报,一经查实,本站将立刻删除。
发布者:全栈程序员-站长,转载请注明出处:https://javaforall.net/189299.html原文链接:https://javaforall.net


