
大家好,又见面了,我是你们的朋友全栈君。如果您正在找激活码,请点击查看最新教程,关注关注公众号 “全栈程序员社区” 获取激活教程,可能之前旧版本教程已经失效.最新Idea2022.1教程亲测有效,一键激活。
Jetbrains全系列IDE使用 1年只要46元 售后保障 童叟无欺
1.user-info-uri 与 token-info-uri
作用:二者皆是为了check token,并且顺带返回了用户信息。配置信息位置在资源服务器上。
解释:下面代码列举的都是token-info-uri,user-info-uri不解释。user-info-uri原理是在授权服务器认证后将认证信息Principal通过形参绑定的方法通过URL的方式获取用户信息。当然它也有配套的UserInfoTokenService等等,我没有研究,不过流程大概跟token-info-uri差不多。
server:
  port: 9007
security:
  oauth2:
    client:
      clientId: resource1
      clientSecret: secret
      userAuthorizationUri: http://localhost:9005/oauth/authorize
      grant-type: password
      scope: read
      access-token-uri: http://localhost:9005/oauth/token

    resource:
      token-info-uri: http://localhost:9005/oauth/check_token
      user-info-uri: http://localhost:9005/user
    authorization:
      check-token-access: http://localhost:9005/oauth/check_token

#    resource:
#      jwt:
#        key-uri: http://localhost:9005/oauth/token_key
  basic:
    enabled: false
下面内容默认已经自定义了UserDetail的实现,我们从开始向授权服务器验证token开始分析源码
从RemoteTokenService发起验证请求,可以看到是通过restTemplate发起请求的,并且返回map类型的响应结果
public OAuth2Authentication loadAuthentication(String accessToken) throws AuthenticationException, InvalidTokenException {
        MultiValueMap<String, String> formData = new LinkedMultiValueMap();
        formData.add(this.tokenName, accessToken);
        HttpHeaders headers = new HttpHeaders();
        headers.set("Authorization", this.getAuthorizationHeader(this.clientId, this.clientSecret));
        Map<String, Object> map = this.postForMap(this.checkTokenEndpointUrl, formData, headers);
        if (map.containsKey("error")) {
            this.logger.debug("check_token returned error: " + map.get("error"));
            throw new InvalidTokenException(accessToken);
        } else {
            Assert.state(map.containsKey("client_id"), "Client id must be present in response from auth server");
            return this.tokenConverter.extractAuthentication(map);
        }
    }
public class RemoteTokenServices implements ResourceServerTokenServices {
......
private Map<String, Object> postForMap(String path, MultiValueMap<String, String> formData, HttpHeaders headers) {
if (headers.getContentType() == null) {
headers.setContentType(MediaType.APPLICATION_FORM_URLENCODED);
}
Map map = (Map)this.restTemplate.exchange(path, HttpMethod.POST, new HttpEntity(formData, headers), Map.class, new Object[0]).getBody();
return map;
}
}
接着我们会到达check_token端点,可以看到通过loadAuthentication将token转化成OAuth2Authentication。然后再通过convertAccessToken转换我们需要返回的信息
@RequestMapping({"/oauth/check_token"})
    @ResponseBody
    public Map<String, ?> checkToken(@RequestParam("token") String value) {
        OAuth2AccessToken token = this.resourceServerTokenServices.readAccessToken(value);
        if (token == null) {
            throw new InvalidTokenException("Token was not recognised");
        } else if (token.isExpired()) {
            throw new InvalidTokenException("Token has expired");
        } else {
            OAuth2Authentication authentication = this.resourceServerTokenServices.loadAuthentication(token.getValue());
            Map<String, ?> response = this.accessTokenConverter.convertAccessToken(token, authentication);
            return response;
        }
    }
通过将token作为key从redis取出value,然后反序列化出来认证对象
public OAuth2AccessToken readAccessToken(String tokenValue) {
        byte[] key = this.serializeKey("access:" + tokenValue);
        byte[] bytes = null;
        RedisConnection conn = this.getConnection();

        byte[] bytes;
        try {
            bytes = conn.get(key);
        } finally {
            conn.close();
        }

        OAuth2AccessToken var5 = this.deserializeAccessToken(bytes);
        return var5;
    }
通过转换器挑选需要返回的数据信息
 public Map<String, ?> convertAccessToken(OAuth2AccessToken token, OAuth2Authentication authentication) {
        Map<String, Object> response = new HashMap();
        OAuth2Request clientToken = authentication.getOAuth2Request();
        if (!authentication.isClientOnly()) {
            response.putAll(this.userTokenConverter.convertUserAuthentication(authentication.getUserAuthentication()));
        } else if (clientToken.getAuthorities() != null && !clientToken.getAuthorities().isEmpty()) {
            response.put("authorities", AuthorityUtils.authorityListToSet(clientToken.getAuthorities()));
        }

        if (token.getScope() != null) {
            response.put("scope", token.getScope());
        }

        if (token.getAdditionalInformation().containsKey("jti")) {
            response.put("jti", token.getAdditionalInformation().get("jti"));
        }

        if (token.getExpiration() != null) {
            response.put("exp", token.getExpiration().getTime() / 1000L);
        }

        if (this.includeGrantType && authentication.getOAuth2Request().getGrantType() != null) {
            response.put("grant_type", authentication.getOAuth2Request().getGrantType());
        }

        response.putAll(token.getAdditionalInformation());
        response.put("client_id", clientToken.getClientId());
        if (clientToken.getResourceIds() != null && !clientToken.getResourceIds().isEmpty()) {
            response.put("aud", clientToken.getResourceIds());
        }

        return response;
    }
从默认的实现类可以看出,只会将认证的用户名name返回到资源服务器,我们如果想要所有信息,最好是重构此方法。当然这个前提是我们在使用token-info-uri
public class DefaultUserAuthenticationConverter implements UserAuthenticationConverter {
    private Collection<? extends GrantedAuthority> defaultAuthorities;
    private UserDetailsService userDetailsService;

    public DefaultUserAuthenticationConverter() {
    }

    public void setUserDetailsService(UserDetailsService userDetailsService) {
        this.userDetailsService = userDetailsService;
    }

    public void setDefaultAuthorities(String[] defaultAuthorities) {
        this.defaultAuthorities = AuthorityUtils.commaSeparatedStringToAuthorityList(StringUtils.arrayToCommaDelimitedString(defaultAuthorities));
    }

    public Map<String, ?> convertUserAuthentication(Authentication authentication) {
        Map<String, Object> response = new LinkedHashMap();
        response.put("user_name", authentication.getName());
        if (authentication.getAuthorities() != null && !authentication.getAuthorities().isEmpty()) {
            response.put("authorities", AuthorityUtils.authorityListToSet(authentication.getAuthorities()));
        }

        return response;
    }
开始重写 DefaultUserAuthenticationConverter的convertUserAuthentication方法,将所有授权信息都返回到资源服务器
@Service
public class MyUserAuthenticationConverter extends DefaultUserAuthenticationConverter {

    @Override
    public Map<String, ?> convertUserAuthentication(Authentication authentication) {
        Map<String, Object> response = new LinkedHashMap();
        response.put("user_name", authentication);
        return response;
    }
}
在授权服务器的配置类上,我们把重写的认证转换器设置到配置类上,由于看到源代码只有accessTokenConverter方法,可以得知需要替换整个DefaultAccessTokenConverter,而在DefaultAccessTokenConverter里面我们可以把我们刚刚重构的DefaultUserAuthenticationConverter设置进去。
@Override
    public void configure(AuthorizationServerEndpointsConfigurer endpoints) throws Exception {
        Collection<TokenEnhancer> tokenEnhancers = applicationContext.getBeansOfType(TokenEnhancer.class).values();
        TokenEnhancerChain tokenEnhancerChain=new TokenEnhancerChain();
        tokenEnhancerChain.setTokenEnhancers(new ArrayList<>(tokenEnhancers));
        DefaultTokenServices defaultTokenServices = new DefaultTokenServices();
        defaultTokenServices.setReuseRefreshToken(isReuseRefreshToken);
        defaultTokenServices.setSupportRefreshToken(isSupportRefreshToken);
        defaultTokenServices.setTokenStore(tokenStore);
        defaultTokenServices.setAccessTokenValiditySeconds(accessTokenValiditySeconds);
        defaultTokenServices.setRefreshTokenValiditySeconds(refreshTokenValiditySeconds);
        defaultTokenServices.setTokenEnhancer(tokenEnhancerChain);
        //若通过 JDBC 存储令牌
        if (Objects.nonNull(jdbcClientDetailsService)){
            defaultTokenServices.setClientDetailsService(jdbcClientDetailsService);
        }
        DefaultAccessTokenConverter defaultAccessTokenConverter=new DefaultAccessTokenConverter();
        defaultAccessTokenConverter.setUserTokenConverter(new MyUserAuthenticationConverter());
        endpoints
                .authenticationManager(authenticationManager)
                .userDetailsService(userDetailsService)
                .accessTokenConverter(defaultAccessTokenConverter)
                .tokenServices(defaultTokenServices);
    }
当授权服务器响应完毕,我们重新回到资源发武器发起check token请求的函数那里,可以看到当拿到map后,开始用资源服务器也就是本引用中的tokenConverte进行数据的处理
public OAuth2Authentication loadAuthentication(String accessToken) throws AuthenticationException, InvalidTokenException {
        MultiValueMap<String, String> formData = new LinkedMultiValueMap();
        formData.add(this.tokenName, accessToken);
        HttpHeaders headers = new HttpHeaders();
        headers.set("Authorization", this.getAuthorizationHeader(this.clientId, this.clientSecret));
        Map<String, Object> map = this.postForMap(this.checkTokenEndpointUrl, formData, headers);
        if (map.containsKey("error")) {
            this.logger.debug("check_token returned error: " + map.get("error"));
            throw new InvalidTokenException(accessToken);
        } else {
            Assert.state(map.containsKey("client_id"), "Client id must be present in response from auth server");
            return this.tokenConverter.extractAuthentication(map);
        }
    }
我们查看DefaultAcessTokenConverter类中的extractAuthentication方法,发现了核心方法在DefaultUserAccessTokenConcerter中的extractAuthentication方法。
 public OAuth2Authentication extractAuthentication(Map<String, ?> map) {
        Map<String, String> parameters = new HashMap();
        Set<String> scope = this.extractScope(map);
        Authentication user = this.userTokenConverter.extractAuthentication(map);
        String clientId = (String)map.get("client_id");
        parameters.put("client_id", clientId);
        if (this.includeGrantType && map.containsKey("grant_type")) {
            parameters.put("grant_type", (String)map.get("grant_type"));
        }

        Set<String> resourceIds = new LinkedHashSet((Collection)(map.containsKey("aud") ? this.getAudience(map) : Collections.emptySet()));
        Collection<? extends GrantedAuthority> authorities = null;
        if (user == null && map.containsKey("authorities")) {
            String[] roles = (String[])((Collection)map.get("authorities")).toArray(new String[0]);
            authorities = AuthorityUtils.createAuthorityList(roles);
        }

        OAuth2Request request = new OAuth2Request(parameters, clientId, authorities, true, scope, resourceIds, (String)null, (Set)null, (Map)null);
        return new OAuth2Authentication(request, user);
    }
从这个方法可以看出,将user_name对象取出value作为principal。从这里我们也不难想到,要想拿所有的用户信息有两种解决方法。第一种就是从资源服务器那里重写Conveter方法,将所有数据返回。并直接用user_name当成key名,资源服务器无需修改。第二种方法就是不修改授权服务器,而是在资源服务器这里配置好UserDetailsService类,通过user_name从数据库加载信息,如果不配置,那么将不执行这段代码。但是我认为最好是不要采用第二种方法,让授权服务器管理认证和授权即可,不要把资源服务器也牵扯到这上面。让资源服务器保持单一性。
public Authentication extractAuthentication(Map<String, ?> map) {
if (map.containsKey("user_name")) {
Object principal = map.get("user_name");
Collection<? extends GrantedAuthority> authorities = this.getAuthorities(map);
if (this.userDetailsService != null) {
UserDetails user = this.userDetailsService.loadUserByUsername((String)map.get("user_name"));
authorities = user.getAuthorities();
principal = user;
}
return new UsernamePasswordAuthenticationToken(principal, "N/A", authorities);
} else {
return null;
}
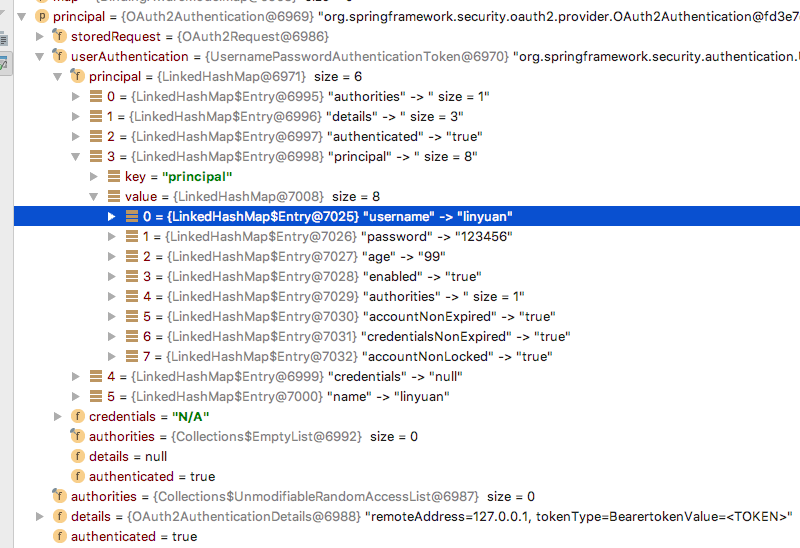
}最后查看资源服务器上获取到的认证信息。当然需要返回什么信息自己可以在授权服务端自行定义,本处就不一一列举了。
直接在形参上 绑定Principal是因为当返回map的时候我们也可以看到会调用TokenConveter的方法进行参数的转化,所以最后返回的信息是一个Authentication,而它的顶级接口就是Principal.所以我们可以通过自动绑定的方式拿到用户信息。


发布者:全栈程序员-站长,转载请注明出处:https://javaforall.net/196006.html原文链接:https://javaforall.net


