
大家好,又见面了,我是你们的朋友全栈君。如果您正在找激活码,请点击查看最新教程,关注关注公众号 “全栈程序员社区” 获取激活教程,可能之前旧版本教程已经失效.最新Idea2022.1教程亲测有效,一键激活。
Jetbrains全系列IDE使用 1年只要46元 售后保障 童叟无欺
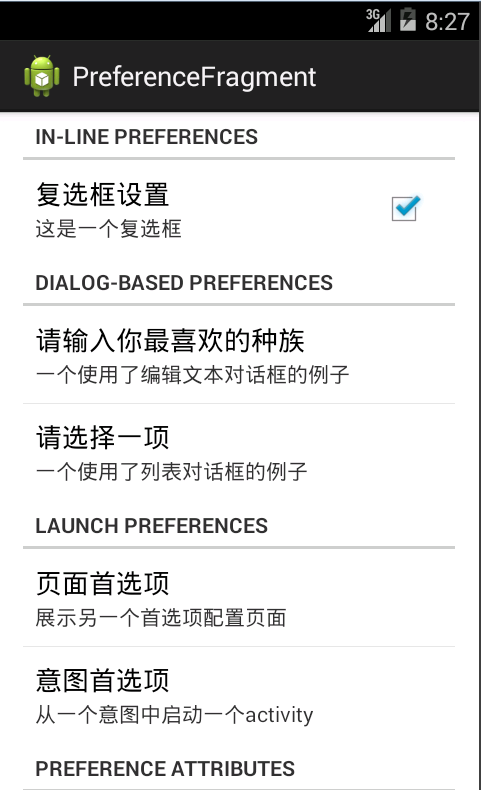
PreferenceFragment用来显示首选项的设置,效果图如下:

主布局文件:
<RelativeLayout xmlns:android="http://schemas.android.com/apk/res/android"
    xmlns:tools="http://schemas.android.com/tools"
    android:layout_width="match_parent"
    android:layout_height="match_parent"
    tools:context=".MainActivity" >

    <fragment
        android:id="@+id/fragment1"
        android:name="com.example.preferencefragment.prefe"//自己的包名和java文件
        android:layout_width="match_parent"
        android:layout_height="match_parent"
        android:layout_alignParentLeft="true"
        android:layout_alignParentTop="true"
         />

</RelativeLayout>
新建一个prefe.java类
package com.example.preferencefragment;

import android.content.SharedPreferences;
import android.os.Bundle;
import android.preference.Preference;
import android.preference.PreferenceFragment;
import android.preference.PreferenceManager;
import android.preference.PreferenceScreen;

public class prefe extends PreferenceFragment {
    @Override
    public void onCreate(Bundle savedInstanceState) {
        // TODO 自动生成的方法存根
        super.onCreate(savedInstanceState);
        addPreferencesFromResource(R.xml.preferences);

    }

}
在res文件夹下新建xml文件夹,命名为:preferences.xml
<PreferenceScreen xmlns:android="http://schemas.android.com/apk/res/android" >

    <PreferenceCategory android:title="In-line preferences" >
        <CheckBoxPreference
            android:key="checkbox_preference"
            android:summary="这是一个复选框"
            android:title="复选框设置" />
    </PreferenceCategory>
    <PreferenceCategory android:title="Dialog-based preferences" >
        <EditTextPreference
            android:dialogTitle="请输入你最喜欢的种族"
            android:key="edittext_preference"
            android:summary="一个使用了编辑文本对话框的例子"
            android:title="请输入你最喜欢的种族" />

        <ListPreference
            android:dialogTitle="请选择一项"
            android:entries="@array/cities"
            android:entryValues="@array/cities"
            android:key="list_preferenc"
            android:summary="一个使用了列表对话框的例子"
            android:title="请选择一项" />
    </PreferenceCategory>
    <PreferenceCategory android:title="Launch preferences" >
        <!-- This PreferenceScreen tag serves as a screen break (similar to page break in word processing). Like for other preference types, we assign a key here so it is able to save and restore its instance state. -->
        <PreferenceScreen
            android:key="screen_preference"
            android:summary="展示另一个首选项配置页面"
            android:title="页面首选项" >
            <!-- 你可以在这里放置更多的首选项内容,将被在下一个页面呈现出来 -->
            <CheckBoxPreference
                android:key="next_screen_checkbox_preference"
                android:summary="在另一个页面展示但出于同一个层级的首选项配置"
                android:title="复选框设置" />
        </PreferenceScreen>
        <PreferenceScreen
            android:summary="从一个意图中启动一个activity"
            android:title="意图首选项" >
            <intent
                android:action="android.intent.action.VIEW"
                android:data="http://www.baidu.com" />
        </PreferenceScreen>
    </PreferenceCategory>
    <PreferenceCategory android:title="Preference attributes" >
        <CheckBoxPreference
            android:key="parent_checkbox_preference"
            android:summary="这是一个可见的父类"
            android:title="父类复选框首选项" />
        <!-- 子类的可见类型是由样式属性定义的 -->
        <CheckBoxPreference
            android:dependency="parent_checkbox_preference"
            android:key="child_checkbox_preference"
            android:layout="?android:attr/preferenceLayoutChild"
            android:summary="这是一个可见的子类"
            android:title="子类复选框首选项" />
    </PreferenceCategory>

</PreferenceScreen>
MainActivity.java
package com.example.preferencefragment;

import android.os.Bundle;
import android.preference.PreferenceFragment;
import android.preference.PreferenceManager;
import android.app.Activity;
import android.app.FragmentManager;
import android.app.FragmentTransaction;
import android.content.SharedPreferences;
import android.view.Menu;

public class MainActivity extends Activity {

    @Override
    protected void onCreate(Bundle savedInstanceState) {
        // TODO 自动生成的方法存根
        super.onCreate(savedInstanceState);
        setContentView(R.layout.activity_main);
        //加载PrefFragment
        FragmentManager fragmentManager = getFragmentManager();
        FragmentTransaction transaction = fragmentManager.beginTransaction();
        prefe prefFragment = new prefe();
        transaction.add(R.id.fragment1, prefFragment);
        transaction.commit();

        //SharedPreferences sp=PreferenceManager.getDefaultSharedPreferences(this);
        //String name=sp.getString("key", "");
    }
}
转载于:https://www.cnblogs.com/hyyweb/p/5249473.html
版权声明:本文内容由互联网用户自发贡献,该文观点仅代表作者本人。本站仅提供信息存储空间服务,不拥有所有权,不承担相关法律责任。如发现本站有涉嫌侵权/违法违规的内容, 请联系我们举报,一经查实,本站将立刻删除。
发布者:全栈程序员-站长,转载请注明出处:https://javaforall.net/196471.html原文链接:https://javaforall.net


