
大家好,又见面了,我是你们的朋友全栈君。如果您正在找激活码,请点击查看最新教程,关注关注公众号 “全栈程序员社区” 获取激活教程,可能之前旧版本教程已经失效.最新Idea2022.1教程亲测有效,一键激活。
Jetbrains全系列IDE使用 1年只要46元 售后保障 童叟无欺
以前我们经常使用PreferenceActivity来显示给用户一个选项设置的界面,而现在Google推荐用PreferenceFragment来代替使用.
先来看看官方文档的描述:
The preference hierarchy can be formed in multiple ways:
From an XML file specifying the hierarchy
From different Activities that each specify its own preferences in an XML file via Activity meta-data
From an object hierarchy rooted with PreferenceScreen
To inflate from XML, use the addPreferencesFromResource(int). The root element should be a PreferenceScreen. Subsequent elements can point to actual Preference subclasses. As mentioned above, subsequent PreferenceScreen in the hierarchy will result in the screen break.
To specify an Intent to query Activities that each have preferences, use addPreferencesFromIntent(Intent). Each Activity can specify meta-data in the manifest (via the key METADATA_KEY_PREFERENCES) that points to an XML resource. These XML resources will be inflated into a single preference hierarchy and shown by this fragment.
To specify an object hierarchy rooted with PreferenceScreen, use setPreferenceScreen(PreferenceScreen).
本次我们使用的第一种方法利用XML构建.
首先来看看Preference的xml文件preference.xml:
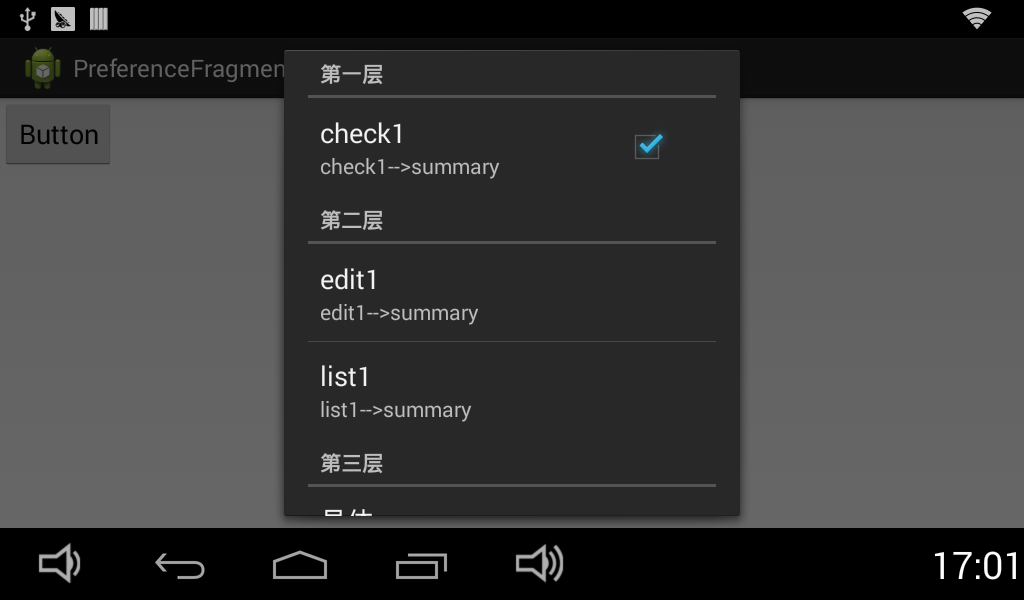
<PreferenceScreen
        xmlns:android="http://schemas.android.com/apk/res/android">

    <PreferenceCategory
            android:title="第一层">

        <CheckBoxPreference
                android:key="checkbox_preference"
                android:title="check1"
                android:summary="check1-->summary"/>

    </PreferenceCategory>

    <PreferenceCategory
            android:title="第二层">

        <EditTextPreference
                android:key="edittext_preference"
                android:title="edit1"
                android:summary="edit1-->summary"
                android:dialogTitle="edit1-->2" />

        <ListPreference
                android:key="list_preference"
                android:title="list1"
                android:summary="list1-->summary"
                android:entries="@array/department"
                android:entryValues="@array/department_value"
                android:dialogTitle="list1-->2" />

    </PreferenceCategory>

    <PreferenceCategory
            android:title="第三层">

        <!-- This PreferenceScreen tag serves as a screen break (similar to page break
             in word processing). Like for other preference types, we assign a key
             here so it is able to save and restore its instance state. -->
        <PreferenceScreen
                android:key="screen_preference"
                android:title="具体一"
                android:summary="具体一 summary">

            <!-- You can place more preferences here that will be shown on the next screen. -->
            <CheckBoxPreference
                    android:key="next_screen_checkbox_preference"
                    android:title="check2"
                    android:summary="check2-->summary" />

        </PreferenceScreen>

        <PreferenceScreen
                android:title="具体二"
                android:summary="NO.5-->1">

            <intent android:action="android.intent.action.VIEW"
                    android:data="http://www.baidu.com" />

        </PreferenceScreen>

    </PreferenceCategory>

    <PreferenceCategory
            android:title="第四层">

        <CheckBoxPreference
                android:key="parent_checkbox_preference"
                android:title="check3"
                android:summary="check3-->summary" />

        <!-- The visual style of a child is defined by this styled theme attribute. -->
        <CheckBoxPreference
                android:key="child_checkbox_preference"
                android:dependency="parent_checkbox_preference"
                android:layout="?android:attr/preferenceLayoutChild"
                android:title="check4"
                android:summary="check4-->summary" />

    </PreferenceCategory>

</PreferenceScreen>
需要注意的是:
 <ListPreference
                android:key="list_preference"
                android:title="list1"
                android:summary="list1-->summary"
                android:entries="@array/department"
                android:entryValues="@array/department_value"
                android:dialogTitle="list1-->2" />
这里有两个属性,android:entries=”@array/department”及android:entryValues=”@array/department_value”
分别表示:在列表中显数组entryValues键数组 entries与entryValues一一对应关系
注意:android:entries对应于key,android:entryValues对应于value,两个数组的数目一致
arrays.xml:
<?xml version="1.0" encoding="utf-8"?>
<resources>
    <string-array name="department">
        <item>综合部</item>
        <item>行政部</item>
        <item>外贸部</item>
    </string-array>

    <string-array name="department_value">
        <item>001</item>
        <item>002</item>
        <item>003</item>
    </string-array>
</resources>
此时,XML已经部署好,接着我们来看看PreferenceFragment如何实现:
package com.example.preferencefragment;

import android.content.SharedPreferences;
import android.os.Bundle;
import android.preference.CheckBoxPreference;
import android.preference.Preference;
import android.preference.PreferenceManager;
import android.preference.Preference.OnPreferenceChangeListener;
import android.preference.Preference.OnPreferenceClickListener;
import android.preference.PreferenceFragment;
import android.view.LayoutInflater;
import android.view.View;
import android.view.ViewGroup;
import android.widget.Toast;


public class PrefsFragment extends PreferenceFragment implements OnPreferenceChangeListener, OnPreferenceClickListener {
	//这里只声明了一个CheckBox偏好,其他的同理
	private CheckBoxPreference checkBox1;
	@Override
	public void onCreate(Bundle savedInstanceState) {
		// TODO Auto-generated method stub
		super.onCreate(savedInstanceState);
		//给PrefsFragment指定一个xml
		addPreferencesFromResource(R.layout.preference);
		checkBox1 = (CheckBoxPreference)findPreference("checkbox_preference");
		checkBox1.setOnPreferenceChangeListener(this);
		checkBox1.setOnPreferenceClickListener(this);
	}

	@Override
	public View onCreateView(LayoutInflater inflater, ViewGroup container,
			Bundle savedInstanceState) {
		// TODO Auto-generated method stub
		return super.onCreateView(inflater, container, savedInstanceState);
	}

	/*
	 * 当点击CheckBox时,先调用onPreferenceChange,之后再调用onPreferenceClick
	 */
	@Override
	public boolean onPreferenceChange(Preference preference, Object newValue) {
		// TODO Auto-generated method stub
		if(preference == checkBox1){
			if((Boolean)newValue){
				Toast.makeText(getActivity(), "111111111", Toast.LENGTH_SHORT).show();
			}else {
				Toast.makeText(getActivity(), "222222222", Toast.LENGTH_SHORT).show();
			}

		}
		//如果返回false表示不允许被改变 返回true表示允许改变
		return true;
	}

	@Override
	public boolean onPreferenceClick(Preference preference) {
		// TODO Auto-generated method stub
//		if(preference == checkBox1){
//			//得到我们的存储Preferences值的对象,然后对其进行相应操作
//			SharedPreferences shp = PreferenceManager.getDefaultSharedPreferences(getActivity());
//			boolean checkvalues = shp.getBoolean("checkbox_preference", false);
//			if(checkvalues){
//				Toast.makeText(getActivity(), "checked true!!!", Toast.LENGTH_SHORT).show();
//			}else {
//				Toast.makeText(getActivity(), "checked false!!!", Toast.LENGTH_SHORT).show();
//			}
//		}
		return false;
	}
}
这里我们的PreferenceFragment已经配置好了 因为是Fragment所以需要依赖一个Activity.
DialogActivity.java:
package com.example.preferencefragment;

import android.os.Bundle;
import android.app.Activity;
import android.app.FragmentManager;
import android.app.FragmentTransaction;
import android.view.Menu;
import android.view.View;
import android.view.View.OnClickListener;
import android.widget.Button;

public class DialogActivity extends Activity {
	private FragmentManager fragmentManager;
	private FragmentTransaction fragmentTransaction;

	@Override
	protected void onCreate(Bundle savedInstanceState) {
		super.onCreate(savedInstanceState);
		setContentView(R.layout.layout_dialog);
		fragmentManager = this.getFragmentManager();
		fragmentTransaction = fragmentManager.beginTransaction();
		PrefsFragment fragment = new PrefsFragment();
		fragmentTransaction.replace(R.id.content, fragment).commit();

	}

}
layout_dialog.xml布局:
<RelativeLayout xmlns:android="http://schemas.android.com/apk/res/android"
    android:id="@+id/content"
    android:layout_width="match_parent"
    android:layout_height="match_parent" >
</RelativeLayout>
此Activity就是承载我们的PreferenceFragment的容器,非常简单.同时在AndroidManifest.xml中将DialogActivity主题设置为Dialog,以防占据整个屏幕:
AndroidManifest.xml:
<?xml version="1.0" encoding="utf-8"?>
<manifest xmlns:android="http://schemas.android.com/apk/res/android"
    package="com.example.preferencefragment"
    android:versionCode="1"
    android:versionName="1.0" >

    <uses-sdk
        android:minSdkVersion="13"
        android:targetSdkVersion="17" />

    <application
        android:allowBackup="true"
        android:icon="@drawable/ic_launcher"
        android:label="@string/app_name"
        android:theme="@style/AppTheme" >
        <activity
            android:name="com.example.preferencefragment.MainActivity"
            android:label="@string/app_name" >
            <intent-filter>
                <action android:name="android.intent.action.MAIN" />

                <category android:name="android.intent.category.LAUNCHER" />
            </intent-filter>
        </activity>
        <activity
            android:name="com.example.preferencefragment.DialogActivity"
            android:theme="@android:style/Theme.Holo.Dialog.NoActionBar" >
            <intent-filter>
                <action android:name="com.example.predialog" />

                <category android:name="android.intent.category.DEFAULT" />
            </intent-filter>
        </activity>
    </application>

</manifest>
MainActivity.java:
package com.example.preferencefragment;

import android.app.Activity;
import android.content.Intent;
import android.os.Bundle;
import android.view.View;
import android.view.View.OnClickListener;
import android.widget.Button;

public class MainActivity extends Activity {
	private Button button;

	@Override
	protected void onCreate(Bundle savedInstanceState) {
		// TODO Auto-generated method stub
		super.onCreate(savedInstanceState);
		setContentView(R.layout.main);
		button = (Button) findViewById(R.id.btn1);
		button.setOnClickListener(new OnClickListener() {

			@Override
			public void onClick(View v) {
				// TODO Auto-generated method stub
				Intent intent = new Intent("com.example.predialog");
				startActivity(intent);
			}
		});
	}

}
main.xml:
<?xml version="1.0" encoding="utf-8"?>
<LinearLayout xmlns:android="http://schemas.android.com/apk/res/android"
    android:layout_width="match_parent"
    android:layout_height="match_parent"
    android:orientation="vertical" >

    <Button
        android:id="@+id/btn1"
        android:layout_width="wrap_content"
        android:layout_height="wrap_content"
        android:text="Button" />

</LinearLayout>
效果就是通过一个点击Button呼出我们的PreferenceFragment.
来一张效果图:

发布者:全栈程序员-站长,转载请注明出处:https://javaforall.net/197564.html原文链接:https://javaforall.net


